Enable Autofill in Safari Settings
To scan credit card numbers in Safari for iPhone, you need to enable autofill in your Safari settings. Autofill allows Safari to automatically fill in your credit card information in web forms, making online shopping and transactions more convenient and efficient. Here’s how you can enable autofill:
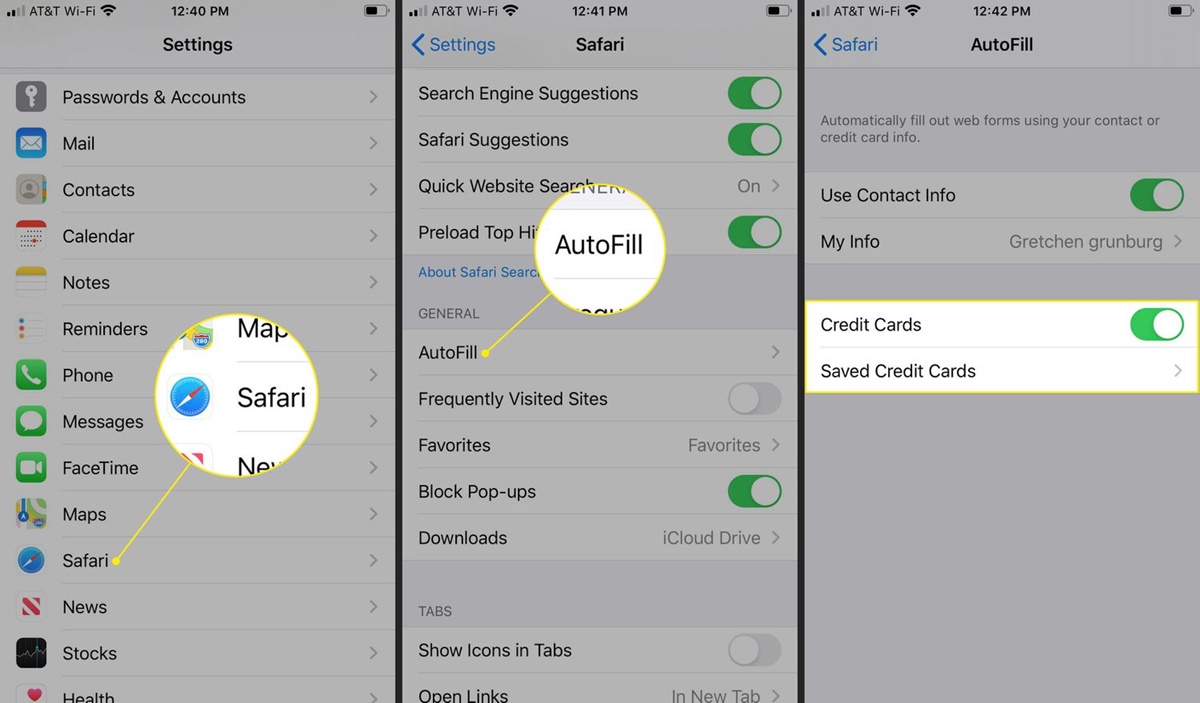
1. Open the “Settings” app on your iPhone.
2. Scroll down and tap on “Safari” to access Safari settings.
3. In the Safari settings menu, scroll down and find the “Autofill” section.
4. Tap on “Autofill” and ensure that the toggle switch next to “Credit Cards” is turned on.
By enabling this option, Safari will be able to fill in your credit card details when you encounter a web form that requires them.
If you have previously added your credit card information to your iCloud Keychain, Safari will be able to access it and autofill your credit card details securely.
Enabling autofill in Safari settings is the first step in using the credit card scanning feature.
Once you have enabled autofill, you can proceed to the next steps to add your credit card details to iCloud Keychain and learn how to use the credit card scanning feature in Safari.
Add Your Credit Card to iCloud Keychain
In order to scan and autofill credit card numbers in Safari for iPhone, you’ll need to add your credit card information to iCloud Keychain. iCloud Keychain is a built-in feature that securely stores your passwords, credit card details, and other sensitive information across your Apple devices. Follow the steps below to add your credit card to iCloud Keychain:
1. Open the “Settings” app on your iPhone.
2. Tap on your name at the top of the Settings menu to access your Apple ID settings.
3. Select “Passwords & Security” from the options available.
4. Tap on “Edit” next to the “Saved Credit Cards” section.
5. If prompted, authenticate yourself with your Apple ID password, Face ID, or Touch ID.
6. Tap on “Add Credit Card” to manually enter your credit card details or choose “Scan Credit Card” to use your iPhone’s camera to capture the information.
If you choose to scan your credit card, position it within the frame on the screen, and make sure the card details are fully visible. The camera will automatically detect and capture the necessary information.
7. Verify the captured information and make any necessary edits. Tap “Next” to proceed.
8. Review the Summary screen to ensure all the information is correct. Tap “Done” to save your credit card to iCloud Keychain.
Your credit card information will now be securely stored in iCloud Keychain, and Safari will be able to access it for autofill purposes. This will streamline your online transactions and make it easier to complete credit card forms on websites using Safari.
Now that you’ve successfully added your credit card to iCloud Keychain, let’s move on to the next steps to enable credit card autofill in Safari and use the credit card scanning feature.
Access Safari Autofill Preferences
In order to enable credit card autofill in Safari for iPhone, you will need to access the Safari Autofill preferences. Follow these steps to access the Safari Autofill preferences:
1. Open the “Settings” app on your iPhone.
2. Scroll down and tap on “Safari” to access Safari settings.
3. In the Safari settings menu, scroll down until you find the “Autofill” section.
4. Tap on “Autofill” to view the available options.
5. Inside the Autofill preferences, you will find various options such as “Use Contact Info”, “Use Names and Passwords”, and “Credit Cards”.
Here, you can choose to toggle on or off the options based on your preference. To enable credit card autofill, make sure the “Credit Cards” option is turned on.
Enabling the “Credit Cards” option in Safari’s Autofill preferences will allow Safari to automatically fill in your credit card details when you are prompted to enter them on a website.
Additionally, you can also manage your saved credit cards and edit the information by tapping on the “Saved Credit Cards” option within the Autofill preferences.
By accessing the Safari Autofill preferences, you have now taken a crucial step in enabling credit card autofill in Safari for iPhone. With this feature turned on, Safari will be able to automatically fill in your credit card information, making online transactions faster and more convenient.
Now that you have accessed the Safari Autofill preferences, let’s move on to enabling credit card autofill in Safari and using the credit card scanning feature.
Enable Credit Card Autofill in Safari
Once you have accessed the Safari Autofill preferences, the next step is to enable credit card autofill in Safari for iPhone. Here’s how you can do it:
1. Open the “Settings” app on your iPhone.
2. Scroll down and tap on “Safari” to access Safari settings.
3. In the Safari settings menu, scroll down and find the “Autofill” section.
4. Tap on “Autofill” to view the available options.
5. Within the Autofill preferences, make sure the toggle switch next to “Credit Cards” is turned on.
Enabling the “Credit Cards” option in Safari’s Autofill preferences will allow Safari to autofill your credit card details when you encounter a web form that requires them.
By enabling credit card autofill, you are allowing Safari to securely access and fill in your credit card information from your iCloud Keychain. This eliminates the need for you to manually enter your credit card details on each website, saving you time and effort.
It’s important to note that Safari takes measures to ensure the security of your credit card information. When using autofill, Safari encrypts your credit card details and stores them in your device’s secure enclave or the iCloud Keychain, depending on your settings.
Enabling credit card autofill in Safari is a simple yet important step to take full advantage of the credit card scanning feature. With this option turned on, Safari will automatically fill in your credit card information, making online transactions smoother and more efficient.
Now that you have enabled credit card autofill in Safari, let’s explore how to use the credit card scanning feature in Safari for iPhone.
Open a Website with a Credit Card Field
After enabling credit card autofill in Safari, the next step is to open a website that has a credit card field where you can utilize the autofill feature. Here’s how you can do it:
1. Launch the Safari browser on your iPhone.
2. Enter the web address of the website you wish to visit in the address bar at the top of the Safari screen or perform a search in Safari’s search bar.
3. Tap on the search result or the website link to open the webpage.
4. Navigate to the page or section of the website where you need to enter your credit card information.
Common areas where credit card information is required include online shopping checkout pages, subscription sign-ups, or payment forms.
5. Once you have reached the credit card field on the website, you will notice that Safari may offer to autofill your credit card details. This occurs when your credit card information matches the requirements of the web form.
6. Tap on the credit card field, and if Safari suggests autofill options, you can select your saved card from the list. Safari will then automatically fill in the credit card number, expiration date, and name associated with the card.
If Safari does not offer to autofill your credit card details, you can manually tap on the credit card field and then tap the “AutoFill” button that appears above the keyboard. This will initiate the autofill process.
By opening a website with a credit card field and utilizing Safari’s credit card autofill feature, you can save time and effort when entering your credit card details for online transactions.
Now that you know how to open a website with a credit card field, it’s time to explore how to use Face ID or Touch ID to authenticate and scan your credit card using Safari.
Use Face ID or Touch ID to Authenticate
When using the credit card scanning feature in Safari for iPhone, you can authenticate and authorize the autofill process using either Face ID or Touch ID. This adds an extra layer of security to protect your sensitive credit card information. Here’s how you can use Face ID or Touch ID to authenticate:
1. Ensure that your iPhone is equipped with either Face ID or Touch ID, depending on the model you own.
2. Visit a website with a credit card field in Safari.
3. Tap on the credit card field to initiate the autofill process.
4. If your iPhone supports Face ID, the Face ID authentication prompt will appear on the screen. Look at your iPhone to authenticate using Face ID. If your iPhone supports Touch ID, place your finger on the Touch ID sensor to authenticate.
5. Once you have successfully authenticated, Safari will access your credit card information securely from your iCloud Keychain and autofill the credit card details into the web form.
Using Face ID or Touch ID adds an additional layer of security because it ensures that only you can authorize the autofill process. This protects your credit card information from being accessed by unauthorized individuals.
It’s worth mentioning that Face ID and Touch ID are secure authentication methods that use biometric data stored locally on your device. This means that your fingerprint or facial data is not shared with Apple or any third parties.
By utilizing Face ID or Touch ID to authenticate, you can enjoy a seamless and secure autofill experience when scanning credit card numbers in Safari for iPhone.
Now that you know how to use Face ID or Touch ID to authenticate, let’s move on to the exciting part – scanning your credit card with Safari!
Scan Your Credit Card with Safari
Safari for iPhone offers a convenient and efficient way to scan your credit card using the built-in camera. By scanning your credit card, Safari can extract the necessary information and autofill it into web forms, saving you time and effort. Here’s how you can scan your credit card with Safari:
1. Open Safari on your iPhone and navigate to a webpage with a credit card field that requires your information.
2. Tap on the credit card field to initiate the autofill process.
3. If your iPhone supports credit card scanning, you will see a blue ‘Scan Credit Card’ button in the keyboard area above the virtual keyboard.
4. Tap the ‘Scan Credit Card’ button to activate the camera scanner.
5. Position your credit card within the camera frame, making sure that the card’s details are fully visible.
Safari will automatically detect the credit card and capture the necessary information, such as the card number and expiration date.
6. Wait for the scanning process to complete, and Safari will populate the credit card details into the appropriate fields on the web form automatically.
If the scan is successful, you will see your credit card information on the screen. Review the autofilled details to ensure their accuracy.
7. Tap ‘Next’ or proceed with filling out any additional payment details required by the website.
The credit card scanning feature in Safari makes it incredibly convenient to enter your credit card information accurately and efficiently. Moreover, it reduces the risk of manual errors when typing the card details.
It’s worth noting that Safari takes measures to ensure the security of your credit card information. The scanning process is done on your device, and Safari encrypts and securely stores your credit card details in your iCloud Keychain.
By utilizing the credit card scanning feature, you can streamline your online transactions and enjoy a seamless autofill experience in Safari for iPhone.
Now that you know how to scan your credit card with Safari, let’s proceed to the next step – reviewing and confirming the autofilled credit card information.
Review and Confirm Autofilled Credit Card Information
Once you have scanned your credit card and Safari has autofilled the information into the web form, it’s crucial to review and confirm the autofilled credit card details for accuracy. This step ensures that the correct information is used for your online transaction. Here’s what you need to do:
1. Take a moment to carefully review the autofilled credit card information provided by Safari.
2. Check the credit card number to ensure it matches the card in your possession. Verify that the expiration date and cardholder name are also correct.
3. If you notice any inaccuracies or need to make changes, tap on the respective field and edit the information manually.
4. Once you have verified and made any necessary changes, proceed with the rest of the payment details required by the website, such as billing address or security codes.
5. Double-check all the entered information to ensure the accuracy of the entire transaction before proceeding.
By carefully reviewing and confirming the autofilled credit card information, you can avoid any potential errors or discrepancies when completing your online purchase or transaction.
It’s important to note that while Safari’s credit card autofill feature is designed to streamline the process and save time, it is always wise to double-check the information before confirming any online transactions.
If you encounter any issues with the autofill feature, ensure that you have enabled credit card autofill in Safari settings and added your credit card details to iCloud Keychain correctly. Additionally, check your internet connection and ensure that the website supports the autofill feature.
Reviewing and confirming the autofilled credit card information is an essential step to ensure the accuracy of your online transactions. Now that you have reviewed and confirmed the information, you can proceed to complete your purchase or transaction with ease.
Troubleshooting: Common Issues and Solutions
While using the credit card scanning feature in Safari for iPhone is generally seamless, there may be some common issues that you might encounter. Fortunately, most of these issues have straightforward solutions. Here are some troubleshooting steps for common issues:
1. Autofill not appearing: If the credit card autofill option does not appear when you tap on a credit card field, ensure that you have enabled credit card autofill in Safari settings. Go to “Settings” > “Safari” > “Autofill” and make sure the “Credit Cards” option is turned on.
2. Incorrect autofilled information: If Safari is autofilling incorrect credit card details, double-check that your credit card information is accurate in your iCloud Keychain. Open the “Settings” app, tap on your name, select “Passwords & Security,” and tap on “Edit” next to “Saved Credit Cards” to review and update your card details if necessary.
3. Incompatible websites: Not all websites support the credit card scanning feature. If the autofill option doesn’t appear on a website with a credit card field, you may need to manually enter your credit card details or try using a different browser or device.
4. Poor camera quality: If the camera on your iPhone isn’t capturing the credit card details accurately, ensure that you have proper lighting and position the card within the camera frame, making sure the details are fully visible. Additionally, clean the camera lens to improve image quality.
5. Connection issues: If you’re experiencing connectivity problems, check your internet connection. Ensure that you have a stable and reliable internet connection to enable the smooth functioning of the credit card scanning feature.
6. Security concerns: If you have concerns about the security of your credit card information, rest assured that Safari employs robust encryption and secure storage in your iCloud Keychain. However, it’s always a good practice to regularly update your device’s software and use strong, unique passwords to enhance your overall online security.
If you continue to experience issues with the credit card scanning feature in Safari, you may consider reaching out to Apple Support for further assistance and guidance tailored to your specific situation.
By following these troubleshooting steps, you can resolve common issues and ensure a smooth and efficient experience when scanning credit card numbers in Safari for iPhone.
Now that you’re equipped with these troubleshooting tips, you’re ready to navigate any challenges that may arise and make the most of the credit card scanning feature in Safari.