
What is FaceTime and How Does it Work?
FaceTime is a video and audio calling service designed exclusively for Apple devices. It allows users to make free, high-quality video and audio calls to other Apple users around the world. FaceTime utilizes the internet connection, whether it’s Wi-Fi or cellular data, to establish a connection between two or more devices.
When you initiate a FaceTime call, the app uses your Apple ID and the recipient’s Apple ID to establish a secure and encrypted connection. This means that you can make calls without worrying about your privacy and security being compromised.
FaceTime works seamlessly on iPhones, iPads, iPod Touch devices, and Mac computers. It harnesses the power of Apple’s ecosystem, allowing you to call anyone using an Apple device easily.
With FaceTime, you can not only have one-on-one conversations but also engage in group calls with up to 32 participants. This feature is particularly useful for business meetings, family gatherings, and catching up with friends.
Whether you’re across the street or on the other side of the world, FaceTime bridges the distance and brings you closer to your loved ones. It’s a convenient and user-friendly platform that has become an integral part of Apple’s ecosystem.
Now that you have an understanding of what FaceTime is and how it works, let’s dive into how you can prevent FaceTime calls from ringing on all of your devices.
Syncing FaceTime Across Multiple Devices
One of the convenient features of FaceTime is its ability to sync across multiple devices. This means that you can receive and answer calls on your iPhone, iPad, and Mac, ensuring that you never miss an important conversation.
When you sign in to FaceTime using your Apple ID, all of your Apple devices with FaceTime enabled automatically sync with each other. This synchronization allows your devices to ring simultaneously when you receive a FaceTime call.
By default, FaceTime is set to ring on all of your devices to ensure that you can answer calls from any device you have at hand. While this can be convenient, it can also be overwhelming and disruptive, especially if you have multiple devices in close proximity.
However, it is possible to customize your FaceTime settings to prevent calls from going to all of your devices. This allows you to have more control over which devices actually ring when you receive a FaceTime call.
Next, we will explore the issue with all devices ringing and how you can adjust your FaceTime settings to address this concern.
The Issue with All Devices Ringing
When FaceTime is set to ring on all of your devices, it can be quite frustrating and disruptive, especially in situations where you only want specific devices to receive calls. Imagine being in a room with your iPhone, iPad, and Mac, and all three devices start ringing simultaneously whenever you receive a FaceTime call. It can be overwhelming and pose a privacy concern if you’re in a public setting.
Additionally, having all devices ringing at the same time can create unnecessary interruptions and distractions. Whether you’re in the middle of an important task, trying to focus on work, or simply prefer to answer calls on a specific device, the issue of all devices ringing can become bothersome.
Fortunately, Apple provides the option to customize your FaceTime settings, giving you more control over which devices ring when a FaceTime call comes in. By adjusting these settings, you can eliminate the issue of all devices ringing and tailor your FaceTime experience to your preferences and needs.
Let’s explore how you can prevent FaceTime calls from going to all of your devices by adjusting the ringing preferences.
Understanding the Ringing Preferences
Before we explore the steps to prevent FaceTime calls from ringing on all of your devices, it’s important to understand the ringing preferences available in the FaceTime settings.
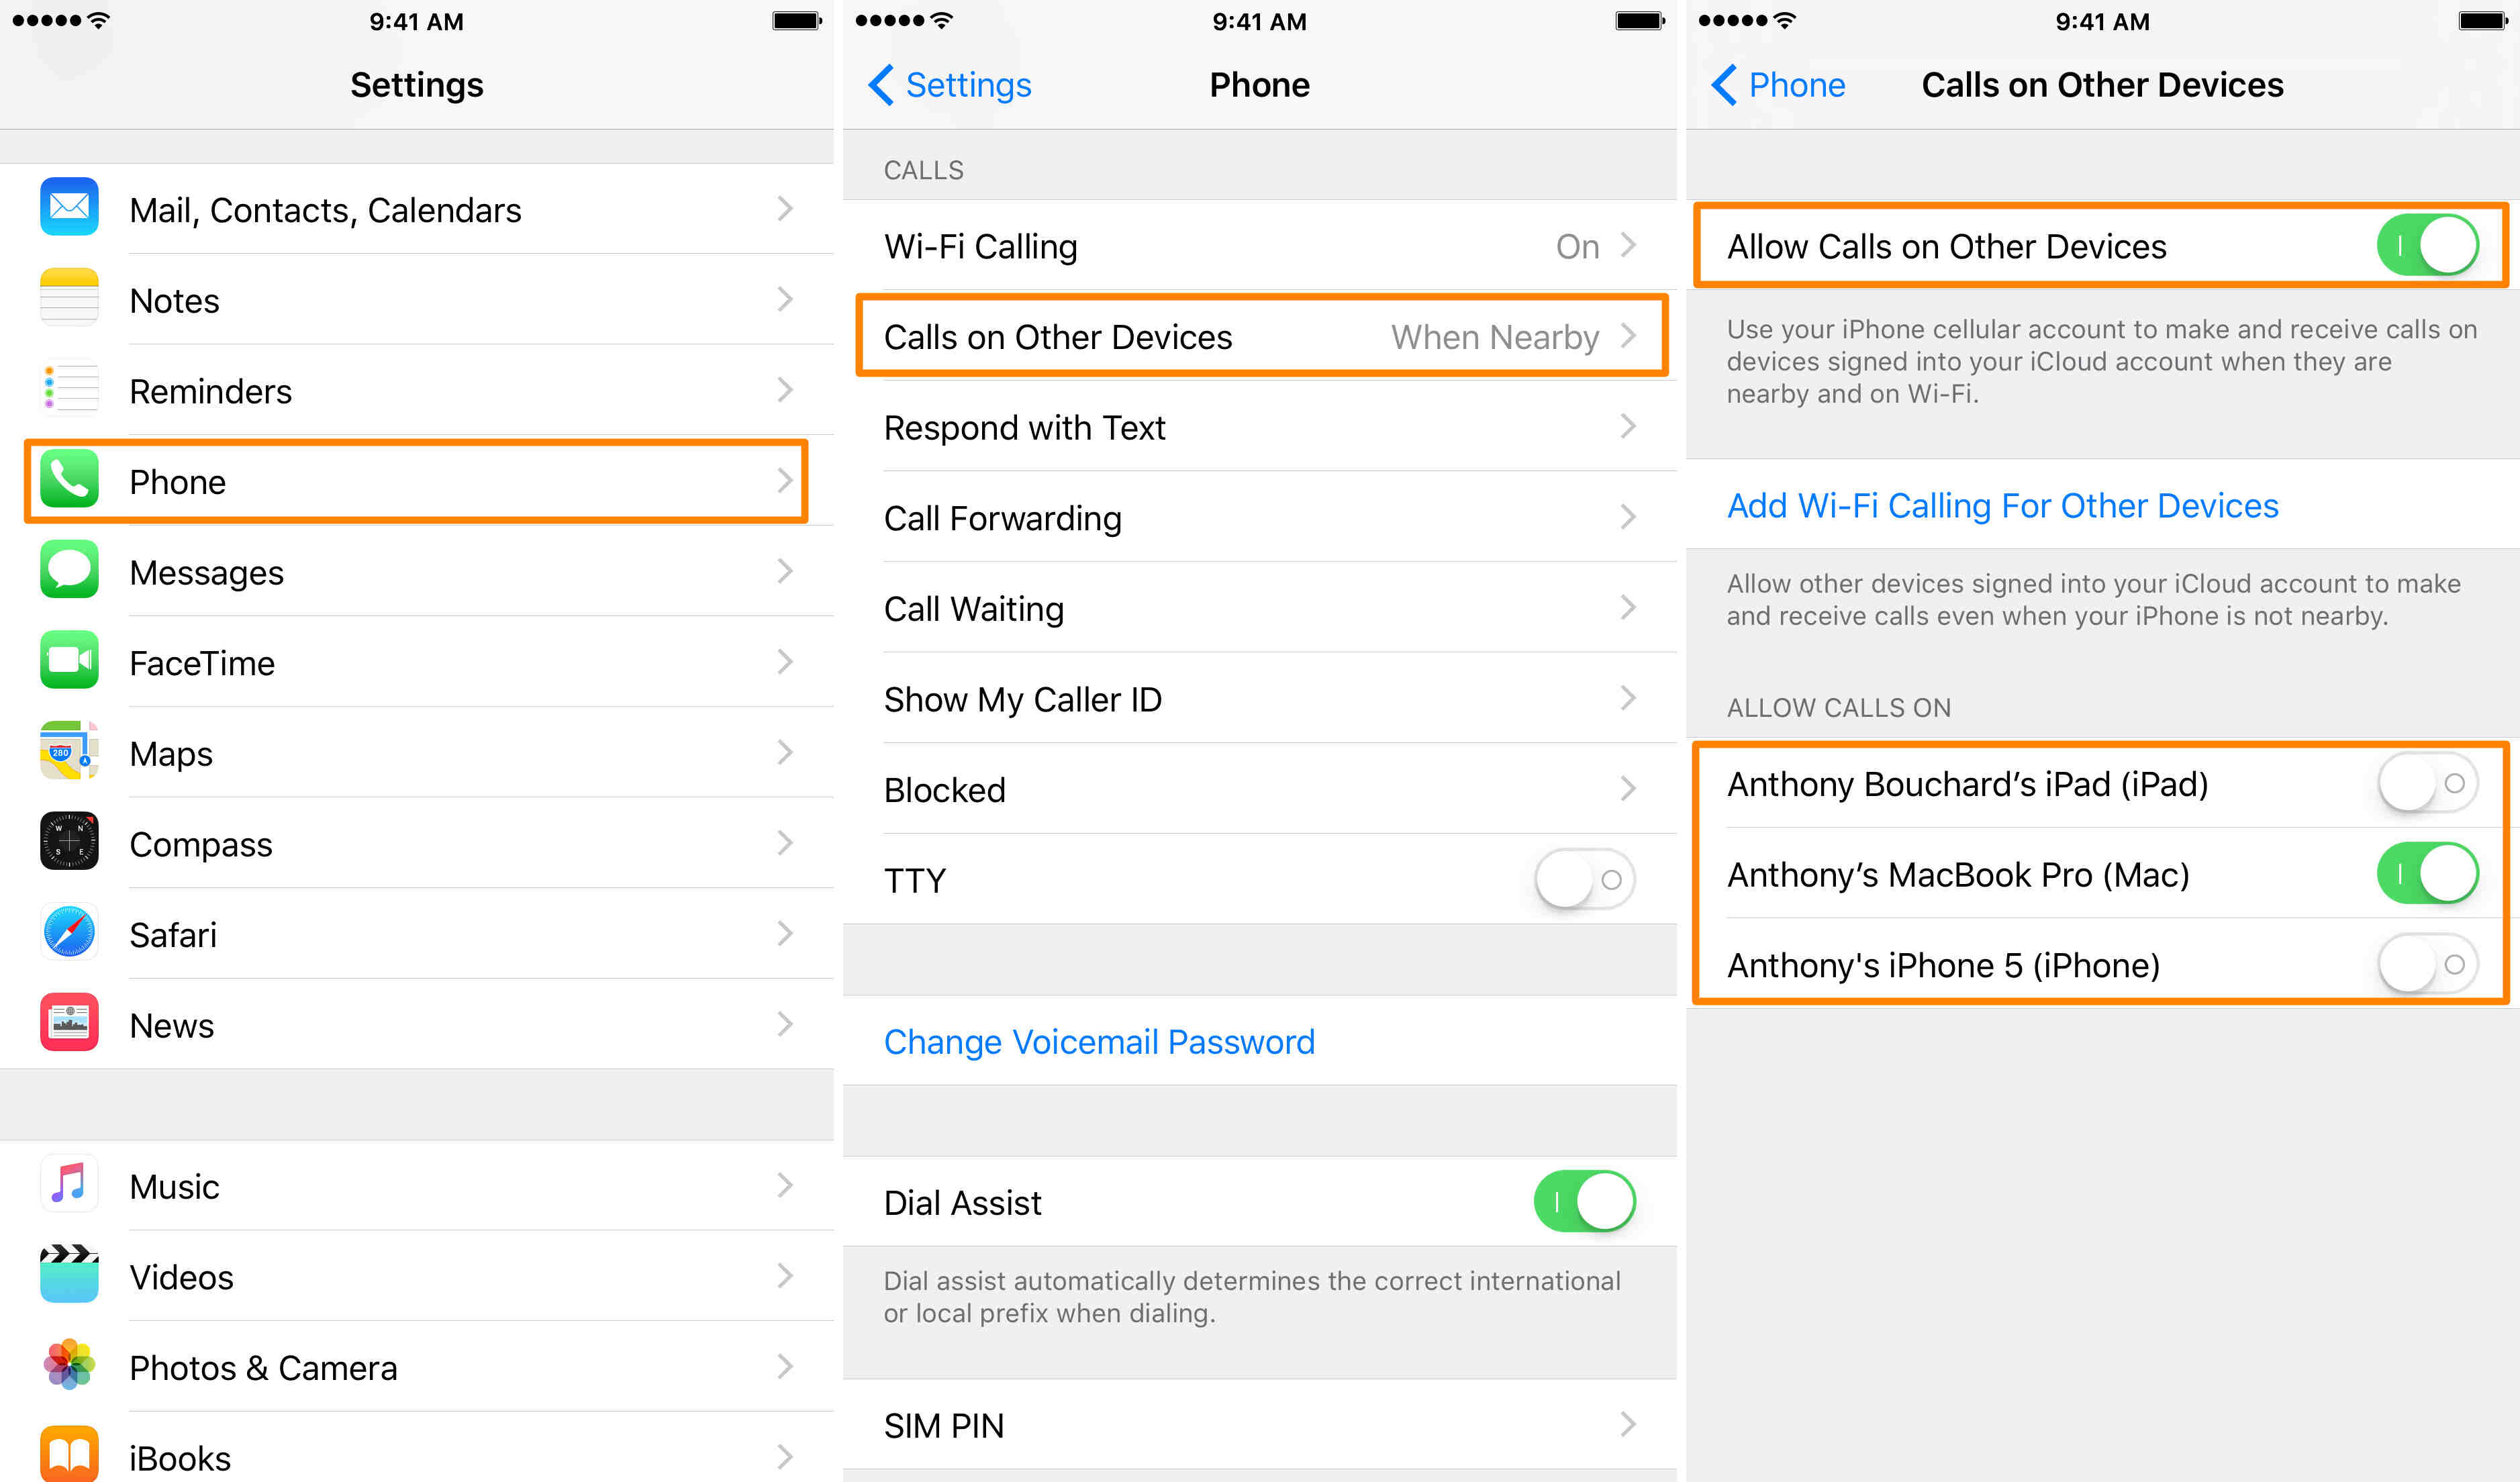
When you receive a FaceTime call, the ringing preferences determine which devices will ring and alert you. By default, FaceTime is set to allow calls on other devices, meaning that all devices signed in to the same Apple ID will ring when you receive a call.
To modify the ringing preferences, you have the option to select “Calls from iPhone” as the source for incoming calls. This setting ensures that calls will primarily ring on your iPhone rather than on your other devices.
Additionally, you can enable or disable the “Allow Calls on Other Devices” option. When this option is enabled, calls will ring on all devices signed in to your Apple ID. Conversely, when this option is disabled, calls will only ring on the device selected as the source for incoming calls.
Understanding and modifying these ringing preferences will allow you to tailor your FaceTime experience according to your personal preferences and needs. Whether you want to prevent all devices from ringing or selectively choose which devices should receive calls, you have the flexibility to adjust these settings.
Now that we have a clear understanding of the ringing preferences, let’s dive into the steps to prevent FaceTime calls from going to all of your devices.
Steps to Prevent Calls from Going to All Devices
If you want to prevent FaceTime calls from ringing on all of your devices and limit them to a specific device, you can follow these simple steps:
Step 1: Open the FaceTime App
On your Apple device, locate and open the FaceTime app. This can be done from the home screen or the app drawer, depending on your device.
Step 2: Tap on “Preference”
Once you have opened the FaceTime app, tap on the “Preference” option. This will bring up a menu that allows you to customize your FaceTime settings.
Step 3: Select “Calls from iPhone”
In the Preference menu, look for an option labeled “Calls from iPhone.” Tap on it to choose your iPhone as the source for incoming calls.
Step 4: Disable the “Allow Calls on Other Devices” Option
To prevent calls from going to all of your devices, locate the “Allow Calls on Other Devices” option and disable it. This will ensure that incoming FaceTime calls will only ring on your iPhone.
Step 5: Repeat the Process on Each Device
If you have multiple Apple devices with FaceTime, repeat the above steps on each device. This will ensure that all devices are configured to prevent calls from ringing on all devices.
By following these steps, you can customize your FaceTime settings and prevent the inconvenience of all devices ringing when you receive a call. Instead, calls will be directed primarily to your iPhone, providing a more streamlined and tailored calling experience.
Next, we will explore a scenario where you may want certain devices to ring and how to configure your FaceTime settings accordingly.
Step 1: Open the FaceTime App
To get started with customizing your FaceTime settings, you first need to open the FaceTime app on your Apple device. Whether you are using an iPhone, iPad, or Mac, locating and launching the FaceTime app is the first step towards preventing calls from going to all devices.
On an iPhone or iPad, you can find the FaceTime app on your home screen. Look for the green icon with a white video camera symbol. Tap on the FaceTime app to open it.
If you’re using a Mac, you can find the FaceTime app in your Applications folder. Open the Finder window, navigate to the Applications folder, and look for the FaceTime app. Double-click on the app to open it.
Once you have successfully opened the FaceTime app, you’ll be ready to proceed to the next step and configure your FaceTime preferences.
It’s important to note that the FaceTime app may vary slightly in appearance and functionality depending on the version of iOS or macOS you are using. However, the general process of customizing your FaceTime settings remains the same.
Now that you have opened the FaceTime app, let’s move on to step 2 and continue with the configuration process.
Step 2: Tap on “Preference”
After opening the FaceTime app on your Apple device, the next step in customizing your FaceTime settings is to tap on the “Preference” option. This will allow you to access the various settings and options available for FaceTime.
The location of the “Preference” option may vary slightly depending on the device you are using. Here’s how you can find it on different Apple devices:
– iPhone or iPad: When you open the FaceTime app, you will see a row of options at the bottom of the screen. Look for the “Preference” button, usually located in the bottom-right corner. Tap on it to proceed.
– Mac: On a Mac, the “Preference” option can be found in the top menu bar. Once the FaceTime app is open, click on the “FaceTime” menu at the top of the screen. A dropdown menu will appear, and you can select the “Preference” option from there.
By tapping on the “Preference” option, you will now have access to the settings menu where you can make changes to your FaceTime preferences.
It’s worth mentioning that the FaceTime preferences menu may contain additional options and configurations that you can explore. These options can vary depending on the version of iOS or macOS you are using.
Now that you have tapped on “Preference,” you are one step closer to customizing your FaceTime settings. Let’s move on to step 3 and continue with the configuration process.
Step 3: Select “Calls from iPhone”
After accessing the FaceTime preferences menu, the next step in customizing your FaceTime settings is to select the “Calls from iPhone” option. This setting determines the source for incoming calls and helps you specify which device you want to receive FaceTime calls on.
The process of selecting “Calls from iPhone” may vary slightly depending on the device you are using. Here’s how you can find and select this option:
– iPhone or iPad: In the FaceTime preferences menu, you will see a section labeled “Caller ID.” Within this section, look for the option that says “Calls from iPhone.” Tap on it to select it as the source for incoming calls.
– Mac: On a Mac, within the FaceTime preferences menu, you’ll find a section titled “Settings.” Look for the checkbox that says “Calls from iPhone.” Click on the checkbox to enable or select it as the source for incoming calls.
Selecting “Calls from iPhone” ensures that incoming FaceTime calls will primarily ring on your iPhone, even if you have multiple devices that are signed in to the same Apple ID.
By choosing this option, you can designate your iPhone as the primary device to receive FaceTime calls, and thus prevent calls from ringing on all of your devices simultaneously.
Now that you have successfully selected “Calls from iPhone” as the source for incoming calls, let’s move on to step 4 and continue configuring your FaceTime settings.
Step 4: Disable the “Allow Calls on Other Devices” Option
Once you have selected “Calls from iPhone” as the source for incoming calls, the next step in customizing your FaceTime settings is to disable the “Allow Calls on Other Devices” option. This option controls whether FaceTime calls will ring on devices other than your selected source device.
Disabling the “Allow Calls on Other Devices” option ensures that incoming FaceTime calls will only ring on the device you designated as the source for calls, preventing calls from reaching all of your devices simultaneously. Here’s how you can disable this option:
– iPhone or iPad: In the FaceTime preferences menu, you will find a section titled “Allow Calls on Other Devices.” Tap on the toggle switch next to this option to turn it off.
– Mac: On a Mac, within the FaceTime preferences menu, look for the checkbox labeled “Allow Calls on Other Devices.” Click on the checkbox to uncheck it and disable this option.
By disabling the “Allow Calls on Other Devices” option, you are effectively preventing FaceTime calls from ringing on devices other than your selected source device. This allows you to have a more streamlined and controlled calling experience.
It’s important to note that by disabling this option, you are limiting FaceTime calls to the selected device as the primary recipient. Other devices signed in to the same Apple ID will still be able to initiate FaceTime calls but will not ring for incoming calls.
Now that you have successfully disabled the “Allow Calls on Other Devices” option, let’s move on to step 5 and complete the configuration of your FaceTime settings.
Step 5: Repeat the Process on Each Device
After disabling the “Allow Calls on Other Devices” option on your chosen device, the final step in preventing FaceTime calls from going to all devices is to repeat the process on each of your Apple devices. This ensures that all devices are configured to ring selectively and in accordance with your preferences.
Here’s how you can repeat the process on each device:
1. iPhone or iPad: Open the FaceTime app on each additional iPhone or iPad device and follow steps 2, 3, and 4, as mentioned in the previous sections. Tap on “Preference,” select “Calls from iPhone,” and disable the “Allow Calls on Other Devices” option.
2. Mac: Open the FaceTime app on each Mac device and follow steps 2, 3, and 4 mentioned earlier. Click on “FaceTime” in the top menu bar, select “Preference,” enable “Calls from iPhone” as the source for calls, and uncheck the “Allow Calls on Other Devices” option.
By repeating the process on each device, you ensure that all of your Apple devices are configured to ring selectively based on your preferences. This means that when you receive a FaceTime call, only the designated device selected as the source for calls will ring, providing a more personalized and convenient calling experience.
Now that you have successfully gone through the steps on each device, you have effectively prevented FaceTime calls from going to all of your devices and tailored your FaceTime settings according to your preferences.
In the next section, we will explore a scenario where you may want certain devices to ring and discuss how to configure your FaceTime settings accordingly.
When You Want Certain Devices to Ring
While preventing FaceTime calls from going to all devices can be useful in many situations, there may be times when you want specific devices to ring for incoming calls. For example, you may want your iPhone and iPad to ring but not your Mac computer.
To configure FaceTime settings so that only certain devices ring, you can follow a similar process as before, with a slight adjustment. Here are the steps:
Step 1: Open the FaceTime App
Open the FaceTime app on each device you want to configure. This could include your iPhone, iPad, and Mac.
Step 2: Tap on “Preference”
Within the FaceTime app, tap on the “Preference” option to access the settings and customization options.
Step 3: Select “Calls from iPhone”
In the Preference menu, choose “Calls from iPhone” as the source for incoming calls. This ensures that calls will primarily ring on your iPhone.
Step 4: Enable the “Allow Calls on Other Devices” Option
To allow specific devices to ring, enable the “Allow Calls on Other Devices” option. This allows other devices, such as your iPad, to receive FaceTime calls as well.
Step 5: Choose the Specific Devices You Want to Ring
Within the “Allow Calls on Other Devices” option, you can select and enable only the specific devices you want to ring. For example, you can choose to enable calls on your iPhone and iPad, but leave your Mac computer disabled.
By following these steps, you can customize your FaceTime settings to ensure that only desired devices ring when you receive a call. This provides you with the flexibility to prioritize certain devices and tailor your FaceTime experience according to your preferences and needs.
In the next section, we will provide some common troubleshooting tips to help address any issues you may encounter while customizing your FaceTime settings.
Step 1: Open the FaceTime App
To begin customizing your FaceTime settings and configuring which devices will ring for incoming calls, the first step is to open the FaceTime app on your Apple device.
The FaceTime app is pre-installed on most Apple devices, including iPhones, iPads, and Macs. Locating and opening the app may vary slightly depending on the device you are using.
Here’s how you can open the FaceTime app on different Apple devices:
– iPhone or iPad: On your device’s home screen, look for the green FaceTime icon with a white video camera in the center. Tap on the icon to launch the FaceTime app.
– Mac: On your Mac, locate the FaceTime app in the Applications folder. You can access the Applications folder by clicking on the Finder icon in the dock and selecting “Applications” from the sidebar. Once you’re in the Applications folder, scroll or search for the FaceTime app and double-click on it to open it.
Once you have successfully opened the FaceTime app, you will be ready to proceed to the next steps and customize your FaceTime settings according to your preferences.
Keep in mind that the FaceTime app may look slightly different on different devices and operating systems, but the basic functionality remains the same.
Now that you have opened the FaceTime app, let’s move on to step 2 and continue with the configuration process.
Step 2: Tap on “Preference”
After opening the FaceTime app on your Apple device, the next step in customizing your FaceTime settings is to tap on the “Preference” option. This will allow you to access the various settings and options available for FaceTime.
Locating the “Preference” option may vary slightly depending on the device you are using. Here’s how you can find it on different Apple devices:
– iPhone or iPad: When you open the FaceTime app, you will see a row of options along the bottom of the screen. Look for the “…” (ellipsis) button, usually located on the right side. Tap on the “…” button to access additional options, including “Preference.”
– Mac: On a Mac, within the FaceTime app, look for the “FaceTime” menu option in the top menu bar. Click on “FaceTime” and a dropdown menu will appear. From the dropdown menu, select “Preference.”
By tapping on the “Preference” option, you will now have access to the settings menu where you can make changes to your FaceTime preferences.
Please note that the FaceTime preferences menu may look slightly different on different devices, but the general configuration options will be present.
Now that you have tapped on “Preference,” you are one step closer to customizing your FaceTime settings. Let’s move on to step 3 and continue with the configuration process.
Step 3: Select “Calls from iPhone”
After accessing the FaceTime preferences menu, the next step in customizing your FaceTime settings is to select the “Calls from iPhone” option. This setting allows you to specify which device you want to receive FaceTime calls on.
Here’s how you can select “Calls from iPhone” as the source for incoming calls:
– iPhone or iPad: In the FaceTime preferences menu, locate the “Caller ID” section. Within this section, you will find the option titled “Calls from iPhone.” Tap on it to select it as the source for incoming calls.
– Mac: On a Mac, within the FaceTime preferences menu, you’ll find a tab titled “Settings.” Look for the checkbox labeled “Calls from iPhone.” Click on the checkbox to enable or select it as the source for incoming calls.
By selecting “Calls from iPhone,” you ensure that incoming FaceTime calls will primarily ring on your iPhone, even if you have multiple devices that are signed in to the same Apple ID.
This setting allows you to designate your iPhone as the primary device to receive FaceTime calls, providing a more streamlined and personalized calling experience.
Now that you have successfully selected “Calls from iPhone” as the source for incoming calls, let’s move on to step 4 and continue configuring your FaceTime settings.
Step 4: Enable the “Allow Calls on Other Devices” Option
After selecting “Calls from iPhone” as the source for incoming calls, the next step in customizing your FaceTime settings is to enable the “Allow Calls on Other Devices” option. This option allows you to receive FaceTime calls on additional devices connected to the same Apple ID.
Enabling the “Allow Calls on Other Devices” option provides you with the flexibility to receive calls on devices other than your iPhone. This can be particularly useful if you want to answer FaceTime calls on your iPad, Mac, or other Apple devices.
Here’s how you can enable the “Allow Calls on Other Devices” option:
– iPhone or iPad: In the FaceTime preferences menu, look for the “Allow Calls on Other Devices” toggle switch. Toggle it to the “On” position to enable this option.
– Mac: On a Mac, within the FaceTime preferences menu, you’ll find a checkbox labeled “Allow Calls on Other Devices.” Click on the checkbox to enable this option.
Enabling the “Allow Calls on Other Devices” option ensures that incoming FaceTime calls can ring on all devices connected to your Apple ID, providing you with more flexibility in answering calls.
It’s worth noting that when you enable this option, all devices signed in to your Apple ID will be able to receive FaceTime calls. However, you can still customize which devices actually ring by selecting them individually in the next steps.
Now that you have successfully enabled the “Allow Calls on Other Devices” option, let’s move on to step 5 and continue configuring your FaceTime settings.
Step 5: Choose the Specific Devices You Want to Ring
After enabling the “Allow Calls on Other Devices” option, the final step in customizing your FaceTime settings is to choose the specific devices you want to ring for FaceTime calls. This allows you to control which devices receive incoming calls and ring when you receive a FaceTime call.
Here’s how you can choose the specific devices you want to ring:
1. iPhone or iPad: On each iPhone or iPad device, open the FaceTime app and go to the FaceTime preferences menu. Within the preferences menu, look for the section labeled “You Can Be Reached By FaceTime At.” You will see a list of devices signed in with your Apple ID. Toggle the switch next to each device to enable or disable FaceTime calls on that specific device.
2. Mac: On each Mac device, open the FaceTime app and go to the FaceTime preferences menu. Within the preferences menu, look for the section labeled “Settings.” Next to each device, you will find checkboxes. Click on the checkbox next to each device to enable or disable FaceTime calls on that specific device.
By choosing the specific devices you want to ring, you have control over which devices receive FaceTime calls. This allows you to customize your FaceTime experience based on your preferences and needs.
It’s worth mentioning that even if a device is selected to receive FaceTime calls, it will only ring if it is connected to the internet and has an active FaceTime session.
Now that you have chosen the specific devices you want to ring for FaceTime calls, you have successfully customized your FaceTime settings to fit your preferences.
Common Troubleshooting Tips
While configuring your FaceTime settings, you may encounter some issues or difficulties. Here are some common troubleshooting tips to help you overcome any challenges:
1. Ensure FaceTime is enabled: Make sure FaceTime is enabled on each device you want to use for FaceTime calls. You can do this by going to the device’s settings and finding the FaceTime option. Toggle it on if it is disabled.
2. Check internet connection: Ensure that all devices have a stable internet connection. FaceTime calls require a reliable Wi-Fi or cellular connection for optimal performance. If you’re experiencing connectivity issues, try switching to a different network or resetting your internet connection.
3. Update software: Keeping your devices up to date with the latest software can help resolve any known issues or bugs. Check for software updates on your iPhone, iPad, or Mac and install any available updates for the FaceTime app.
4. Sign out and sign back in: If you’re experiencing persistent issues, try signing out of FaceTime on all devices, and then sign back in. This can help refresh the connection and resolve any temporary glitches.
5. Restart devices: Sometimes, a simple restart can fix minor software issues. Restart your iPhone, iPad, or Mac to clear any temporary files or processes that may be affecting FaceTime.
6. Contact Apple Support: If you have tried the above troubleshooting tips and are still experiencing issues with FaceTime, it may be helpful to reach out to Apple Support. They can provide further guidance and assistance in resolving any technical issues you may be facing.
By following these troubleshooting tips, you can address common problems and ensure a smoother experience when using FaceTime for video and audio calls.
Remember, FaceTime is a powerful communication tool, and customizing your settings allows you to have greater control over your calling experience. With the right configuration and troubleshooting, you can enjoy seamless FaceTime calls on your preferred devices.