
What is Screen Recording on FaceTime?
Screen recording on FaceTime allows you to capture and save videos of your FaceTime conversations, making it a handy feature for various purposes. Whether you want to save important conversations for later reference, create tutorial videos, or simply share memorable moments with friends and family, screen recording on FaceTime provides a convenient way to do so.
By capturing both the audio and video of your FaceTime call, screen recording allows you to create a dynamic, visual representation of your conversation. This can be particularly useful for communication professionals who need to review client meetings, educators who want to record virtual classes or lessons, or individuals who want to preserve precious memories with loved ones.
Screen recording on FaceTime is available on devices running iOS 11 and later, including iPhone, iPad, and Mac. However, it’s important to note that screen recording is a privacy-sensitive feature, so it’s crucial to obtain consent from all parties involved before initiating a screen recording on FaceTime.
Enabling screen recording on FaceTime is a straightforward process, and once it’s enabled, you can start capturing your FaceTime calls effortlessly.
How to Enable Screen Recording
Before you can start using screen recording on FaceTime, you need to enable the feature on your device. The steps to enable screen recording may vary slightly depending on your device’s operating system, but the general process remains the same.
Here’s how you can enable screen recording on FaceTime:
- Open your device’s Settings app.
- Scroll down and tap on Control Center.
- Tap on Customize Controls.
- Under the More Controls section, find Screen Recording and tap on the green plus (+) button next to it. This will add Screen Recording to your Control Center.
Once you have enabled Screen Recording in your Control Center, you are ready to start capturing FaceTime calls on your device.
Note that enabling screen recording on FaceTime grants permission for screen recording across all apps on your device and not just FaceTime. However, you can easily control when and where you want to initiate the screen recording.
Now that you have successfully enabled screen recording, let’s move on to the next section to learn how to screen record on FaceTime.
Steps to Screen Record on FaceTime
Now that you have enabled screen recording on FaceTime, it’s time to learn how to effectively capture your FaceTime calls. Follow these simple steps to screen record on FaceTime:
- Open the FaceTime app on your device.
- Initiate a FaceTime call with the person or group you want to record.
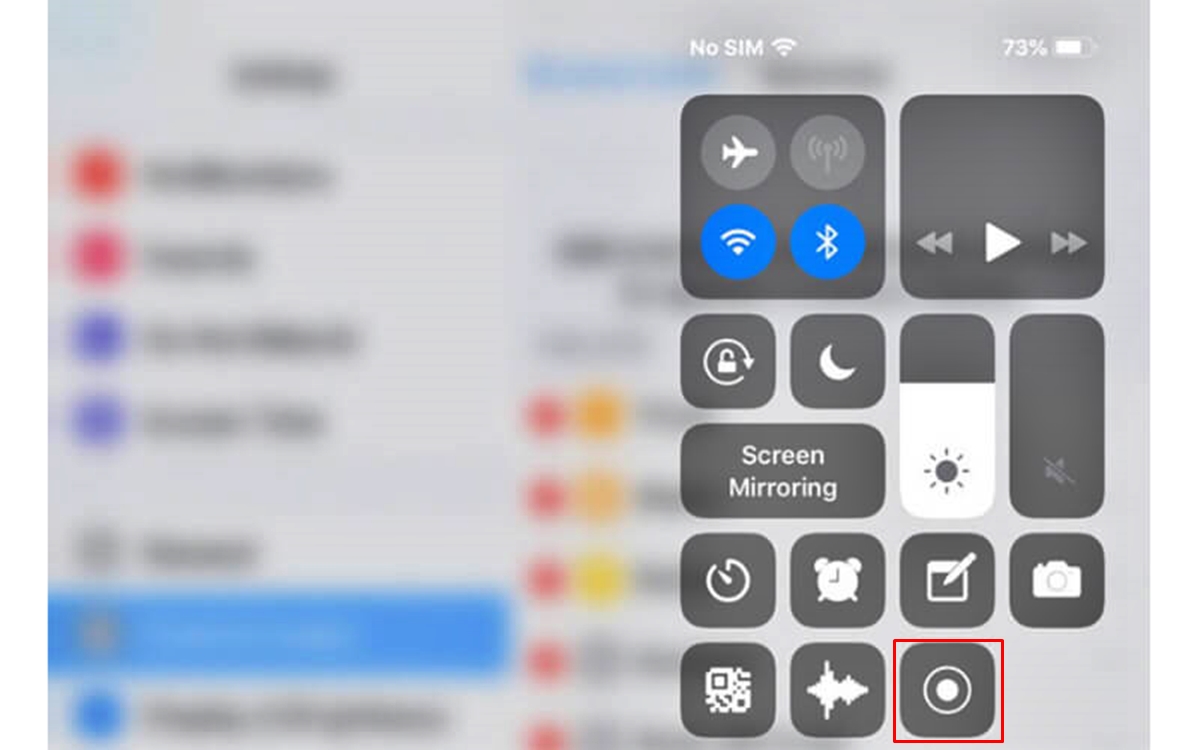
- Swipe up from the bottom of your screen (or, on iPhone X or later, swipe down from the top-right corner) to access the Control Center.
- Tap on the Screen Recording icon. It looks like a solid circle inside a larger circle.
- A countdown of three seconds will appear, indicating that your device is about to start screen recording.
- During the FaceTime call, the screen recording indicator (a red bar at the top or bottom of the screen) will remind you that the call is being recorded.
- To stop the screen recording, swipe up from the bottom of the screen (or, on iPhone X or later, swipe down from the top-right corner) to access the Control Center again.
- Tap on the Screen Recording icon again to stop the recording.
- The recorded video will be saved to your Photos app, where you can access, edit, and share it.
Remember to obtain consent from all parties involved before initiating the screen recording to respect privacy and legal considerations.
With these simple steps, you can easily capture and save your FaceTime conversations for future reference or sharing.
Next, we’ll explore some helpful tips and tricks to enhance your screen recording experience on FaceTime.
Tips and Tricks for Screen Recording on FaceTime
Screen recording on FaceTime provides a great opportunity to optimize your recording experience and create high-quality videos. Here are some tips and tricks to enhance your screen recording on FaceTime:
- Ensure a stable internet connection: To prevent interruptions or lag during your FaceTime call, make sure you have a stable internet connection. This will ensure smooth recording and clear audio and video quality.
- Frame your video effectively: Position your device or webcam in a way that captures both your face and the screen content. This will provide a comprehensive view of the conversation and any visuals being shared.
- Use external microphones or headphones: For better audio quality, consider using external microphones or headphones. This will help eliminate background noise and ensure clear sound recordings.
- Keep your device charged: Screen recording can consume a significant amount of battery power. To avoid running out of battery during your recording, make sure your device is adequately charged or connected to a power source.
- Edit your recordings: After capturing your FaceTime call, you can edit the recording using video editing software or apps. Trim unnecessary parts, enhance audio, add text or captions, and apply any other edits to make your recording more polished and professional.
- Share your recordings securely: If you plan to share your FaceTime recording, ensure that you do so securely. Be mindful of the content you’re sharing and consider using secure file-sharing platforms or private messaging options to maintain confidentiality.
These tips and tricks will help you create impressive screen recordings of your FaceTime calls. Experiment with different techniques and settings to find the approach that works best for you.
Now, let’s address some common issues that you may encounter while screen recording on FaceTime.
Troubleshooting Common Issues with Screen Recording on FaceTime
While screen recording on FaceTime is generally a smooth process, you may encounter some common issues along the way. Here are a few troubleshooting tips to help you resolve these issues:
- Screen recording won’t start: If you’re unable to initiate screen recording on FaceTime, double-check that the screen recording feature is enabled in your Control Center settings. If it’s already enabled, try restarting your device and attempting the screen recording again.
- No audio in the recording: If your screen recording captures only video without any audio, check that the microphone permission is enabled for FaceTime in your device’s settings. You can do this by going to Settings > FaceTime > Microphone and ensuring that it’s set to “Allow”.
- Poor video or audio quality: If your screen recording has low video or audio quality, it’s possible that your device’s settings need adjustment. Check that your camera and microphone settings are optimized for the best recording quality.
- Large file size: Screen recordings can result in large file sizes, which may be challenging to share or store. Consider compressing the video file using video editing software or apps to reduce the file size without compromising too much on quality.
- Recording interruption: If your screen recording is interrupted due to a phone call or other notifications, it will pause automatically. You can resume the recording by accessing the Control Center and tapping the Screen Recording icon again.
- Excessive battery drain: Screen recording consumes a significant amount of battery power. If you’re concerned about battery drain during a long recording, try reducing the screen brightness or connecting your device to a power source.
If you continue to experience issues with screen recording on FaceTime, it’s advisable to check for software updates on your device. Keeping your device’s operating system up to date can often resolve compatibility issues and improve the overall performance of screen recording functionality.
With these troubleshooting tips in mind, you can overcome common challenges and enjoy a seamless screen recording experience on FaceTime.
Now, let’s address some frequently asked questions about screen recording on FaceTime.
FAQs about Screen Recording on FaceTime
Here are answers to some frequently asked questions about screen recording on FaceTime:
- Is screen recording on FaceTime legal?
- Can I screen record on FaceTime without the other person knowing?
- Can I screen record small portions of a FaceTime call?
- Can I screen record FaceTime on both iPhone and iPad?
- Can I screen record FaceTime on my Mac?
Screen recording on FaceTime is legal as long as you have obtained the consent of all parties involved. It’s essential to respect privacy and adhere to legal regulations when recording conversations.
No, screen recording on FaceTime displays a red bar at the top or bottom of the screen, indicating to all participants that the call is being recorded. This ensures transparency and respect for privacy.
Yes, you have the flexibility to start and stop screen recording during a FaceTime call. This allows you to selectively capture specific segments of the call that you want to record.
Yes, screen recording on FaceTime is available on both iPhone and iPad, as long as the devices are running iOS 11 or later. The process for enabling and using screen recording is similar on both devices.
Yes, screen recording on FaceTime is available on Mac devices running macOS Mojave or later. You can enable screen recording in Control Center or use third-party screen recording software to capture your FaceTime calls.
These are some common questions regarding screen recording on FaceTime. It’s important to stay informed and use this feature responsibly and ethically.