
What is a network drive?
A network drive, also known as a mapped network drive, is a virtual storage space on a network server that can be accessed by multiple users within an organization. It allows users to store and retrieve files, documents, and other data from a centralized location, making it easier to share and collaborate on projects.
When a network drive is mapped, it appears as a familiar drive letter (such as “Z” or “S”) on the user’s computer, just like their local hard drive or USB flash drive. However, instead of storing data locally, the network drive stores it on a server, which can be located in the same office or accessed remotely over the internet.
One of the key advantages of using a network drive is that it promotes seamless file sharing and collaboration among team members. Instead of emailing files back and forth or relying on physical storage devices, everyone can access and work on the same files in real-time. This eliminates version control issues and ensures that everyone is working with the most up-to-date information.
In addition, network drives offer a secure and centralized way to back up important files and data. By storing everything on a server, organizations can protect against data loss due to hardware malfunctions, theft, or other unforeseen incidents. Regular backups can be scheduled to ensure that critical data is always protected.
Network drives also provide convenient access to files from anywhere, as long as there is an internet connection. This is especially useful for remote or mobile workers who need to access files on-the-go. By mapping a network drive, users can access their files as if they were stored locally, regardless of their physical location.
Overall, a network drive simplifies file management, enhances collaboration, improves data security, and boosts productivity within an organization. Whether it’s a small business or a large enterprise, the use of network drives has become an essential part of modern workplace efficiency.
Why map a network drive?
Mapping a network drive offers several benefits that can greatly improve productivity and streamline file access and sharing within an organization. Let’s explore some of the key reasons why mapping a network drive is essential:
1. Easy and Convenient Access: By mapping a network drive, users can access shared files and folders with just a few clicks. It eliminates the need to remember complex server paths or manually navigate through network folders. With a mapped drive, users can simply open the drive letter, similar to accessing their local storage, and find all their shared files in one place.
2. Improved Collaboration: A mapped network drive enables teams to work together more efficiently. Instead of sending files through email or using other file transfer methods, users can directly access and edit shared files from the network drive. This promotes real-time collaboration and eliminates the hassle of merging multiple versions of documents.
3. Enhanced File Security: Centralizing files on a network drive enhances data security. With appropriate access controls and permissions, administrators can ensure that only authorized users have access to sensitive information. This reduces the risk of data breaches and accidental data loss caused by improper handling of files.
4. Efficient File Backup: Network drives provide a centralized location for regular backups. Instead of individually backing up files on each user’s computer, automated backup processes can be set up to regularly back up files on the network drive. This ensures that critical files are protected and easily recoverable in the event of data loss.
5. Remote File Access: One of the significant advantages of mapping a network drive is the ability to access files remotely. Whether working from home or traveling, users can connect to the network drive over the internet and access their files as if they were sitting in the office. This flexibility allows for seamless productivity regardless of location.
6. Simplified File Management: With a mapped network drive, users can organize files in a structured manner, making it easier to locate and manage documents. Folders can be created, renamed, and organized according to specific projects or departments, ensuring that files are stored in a logical and accessible way.
Overall, mapping a network drive offers numerous advantages, including easy access, improved collaboration, enhanced security, efficient backups, remote file accessibility, and simplified file management. By utilizing this feature, organizations can boost productivity and streamline workflows, ultimately leading to better efficiency and success.
Windows
Mapping a network drive in Windows allows users to conveniently access shared files and folders on a network server. The process involves a few simple steps that can be easily followed:
Step 1: Accessing the “Map Network Drive” option: Open the File Explorer by pressing Windows key + E on your keyboard. From the top menu, select “Computer” or “This PC” and click on “Map network drive” from the toolbar.
Step 2: Choosing the drive letter: In the “Map Network Drive” dialog box, choose an available drive letter from the drop-down menu. This will be the letter assigned to the network drive.
Step 3: Identifying the network location: Next, you need to specify the network location of the shared folder. You can either enter the server address directly or browse for it by clicking on the “Browse” button.
Step 4: Connecting to the network drive: Once you have entered the network location, check the box that says “Connect using different credentials” if you need to provide authentication details. Then, click on “Finish” to establish the connection to the network drive.
Step 5: Selecting the option to reconnect at sign-in: If you want the network drive to be automatically connected every time you sign in to your computer, check the box that says “Reconnect at sign-in.” This ensures that the network drive is seamlessly available whenever you use your system.
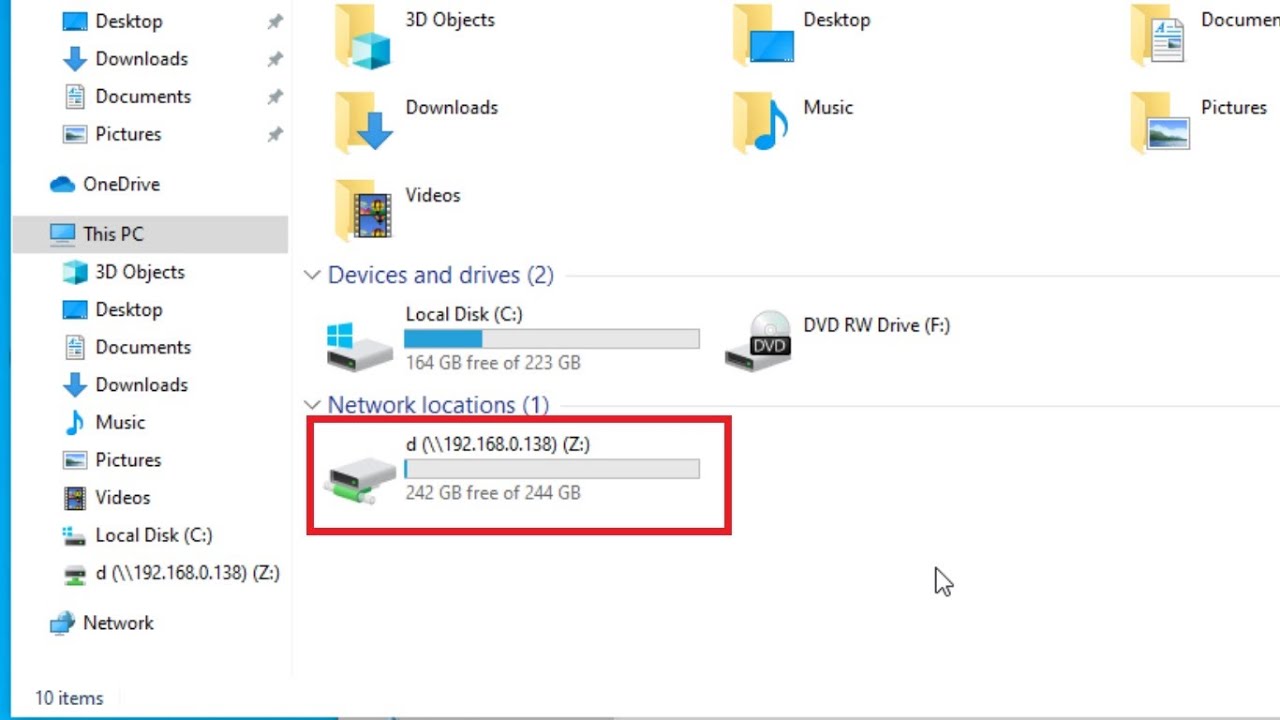
Step 6: Completing the mapping process: Click “Finish” to complete the mapping process. The mapped network drive will now appear in the File Explorer under “This PC” or “Computer,” along with other local storage drives.
By mapping network drives in Windows, users can access shared files and folders with ease. This simplifies file management, promotes collaboration, and boosts productivity within the organization.
Step 1: Accessing the “Map Network Drive” option
To begin mapping a network drive in Windows, you need to access the “Map Network Drive” option. Follow these steps:
1. Open File Explorer: Press the Windows key + E on your keyboard to open the File Explorer. Alternatively, you can right-click on the Start menu and select “File Explorer” from the menu.
2. Navigate to “This PC” or “Computer”: Once the File Explorer is open, you’ll see a navigation pane on the left-hand side. Look for either “This PC” or “Computer” in the navigation pane, and click on it. This will display a list of available drives on your computer.
3. Click on “Map network drive”: In the top menu of the File Explorer window, you will find the “Map network drive” option. It is represented by an icon depicting a drive and a green plus sign. Click on this option to open the “Map Network Drive” dialog box.
4. Select an available drive letter: In the “Map Network Drive” dialog box, a drop-down menu allows you to choose a drive letter for the network drive. This letter will be used to identify the mapped drive in File Explorer.
5. Optional: Connect using different credentials: If necessary, check the box that says “Connect using different credentials.” This option is useful when you need to provide specific authentication details, such as a username and password, to access the network drive.
6. Click on “Finish”: Once you have chosen a drive letter and made any necessary credentials changes, click on the “Finish” button. This will initiate the mapping process and attempt to connect to the network drive.
By following these steps, you can easily access the “Map Network Drive” option in Windows. This option serves as the starting point for mapping a network drive, allowing you to connect to shared files and folders on a network server.
Step 2: Choosing the drive letter
Once you have accessed the “Map Network Drive” option in Windows, the next step is to choose the drive letter that will represent the mapped network drive. Follow these instructions to select a drive letter:
1. Open the “Map Network Drive” dialog box: Clicking on the “Map network drive” option in File Explorer will open the “Map Network Drive” dialog box. This is where you can specify the settings for the mapped network drive.
2. Choose an available drive letter: In the “Map Network Drive” dialog box, you will see a drop-down menu next to the Drive letter field. This menu lists the available drive letters that can be assigned to the network drive. Select a letter from the available options.
3. Consider drive letter availability: It’s important to remember that some drive letters may already be in use on your computer. Drive letters such as C, D, and E are typically reserved for the main hard drive, DVD/CD drives, or USB devices. Make sure to choose a drive letter that is not already in use to avoid conflicts.
4. Choose a letter that is easy to remember: While selecting a drive letter, it is helpful to choose one that is easy to remember and associate with the network drive. For example, you can pick a letter that corresponds to the department or project associated with the shared files.
5. Click on “Finish”: Once you have chosen the desired drive letter for the network drive, click on the “Finish” button. This will save the settings and proceed to the next step in the mapping process.
By selecting an appropriate drive letter for the mapped network drive, you establish a unique identifier for accessing shared files and folders. This step ensures that the network drive appears as a separate drive on your computer, allowing for easy navigation and file management.
Step 3: Identifying the network location
After choosing the drive letter for the mapped network drive in Windows, the next step is to identify the network location of the shared folder. This involves specifying the server address or browsing for the network location. Follow these instructions to identify the network location:
1. Open the “Map Network Drive” dialog box: Clicking on the “Map network drive” option in File Explorer opens the “Map Network Drive” dialog box. This dialog box allows you to set up the mapping for the network drive.
2. Specify the network location: In the “Map Network Drive” dialog box, you will see a text field labeled “Folder” or “Path.” This is where you need to specify the network location of the shared folder. You can do this by entering the server address directly or by browsing for the folder.
3. Enter the server address: If you know the exact server address, enter it in the “Folder” or “Path” field. The server address usually follows the format of \\servername\sharedfolder. Replace “servername” with the name or IP address of the server, and “sharedfolder” with the name of the folder you want to map.
4. Browse for the network location: If you are unsure of the server address, you can click on the “Browse” button next to the “Folder” or “Path” field. This will open a new window where you can navigate through the network to locate the shared folder. Once you find the desired folder, select it and click “OK.”
5. Check the spelling and formatting: Double-check the server address or the folder path to ensure it is accurate and properly formatted. A small mistake in the address can result in a failed connection or the mapping of the wrong folder.
6. Click on “Finish”: Once you have entered or browsed for the network location, click on the “Finish” button. This will save the settings and initiate the connection to the specified shared folder.
By correctly identifying the network location of the shared folder, you ensure that the mapped network drive can establish a connection and access the desired files and folders. This step is crucial for seamless access and collaboration on the network.
Step 4: Connecting to the network drive
Once you have specified the network location of the shared folder when mapping a network drive in Windows, the next step is to establish a connection to the network drive. This involves entering any necessary credentials and finalizing the connection. Follow these instructions to connect to the network drive:
1. Open the “Map Network Drive” dialog box: Click on the “Map network drive” option in File Explorer to open the “Map Network Drive” dialog box. This is where you can configure the settings for the mapped network drive.
2. Provide authentication details (if required): If you need to provide authentication details to access the shared folder, check the box that says “Connect using different credentials” in the “Map Network Drive” dialog box. This will prompt you to enter a username and password for authentication purposes.
3. Enter the username and password: If prompted, enter your username and password in the appropriate fields. These credentials should be provided to you by the network administrator or the owner of the shared folder. Make sure to enter the correct details to establish a successful connection.
4. Check the “Remember my credentials” option: If you want Windows to remember the authentication details for future access to the network drive, check the box that says “Remember my credentials.” This will save your username and password so you won’t have to enter them every time you want to connect.
5. Click on “Finish”: Once you have entered the authentication details (if required), click on the “Finish” button to complete the connection process. Windows will attempt to connect to the network drive using the provided credentials and display a progress window while establishing the connection.
6. Explore the mapped network drive: After successfully connecting to the network drive, you can navigate to it in File Explorer or any other file management software. The mapped network drive will appear as a separate drive in “This PC” or “Computer,” along with other local storage drives.
By connecting to the network drive, you gain access to the shared files and folders on the network server. This allows you to collaborate, share, and work with the files just as you would with your local storage, promoting efficiency and ease of use.
Step 5: Selecting the option to reconnect at sign-in
When mapping a network drive in Windows, you have the option to configure it to automatically reconnect every time you sign in to your computer. This ensures that the mapped network drive is readily available without manual intervention. Follow these steps to select the option to reconnect at sign-in:
1. Open the “Map Network Drive” dialog box: Access the “Map Network Drive” dialog box by clicking on the “Map network drive” option in File Explorer. This is where you can set up the mapping for the network drive.
2. Provide the drive letter and network location: Before selecting the option to reconnect at sign-in, make sure you have already provided the appropriate drive letter and network location settings for the mapped network drive.
3. Check the box for “Reconnect at sign-in”: In the “Map Network Drive” dialog box, you will see a checkbox labeled “Reconnect at sign-in.” To ensure that the network drive is automatically connected every time you sign in to your computer, check this box. This will establish a persistent mapping that persists across sessions.
4. Verify credentials (if required): If you have provided authentication details to access the network drive, make sure they are verified and saved before selecting the option to reconnect at sign-in. This will prevent any interruptions in the connection when your computer starts up.
5. Click on “Finish”: Once you have checked the box for “Reconnect at sign-in” and ensured that all necessary settings are correct, click on the “Finish” button. This will save the configuration and establish the persistent mapping for the network drive.
6. Test the automatic reconnection: To confirm that the mapped network drive reconnects at sign-in, restart or log out of your computer and then sign back in. After signing in, open File Explorer and verify that the mapped network drive appears and is accessible without requiring manual connection.
By selecting the option to reconnect at sign-in for a mapped network drive, you ensure that the drive is automatically available each time you start your computer. This feature eliminates the need to manually establish the connection and provides a seamless and convenient experience when accessing shared files and folders on the network.
Step 6: Completing the mapping process
After configuring the necessary settings for mapping a network drive in Windows, the final step is to complete the mapping process. This involves finalizing the connection and ensuring that the mapped network drive is ready for use. Follow these instructions to complete the mapping process:
1. Open the “Map Network Drive” dialog box: Access the “Map Network Drive” dialog box by clicking on the “Map network drive” option in File Explorer. This is where you have set up the mapping for the network drive.
2. Verify the drive letter and network location: Before completing the mapping process, double-check that you have selected the correct drive letter and specified the accurate network location for the shared folder. Ensure that these settings accurately reflect your intended mapping configuration.
3. Check the box for “Reconnect at sign-in” (if applicable): If you want the network drive to automatically reconnect every time you sign in to your computer, ensure that the “Reconnect at sign-in” box is checked. This option provides the convenience of having the mapped network drive readily available without manual intervention.
4. Click on “Finish”: Once you have verified all the settings and ensured that everything is in order, click on the “Finish” button. This will save the mapping configuration and establish the connection to the network drive.
5. Verify the mapped network drive: After completing the mapping process, open File Explorer and navigate to “This PC” or “Computer.” You should see the mapped network drive listed alongside other storage drives. Click on the mapped network drive to ensure that it is accessible and displaying the shared files and folders from the network location.
6. Test file access and usage: To confirm that the mapping process is successful, open some files or folders from the mapped network drive. Ensure that you can browse, open, edit, and save files without any issues. This will validate that the network drive is functioning correctly and that files can be accessed and used as intended.
By following these steps and completing the mapping process, you can successfully establish a mapped network drive in Windows. This provides you with seamless access to shared files and folders, enhancing collaboration, file management, and productivity within your organization.
Mac
Mapping a network drive on a Mac allows you to access shared files and folders on a network server. While the process may differ from Windows, it is straightforward and can be completed using the following steps:
Step 1: Locating the Finder app: On your Mac, click on the Finder icon in the Dock, which is usually located at the bottom of the screen. The Finder app is the default file manager on macOS and is used to navigate and access files.
Step 2: Opening the “Connect to Server” window: From the top menu, click on “Go” and then select “Connect to Server.” Alternatively, you can use the keyboard shortcut Command + K to open the “Connect to Server” window.
Step 3: Entering the server address: In the “Connect to Server” window, enter the server address or network location of the shared folder you want to map. The server address typically follows the format of smb://servername/sharedfolder. Replace “servername” with the name or IP address of the server and “sharedfolder” with the name of the folder you want to map.
Step 4: Selecting the shared folder: Once you have entered the server address, click on the “Connect” button. The Mac will attempt to establish a connection to the shared folder. If successful, a list of available shared folders on the server will be displayed. Select the folder that you want to map as the network drive.
Step 5: Choosing an alias if desired: After selecting the shared folder, you can choose to create an alias by clicking on the “Add to Sidebar” button. This will create a shortcut to the network drive in the sidebar of the Finder app for quick and easy access in the future.
Step 6: Authenticating the connection: If the shared folder requires authentication, a login window will appear. Enter your username and password for the network drive and click on the “Connect” button to authenticate the connection.
Step 7: Completing the map process: Once you have successfully connected to the shared folder, it will be displayed as a network drive on your Mac. You can access it by clicking on it in the Finder sidebar or navigating to it in the Finder app.
Macs provide a user-friendly interface for mapping network drives, allowing you to easily access shared files and folders within your network. The steps outlined above enable seamless collaboration and efficient file management, enhancing productivity on your Mac.
Step 1: Locating the Finder app
When mapping a network drive on a Mac, the first step is to locate the Finder app, which serves as the default file manager on macOS. Follow these steps to find and open the Finder app:
1. Look for the Finder icon in the Dock: The Dock is the row of icons typically located at the bottom of the screen. The Finder icon is represented by a blue and white smiling face and is usually positioned on the far left side of the Dock. Click on the Finder icon to open the app.
2. Use the Spotlight search: Alternatively, you can use the Spotlight search to locate and open the Finder app. Press Command + Space on your keyboard to open Spotlight, then type “Finder” in the search bar. From the search results, click on the Finder app to open it.
3. Access Finder through the Applications folder: If you prefer navigating through the Applications folder, follow these steps. Click on the “Go” menu in the top menu bar and select “Applications.” This will open a new window displaying all the applications installed on your Mac. Scroll down or use the search bar to find the Finder app, then double-click on it to launch the app.
4. Check the Launchpad: Another option is to check the Launchpad, which displays all the applications installed on your Mac in a grid-like view similar to iOS. Click on the Launchpad icon in the Dock (resembling a rocket) or use the pinch-to-zoom gesture on the trackpad to open Launchpad. From there, locate and click on the Finder app to open it.
5. Use the keyboard shortcut: Lastly, you can use a keyboard shortcut to open the Finder app. Press Command + Option + Space simultaneously, and the Finder app will launch.
By following these steps, you can easily locate and open the Finder app on your Mac. The Finder app provides a graphical interface that allows you to navigate and manage files and folders, including mapping network drives to access shared files within your network.
Step 2: Opening the “Connect to Server” window
After locating the Finder app on your Mac, the next step in mapping a network drive is to open the “Connect to Server” window. This window allows you to establish a connection to the network server where the shared folder is located. Follow these steps to open the “Connect to Server” window:
1. Click on the “Go” menu: In the top menu bar of your Mac, click on the “Go” menu, which is positioned between “Window” and “Bookmarks”. This menu provides access to various system utilities and features.
2. Select “Connect to Server”: From the “Go” menu, scroll down and click on the “Connect to Server” option. You can also use the keyboard shortcut Command + K to open the “Connect to Server” window.
3. Use the “+” button: An alternate method is to click on the “+” button located on the right side of the Finder’s toolbar. This button is typically represented by a plus sign within a circle. Clicking on it will also open the “Connect to Server” window.
4. Utilize the “Command + K” keyboard shortcut: Another way to open the “Connect to Server” window is by using the keyboard shortcut Command + K. Press and hold the Command key, then press the letter “K” on your keyboard simultaneously.
5. Use the right-click menu: If you have already selected a folder or file in the Finder, you can right-click (or control-click) on the selection, and a contextual menu will appear. From the menu, select “Connect to Server” to open the “Connect to Server” window with the selected item pre-filled in the address field.
By following these steps, you can easily open the “Connect to Server” window on your Mac. This window provides you with the means to establish a connection to the network server where the shared folder is located, enabling you to map a network drive and access shared files and folders within your network.
Step 3: Entering the server address
Once you have opened the “Connect to Server” window on your Mac, the next step in mapping a network drive is to enter the server address. The server address identifies the network location where the shared folder is hosted. Here is how to complete this step:
1. Obtain the server address: Before entering the server address, you need to know the specific network location of the shared folder. You can obtain the server address from your network administrator or the owner of the shared folder. Typically, the server address starts with “smb://” followed by the server name or IP address, and the shared folder name.
2. Open the “Connect to Server” window: If you haven’t done so already, open the “Connect to Server” window. This can be done by clicking on the “Go” menu in the Finder’s top menu bar and selecting “Connect to Server,” using the “+” button in the Finder’s toolbar, or by using the keyboard shortcut Command + K.
3. Enter the server address: In the “Connect to Server” window, you will see an input field labeled “Server Address” or “Address.” This is where you enter the server address. Start by typing “smb://” followed by the server name or IP address. Then, include the shared folder name or path, ensuring proper formatting and accuracy.
4. Include any additional parameters (if needed): Depending on your network configuration, you may need to include additional parameters when entering the server address. This could include specifying a specific port number, using other protocols (e.g., AFP or NFS), or providing any required authentication details. Consult your network administrator or the owner of the shared folder for any specific parameters you need to include.
5. Click on “Connect”: After entering the server address and any additional parameters, click on the “Connect” button in the “Connect to Server” window. Your Mac will attempt to establish a connection to the specified network location and the shared folder.
By accurately entering the server address, you enable your Mac to establish a connection to the network server hosting the shared folder. This step is crucial in mapping a network drive and gaining access to the shared files and folders within your network.
Step 4: Selecting the shared folder
After entering the server address in the “Connect to Server” window on your Mac, the next step in mapping a network drive is to select the shared folder that you want to access. Here is how you can complete this step:
1. Open the “Connect to Server” window: If you haven’t done so already, open the “Connect to Server” window by clicking on the “Go” menu in the Finder’s top menu bar and selecting “Connect to Server,” using the “+” button in the Finder’s toolbar, or by using the keyboard shortcut Command + K.
2. Establish a connection to the server: After entering the server address, click on the “Connect” button in the “Connect to Server” window. Your Mac will attempt to establish a connection to the specified network location.
3. View the list of shared folders: If the connection is successful, a list of available shared folders on the server will be displayed in a new window. This window shows all accessible folders on the server that you can select to map as a network drive.
4. Navigate to the desired shared folder: To select the shared folder you want to access, navigate through the available folders by double-clicking on them. This allows you to explore the folder structure and locate the target shared folder.
5. Select the shared folder: Once you have located the desired shared folder, click on it to select it. The selected shared folder will now appear in the “Connect to Server” window, indicating that it will be mapped as the network drive.
6. Optional: Create a shortcut in the Finder sidebar: If you want quick and easy access to the mapped network drive, you can click on the checkbox next to “Add to Sidebar” in the “Connect to Server” window. This will create a shortcut to the network drive in the Finder sidebar for convenient future access.
7. Click on “Connect”: After selecting the shared folder and making any desired changes, click on the “Connect” button in the “Connect to Server” window. This will establish the connection to the selected shared folder and map it as a network drive on your Mac.
By selecting the shared folder in the “Connect to Server” window, you ensure that the designated folder is mapped as the network drive on your Mac. This allows you to access and work with the shared files and folders within your network from your Mac’s file system.
Step 5: Choosing an alias if desired
When mapping a network drive on a Mac, you have the option to create an alias for the mapped network drive. An alias is a shortcut that provides quick access to the network drive, making it easier to navigate and locate the shared files. Follow these steps to choose an alias for the mapped network drive:
1. Open the “Connect to Server” window: If you haven’t done so already, open the “Connect to Server” window by clicking on the “Go” menu in the Finder’s top menu bar and selecting “Connect to Server,” using the “+” button in the Finder’s toolbar, or by using the keyboard shortcut Command + K.
2. Establish a connection to the server: After entering the server address and selecting the shared folder, click on the “Connect” button to establish the connection to the network drive. This will map the shared folder as a network drive on your Mac.
3. Create an alias: In the window that displays the mapped network drive, click on the “Add to Sidebar” button. This will create an alias for the network drive and place it in the sidebar of the Finder app for easy access.
4. View the alias: After clicking on the “Add to Sidebar” button, check the Finder’s sidebar to locate the alias for the network drive. The alias appears as a clickable shortcut with the name of the shared folder.
5. Access the network drive via the alias: To access the network drive, simply click on the alias in the sidebar of the Finder app. This will immediately open the network drive and display the shared files and folders within it.
6. Rearrange the alias (optional): If desired, you can rearrange the position of the alias in the Finder sidebar by clicking and dragging it to a different location. This allows you to customize the arrangement of icons and shortcuts in the sidebar to suit your preferences.
By choosing an alias for the mapped network drive, you create a shortcut in the Finder sidebar that provides quick and convenient access to the shared files and folders. This makes it easier to navigate the network drive and improves efficiency when working with the shared resources on your Mac.
Step 6: Authenticating the connection
After mapping a network drive on a Mac, the next step is to authenticate the connection, especially if the shared folder requires specific credentials for access. This authentication process ensures that you have the necessary permissions to connect to the shared resources. Follow these steps to authenticate the connection:
1. Open the mapped network drive: After mapping the network drive, you can access it through the Finder or any file management software. Click on the network drive icon in the sidebar or navigate to it in the Finder app.
2. Authenticate with your username and password: If the shared folder requires authentication, a login prompt will appear. Enter your username and password in the provided fields. If you have the option to save your credentials, you can check the box to remember your login information for future access.
3. Provide the correct credentials: Ensure that you enter the correct username and password combination. Double-check for any uppercase or lowercase letters, as well as any special characters or spaces. Keep in mind that the login credentials may differ from your macOS account credentials.
4. Use a different set of credentials: If you need to use different authentication details, click on the “Use different credentials” or “Connect As” option, if available. Enter the appropriate username and password to authenticate with the network drive.
5. Utilize Keychain Access for automatic authentication (optional): On macOS, you can leverage the Keychain Access app to store and manage your login credentials. This allows for automatic authentication when accessing the mapped network drive in the future, saving you from manually entering the credentials each time.
6. Wait for confirmation: After entering the correct credentials, wait for the authentication process to complete. If the authentication is successful, the network drive will be fully accessible, and you can begin working with the shared files and folders.
By properly authenticating the connection to the mapped network drive, you ensure that you have the necessary authorization to access and interact with the shared resources. This authentication step helps maintain the security and integrity of the shared folder while allowing you to collaborate and work efficiently within your network environment.
Step 7: Completing the map process
After authenticating the connection to the mapped network drive on your Mac, the final step is to complete the mapping process. This finalization ensures that the network drive is fully set up and ready for use. Follow these steps to complete the map process:
1. Open the mapped network drive: Click on the network drive icon in the sidebar of the Finder app or navigate to it in the Finder’s file system. This will open the mapped network drive, displaying the shared files and folders from the network location.
2. Verify access and functionality: Once the network drive is open, verify that you have access to the shared files and folders within it. Navigate through the drive, open files, and perform any necessary actions to ensure that everything is working correctly.
3. Test file operations: Perform various file operations within the mapped network drive, such as creating new folders, copying/moving files, and saving changes. This will confirm that the mapped network drive supports standard file operations and that modifications are successfully reflected on the network server.
4. Verify seamless connectivity: Test the network drive’s connectivity by disconnecting your Mac from the network temporarily or restarting your computer. After reconnecting or restarting, check if the mapped network drive automatically reconnects and remains accessible without requiring manual intervention.
5. Set the network drive as a login item (optional): If you want the mapped network drive to automatically mount and appear upon login, you can configure it as a login item. Open System Preferences, navigate to the “Users & Groups” or “Users & Accounts” section, select your user account, and go to the “Login Items” tab. Add the mapped network drive to the list of login items to ensure automatic mounting upon login.
6. Ensure regular backups: It is important to regularly back up the files on the network drive to prevent data loss. Consult with your network administrator or IT department to implement a proper backup strategy that includes the shared files and folders on the network server.
By completing the map process, you finalize the setup of the mapped network drive on your Mac. This ensures that you can access and work with the shared resources seamlessly, enhancing collaboration and productivity within your network environment.
Troubleshooting common issues
While mapping a network drive is generally a straightforward process, you may encounter some common issues along the way. Here are some troubleshooting steps you can take to resolve these issues:
1. Double-check the server address: Ensure that you have entered the correct server address for the shared folder. Double-check for any typos or misspellings. If necessary, consult with your network administrator or the owner of the shared folder to confirm the server address.
2. Verify network connectivity: Ensure that your Mac is properly connected to the network. Check your internet connection and network settings. If you are using a Wi-Fi connection, check the signal strength and try reconnecting. In the case of a wired connection, ensure that the Ethernet cable is securely plugged in.
3. Check server permissions and credentials: Verify that you have the appropriate permissions to access the shared folder. If necessary, contact the network administrator or the owner of the shared folder to ensure that your credentials are correct and have the necessary access privileges.
4. Test with another user account: If you are experiencing issues with your user account, try mapping the network drive using a different user account on your Mac. This will help determine if the problem is specific to your account or a system-wide issue.
5. Restart your Mac: Sometimes, a simple restart can resolve temporary issues. Restart your Mac and try mapping the network drive again. This can help refresh system settings and resolve any conflicts that may be causing the issue.
6. Update network drive firmware: If you are experiencing issues with a specific network drive model, check if there are any firmware updates available from the manufacturer. Updating the firmware can address known bugs or compatibility issues and improve the performance of the network drive.
7. Ensure proper network configuration: Verify that your network is configured correctly, including DNS settings, firewall configurations, and any VPN connections. Ensure that the network settings on your Mac are correctly configured to connect to the network drive.
8. Troubleshoot network connectivity: If you are unable to connect to the network drive, try pinging the server IP address or running a network diagnostic tool on your Mac to identify any network connectivity issues. This can help pinpoint if there are issues with the network itself.
If you continue to experience issues mapping a network drive, it may be helpful to consult with your network administrator or IT support team. They can provide more specific guidance and troubleshoot any network-related problems to ensure a successful mapping process.