
Enable Conversation View in Gmail
In Gmail, conversations are grouped together by default, making it easier to keep track of related emails in a single thread. To forward a complete thread of emails, you’ll first need to ensure that Conversation View is enabled in your Gmail settings. Follow these simple steps to enable Conversation View:
- Open Gmail and click on the gear icon in the top right corner of the screen.
- Select “Settings” from the drop-down menu that appears.
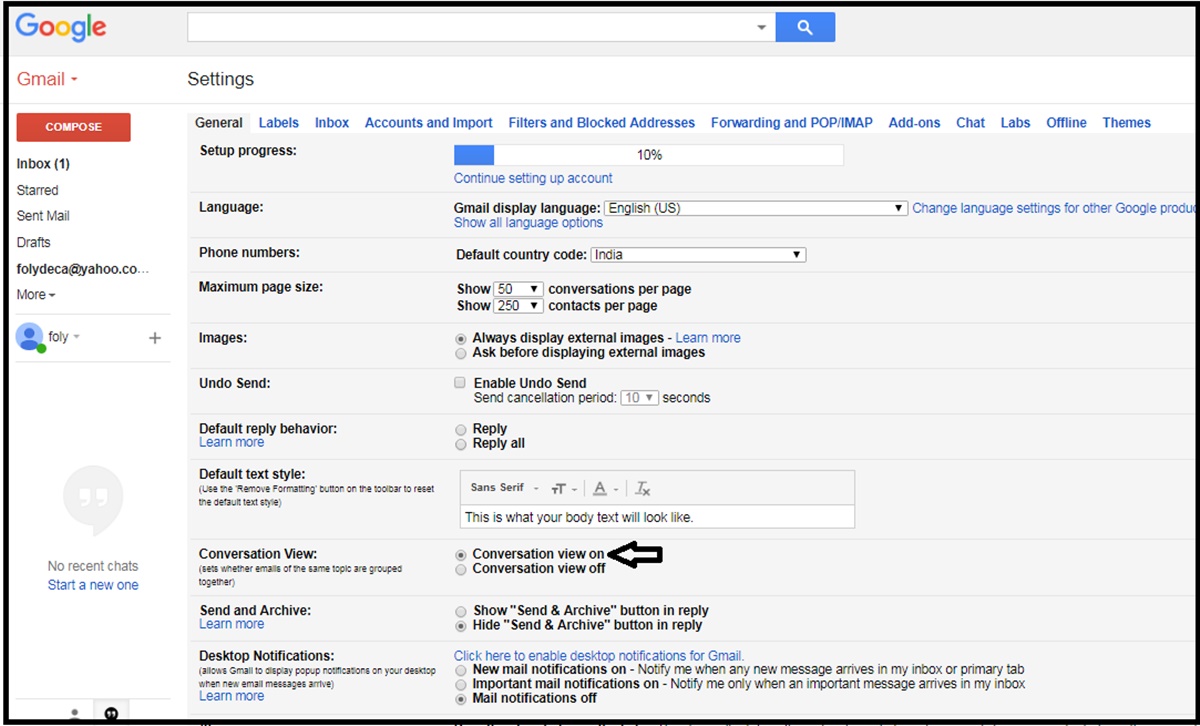
- In the “General” tab, scroll down to the “Conversation View” section.
- Make sure that the “Conversation View” option is set to “On”.
- Click on the “Save Changes” button at the bottom of the page to apply the settings.
Once you’ve enabled Conversation View, your emails will be displayed in threaded conversations, allowing you to easily view and forward complete email threads. Now that you have enabled the necessary setting, you can proceed to select the thread of emails you want to forward.
Select the Thread of Emails You Want to Forward
Now that you have enabled Conversation View in Gmail, it’s time to select the thread of emails that you want to forward. Follow these steps to selectively choose the email thread:
- Open your Gmail inbox and locate the email thread you wish to forward.
- Click on the checkbox located next to the email thread to select it. If there are multiple threads, you can select multiple checkboxes to forward them together.
- If the thread includes many emails, you may need to click on the “Expand All” option to view the entire thread.
- If you want to include all the messages within the conversation, simply proceed to the next step. However, if you only want to forward specific emails within the thread, click on the email(s) you wish to exclude to deselect them. The selected emails will be marked with a checkmark.
By carefully selecting the desired thread and, if necessary, specific emails within that thread, you can ensure that you forward only the relevant information to recipients. Once you are satisfied with your selection, proceed to the next step to learn how to forward the thread of emails in Gmail.
Click on the Forward Button
After selecting the thread of emails you want to forward, the next step is to click on the forward button. Here’s how to do it:
- In your Gmail inbox, locate the toolbar at the top of the screen.
- Click on the “Forward” button. It is typically represented by an arrow pointing to the right.
- If you have selected multiple threads, Gmail will automatically open a new compose window with the emails attached as one long thread.
- If you have only selected a single email thread, the compose window will open with that email thread attached.
By clicking on the forward button, you are starting the process of forwarding the selected thread of emails. The emails will be attached to the new compose window, allowing you to review and make any necessary modifications before sending them. In the next section, we will discuss how to review the emails before forwarding them.
Review the Emails before Forwarding
Before you hit the send button, it’s important to review the emails you are about to forward to ensure accuracy and appropriateness. Follow these steps to review the emails:
- In the new compose window with the attached thread, take a moment to carefully read through the emails. Pay attention to the content, attachments, and formatting.
- Make any necessary edits or modifications to the email content. You may want to remove unnecessary portions or add clarifications if needed.
- If there are any attachments within the thread, ensure that they are still relevant and necessary for the recipients.
- Double-check the recipient list to ensure that all the intended recipients are correctly included.
Take your time during the review process to ensure that the forwarded emails convey the intended information and that all aspects of the thread are accurate and appropriate. Once you are satisfied with the review, you can proceed to the next step to learn how to add recipients to the forwarded email.
Add Recipients to the Forwarded Email
When forwarding a thread of emails in Gmail, you have the option to add recipients to the email. Follow these steps to include additional recipients:
- In the compose window with the forwarded thread, locate the “To” field.
- Type the email addresses or names of the recipients you want to add. You can separate multiple recipients with commas.
- If you want to add recipients using their Gmail contacts, click on the “Gmail Contacts” icon located at the right end of the “To” field. This will open your contacts list, and you can select the desired contacts.
- Review the recipient list to ensure that all the intended recipients are correctly included.
By adding recipients to the forwarded email, you can share the thread of emails with others who may need the information or context. Remember to use the “To” field responsibly to respect people’s privacy and only include those who truly need to be involved. Now that you have added the recipients, the next section will discuss how you can include additional information in the forwarded email.
Include Additional Information in the Forwarded Email
When forwarding a thread of emails in Gmail, you have the option to include additional information in the forwarded email. This can be helpful to provide context or clarification to the recipients. Here’s how you can do it:
- In the compose window with the forwarded thread, locate the body of the email where you can type your message.
- Start by addressing the recipients and providing a brief introduction to the forwarded email.
- Include any necessary explanations or comments to give context to the emails in the thread.
- If there are specific points or portions of the thread that you want to highlight, use bullet points or numbered lists for clarity.
- Proofread your message to ensure clarity, accuracy, and professionalism.
By including additional information in the forwarded email, you can guide the recipients and help them understand the purpose of the thread. This is especially useful if the thread contains lengthy or complex discussions. Once you have added the necessary information, you can proceed to the next step to learn how to choose whether to include attachments in the forwarded email.
Choose Whether to Include Attachments
When forwarding a thread of emails in Gmail, you have the option to include or exclude attachments in the forwarded email. Here’s how you can choose whether to include attachments:
- In the compose window with the forwarded thread, observe the attachments that are already included in the email.
- If you want to include all the attachments, there is no action required.
- If you want to exclude certain attachments, you can manually remove them by clicking on the “X” icon next to each attachment.
- If you want to add new attachments to the forwarded email, you can click on the “Attach files” icon to browse and select the desired files from your computer.
It’s important to consider whether including attachments is necessary for recipients to fully understand the context of the thread. If the attachments are large in size, it may be more appropriate to upload them to a file-sharing platform and provide download links within the email. By carefully choosing whether to include attachments, you can ensure that the forwarded email remains concise and relevant. Once you have made your decision, you can proceed to the final step to send the forwarded email.
Send the Forwarded Email
After reviewing the emails, adding recipients, including additional information, and deciding whether to include attachments, you are ready to send the forwarded email. Follow these steps to complete the process:
- Double-check the content of the forwarded email to ensure everything is accurate and complete.
- If needed, make any final adjustments to the recipient list, email subject, or any other details.
- Click on the “Send” button located at the bottom-right corner of the compose window.
By clicking the “Send” button, the forwarded email will be sent to the recipients you specified, along with the selected thread of emails and any included attachments. It’s important to take a moment to ensure that the email is ready to be sent before clicking the button.
Once the email is sent, it will appear in your “Sent” folder, and the recipients will receive the forwarded email in their respective inboxes. Congratulations! You have successfully forwarded a complete thread of emails in Gmail.