
Enable Multiple Email Forwarding in Gmail
Gmail is a powerful email service that offers various features to enhance your email management. One useful feature is the ability to forward multiple emails at once. This can save you time and effort, especially when you need to forward multiple emails to the same recipient or group of recipients.
Enabling multiple email forwarding in Gmail is simple. Here’s how:
- Open your Gmail account and click on the gear icon in the top right corner, then select “Settings” from the dropdown menu.
- In the Settings menu, click on the “Forwarding and POP/IMAP” tab.
- Under the “Forwarding” section, click on the “Add a forwarding address” button.
- Enter the email address to which you want to forward multiple emails, then click “Next” and “Proceed” to confirm.
- A verification code will be sent to the forwarding email address. Check your inbox and enter the code in the verification box.
- Once the verification is complete, go back to the “Forwarding and POP/IMAP” tab in your Gmail settings.
- Check the box next to “Forward a copy of incoming mail to” and select the forwarding address from the dropdown menu.
- Choose whether you want to keep a copy of forwarded emails in your Gmail inbox or automatically mark them as read.
- Click “Save Changes” to apply the forwarding settings.
Now that you have enabled multiple email forwarding in Gmail, you can easily forward multiple emails with a few clicks. This feature allows you to streamline your email management process, whether you need to forward important documents, share multiple emails with a team, or send updates to a group of clients.
Forward Multiple Emails at Once
Forwarding multiple emails individually can be time-consuming and tedious. Luckily, Gmail provides a convenient way to forward multiple emails at once. Here’s how to do it:
- Open your Gmail account and log in.
- Select the emails you want to forward by checking the boxes next to them. You can select multiple emails by holding down the Ctrl key (Windows) or Command key (Mac) while clicking on each email.
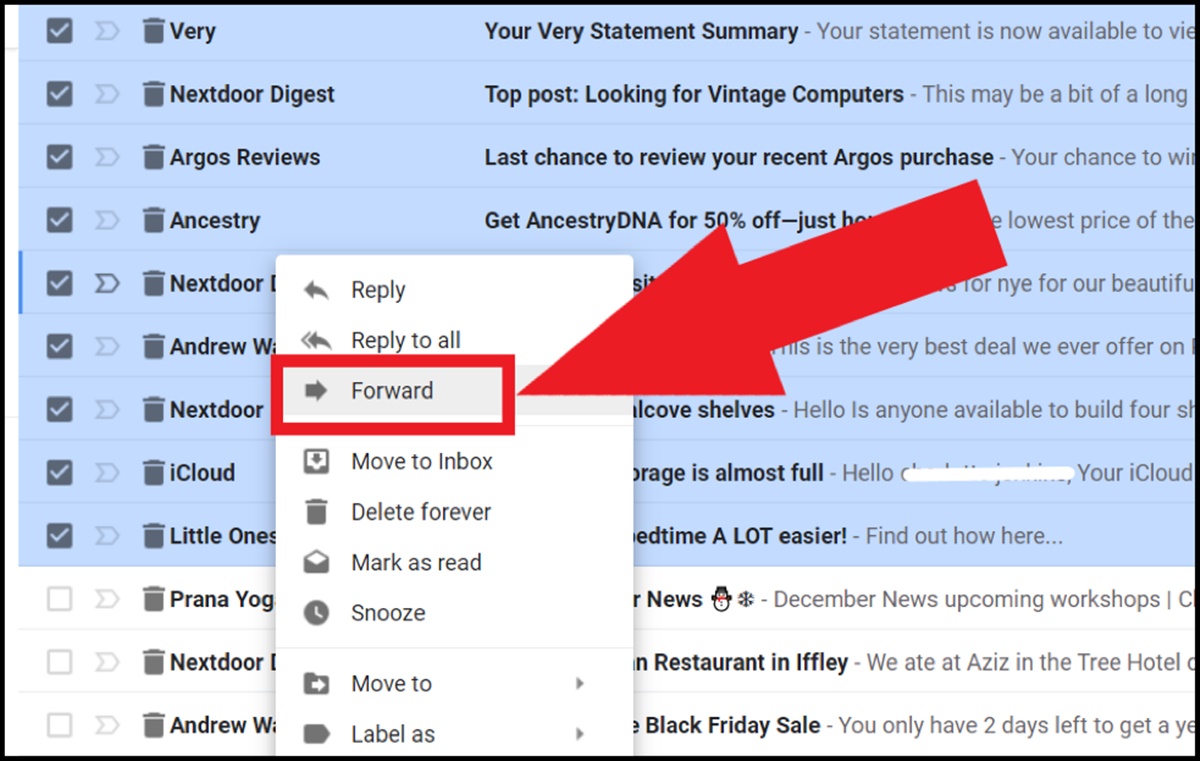
- Once you have selected the emails, click on the “Forward” button located at the top of the Gmail interface. Alternatively, you can right-click on the selected emails and choose “Forward” from the context menu.
- A new email compose window will open with the selected emails included as attachments. Enter the recipient’s email address and add any additional message you want to include.
- Click on the “Send” button to forward the selected emails to the recipient.
By following these steps, you can easily forward multiple emails at once, saving you time and effort. This feature is particularly useful when you need to share a series of related emails with someone or provide a colleague with an email thread for reference.
It’s important to note that when you forward multiple emails this way, they will be sent as separate email attachments to the recipient. This means the recipient will receive individual emails, and they can open and view each email attachment separately.
Now that you know how to forward multiple emails at once, you can efficiently share important information, collaborate with others, or provide necessary updates without having to forward each email individually.
Forward Emails with Attachments
Gmail allows you to forward emails with attachments to easily share important documents, images, or other files. Here’s how you can forward emails with attachments:
- Open your Gmail account and locate the email you want to forward.
- Click on the email to open it.
- If the email has attachments, you will see them listed below the email body. To forward the email with attachments, click on the “Forward” button as you would for a regular email.
- A new compose window will open with the original email content and attachments included.
- Enter the recipient’s email address and any additional message you want to include.
- Click on the “Send” button to forward the email with attachments.
It’s important to note that when forwarding emails with attachments, the recipient will receive both the email content and the attached files in their inbox. They can then download and access the attachments directly from the forwarded email.
Forwarding emails with attachments is particularly useful when you need to share important documents or collaborate on projects with others. Instead of downloading the attachments and sending them separately, you can simply forward the original email, preserving the context and making it easier for recipients to access the necessary files.
With Gmail’s ability to forward emails with attachments, you can share important information and files seamlessly, simplifying collaboration and communication.
Forward Emails with a Filter
Gmail offers a powerful filtering feature that allows you to automatically forward specific emails to designated recipients. With this capability, you can streamline your email workflow and ensure that important messages are forwarded to the right people without manual intervention. Here’s how to set up a filter to forward emails:
- Open your Gmail account and click on the gear icon in the top right corner, then select “Settings” from the dropdown menu.
- In the Settings menu, navigate to the “Filters and Blocked Addresses” tab.
- Click on the “Create a new filter” link to begin creating your filter.
- In the filter creation window, specify the criteria that Gmail should use to identify the emails you want to forward. You can set rules based on sender, subject, keywords, or other parameters.
- Once you have defined the filter criteria, click on the “Create filter” button.
- In the next window, select the option to “Forward it to” and enter the email address of the recipient to whom you want to forward the filtered emails.
- Optionally, you can also choose to apply the filter to existing emails that match the criteria.
- Click on the “Create filter” button to save your filter settings.
Once the filter is applied, Gmail will automatically forward any incoming emails that match the specified criteria to the designated recipient. You no longer have to manually forward these emails, saving you time and effort.
This feature is particularly useful when you want to ensure that certain types of emails, such as notifications or specific topic-related messages, are forwarded to the appropriate person or team. By setting up a filter to automate the forwarding process, you can streamline your email management and ensure efficient communication.
Create a Forwarding Rule in Gmail
Gmail provides a convenient way to create forwarding rules, which allow you to automatically forward incoming emails to specific recipients based on certain criteria. By setting up forwarding rules, you can ensure that important emails are sent to the right people without manual intervention. Here’s how to create a forwarding rule in Gmail:
- Open your Gmail account and click on the gear icon in the top right corner, then select “Settings” from the dropdown menu.
- In the Settings menu, navigate to the “Forwarding and POP/IMAP” tab.
- Under the “Forwarding” section, click on the “Add a forwarding address” button if you haven’t already added a forwarding address. Follow the prompts to input the email address you want to forward to, and verify the address.
- Once you have added a forwarding address, go back to the “Forwarding and POP/IMAP” tab.
- Click on the “Create a new filter” link.
- In the filter creation window, specify the criteria that Gmail should use to identify the emails you want to forward. You can set rules based on sender, subject, keywords, or other parameters.
- Click on the “Create filter” button to proceed to the next step.
- In the next window, select the option to “Forward it to” and choose the forwarding address you added earlier from the dropdown menu.
- Click on the “Create filter” button to save your forwarding rule.
Once the forwarding rule is created, Gmail will automatically forward any incoming emails that match the specified criteria to the designated recipient. This eliminates the need for manual forwarding and ensures that important messages are promptly sent to the right person.
Creating a forwarding rule in Gmail can be particularly beneficial when you want to ensure specific types of emails, such as those from a particular sender or with certain keywords, are forwarded to the appropriate recipient or group. By automating this process, you can streamline your email management and enhance your productivity.
Automatically Forward Emails from a Specific Sender
Gmail offers a handy feature that allows you to automatically forward emails from a specific sender to another recipient. This can be useful when you constantly receive important updates or notifications from a particular sender and want to ensure someone else is also aware of them. Here’s how to set up automatic forwarding for emails from a specific sender:
- Open your Gmail account and click on the gear icon in the top right corner, then select “Settings” from the dropdown menu.
- In the Settings menu, navigate to the “Forwarding and POP/IMAP” tab.
- Under the “Forwarding” section, click on the “Add a forwarding address” button if you haven’t already added a forwarding address. Follow the prompts to input the email address you want to forward to, and verify the address.
- Once you have added a forwarding address, go back to the “Forwarding and POP/IMAP” tab.
- Scroll down to the “Filters” section and click on the “Create a new filter” link.
- In the “From” field, enter the email address of the specific sender from whom you want to automatically forward emails.
- Click on the “Create filter” button to proceed to the next step.
- In the next window, select the option to “Forward it to” and choose the forwarding address you added earlier from the dropdown menu.
- Click on the “Create filter” button to save your forwarding settings.
Once the automatic forwarding rule is created, any new emails you receive from the specified sender will be automatically forwarded to the designated recipient. This ensures that important messages are promptly shared with the relevant parties without any manual effort.
This feature is particularly useful in situations where you need to keep others informed about specific senders’ emails, such as forwarding customer inquiries to the sales team or sharing project updates with stakeholders. By enabling automatic forwarding for emails from a specific sender, you can enhance collaboration, streamline communication, and ensure that critical information reaches the right people.
Forward Multiple Emails as an Attachment
There may be instances when you need to forward multiple emails as an attachment, preserving the original email format and content. Gmail allows you to easily accomplish this by converting multiple emails into a single email attachment. Here’s how to forward multiple emails as an attachment:
- Open your Gmail account and select the emails you want to forward as attachments by checking the boxes next to them.
- Once you have selected the emails, click on the “More” button (represented by three vertical dots) located at the top of the Gmail interface.
- In the dropdown menu, click on “Forward as attachment”.
- A new compose window will open with the selected emails attached as a single EML file.
- Enter the recipient’s email address and any additional message you want to include.
- Click on the “Send” button to forward the multiple emails as an attachment.
By following these steps, you can easily forward multiple emails as an attachment, providing recipients with a convenient way to open and view the emails within their preferred email client.
When the recipient receives the forwarded email with the EML attachment, they can simply open the attachment to access and view the original emails, including all the metadata and formatting. This method allows for a seamless transfer of multiple emails while preserving the integrity of each individual message.
Forwarding multiple emails as an attachment can be beneficial in various scenarios, such as sharing an entire email thread with someone or providing a comprehensive record of communication for reference purposes. By utilizing this feature, you can efficiently transmit multiple emails without cluttering the recipient’s inbox, ensuring a seamless and convenient experience for all parties involved.
Use Labels to Forward Specific Emails
Gmail’s labeling feature allows you to categorize and organize your emails. You can also use labels as a way to automatically forward specific emails to designated recipients. This can be especially useful when you want to streamline your email management and ensure that relevant messages are shared with the appropriate individuals. Here’s how to use labels to forward specific emails:
- Open your Gmail account and go to the email you want to set up forwarding for.
- Click on the checkbox next to the email to select it.
- In the Gmail toolbar, click on the “Labels” button (represented by a label icon) to open the labels dropdown menu.
- Click on the “Create new” option to create a label for this specific type of email.
- Enter a name for the label and click on the “Create” button.
- Now, go to the Gmail settings by clicking on the gear icon in the top right corner, then selecting “Settings” from the dropdown menu.
- In the Settings menu, navigate to the “Forwarding and POP/IMAP” tab.
- Click on the “Add a forwarding address” button if you haven’t already added a forwarding address. Follow the prompts to input the email address you want to forward to, and verify the address.
- Once you have added a forwarding address, go back to the “Forwarding and POP/IMAP” tab.
- Scroll down to the “Filters” section and click on the “Create a new filter” link.
- In the filter creation window, specify the criteria for the emails you want to forward. For example, you can set the “From” field to the specific sender that should trigger the forwarding, or you can use other parameters like keywords or subject lines.
- Click on the “Create filter” button to proceed to the next step.
- In the next window, select the checkbox next to “Apply the label:” and choose the label you created earlier from the dropdown menu.
- Check the box next to “Forward it to:” and select the forwarding address you added previously from the dropdown menu.
- Click on the “Create filter” button to save your settings.
After setting up the label and filter, any new emails that meet the specified criteria will be automatically labeled and forwarded to the designated recipient. This allows you to efficiently manage and share specific types of emails without manual intervention.
Using labels to forward specific emails can be incredibly helpful in scenarios where you receive emails from a particular sender or related to a specific topic, which need to be shared with a specific person or team. By implementing this automation, you can save time and ensure that important information is seamlessly forwarded and accessible to the appropriate recipients.
Forward and Archive Emails in Gmail
Gmail offers a practical feature that allows you to forward and archive emails simultaneously. This can be beneficial in situations where you want to share important information with others while keeping your inbox organized. Here’s how to forward and archive emails in Gmail:
- Open your Gmail account and locate the email you want to forward and archive.
- Click on the email to open it.
- In the Gmail toolbar, click on the “Forward” button to start composing a new email.
- Enter the recipient’s email address and any additional message you want to include.
- Before clicking on the “Send” button, look for the “Archive” button located in the top right corner of the email compose window.
- Click on the “Archive” button to move the original email to the archive folder.
- Click on the “Send” button to forward the email to the recipient.
By using this method, you can efficiently forward important emails while keeping your inbox clutter-free by archiving the original email. This allows you to retain a copy of the forwarded email for future reference, without the need to manually move or delete the original email.
It’s important to note that the “Archive” function in Gmail simply removes the email from the inbox and stores it in the “All Mail” or “Archive” folder. This means the email is still accessible and searchable whenever you need to refer back to it.
Forwarding and archiving emails in Gmail is particularly useful when you want to share relevant information with colleagues or stakeholders, ensuring that everyone has the necessary details while maintaining an organized and clutter-free inbox.
By utilizing this feature, you can streamline your email management, keep your inbox organized, and securely share important information with others, all with just a few simple steps.
Tips for Efficiently Forwarding Multiple Emails in Gmail
Forwarding multiple emails in Gmail can be a time-saving and efficient way to share important information or collaborate with others. To make the process even smoother, consider these helpful tips:
- Organize emails with labels: Use labels to categorize and group related emails. This makes it easier to select and forward specific groups of emails at once.
- Use the “Select All” feature: When selecting multiple emails, click on the checkbox at the top of your inbox to select all visible emails on the current page. You can then forward them simultaneously.
- Combine emails into a single message: Instead of forwarding each email individually, you can compose a new email and copy-paste the contents of multiple emails into a single message. This reduces clutter in recipients’ inboxes.
- Consider forwarding as attachments: If you want to maintain the context of each individual email, forward them as attachments. This allows recipients to open and view each email separately.
- Create filters: Use Gmail’s filtering feature to automatically forward emails that meet specific criteria. This saves time by eliminating the manual forwarding process.
- Double-check recipient addresses: Before clicking on the send button, ensure that you have entered the correct recipient email addresses to avoid any miscommunication or accidental forwarding.
- Add a personal note: Include a brief introduction or context in your forwarded email to provide recipients with a clear understanding of why you’re forwarding the emails and any additional information they may need.
- Trim unnecessary content: If the forwarded emails contain long email threads, consider trimming irrelevant or redundant parts to keep the email concise and focused on the necessary information.
- Use templates: If you frequently need to forward similar types of emails, create email templates to streamline the process. This allows you to quickly fill in the recipient’s email address and any additional details.
- Review before forwarding: Always review the content of the emails before forwarding them to ensure that you’re sending the right information and that any sensitive or confidential information is appropriately handled.
By following these tips, you can expedite the process of forwarding multiple emails in Gmail, save time, and effectively share important information with others. These strategies can help you streamline your email management, enhance collaboration, and promote efficient communication.