
Benefits of Forwarding Gmail to Another Email Address
Forwarding your Gmail to another email address can be a game changer, offering a range of benefits that can greatly improve your productivity and convenience. Whether you’re a busy professional, a student, or someone who just wants to streamline their email management, here are some key advantages of setting up email forwarding in Gmail:
- Consolidate all your emails in one place: By forwarding your Gmail to another email address, you can centralize your email communications. No more logging in and out of multiple accounts; now you can access all your emails from a single inbox, saving you time and effort.
- Backup and redundancy: Forwarding your Gmail to an alternate email address serves as a backup in case of any issues with your Gmail account. If your Gmail experiences technical difficulties or if you accidentally delete an important email, you’ll have a copy in your forwarded email inbox.
- Access your emails on the go: By forwarding your Gmail to a mobile-friendly email address, you can easily check your emails on your smartphone or tablet. This allows you to stay connected and respond promptly, even when you’re away from your computer.
- Manage emails from different accounts: If you have multiple Gmail accounts or email accounts from different providers, forwarding your emails to one central email address simplifies the process of monitoring and responding to messages. You’ll have everything in one place, making it easier to prioritize and stay organized.
- Customize your email experience: Email forwarding allows you to tailor your email management to your specific needs. You can set up filters and rules to automatically forward certain types of emails or emails from specific senders. This customization feature enables you to create a more efficient email workflow.
These are just a few of the many benefits of forwarding your Gmail to another email address. It’s a simple and effective way to streamline your email management, increase productivity, and have more control over your inbox. Now let’s explore how you can set up email forwarding in Gmail and make the most out of this feature.
How to Set Up Email Forwarding in Gmail
Setting up email forwarding in Gmail is a straightforward process that can be done in just a few steps. Follow the instructions below to get started:
- Open Gmail settings: Log in to your Gmail account and click on the gear icon in the top right corner of the screen. From the dropdown menu, select “Settings”.
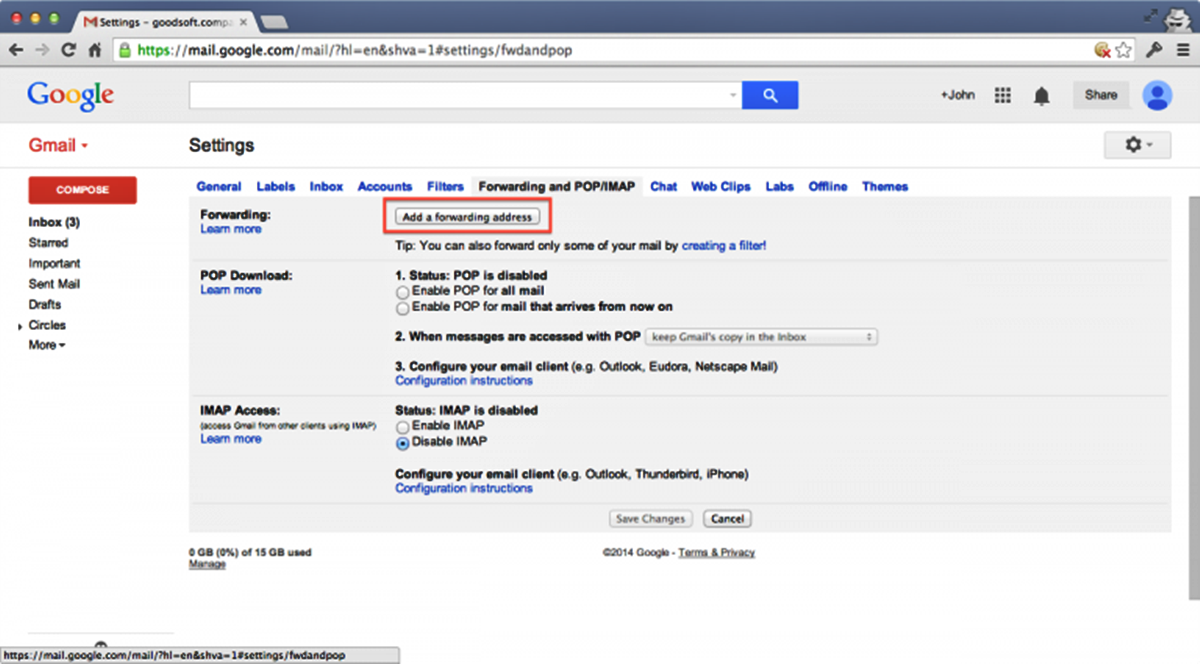
- Go to the “Forwarding and POP/IMAP” tab: In the Gmail settings, click on the “Forwarding and POP/IMAP” tab, which is located next to the “General” tab.
- Click on “Add a forwarding address”: Under the “Forwarding” section, click on the “Add a forwarding address” button. A popup window will appear.
- Enter the email address to forward to: In the popup window, enter the email address to which you want to forward your Gmail messages. Double-check the address to ensure it is correct, as any typos can lead to misdirected emails.
- Confirm the forwarding: Gmail will send a verification email to the address you entered. Go to the inbox of the forwarding address and find the verification email. Open it and click on the confirmation link provided.
- Select email forwarding options: After confirming the forwarding address, return to the “Forwarding and POP/IMAP” tab in Gmail settings. Here, you can choose how you want Gmail to handle your forwarded emails. You can keep a copy of the forwarded emails in your Gmail inbox or choose to delete them after forwarding.
- Save changes: Once you’ve selected your preferred forwarding options, scroll down to the bottom of the page and click on the “Save Changes” button to apply the settings.
That’s it! You have successfully set up email forwarding in Gmail. Now, all incoming emails to your Gmail account will be automatically forwarded to the email address you specified. Remember to periodically check the forwarding address to ensure you don’t miss any important messages.
Note that Gmail also offers the option to disable forwarding or remove any forwarding addresses you’ve set up. You can always revisit the “Forwarding and POP/IMAP” tab in Gmail settings to make changes to your email forwarding setup.
Now that you know how to set up email forwarding in Gmail, let’s explore the different types of forwarding and how to forward specific types of emails.
Forwarding All Emails vs. Selective Forwarding
When it comes to email forwarding in Gmail, you have two primary options: forwarding all incoming emails or selectively forwarding specific types of emails. Let’s take a closer look at each option and their respective benefits:
Forwarding All Emails:
Forwarding all emails means that every email you receive in your Gmail inbox will be automatically forwarded to the designated email address. This is a simple and efficient way to ensure that you never miss any important messages. It is particularly useful if you want to consolidate all your emails in one place or if you rely heavily on another email account for your daily communication.
However, it’s important to consider the potential drawbacks of forwarding all emails. If you receive a high volume of email or if you are subscribed to mailing lists and newsletters, your forwarded inbox may become cluttered with unnecessary messages. Additionally, confidential or sensitive information may inadvertently be forwarded, potentially compromising your privacy.
Selective Forwarding:
Selective forwarding allows you to choose specific types of emails to forward to another email address. This option provides more control and flexibility over which messages are forwarded. You can set up filters and rules in Gmail to automatically forward emails that meet certain criteria, such as specific senders, subject lines, or keywords. This is particularly helpful if you receive a large number of emails and only want to forward important or relevant ones.
With selective forwarding, you can effectively manage and organize your emails, ensuring that only the most relevant ones are forwarded to the designated email address. This can save you time and improve your overall email management process.
However, it’s essential to regularly review and update your filters and rules to ensure that the right emails are being forwarded. If the filters are too broad or too specific, you may inadvertently miss important messages or forward irrelevant ones.
Before deciding on the type of forwarding that suits your needs, consider your email usage patterns, the volume of incoming emails, and the level of control you want over the forwarding process. Both options have their advantages, so choose the one that aligns with your email management preferences and goals.
Now that you understand the differences between forwarding all emails and selective forwarding, let’s explore how you can set up filters to automatically forward specific types of emails in Gmail.
How to Forward Specific Emails in Gmail
If you want to forward specific types of emails in Gmail instead of forwarding all incoming emails, you can leverage Gmail’s filtering system. Filters allow you to automatically categorize and perform actions on specific emails based on criteria you set. Here’s how you can forward specific emails using filters in Gmail:
- Open Gmail settings: Log in to your Gmail account and click on the gear icon in the top right corner of the screen. From the dropdown menu, select “Settings”.
- Go to the “Filters and Blocked Addresses” tab: In the Gmail settings, click on the “Filters and Blocked Addresses” tab, which is located next to the “General” tab.
- Create a new filter: Scroll down to the bottom of the page and click on the “Create a new filter” link. A popup window will appear with various filtering options.
- Specify the criteria: In the popup window, you can set the criteria for the emails you want to forward. You can specify the sender’s email address, certain keywords in the subject or body of the email, or any other relevant criteria.
- Click on “Create filter with this search”: Once you’ve set the criteria for your filter, click on the “Create filter with this search” link at the bottom right of the window.
- Select the forwarding option: In the next window, you’ll see a list of actions you can perform on the filtered emails. Check the box next to “Forward it to” and enter the email address to which you want to forward the specified emails.
- Save the filter: After specifying the forwarding option, click on the “Create filter” button to save the filter.
From now on, any incoming emails that match the specified criteria will be automatically forwarded to the designated email address. You can create multiple filters to forward different types of emails to different email addresses, allowing for even more customization and organization.
It’s important to periodically review and update your filters to ensure they are still relevant and effective. If you no longer need to forward certain types of emails or if your criteria change, you can edit or delete the filters accordingly.
Now that you know how to forward specific emails in Gmail using filters, let’s explore how to set up filters to automatically forward emails based on certain conditions.
How to Set Up Filters to Automatically Forward Emails
Gmail’s filtering system allows you to automate the process of forwarding emails based on specific conditions. By setting up filters, you can ensure that certain emails are automatically forwarded to the desired email address. Here’s a step-by-step guide on how to set up filters to automatically forward emails in Gmail:
- Open Gmail settings: Log in to your Gmail account and click on the gear icon in the top right corner of the screen. From the dropdown menu, select “Settings”.
- Go to the “Filters and Blocked Addresses” tab: In the Gmail settings, click on the “Filters and Blocked Addresses” tab, which is located next to the “General” tab.
- Create a new filter: Scroll down to the bottom of the page and click on the “Create a new filter” link. A popup window will appear with various filtering options.
- Specify the filtering criteria: In the popup window, you can set the specific criteria for the emails you want to filter. You can choose to filter emails based on the sender’s email address, specific keywords in the subject or body, or other relevant criteria.
- Click on “Create filter with this search”: Once you’ve specified the filtering criteria, click on the “Create filter with this search” link at the bottom right of the window.
- Select the forwarding option: In the next window, you’ll see a list of actions you can perform on the filtered emails. Check the box next to “Forward it to” and enter the email address to which you want to automatically forward the filtered emails.
- Optional: Apply the filter to existing emails: If you want to apply the filter to existing emails in your Gmail inbox that match the specified criteria, check the box next to “Also apply filter to matching conversations”.
- Save the filter: After specifying the forwarding option and any other desired actions, click on the “Create filter” button to save the filter.
Once the filter is saved, Gmail will automatically forward any new incoming emails that match the specified criteria to the designated email address. You can create multiple filters to handle different types of emails and forwarding actions, allowing for a highly customized and efficient email management system.
It’s important to regularly review and manage your filters to ensure they are still relevant and effective. You can edit, delete, or disable filters as needed to adapt to changes in your email workflow.
Now that you know how to set up filters to automatically forward emails in Gmail, let’s explore how to forward Gmail to an email address outside of Gmail itself.
Forwarding Gmail to an Email Address Outside of Gmail
While Gmail is known for its robust features and user-friendly interface, you may prefer to consolidate your emails in a different email service or access them through a different email client. Thankfully, Gmail offers the capability to forward your emails to an email address outside of Gmail. Here’s how you can do it:
- Open Gmail settings: Log in to your Gmail account and click on the gear icon in the top right corner of the screen. From the dropdown menu, select “Settings”.
- Go to the “Forwarding and POP/IMAP” tab: In the Gmail settings, click on the “Forwarding and POP/IMAP” tab, which is located next to the “General” tab.
- Click on “Add a forwarding address”: Under the “Forwarding” section, click on the “Add a forwarding address” button. A popup window will appear.
- Enter the external email address: In the popup window, enter the email address to which you want to forward your Gmail messages. Double-check the address to ensure it is correct, as any typos can lead to misdirected emails.
- Confirm the forwarding: Gmail will send a verification email to the address you entered. Go to the inbox of the forwarding address and find the verification email. Open it and click on the confirmation link provided.
- Select the forwarding option for Gmail: After confirming the forwarding address, return to the “Forwarding and POP/IMAP” tab in Gmail settings. Here, you can choose how you want Gmail to handle your forwarded emails. You can keep a copy of the forwarded emails in your Gmail inbox or choose to delete them after forwarding.
- Set up email retrieval in the external email account: To receive your Gmail emails in your external email account, you’ll need to configure email retrieval. This process varies depending on the email service or email client you’re using. Generally, you’ll need to add your Gmail account as an external account and set up the necessary server and authentication settings.
- Save changes: Once you’ve selected the forwarding and retrieval options, scroll down to the bottom of the page and click on the “Save Changes” button to apply the settings.
Now, any new emails that arrive in your Gmail account will be automatically forwarded to the designated email address outside of Gmail. By setting up email retrieval in your external email account, you can access and manage your Gmail emails seamlessly.
Keep in mind that the exact steps for email retrieval may vary depending on the email service or client you’re using. It’s recommended to consult the documentation or support resources provided by your email service or client for specific instructions on how to configure email retrieval.
Now that you know how to forward Gmail to an email address outside of Gmail, let’s explore some tips and best practices for effective email forwarding in Gmail.
Tips and Best Practices for Email Forwarding in Gmail
When it comes to email forwarding in Gmail, following some tips and best practices can help you make the most out of this feature and ensure a smooth email management experience. Here are some valuable tips to consider:
- Review and update your filters regularly: As your email needs and preferences evolve, make sure to periodically review and update your filters. This will help ensure that the right emails are being forwarded and avoid forwarding unnecessary or unimportant messages.
- Use descriptive filter criteria: When setting up filters, be specific and use descriptive criteria to accurately capture the emails you want to forward. This will prevent the risk of forwarding unrelated or irrelevant emails.
- Test your filters: After creating or modifying filters, it’s a good practice to test them by sending test emails to confirm that they are working correctly. This will help you avoid any surprises and ensure that the desired emails are being forwarded.
- Be mindful of confidentiality: If you choose to forward emails containing sensitive or confidential information, ensure that the recipient email address is secure and trustworthy. It’s also recommended to consider alternative methods, such as encryption or secure file sharing, for sharing sensitive information.
- Check the forwarded email regularly: It’s essential to regularly check the email address where your Gmail messages are being forwarded to avoid missing any important emails. Create a routine to review the forwarded inbox and organize it effectively.
- Disable or remove forwarding when not needed: If you no longer require email forwarding or if your circumstances change, disable or remove the forwarding settings in Gmail. This will prevent the forwarding of emails that are no longer relevant, helping you maintain a clutter-free inbox.
- Consider archiving or deleting forwarded emails: To prevent your forwarded inbox from becoming overwhelming, consider setting filters to automatically archive or delete the forwarded emails after a certain period. This will help you maintain a cleaner and more organized mailbox.
- Regularly monitor spam and junk folders: Emails forwarded from Gmail to another email address can sometimes end up in the spam or junk folder. It’s important to periodically check these folders and mark any legitimate emails as “not spam” to ensure they reach your main inbox.
Following these tips and best practices will help you make the most out of email forwarding in Gmail. By staying organized, maintaining security, and regularly refining your forwarding settings, you can create an efficient and streamlined email management workflow.
Now that you have a good understanding of email forwarding in Gmail and some best practices, let’s explore how you can manage your forwarding settings in Gmail.
Managing Forwarding Settings in Gmail
Once you have set up email forwarding in Gmail, it’s important to know how to manage and adjust your forwarding settings as needed. Here are some key aspects to consider when managing your forwarding settings:
- Accessing the forwarding settings: To manage your Gmail forwarding settings, start by opening your Gmail account and clicking on the gear icon in the top right corner. From the dropdown menu, select “Settings” to access the Gmail settings.
- Reviewing the forwarding addresses: In the “Forwarding and POP/IMAP” tab of the Gmail settings, you will see a section titled “Forwarding”. Here you can review the email addresses to which your Gmail messages are currently being forwarded. You can also add, remove, or change the forwarding addresses as needed.
- Managing filters and forwarding rules: In the “Filters and Blocked Addresses” tab, you can manage your existing filters and create new ones. Filters allow you to automatically forward specific emails based on criteria you set. You can edit, delete, or disable filters depending on your evolving email management needs.
- Adjusting forwarding options: Under the “Forwarding and POP/IMAP” tab, you can choose the forwarding options that best suit your requirements. You can decide to keep a copy of the forwarded emails in your Gmail inbox or select the option to delete them after forwarding. You can also enable or disable forwarding if you need a temporary break.
- Testing the forwarding setup: After making any changes to your forwarding settings or filters, it’s wise to send test emails and ensure that they are being forwarded correctly. This will help you verify that the forwarding setup is functioning as intended.
- Regularly reviewing and fine-tuning: As your email needs and circumstances change, it’s important to periodically review and fine-tune your forwarding settings. This will prevent any unnecessary forwarding, ensure that important emails reach the intended recipients, and maintain an organized email management system.
Managing your forwarding settings in Gmail allows you to have control over how your emails are handled and forwarded. Regularly reviewing and adjusting these settings ensures that your forwarding setup stays effective and aligned with your email management goals.
Now that you have a good grasp of how to manage forwarding settings in Gmail, let’s explore some common issues you may encounter with email forwarding and how to troubleshoot them.
Troubleshooting Common Issues with Email Forwarding
While email forwarding can greatly improve your email management, you may encounter some common issues along the way. Understanding and troubleshooting these issues can help ensure that your email forwarding setup operates smoothly. Here are some common issues with email forwarding in Gmail and tips to resolve them:
- Verification emails not received: If you’re not receiving the verification email after adding a forwarding address, check your spam or junk folder in both your Gmail account and the forwarding email account. If you still can’t find the email, double-check the entered address for any typos and resend the verification request.
- Forwarding not working for specific emails: If certain emails are not being forwarded as expected, review your filters and ensure that the criteria you set match the specific emails you want to forward. Make sure the filters are correctly configured and there are no conflicting rules or actions applied to those emails.
- Forwarding to wrong email address: If emails are being forwarded to an incorrect or unintended email address, double-check the forwarding settings in Gmail. Ensure that the correct email address is entered and that there are no typos or inadvertent changes. Verify that the forwarding address is valid and able to receive forwarded emails.
- Forwarding loops: Occasionally, you may encounter forwarding loops where emails keep bouncing back and forth between two email addresses. To resolve this, review your forwarding settings and ensure that there are no circular forwarding rules or conflicting filters that cause the looping behavior.
- Missing forwarded emails: If you notice that certain emails are missing from the forwarded inbox, check your Gmail filters and ensure that the forwarding filters are correctly applied. Make sure that the forwarding actions are not conflicting with any other filters or actions that could prevent emails from being forwarded.
- Disabled forwarding: If forwarding suddenly stops working, verify that you haven’t accidentally disabled the forwarding settings in Gmail. Go to the Gmail settings and ensure that forwarding is still enabled and configured correctly. Additionally, check that any filters or rules associated with forwarding are still active and effective.
- Blocked or rejected forwarded emails: In some cases, forwarded emails may get blocked or rejected by the recipient’s email service or server. This can occur due to various reasons, such as spam filters or security measures. If this happens, communicate with the recipient and ask them to whitelist or allow emails from your forwarding email address.
By troubleshooting these common issues with email forwarding in Gmail, you can ensure that your forwarding setup functions reliably and as desired. Resolving any problems promptly will help you maintain an efficient and hassle-free email management system.
Now that you have a solid understanding of email forwarding in Gmail and how to troubleshoot common issues, you are well-equipped to make the most out of this feature. Remember to customize and adjust your forwarding settings based on your unique needs and preferences.
Is Forwarding Email the Right Option for You?
While email forwarding can offer numerous benefits and streamline your email management, it might not be the ideal solution for everyone. Consider the following factors to determine if email forwarding is the right option for you:
1. Email Usage: Evaluate how frequently you receive emails and from different sources. If you have multiple email accounts or receive a high volume of emails, email forwarding can help centralize your inbox and simplify your communications.
2. Consolidation: If you prefer to have all your emails in one place for easier access and organization, forwarding your emails to a single email address can be a convenient solution.
3. Email Security: Consider the sensitivity of the emails you receive and whether it’s appropriate to forward them to another email address. Ensure that the recipient’s email address is secure and protected to maintain the confidentiality of your communications.
4. Control and Customization: Email forwarding allows you to have control over which emails are forwarded. If you want to selectively forward specific types of emails, using filters and rules in Gmail can give you the flexibility and customization you need.
5. Email Management System: Assess your current email management system and determine if forwarding will improve your productivity. Consider factors such as time saved, reduction in logging in and out of multiple accounts, and better organization of your emails.
6. Compatibility with Other Email Services: If you plan to forward your Gmail emails to another email service, ensure that the receiving service supports email forwarding and offers a seamless integration. Verify that the forwarded emails appear correctly and that any attachments or formatting are preserved.
7. Regular Monitoring and Maintenance: Email forwarding requires regular monitoring to ensure that the forwarding setup is functioning properly. You’ll need to periodically review filters, test forwarding, and troubleshoot any issues that may arise. If you prefer a more hands-off approach to email management, forwarding emails may not be the best fit for you.
Consider these factors carefully to determine if email forwarding aligns with your needs and preferences. It may be helpful to try forwarding emails on a trial basis before fully committing to it, allowing you to assess its effectiveness and make any necessary adjustments.
Remember, email forwarding is not the only solution available. Depending on your specific requirements, alternative methods such as email delegation, email aliases, or email syncing across devices may be worth exploring.
Now that you’ve considered these factors, you can make an informed decision on whether email forwarding is the right option for you and your email management needs.