
Enable Private Browsing Mode on Safari
Private Browsing Mode, also known as Incognito mode, is a useful feature available on most web browsers, including Safari for iPad. When enabled, this mode prevents Safari from storing your browsing history, cookies, and other data. Enabling private browsing is a simple process:
- Open Safari from your iPad’s home screen.
- Tap on the tab switcher icon in the bottom right corner of the screen. It looks like two overlapping squares.
- Tap on the “Private” button located at the bottom left corner of the tab switcher screen. This will open a new private browsing window.
Once private browsing mode is activated, you can browse the web without leaving any traces on your device. Any websites you visit, cookies you receive, or forms you fill out will not be saved. Keep in mind that private browsing mode only applies to the Safari browser and does not affect other apps or browsers on your iPad.
It is important to note that while private browsing offers some level of privacy, it does not make you completely anonymous online. Your internet service provider, employer, or the websites you visit can still track your activities. Additionally, any bookmarks or downloads you make in private browsing mode will still be saved to your device.
To exit private browsing mode, simply close the private browsing window by tapping the “X” in the top left corner of the screen. After closing the window, Safari will resume normal browsing and your browsing history, cookies, and data will be saved as usual.
Enabling private browsing mode on Safari for iPad is a great way to protect your privacy and keep your browsing activities discreet. Whether you need to research a personal topic, shop for a surprise gift, or simply want to keep your browsing habits private, private browsing mode is a convenient feature to utilize.
Clear Cookies and Data from Safari Settings
If you want to clear cookies and data from Safari on your iPad, you can do so by following these simple steps:
- Open the Settings app on your iPad’s home screen.
- Scroll down and tap on “Safari” in the list of settings options.
- Under the Safari settings, scroll down to find the “Clear History and Website Data” option and tap on it.
- A confirmation pop-up will appear asking if you want to clear the history, cookies, and other browsing data from Safari. Tap on “Clear History and Data” to proceed.
By doing this, all the cookies and browsing data stored by Safari will be removed from your device.
It is worth mentioning that clearing your browsing data will also delete your browsing history, cache, and stored website data. This means that you may need to re-enter your login credentials on some websites, and your frequently visited websites may no longer appear in your browsing history.
If you only want to remove specific cookies from Safari, you can use an alternative method:
- Go back to the Safari settings page in the Settings app.
- Scroll down and tap on “Advanced”.
- Under the Advanced settings, tap on “Website Data”.
You will see a list of all the websites that have stored data on your device. To remove a specific website’s cookies, swipe left on its name and tap on “Delete”. Alternatively, you can tap on “Remove All Website Data” to clear all cookies and data from Safari.
By regularly clearing cookies and data from Safari, you can enhance your privacy, free up storage space on your iPad, and potentially improve your browser’s performance.
Delete Cookies and Browsing History on Chrome
If you use Google Chrome as your browser on your iPad and want to delete cookies and browsing history, the following steps will guide you through the process:
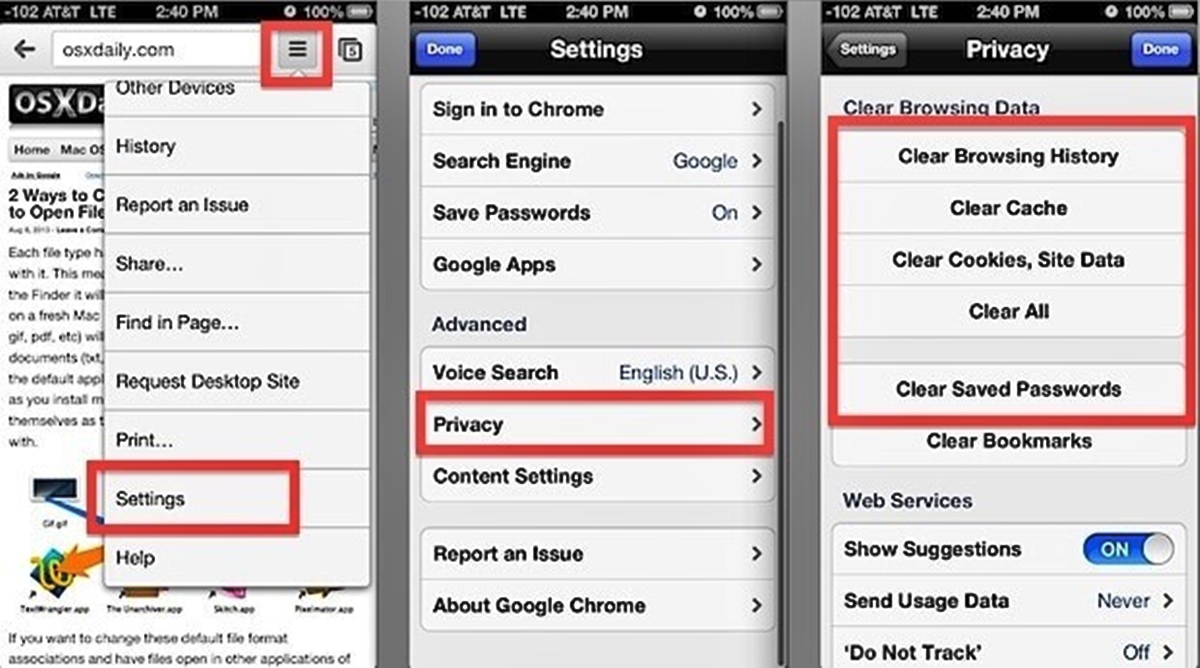
- Launch the Google Chrome app on your iPad.
- Tap the three-dot menu icon in the top-right corner of the screen.
- In the drop-down menu that appears, tap on “Settings”.
- Scroll down and tap on “Privacy” in the Settings menu.
- Under the Privacy settings, tap on “Clear Browsing Data”.
- Select the types of data you want to delete. To delete cookies, make sure the “Cookies and Site Data” option is checked.
- You can also choose to delete other browsing data such as browsing history, cached images and files, and passwords.
- Tap on the “Clear Browsing Data” button to proceed with the deletion.
Chrome will then delete the selected data, including cookies and browsing history, from your iPad.
By deleting cookies, you are essentially removing the data that websites store on your device, which can include login information, preferences, and tracking data. Clearing your browsing history removes the record of websites you have visited.
It’s important to note that deleting cookies will sign you out of websites that you have previously logged into, so be prepared to re-enter your login credentials when you revisit those sites.
Regularly deleting cookies and browsing history can help protect your privacy, enhance your browsing experience, and prevent websites from tracking your online activities. It’s a good practice to perform these clean-up tasks to maintain a clean and secure browsing environment on your iPad.
Remove Cookies and History on Firefox
If you use Mozilla Firefox as your preferred browser on your iPad and want to remove cookies and browsing history, follow these steps:
- Launch the Firefox app on your iPad.
- Tap the three-line menu icon in the bottom-right corner of the screen.
- In the menu that appears, tap on “Settings”.
- Scroll down and tap on “Clear Private Data”.
- Select the types of data you want to remove. To delete cookies and browsing history, make sure the “Cookies” and “Browsing History” options are checked.
- You can also choose to clear other types of data such as cache, passwords, and form data.
- Tap on the “Clear Data” button to confirm and proceed with the deletion.
Firefox will then delete the selected data, including cookies and browsing history, from your iPad.
Removing cookies will erase the information that websites store on your device, such as login details and website preferences. Clearing your browsing history will remove the record of websites you have visited.
Keep in mind that clearing cookies will sign you out of websites that you have previously logged into, so be prepared to re-enter your login credentials when you revisit those sites.
Regularly removing cookies and browsing history is an essential practice to maintain your privacy, keep your browsing experience clean, and prevent websites from tracking your online activities. By implementing these steps to manage your Firefox browser, you can ensure a secure and personalized browsing experience on your iPad.
Clear Cookies and Cache on Opera
If you are using the Opera browser on your iPad and want to clear cookies and cache, the steps below will help you accomplish this:
- Launch the Opera app on your iPad.
- Tap the O-shaped logo at the bottom-center of the screen to access the menu.
- In the menu that appears, tap on “Settings” at the bottom-right corner of the screen.
- Scroll down and tap on “Privacy & Security”.
- Under the Privacy & Security settings, tap on “Clear Browsing Data”.
- Select the data types you want to delete. To clear cookies and cache, make sure the “Cookies and Site Data” and “Cached Images and Files” options are selected.
- You can also choose to clear other types of data like browsing history and passwords.
- Tap on the “Clear” button to proceed with the deletion.
After completing these steps, Opera will clear the selected data, including cookies and cache, from your iPad.
Removing cookies will delete the files that websites store on your device, such as login information and site preferences. Clearing the cache will remove temporary files that Opera stores for quicker access to websites.
It is important to note that clearing cookies will log you out of websites where you were previously signed in, so you may need to re-enter your login credentials when visiting those sites again.
Regularly clearing cookies and cache can help protect your privacy, improve browsing speed, and resolve some website display issues. By following these steps, you can ensure a clean and efficient browsing experience on your iPad while using the Opera browser.
Deleting Cookies on Microsoft Edge
If you are using the Microsoft Edge browser on your iPad and want to delete cookies, you can do so by following these steps:
- Open the Microsoft Edge app on your iPad.
- Tap the three-dot more options button in the bottom-right corner of the screen.
- In the menu that appears, tap on “Settings”.
- Scroll down and tap on “Privacy & security”.
- Under the “Clear browsing data” section, tap on “Choose what to clear”.
- Check the box next to “Cookies and saved website data”.
- Optionally, you can select other types of data you want to delete, such as browsing history and cache.
- Tap on the “Clear” button to initiate the deletion process.
Microsoft Edge will then remove the selected cookies from your iPad’s storage.
Deleting cookies will remove the files that websites store on your device, such as login information and website preferences. It’s important to note that clearing cookies will sign you out of websites that you have previously logged into, so you may need to re-enter your login credentials when revisiting those sites.
Regularly deleting cookies on Microsoft Edge can help protect your privacy and enhance your browsing experience. By following the steps outlined above, you can maintain a clean and secure browsing environment on your iPad while using the Microsoft Edge browser.
Manage Cookies on Safari for iOS 13 and newer
If you are using Safari on your iPad running iOS 13 or a newer version, you can easily manage your cookies settings to enhance your privacy and browsing experience. Here’s how:
- Open the Settings app on your iPad’s home screen.
- Scroll down and tap on “Safari” in the list of settings options.
- Under the Safari settings, tap on “Block All Cookies”.
- Select “Allow from Websites I Visit” to enable cookies from websites you visit.
- You can also choose “Always Allow” to allow cookies from all websites or “Never Allow” to block all cookies.
- If you want to manage cookies for specific websites, tap on “Advanced” and then select “Website Data”.
- You will see a list of websites that have stored cookies on your device. You can swipe left on a website’s name to remove its cookies individually, or tap on “Edit” to delete multiple websites’ cookies at once.
By managing your cookies settings on Safari, you have control over which websites can store cookies on your iPad. Enabling cookies can enhance your browsing experience by allowing websites to remember your preferences and login information. However, it’s important to note that cookies can be used for tracking purposes by advertisers and other third parties.
Regularly reviewing and deleting unwanted cookies can help protect your privacy and maintain a cleaner browser environment. With iOS 13 or newer, Safari provides you with the flexibility to customize your cookie preferences based on your needs and preferences.
Take advantage of these settings to strike a balance between convenience and privacy when browsing the web on your iPad running iOS 13 or a newer version.
Manage Cookies on Safari for iOS 12 and older
If you are using an older version of iOS, specifically iOS 12 or older, managing cookies on Safari requires a slightly different approach. Here’s how you can manage cookies on Safari for iOS 12 and older:
- Open the Settings app on your iPad’s home screen.
- Scroll down and tap on “Safari” in the list of settings options.
- Under the Safari settings, you will find the “Block Cookies” option. Tap on it.
- You will see different options for managing cookies.
- Select “Always Allow” to allow cookies from all websites, “Allow from Websites I Visit” to enable cookies from websites you visit, or “Always Block” to block all cookies.
By choosing the appropriate option, you can customize your cookies settings based on your privacy preferences and browsing needs. Allowing cookies can enhance your browsing experience by allowing websites to remember your preferences and login information. However, keep in mind that cookies can also be used for tracking purposes by advertisers and other third parties.
If you want to remove cookies for specific websites, you will need to delete browsing history on Safari. Here’s how:
- Go back to the Safari settings in the Settings app.
- Scroll down and tap on “Clear History and Website Data”.
- Confirm your action by tapping on “Clear History and Data”.
This process will not only remove your browsing history but will also delete cookies stored on your iPad associated with the cleared websites.
By managing your cookies settings and clearing your browsing history, you have more control over your online privacy and ensure a cleaner browsing experience on Safari for iOS 12 and older.
Disable Automatic Cookie Storage on iPad
If you want to have more control over the cookies that are stored on your iPad, you can disable the automatic cookie storage feature. By doing so, Safari will no longer store cookies without your permission. Here’s how you can disable automatic cookie storage on your iPad:
- Open the Settings app on your iPad’s home screen.
- Scroll down and tap on “Safari” in the list of settings options.
- Under the Safari settings, you will find the “Block All Cookies” option. Toggle the switch to enable it.
Enabling “Block All Cookies” will prevent Safari from storing cookies on your iPad without your explicit permission. This gives you the ability to decide which websites can set cookies and which cannot.
Keep in mind that disabling automatic cookie storage may affect your browsing experience on certain websites. Some websites rely on cookies to provide personalized content, remember your preferences, or enable certain features. If you encounter any issues while browsing a website after blocking all cookies, you may need to adjust your settings or allow cookies for that specific website.
By disabling automatic cookie storage, you have more control over your online privacy and can selectively allow or block cookies based on your preferences. This feature allows you to have a more tailored browsing experience while ensuring that your personal information is not stored without your consent.
Be mindful of the websites you visit and the permissions you grant when managing cookies on your iPad to strike the right balance between privacy and functionality.
Clear Cookies for Specific Websites on iPad
If you want to selectively clear cookies for specific websites on your iPad, you can do so through the Safari settings. This allows you to remove cookies from specific websites while preserving cookies from others. Follow these steps to clear cookies for specific websites:
- Open the Settings app on your iPad’s home screen.
- Scroll down and tap on “Safari” in the list of settings options.
- Under the Safari settings, tap on “Advanced”.
- Tap on “Website Data”.
- You will see a list of websites that have stored data on your device.
- Swipe left on a website’s name to reveal the “Delete” option.
- Tap on “Delete” to remove the cookies and data associated with that specific website.
By deleting cookies for specific websites, you can effectively remove any stored login information, preferences, and tracking data. This can be useful when you want to start fresh on a particular website or reset your preferences for a specific online service.
It’s important to note that clearing cookies for a website will also sign you out if you were previously logged in. Therefore, you will need to re-enter your login credentials the next time you visit that website.
This method allows you to maintain control over which websites store cookies on your iPad. By selectively clearing cookies, you can manage your privacy and control the information that websites can access.
Regularly reviewing and clearing cookies for specific websites is a good practice to ensure your online privacy and maintain a clean browsing experience on your iPad.