
Overview of Private Browsing Mode
Private Browsing Mode, also known as Incognito Mode or Private Mode, is a feature available on many web browsers that allows users to browse the internet without leaving behind a trace of their online activities. When enabled, this mode prevents the browser from storing the user’s browsing history, cookies, cache, and other temporary internet files. Private Browsing Mode is useful for maintaining privacy and preventing others from accessing your browsing history on a shared device.
When you activate Private Browsing Mode, your browser creates a separate browsing session that is isolated from your regular browsing activities. This means that any websites you visit, cookies you enable, or forms you fill out will not be saved once you close the Private Browsing window or tab.
It’s important to note that while Private Browsing Mode can protect your privacy to a certain extent, it does not make you completely anonymous online. The websites you visit can still track your IP address and may collect other identifiers to create a profile of your browsing habits. Additionally, your internet service provider (ISP) and network administrators may still be able to monitor your online activities.
Private Browsing Mode is commonly used for various reasons. Some people use it to browse websites without leaving a trace on their personal devices, especially if they are using public computers or devices provided by their workplace or school. Others may use it to research sensitive topics or make online purchases without the fear of targeted advertisements or data tracking.
While Private Browsing Mode can be a helpful tool, it’s important to understand its limitations and consider other measures, such as using a virtual private network (VPN) or adjusting your privacy settings, to enhance your online privacy.
Why You Might Need to Turn Off Private Browsing Mode
Private Browsing Mode can be a useful feature for protecting your privacy while browsing the internet. However, there are certain situations where you may need to turn off Private Browsing Mode to access specific websites or use certain features. Here are a few reasons why you might need to disable Private Browsing Mode:
– Websites that require cookies: Some websites require the use of cookies to provide a personalized experience or to maintain your login credentials. By default, Private Browsing Mode disables cookies, which may prevent you from accessing certain functionality on these websites. Disabling Private Browsing Mode will allow you to enable cookies and fully utilize the features of these sites.
– Location-based services: Location-based services, such as maps or ride-sharing apps, often rely on tracking your IP address or browser history to provide accurate results. If you are using Private Browsing Mode, these services may not function as expected. Disabling Private Browsing Mode will allow these apps to access your browsing history and provide accurate location-based services.
– Parental controls: If you have parental control software installed on your device, it may conflict with Private Browsing Mode and prevent access to certain websites. Disabling Private Browsing Mode can help resolve any conflicts and allow the parental control software to function properly.
– Website login issues: Occasionally, websites may have issues with Private Browsing Mode and prevent users from logging in or accessing specific features. Turning off Private Browsing Mode can help troubleshoot these problems and allow you to log in and use the website normally.
– Web analytics and tracking: If you are a website owner or digital marketer, you may need to disable Private Browsing Mode to accurately track user behavior and gather data for analytics purposes. Private Browsing Mode can prevent the tracking codes and cookies from functioning correctly, resulting in incomplete or inaccurate data.
Remember to exercise caution when turning off Private Browsing Mode, as it removes the privacy protections that it provides. Make sure you are aware of the potential risks and only disable Private Browsing Mode when necessary or trusted websites request it.
Step-by-Step Guide to Turning Off Private Browsing Mode
If you’re using Private Browsing Mode on your iPad and you need to disable it for any reason, follow these step-by-step instructions:
Method 1: Disabling Private Browsing Mode in Safari Settings
- Open the Settings app on your iPad.
- Scroll down and tap on “Safari” to access the Safari browser settings.
- In the Safari settings, locate the “Privacy & Security” section.
- Under the “Privacy & Security” section, you’ll find the option for “Private Browsing.”
- Toggle the switch next to “Private Browsing” to turn it off.
Method 2: Closing All Incognito Tabs
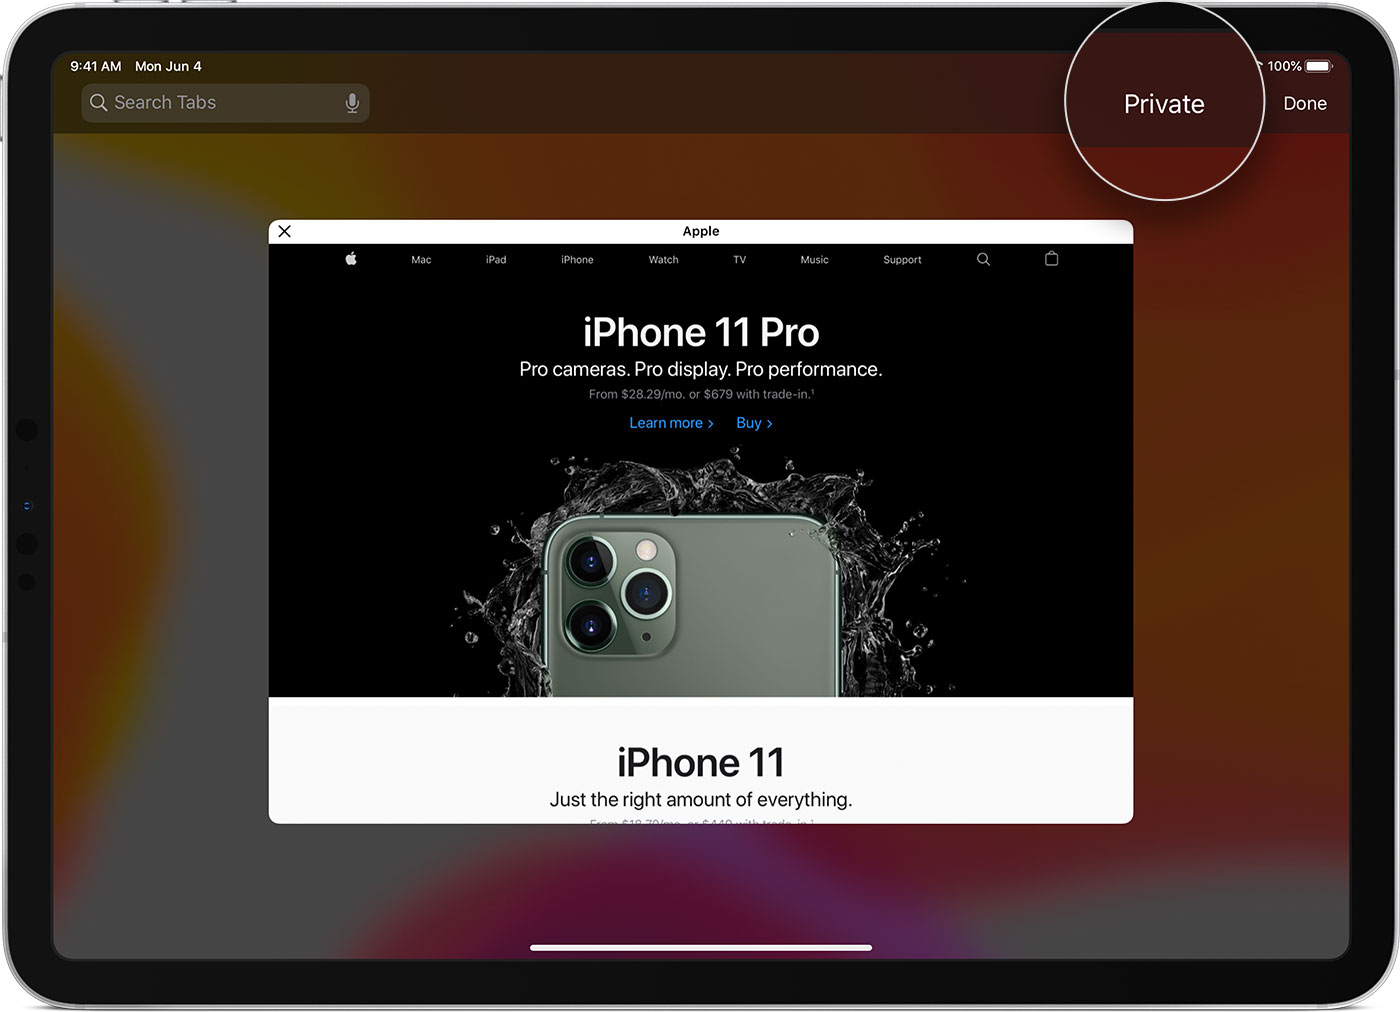
- If you have multiple private browsing tabs open in Safari, tap on the tab icon in the bottom-right corner of the Safari browser window.
- You’ll see a grid of open tabs. Tap on the “Private” button at the bottom-left corner.
- A prompt will appear, asking if you want to close all private tabs. Tap on “Close All.”
Method 3: Restarting Your iPad
- Press and hold the Power button until the Slide to Power Off option appears on the screen.
- Drag the slider to turn off your iPad.
- Wait for a few seconds, and then press and hold the Power button again to turn on your iPad.
After following any of these methods, Private Browsing Mode will be disabled on your iPad. Remember that the specific steps may vary slightly depending on your iPad model and the version of iOS you’re using.
If you need to enable Private Browsing Mode again in the future, simply follow the same steps and toggle the switch to the “On” position in the Safari settings or open a new private browsing tab.
Method 1: Disabling Private Browsing Mode in Safari Settings
Safari is the default web browser on iPads, and it offers a simple method to disable Private Browsing Mode through the Safari settings. Follow these step-by-step instructions to turn off Private Browsing Mode:
- Start by opening the Settings app on your iPad.
- Scroll down the list of settings options and locate “Safari”. Tap on it to access the Safari browser settings.
- Within the Safari settings, you’ll find various options related to browsing, security, and privacy.
- Look for the section labeled “Privacy & Security”. This is where you’ll find the settings related to Private Browsing Mode.
- Under the “Privacy & Security” section, you’ll see a toggle switch next to “Private Browsing”. By default, this switch is turned on, indicating that Private Browsing Mode is enabled.
- To disable Private Browsing Mode, simply tap on the switch to toggle it off. The switch will turn gray, indicating that Private Browsing Mode is now disabled.
Once you’ve followed these steps and turned off Private Browsing Mode in the Safari settings, any future browsing sessions will not be in private mode. Your browsing history, cookies, and other temporary internet files will be stored as usual.
Keep in mind that disabling Private Browsing Mode might be necessary in certain situations, such as accessing websites that require cookies or using location-based services. However, if your primary concern is maintaining privacy, it’s important to remember that disabling Private Browsing Mode means that your browsing activities will be saved, which could impact your privacy in the long run.
By being aware of the options available to you and understanding the potential implications, you can make informed decisions about when to disable or enable Private Browsing Mode on your iPad.
Method 2: Closing All Incognito Tabs
If you have multiple private browsing tabs open in Safari on your iPad, you can easily close all of them to turn off Private Browsing Mode. Follow these steps to close all incognito tabs:
- First, open the Safari browser on your iPad.
- In the bottom-right corner of the Safari browser window, you’ll see an icon with two squares representing the tabs. Tap on this icon to access your open tabs.
- Once you’re in the tab view, you’ll notice that the private browsing tabs are indicated by a black mask overlay on the tab thumbnails.
- At the bottom-left corner of the screen, you’ll see a button labeled “Private”. Tap on this button.
- A prompt will appear, asking if you want to close all private tabs. Tap on the “Close All” option.
After following these steps, all the private browsing tabs will be closed, and Private Browsing Mode will be disabled on your iPad.
It’s worth noting that closing all the private browsing tabs does not disable Private Browsing Mode permanently. If you open a new private browsing tab in the future, the mode will automatically re-enable. However, by following these steps, you can quickly close all private tabs and exit private browsing mode temporarily.
This method is particularly useful if you want to switch back to regular browsing and ensure that your future browsing activities are being recorded in your browsing history. Keep in mind that closing the private tabs will not clear any other browsing data, such as cookies or cache. If you want to clear these data and start fresh, you may need to use other privacy options available in Safari settings.
By knowing how to close all incognito tabs in Safari, you can easily switch back and forth between Private Browsing Mode and regular browsing to suit your privacy needs and browsing preferences on your iPad.
Method 3: Restarting Your iPad
If you’re unable to turn off Private Browsing Mode in Safari settings or close all incognito tabs, you can try restarting your iPad. Restarting your device can sometimes resolve software glitches or conflicts that may be preventing you from disabling Private Browsing Mode. Follow these steps to restart your iPad:
- Press and hold the Power button located on the top or side of your iPad.
- Hold the button until the “Slide to Power Off” option appears on the screen.
- Drag the slider from left to right to power off your iPad.
- Wait for a few seconds until the screen goes completely black.
- To turn your iPad back on, press and hold the Power button again until the Apple logo appears on the screen.
Once your iPad restarts, open the Safari browser and check if Private Browsing Mode is still enabled. In most cases, restarting your iPad should clear any temporary issues and disable Private Browsing Mode.
If restarting your iPad doesn’t resolve the issue and Private Browsing Mode is still enabled, you may need to explore other troubleshooting options, such as updating the iOS software or contacting Apple Support for further assistance. It’s also a good idea to check if there are any software updates available for your iPad, as updating to the latest version of iOS can sometimes fix bugs and improve overall device performance.
Remember that restarting your iPad may temporarily interrupt any ongoing tasks or processes, so it’s a good practice to save any unsaved work before initiating a restart.
By utilizing the method of restarting your iPad, you can potentially resolve any software-related issues and disable Private Browsing Mode, allowing you to resume regular browsing on your device.
Troubleshooting Common Issues
While disabling Private Browsing Mode on your iPad is typically a straightforward process, there are a few common issues that users may encounter. Here are some troubleshooting tips to help you overcome these issues:
– Private Browsing Mode toggle is grayed out: If you find that the toggle switch for Private Browsing Mode in Safari settings is grayed out and cannot be turned off, it could be due to restrictions set by your device’s administrator or parental controls. Check your settings to ensure that there are no restrictions in place that prevent you from disabling Private Browsing Mode.
– Private Browsing Mode re-enables automatically: If you disabled Private Browsing Mode following the provided methods but find that it re-enables automatically, it could be due to a bug or software glitch. Try updating your iPad’s software to the latest version, as software updates often include bug fixes and improvements.
– Third-party browsers: If you are using a third-party browser app on your iPad, the methods mentioned earlier may not be applicable. Each browser has its own settings and options to disable or enable private browsing. Check the settings or preferences within the specific browser app to find options related to private browsing.
– Multiple user accounts: If you’re using an iPad with multiple user accounts, it’s possible that Private Browsing Mode is enabled for another user account. Switch to the appropriate user account and follow the steps outlined to disable Private Browsing Mode.
– Resetting settings: If none of the above troubleshooting steps resolve the issue, you can try resetting the settings on your iPad. Go to Settings > General > Reset, and choose the option to Reset All Settings. Keep in mind that this will reset all settings on your iPad, so make sure to back up any important data before proceeding.
If you’re still experiencing issues with turning off Private Browsing Mode on your iPad, it’s recommended to consult the official documentation or contact the customer support for your device or browser.
By troubleshooting common issues, you can ensure that you have full control over the Private Browsing Mode on your iPad and tailor your browsing experience to your needs.