
Update Your Google Profile Name
Changing your Google profile name is a simple process that allows you to update your name across various Google services. Whether you’ve changed your legal name, want to go by a preferred name, or simply want to update your display name, follow these steps to change your Google name.
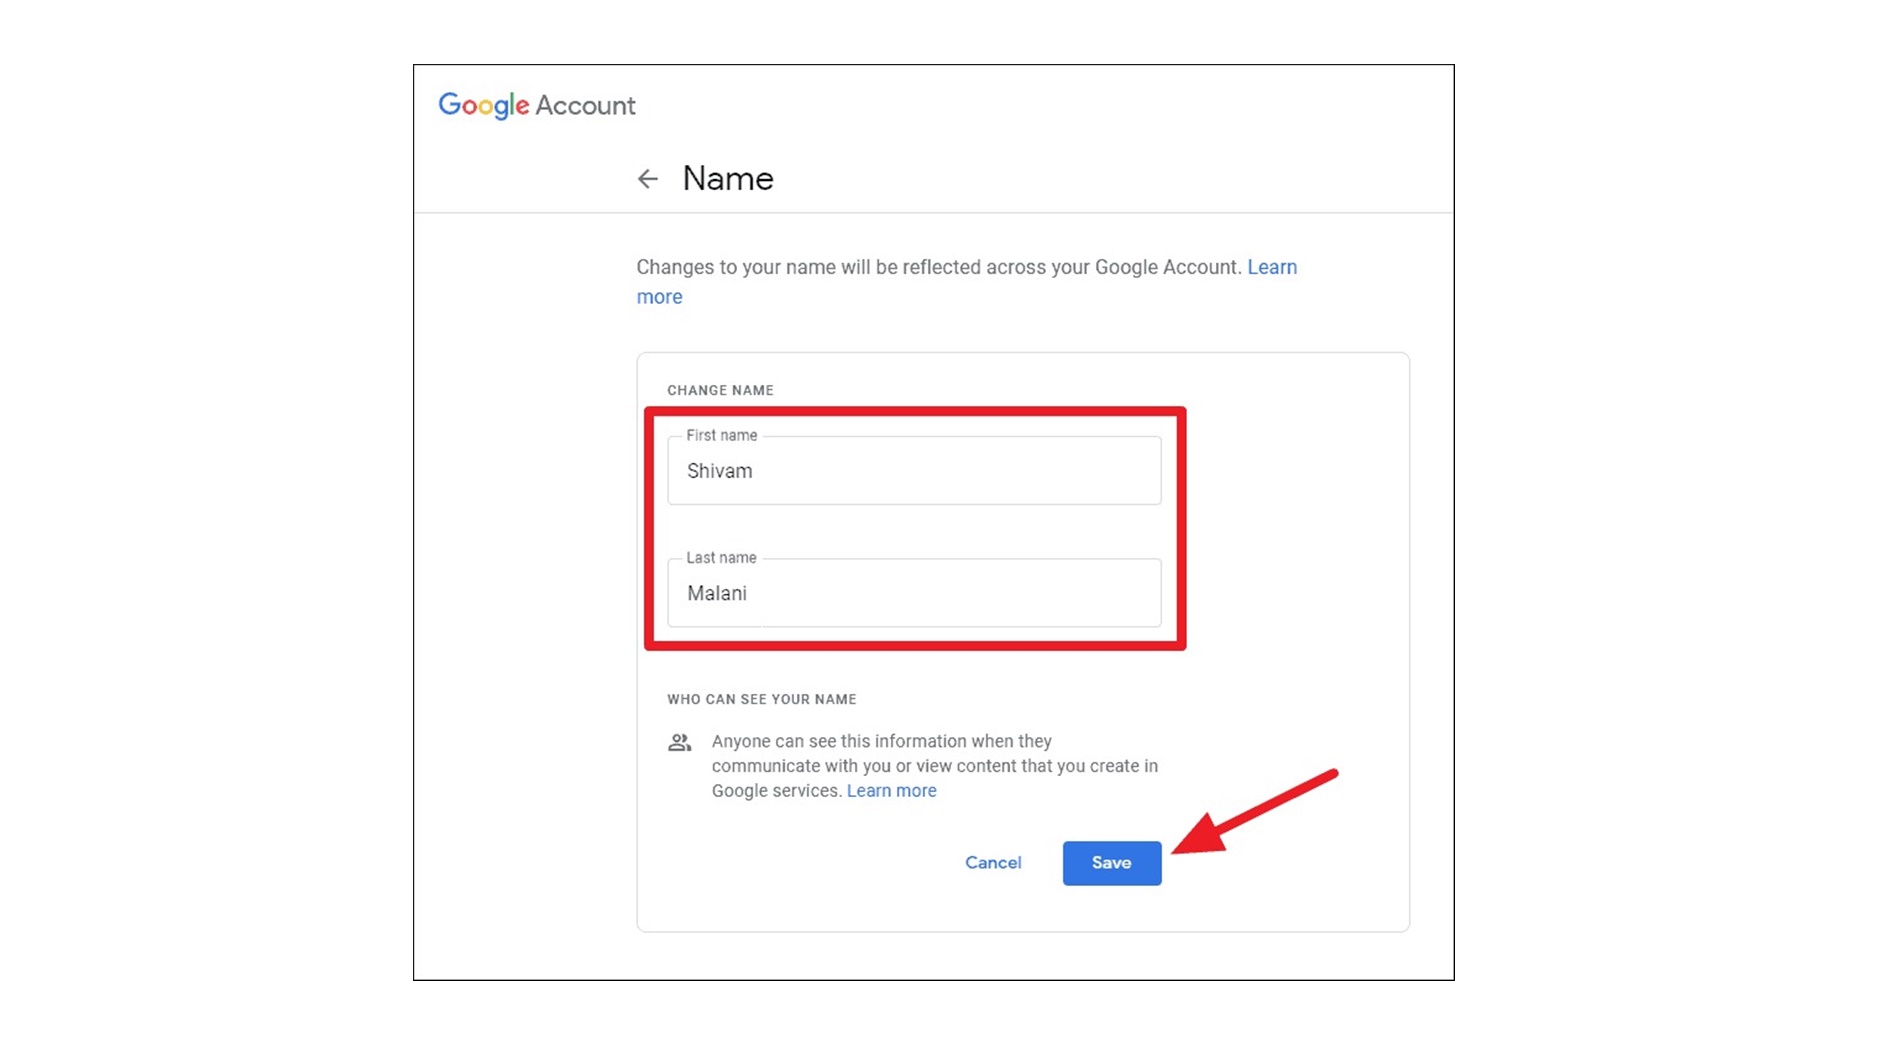
To update your Google profile name:
- Open your preferred web browser and log in to your Google account.
- Click on your profile picture in the top-right corner of the screen. A drop-down menu will appear.
- Select “Manage your Google Account” from the menu. You will be redirected to your Google Account settings.
- In the left-hand menu, click on “Personal info.”
- Scroll down to the section labeled “Profile” and click on your current name.
- Enter your desired name in the provided fields. You can update your first name, last name, or both.
- Review the name change and click on the “Save” button.
Once you have saved the changes, your Google profile name will be updated across various Google services, including Gmail, YouTube, Google Drive, and more. It may take a few minutes for the changes to propagate fully.
Updating your Google profile name not only ensures consistency across all Google services but also allows others to recognize you by your preferred name. It is especially useful if you have recently changed your name or want to display a different name than your legal name.
Remember that your Google profile name is visible to others in various Google services, so choose a name that accurately represents you and aligns with your online presence. It is always a good idea to use your real name or a recognizable variation to maintain authenticity and credibility.
Now that you know how to update your Google profile name, you can easily customize it to reflect your identity and preferences. Take a few moments to review your Google Account settings and make any necessary changes to ensure your name is up to date across all Google services.
Change Your Google Name in Gmail
Your Gmail name is the name that appears in the “From” field when you send emails and is visible to recipients. If you want to change your Google name specifically for your Gmail account, follow these simple steps.
To change your Google name in Gmail:
- Login to your Gmail account using your preferred web browser.
- Click on the gear icon in the top-right corner of the Gmail interface. A drop-down menu will appear.
- Select “Settings” from the menu. You will be directed to the Gmail settings page.
- Navigate to the “Accounts and Import” tab.
- Locate the section labeled “Send mail as” and click on the “Edit info” link next to your desired email address.
- In the “Name” field, enter the new name that you want to use.
- Click on the “Save Changes” button to apply the new name to your Gmail account.
Please note that changing your Google name in Gmail will only affect the name displayed when you send emails. It does not change your Google profile name or your name in other Google services.
By updating your Google name in Gmail, you can ensure that your emails are sent with the desired name and reflect your personal or professional identity. Take the time to review and customize your Gmail settings to best represent yourself to recipients.
Remember that when choosing a name for your Gmail account, it is important to consider professionalism and clarity. Using a name that is recognizable and easy to remember will help recipients recognize your emails more easily and avoid confusion.
Now that you know how to change your Google name in Gmail, take advantage of this feature to tailor your email communications and make a positive impression on your contacts.
Edit Your Google Account Name in YouTube
Your Google Account name is directly associated with your YouTube channel and is displayed when you comment, upload videos, or interact with others on the platform. If you want to edit your Google Account name specifically for YouTube, follow these simple steps.
To edit your Google Account name in YouTube:
- Open your preferred web browser and navigate to YouTube.
- Make sure you are signed in to your Google Account by clicking on the profile icon in the top-right corner of the YouTube interface.
- Click on “Settings” from the drop-down menu that appears. You will be directed to the YouTube settings page.
- In the left-hand menu, click on “Channel” and then select “Basic info.”
- Locate the “Details” section and click on the “Edit” button next to your name.
- Enter the new name that you want to use in the provided fields.
- Review the changes and click on the “Save” button to apply the new name to your YouTube channel.
After saving the changes, your Google Account name will be updated in YouTube, and it will be displayed when you comment on videos, upload content, or engage with the YouTube community.
It’s important to note that changing your Google Account name in YouTube will also reflect the updated name in associated Google services, such as Gmail and Google Drive.
Keep in mind that using a recognizable name on YouTube can help you build your personal brand, connect with your audience, and establish a positive online presence. Choose a name that accurately represents you and aligns with your content and goals.
Now that you know how to edit your Google Account name in YouTube, take the opportunity to personalize your channel and create a cohesive online identity across platforms.
Modify Your Google Name in Google Drive
Your Google name is also associated with your Google Drive account, where you store and manage your files and documents. If you want to modify your Google name specifically for Google Drive, follow these simple steps.
To modify your Google name in Google Drive:
- Open your preferred web browser and go to Google Drive.
- Ensure that you are signed in to your Google Account by clicking on the profile icon in the top-right corner of the Google Drive interface.
- Click on “Settings” from the drop-down menu that appears. You will be directed to the Google Drive settings page.
- In the left-hand menu, click on “General.”
- Locate the “Name” section and click on the “Edit” button next to your current name.
- Enter the new name that you want to use in the provided fields.
- Click on the “Save” button to apply the new name to your Google Drive account.
Once you have saved the changes, your Google name will be modified in Google Drive, and it will be displayed in the top-right corner of the interface and in file sharing options.
It’s important to remember that modifying your Google name in Google Drive will also reflect the updated name in other Google services, such as Gmail and YouTube.
Choose a name that accurately represents you and aligns with your professional identity or personal preferences. A recognizable and meaningful name can make it easier for you to identify and manage your files in Google Drive.
Now that you know how to modify your Google name in Google Drive, take the opportunity to customize it and make your file management experience more personalized and convenient.
Change Your Name in Google Calendar
If you want to change your name in Google Calendar to reflect your preferred or updated name, you can easily do so by following these steps.
To change your name in Google Calendar:
- Open your preferred web browser and access Google Calendar.
- Ensure that you are signed in to your Google Account by clicking on the profile icon in the top-right corner of the Google Calendar interface.
- Click on the “Settings” gear icon located in the top-right corner of the screen. A drop-down menu will appear.
- Select “Settings” from the menu. You will be redirected to the Google Calendar settings page.
- In the left-hand menu, click on “General.”
- Locate the “Personal Settings” section and find the “Display Name” field.
- Enter your desired name in the provided field. This new name will be displayed in Google Calendar.
- Click on the “Save” button to apply the changes to your Google Calendar account.
After saving the changes, your new name will be updated in Google Calendar and will be visible when you schedule events, create invitations, or collaborate with others through the platform.
Remember that changing your name in Google Calendar may also impact the name displayed in other Google services like Gmail, Google Drive, and YouTube.
Choose a name that accurately represents you and aligns with your personal or professional identity. Using a recognizable name will make it easier for others to identify you when viewing calendar invites or collaborating on events.
Now that you know how to change your name in Google Calendar, take the time to customize your profile and make your calendar experience more personalized and engaging.
Customize Your Google Name in Google Photos
Google Photos allows you to store, organize, and share your photos and videos. If you want to customize your Google name specifically for Google Photos, follow these steps.
To customize your Google name in Google Photos:
- Open your preferred web browser and go to Google Photos.
- Ensure that you are signed in to your Google Account by clicking on the profile icon in the top-right corner of the Google Photos interface.
- Click on the “Settings” gear icon located in the top-right corner of the screen. A drop-down menu will appear.
- Select “Settings” from the menu. You will be redirected to the Google Photos settings page.
- In the “Library” tab, locate the “Profile photo” section and click on the “Edit” button.
- Upload or choose a photo that you want to set as your profile picture in Google Photos.
- In the “Name” field, enter the desired customized name that you want to use in Google Photos.
- Click on the “Save” button to apply the changes to your Google Photos account.
After saving the changes, your customized Google name will be updated in Google Photos and will be visible when you interact with your photos, albums, and shared content.
Keep in mind that customizing your Google name in Google Photos may also affect the name displayed in other Google services, such as Gmail, Google Drive, and YouTube.
Choose a name and profile photo that best represent you and your photographic style. A personalized name and picture can make your Google Photos experience more enjoyable and help others recognize your content.
Now that you know how to customize your Google name in Google Photos, take the opportunity to make your photo library more personal and showcase your unique identity.
Update Your Google Name in Google Play Store
If you want to update your Google name specifically for the Google Play Store, it’s a straightforward process that can be done by following these simple steps.
To update your Google name in the Google Play Store:
- Open the Google Play Store app on your Android device.
- Tap on the menu icon (three horizontal lines) in the top-left corner of the screen to open the side menu.
- Tap on “Settings” from the menu.
- In the settings menu, select “Account” or “Account preferences.”
- Tap on your Google account.
- Tap on “Edit account details” or “Personal info.”
- Locate the “Name” section and tap on the pencil icon or the “Edit” button next to your current name.
- Enter the new name that you want to use in the provided fields.
- Tap on the “Save” button to apply the changes to your Google Play Store account.
Once you’ve saved the changes, your updated Google name will be displayed in the Google Play Store when you browse or purchase apps, as well as in your app reviews.
It’s important to note that updating your Google name in the Google Play Store may also reflect the changed name in other Google services, such as Gmail, Google Drive, and YouTube.
Choose a name that best represents you and that you are comfortable using in the Google Play Store. It’s a great opportunity to showcase your personal style or professional identity.
Now that you know how to update your Google name in the Google Play Store, take the time to personalize it and enhance your app browsing and reviews experience.
Adjust Your Google+ Profile Name
Google+ was a social networking service provided by Google. Although Google+ is no longer available for consumer users, if you were a user of Google+ and want to adjust your profile name, you could have followed these steps.
To adjust your Google+ profile name:
- Open your preferred web browser and go to the Google+ website.
- Ensure that you are signed in to your Google Account.
- Click on your profile picture or initial in the top-right corner of the Google+ interface. A drop-down menu will appear.
- Select “Settings” from the menu. You will be directed to the Google+ settings page.
- In the left-hand menu, click on “Profile.”
- Locate your current profile name and click on the “Edit” button or the pencil icon next to it.
- Enter the new name that you want to use in the provided fields.
- Click on the “Save” button to apply the changes to your Google+ profile name.
Updating your Google+ profile name allowed you to personalize your profile and make it reflect your preferred name or updated identity.
It’s important to note that Google+ is no longer actively used, but you might still see the adjusted name if there are any instances where your Google+ profile name is displayed, such as in past interactions or comments.
If you’re looking for a social networking platform, consider exploring other popular platforms like Facebook, Instagram, or Twitter, which provide a wide range of features for connecting with others and sharing content.
Now that you know how to adjust your Google+ profile name, you can apply similar steps to update your name across other Google services where applicable.
Change Your Name in Chrome Browser
If you want to change your name in the Chrome browser, you can do so by following these simple steps.
To change your name in the Chrome browser:
- Open the Chrome browser on your computer.
- Click on the three-dot menu icon in the top-right corner of the browser window.
- From the drop-down menu, select “Settings.” You will be directed to the Chrome settings page.
- In the “People” section, click on “Sync and Google services.”
- On the next page, click on the “Sync” option.
- Under the “People” section, click on your profile picture or the pencil icon next to your name.
- Enter the new name that you want to use in the provided fields.
- Click on the “Done” button to apply the changes to your Chrome browser.
Now, whenever you sign in to Chrome with your Google account, your updated name will be displayed in the browser. It’s worth noting that changing your name in Chrome will not affect your Google account name or the name displayed in other Google services.
Changing your name in the Chrome browser can be a helpful way to easily personalize your browsing experience. Whether you want to use your preferred name, a nickname, or an updated name, Chrome allows you to customize it to your preference.
Additionally, if you have different users in Chrome with separate profiles, each user can have a unique name associated with their profile.
Now that you know how to change your name in the Chrome browser, take a moment to update it and make your browsing experience more personalized and enjoyable.
Modify Your Google Name in Google Maps
If you want to modify your name specifically for Google Maps, follow these simple steps to change it.
To modify your Google name in Google Maps:
- Open your preferred web browser and go to Google Maps.
- Ensure that you are signed in to your Google Account.
- Click on the menu icon (three horizontal lines) in the top-left corner of the Google Maps interface to open the side menu.
- From the side menu, select “Your Profile.” You will be directed to the Google Maps profile page.
- Click on the pencil icon or the “Edit Profile” button.
- In the name fields, enter the new name that you want to use for Google Maps.
- Click on the “Save” button to apply the changes to your Google Maps profile.
Once the changes are saved, your modified Google name will be displayed on your Google Maps profile and any contributions you make on the platform, such as ratings, reviews, or added locations, will reflect the updated name.
Keep in mind that modifying your Google name on Google Maps may also update your name in other Google services, such as Gmail, Google Drive, YouTube, and more, as they are connected to your Google Account.
It’s important to choose a name that accurately represents you and aligns with your online identity. Using a recognizable name can help others easily identify you and your contributions on Google Maps.
Now that you know how to modify your Google name in Google Maps, take the opportunity to personalize your profile and make your presence on the platform more distinct and meaningful.
Update Your Google Name in Google Docs
If you want to update your Google name specifically for Google Docs, follow these simple steps to change it.
To update your Google name in Google Docs:
- Open your preferred web browser and go to Google Docs.
- Ensure that you are signed in to your Google Account.
- Click on the menu icon (three horizontal lines) in the top-left corner of the Google Docs interface to open the side menu.
- From the side menu, select “Settings.” You will be directed to the Google Docs settings page.
- In the settings menu, click on “General.”
- Locate the “Name” section and click on the “Edit” button or the pencil icon next to your current name.
- Enter the new name that you want to use in the provided fields.
- Click on the “Save” button to apply the changes to your Google Docs account.
After saving the changes, your updated Google name will be displayed in Google Docs whenever you create, edit, or share documents.
It’s important to note that updating your Google name in Google Docs may also reflect the changed name in other Google services, such as Gmail, Google Drive, YouTube, and more.
Choose a name that best represents you and that you are comfortable using in your document collaborations. A recognizable and meaningful name can make it easier for others to identify you as the author or collaborator of a document.
Now that you know how to update your Google name in Google Docs, take the opportunity to customize it and make your document editing and collaboration experience more personalized and engaging.
Customize Your Google Name in Google Sheets
If you want to customize your Google name specifically for Google Sheets, follow these steps to change it.
To customize your Google name in Google Sheets:
- Open your preferred web browser and go to Google Sheets.
- Ensure that you are signed in to your Google Account.
- Click on the menu icon (three horizontal lines) in the top-left corner of the Google Sheets interface to open the side menu.
- From the side menu, select “Settings.” You will be directed to the Google Sheets settings page.
- In the settings menu, click on “General.”
- Locate the “Name” section and click on the “Edit” button or the pencil icon next to your current name.
- Enter the new name that you want to use in the provided fields.
- Click on the “Save” button to apply the changes to your Google Sheets account.
After saving the changes, your customized Google name will be displayed in Google Sheets whenever you create, edit, or share spreadsheets.
Remember that customizing your Google name in Google Sheets may also update your name in other Google services, such as Gmail, Google Drive, YouTube, and more, as they are interconnected.
Choose a name that accurately represents you and aligns with your professional or personal identity. A recognizable and meaningful name can make it easier for others to identify you as a contributor or collaborator in spreadsheets.
Now that you know how to customize your Google name in Google Sheets, take the opportunity to personalize it and make your spreadsheet experiences more distinctive and engaging.
Change Your Name in Google Slides
If you want to change your name in Google Slides to personalize your presentations, you can do so by following these steps.
To change your name in Google Slides:
- Open your preferred web browser and go to Google Slides.
- Sign in to your Google Account if you are not already signed in.
- Click on the menu icon (three horizontal lines) in the top-left corner of the Google Slides interface to open the side menu.
- From the side menu, select “Settings.” You will be directed to the Google Slides settings page.
- In the settings menu, click on “General.”
- Locate the “Name” section and click on the “Edit” button or the pencil icon next to your current name.
- Enter your desired name in the provided fields.
- Click on the “Save” button to apply the changes to your Google Slides account.
Once the changes are saved, your new name will be displayed in Google Slides whenever you create or share presentations.
It’s important to note that changing your name in Google Slides may also update the name in other Google services, such as Gmail, Google Drive, YouTube, and more, depending on their interconnectedness with your Google Account.
Choose a name that accurately represents you and aligns with your professional or personal identity. A recognizable name can help others identify you as the presenter or creator of the slides.
Now that you know how to change your name in Google Slides, take the opportunity to customize it and make your presentations more personalized and impactful.
Modify Your Google Name in Google Forms
If you want to modify your Google name specifically for Google Forms, follow these steps to change it.
To modify your Google name in Google Forms:
- Open your preferred web browser and go to Google Forms.
- Ensure that you are signed in to your Google Account.
- Click on the menu icon (three horizontal lines) in the top-left corner of the Google Forms interface to open the side menu.
- From the side menu, select “Settings.” You will be directed to the Google Forms settings page.
- In the settings menu, click on “General.”
- Locate the “Name” section and click on the “Edit” button or the pencil icon next to your current name.
- Enter the new name that you want to use in the provided fields.
- Click on the “Save” button to apply the changes to your Google Forms account.
Once the changes are saved, your modified Google name will be displayed in Google Forms whenever you create, edit, or share forms.
It’s important to note that modifying your Google name in Google Forms may also update your name in other Google services, such as Gmail, Google Drive, YouTube, and more, depending on the interconnectedness of those services with your Google Account.
Choose a name that accurately represents you and aligns with your professional or personal identity. Having a recognizable name can help respondents identify you as the form creator or owner.
Now that you know how to modify your Google name in Google Forms, take the opportunity to personalize it and make your form-building experience more distinctive and engaging.
Update Your Google Name in Google Hangouts
If you want to update your Google name specifically for Google Hangouts, follow these steps to change it.
To update your Google name in Google Hangouts:
- Open your preferred web browser and go to Google Hangouts.
- Ensure that you are signed in to your Google Account.
- In the left-hand menu, click on your current name or the profile picture. A menu will appear.
- Select “Settings” from the menu. You will be directed to the Google Hangouts settings page.
- In the “General” section, click on the “Edit” button or the pencil icon next to your name.
- Enter the new name that you want to use in the provided fields.
- Click on the “Save” button to apply the changes to your Google Hangouts account.
After saving the changes, your updated Google name will be displayed in Google Hangouts whenever you chat or make video calls.
It’s important to note that updating your Google name in Google Hangouts may also reflect the changed name in other Google services, such as Gmail, Google Drive, YouTube, and more, as these services are interconnected.
Choose a name that accurately represents you and aligns with your personal or professional identity. Having a recognizable name can help your contacts easily identify you in conversations and video calls.
Now that you know how to update your Google name in Google Hangouts, take the opportunity to personalize it and make your Hangouts experience more personal and engaging.
Customize Your Google Name in Google Meet
If you want to customize your Google name specifically for Google Meet, follow these steps to change it.
To customize your Google name in Google Meet:
- Open your preferred web browser and go to Google Meet.
- Ensure that you are signed in to your Google Account.
- Click on the gear icon or the three-dot menu in the bottom-right corner of the Meet interface.
- From the menu that appears, select “Settings.”
- In the settings menu, click on your name to edit it.
- Enter the new name that you want to use in the provided fields.
- Click on the “Save” button to apply the changes to your Google Meet account.
After saving the changes, your customized Google name will be displayed in Google Meet whenever you join meetings or conduct video conferences.
It’s important to note that customizing your Google name in Google Meet may also update your name in other Google services, such as Gmail, Google Drive, YouTube, and more, depending on the interconnectedness with your Google Account.
Choose a name that accurately represents you and aligns with your personal or professional identity. Having a recognizable name can help participants easily identify you during meetings and discussions.
Now that you know how to customize your Google name in Google Meet, take the opportunity to personalize it and make your video conferencing experience more personalized and engaging.
Change Your Name in Google Contacts
To change your name in Google Contacts, follow these steps:
To change your name in Google Contacts:
- Open your preferred web browser and go to Google Contacts.
- Sign in to your Google Account.
- Click on the “Contacts” tab on the left-hand side of the screen to access your contacts.
- Locate your name in the contacts list and click on it to open the contact details.
- Click on the “Edit” button or the pencil icon next to your name.
- Enter the new name that you want to use in the provided fields.
- Review the changes and click on the “Save” button to apply the changes to your Google Contacts.
After saving the changes, your updated name will be displayed in Google Contacts and will be visible when you view or interact with your contacts’ information.
It is important to note that changing your name in Google Contacts may also update your name in other Google services, such as Gmail, Google Drive, YouTube, and more, as these services are interconnected through your Google Account.
Choose a name that accurately represents you and ensure it aligns with your professional or personal identity. Having a recognizable name in your contacts can make it easier for you to identify and manage your contacts effectively.
Now that you know how to change your name in Google Contacts, take the opportunity to update it and make your contact management experience more personalized and efficient.
Modify Your Google Name in Google Keep
If you want to modify your Google name specifically for Google Keep, follow these steps to change it.
To modify your Google name in Google Keep:
- Open your preferred web browser and go to Google Keep.
- Ensure that you are signed in to your Google Account.
- Click on the menu icon (three horizontal lines) in the top-left corner of the Google Keep interface to open the side menu.
- From the side menu, select “Settings.” You will be directed to the Google Keep settings page.
- In the settings menu, click on your current name to edit it.
- Enter the new name that you want to use in the provided fields.
- Click on the “Save” button to apply the changes to your Google Keep account.
After saving the changes, your modified Google name will be reflected in Google Keep whenever you create or access your notes and lists.
Keep in mind that modifying your Google name in Google Keep may also update your name in other Google services, such as Gmail, Google Drive, YouTube, and more, depending on the interconnectedness of those services with your Google Account.
Choose a name that accurately represents you and aligns with your personal or professional identity. A recognizable name can help you easily identify and organize your notes and ensure a more personalized experience with Google Keep.
Now that you know how to modify your Google name in Google Keep, take the opportunity to personalize it and make your note-taking and organization more distinctive and engaging.
Update Your Google Name in Google News
If you want to update your Google name specifically for Google News, follow these steps to change it.
To update your Google name in Google News:
- Open your preferred web browser and go to Google News.
- Ensure that you are signed in to your Google Account.
- Click on the profile icon or your profile picture in the top-right corner of the Google News interface.
- Click on “Manage accounts on this device” or “Manage your Google Account” from the dropdown menu. You will be directed to your Google Account settings.
- In the left-hand menu, click on “Personal info.”
- Scroll down to the section labeled “Profile” and click on your current name.
- Edit your name by entering the new name that you want to use in the provided fields.
- Click on the “Save” button to apply the changes to your Google News account.
After saving the changes, your updated Google name will be displayed in Google News, ensuring consistency across articles, personalized recommendations, and other features within the platform.
It’s important to note that updating your Google name in Google News may also update your name in other Google services, such as Gmail, Google Drive, YouTube, and more, as they are linked to your Google Account.
Choose a name that accurately represents you and aligns with your professional or personal identity. A recognizable name can contribute to building a trusted online presence.
Now that you know how to update your Google name in Google News, take the opportunity to personalize your experience and engage with relevant news articles that cater to your interests and preferences.
Customize Your Google Name in Google Podcasts
If you want to personalize your Google name specifically for Google Podcasts, you can do so by following these steps.
To customize your Google name in Google Podcasts:
- Open the Google Podcasts app on your Android device or visit the Google Podcasts website on your web browser.
- Ensure that you are signed in to your Google Account.
- Tap on the menu icon (three horizontal lines) in the top-left corner of the app or website to open the side menu.
- From the side menu, select “Settings.”
- In the settings menu, locate the “Preferences” section.
- Tap on your current name to edit it.
- Enter the new name that you want to use in the provided fields.
- Tap on the “Save” button to apply the changes to your Google Podcasts account.
After saving the changes, your customized Google name will be displayed in Google Podcasts whenever you listen to or interact with podcasts through the platform.
It’s important to note that customizing your Google name in Google Podcasts may also update your name in other Google services, such as Gmail, Google Drive, YouTube, and more, depending on the interconnectedness of those services with your Google Account.
Choose a name that accurately represents you, aligns with your personal or professional identity, and stands out in the podcasting community. A recognizable name can help listeners easily identify your contributions or preferences.
Now that you know how to customize your Google name in Google Podcasts, take the opportunity to personalize your podcast listening experience and engage with content that resonates with your interests and passions.
Change Your Name in Google Search
If you want to change how your name appears in Google search results, you can follow these steps to update it.
To change your name in Google Search:
- Open your preferred web browser and go to the Google Search Knowledge Graph.
- Ensure that you are signed in to your Google Account.
- Click on the “Feedback” option located at the bottom-right corner of the Knowledge Graph panel, next to your name.
- In the feedback form, provide a brief explanation of the name change you want to make and the reason behind it.
- Submit the feedback form to send your request to Google.
Google will review your feedback and take it into consideration when updating the information displayed in the Knowledge Graph panel. However, it’s important to keep in mind that Google has its own criteria for displaying information, and the process of updating your name may vary.
Beyond providing feedback to Google, it’s also important to proactively manage your online presence. You can do this by creating and regularly updating professional profiles on social media platforms and professional networking sites. By doing so, you can have more control over how your name is displayed when people search for you online.
Remember that while you can request a name change in Google Search, it’s ultimately up to Google to decide whether to make the change or not. Therefore, it’s essential to maintain consistency across all online platforms and ensure that your preferred name is reflected accurately in various digital channels to enhance your personal brand.
Now that you know how to request a name change in Google Search, take the opportunity to manage your online presence and curate the information that reflects your professional or personal identity.
Modify Your Google Name in Google Translate
If you want to modify your Google name specifically for Google Translate, you can follow these steps to change it.
To modify your Google name in Google Translate:
- Open your preferred web browser and go to Google Translate.
- Ensure that you are signed in to your Google Account.
- Click on the menu icon (three horizontal lines) in the top-left corner of the Google Translate interface to open the side menu.
- From the side menu, select “Settings.” You will be directed to the Google Translate settings page.
- In the settings menu, click on your name.
- Edit your name by entering the new name that you want to use in the provided fields.
- Click on the “Save” button to apply the changes to your Google Translate account.
After saving the changes, your modified Google name will be displayed in Google Translate whenever you use the translation service.
It’s important to note that modifying your Google name in Google Translate may also update your name in other Google services, such as Gmail, Google Drive, YouTube, and more, depending on the interconnectedness of those services with your Google Account.
Choose a name that accurately represents you and aligns with your personal or professional identity. A recognizable name can make it easier for others to identify you when you use translation services.
Now that you know how to modify your Google name in Google Translate, take the opportunity to personalize it and make your translation experience more tailored and enjoyable.
Update Your Google Name in Google Photos App
If you want to update your Google name specifically for the Google Photos app, you can do so by following these steps.
To update your Google name in the Google Photos app:
- Open the Google Photos app on your Android device or iPhone.
- Make sure you are signed in to your Google Account.
- Tap on your profile picture or initial in the top-right corner of the app to access the sidebar menu.
- Select “Settings” from the menu that appears.
- In the Settings menu, tap on your account name.
- Edit your name by entering the new name that you want to use in the provided fields.
- Tap on the “Save” button to apply the changes to your Google Photos account.
After saving the changes, your updated Google name will be displayed in the Google Photos app. It will be visible when you browse, organize, and share your photos and videos through the app.
It’s important to note that updating your Google name in the Google Photos app may also reflect the changed name in other Google services, such as Gmail, Google Drive, YouTube, and more, as these services are linked to your Google Account.
Choose a name that accurately represents you and aligns with your personal or professional identity. Having a recognizable name can help you and others easily identify your photos and maintain a consistent online presence.
Now that you know how to update your Google name in the Google Photos app, take the opportunity to personalize it and make your photo management and sharing experience more customized and engaging.
Customize Your Google Name in Google Assistant
If you want to customize your Google name specifically for Google Assistant, you can do so by following these steps.
To customize your Google name in Google Assistant:
- Open the Google Assistant app on your Android device or iPhone.
- Ensure that you are signed in to your Google Account.
- Tap on the profile picture or initial in the top-right corner of the app to access the account settings.
- Select “Settings” from the menu that appears.
- In the Settings menu, tap on “Personal info.”
- Edit your name by entering the new name that you want to use in the provided fields.
- Tap on the “Save” button to apply the changes to your Google Assistant account.
After saving the changes, your customized Google name will be used when interacting with Google Assistant. It will be the name that Google Assistant recognizes and responds to.
It’s important to note that customizing your Google name in Google Assistant may also update your name in other Google services, such as Gmail, Google Photos, Google Calendar, and more, as these services are interconnected through your Google Account.
Choose a name that accurately represents you and aligns with your personal or professional identity. A recognizable name can create a more personalized and engaging experience when using Google Assistant.
Now that you know how to customize your Google name in Google Assistant, take the opportunity to personalize it and make your interactions with Google Assistant feel more tailored and authentic.
Change Your Name in Google Home
If you want to change the name that Google Home responds to, you can easily do so by following these steps.
To change your name in Google Home:
- Open the Google Home app on your Android or iOS device.
- Ensure that you are connected to the same Wi-Fi network as your Google Home device.
- Tap on the device icon at the top-right corner of the app’s main screen to access the device settings.
- Scroll down until you find the Google Home device you want to change the name for, and tap on it.
- Tap on the settings icon (three dots) in the top-right corner of the device screen.
- Select “Settings” from the menu.
- In the Device settings menu, scroll down to find the “Device info” section.
- Tap on the “Name” field and edit it with the new name you want to use.
- Tap on the “Save” button to apply the changes to your Google Home device.
Once the changes are saved, your Google Home device will respond to the new name you have specified. You can choose a name that is easier to pronounce or more personalized to your liking.
It’s important to note that changing the name in Google Home does not update your name in other Google services or your Google Account.
Choose a name that you prefer and feel comfortable using when interacting with your Google Home device. The new name can enhance your experience with voice commands and make it more intuitive.
Now that you know how to change your name in Google Home, take the opportunity to personalize it and enjoy a more personalized and seamless smart home experience.
Adjust Your Google Name in Google Nest
If you want to adjust the name associated with your Google Nest device, you can follow these steps to make the necessary changes.
To adjust your Google name in Google Nest:
- Open the Google Home app on your Android or iOS device.
- Make sure that you are connected to the same Wi-Fi network as your Google Nest device.
- Tap on the device icon at the top-right corner of the app’s main screen to access the device settings.
- Scroll down until you find the Google Nest device that you want to adjust the name for and tap on it.
- Tap on the settings icon (three dots) in the top-right corner of the device screen.
- Select “Settings” from the menu.
- In the Device settings menu, scroll down to find the “Device info” section.
- Tap on the “Name” field and edit it with the new name you want to use.
- Tap on the “Save” button to apply the changes to your Google Nest device.
After saving the changes, your Google Nest device will respond to the adjusted name you have specified. Whether you want to change it to a custom name or something more recognizable, the choice is yours.
It’s important to note that adjusting the name in Google Nest does not update your name in other Google services or your Google Account.
Choose a name that you find suitable and easy to remember when interacting with your Google Nest device. A personalized name can enhance your user experience and make it more intuitive for voice commands and smart home automation.
Now that you know how to adjust your Google name in Google Nest, take the opportunity to personalize it and enjoy a more tailored and seamless smart home experience.
Modify Your Google Name in Google Pay
If you want to modify your Google name specifically for Google Pay, you can do so by following these steps.
To modify your Google name in Google Pay:
- Open the Google Pay app on your Android or iOS device.
- Ensure that you are signed in to your Google Account.
- Tap on the profile icon or your profile picture in the top-left corner of the app to access the account settings.
- Select “Settings” from the menu that appears.
- In the Settings menu, tap on “Personal info.”
- Edit your name by entering the new name that you want to use in the provided fields.
- Tap on the “Save” button to apply the changes to your Google Pay account.
After saving the changes, your modified Google name will be used in Google Pay for transactions, sending money, and other financial activities.
It’s important to note that modifying your Google name in Google Pay may also update your name in other Google services, such as Gmail, Google Drive, YouTube, and more, as these services are interconnected through your Google Account.
Choose a name that accurately represents you and aligns with your personal or professional identity. A recognizable name can help streamline payment processes and ensure a consistent digital presence.
Now that you know how to modify your Google name in Google Pay, take the opportunity to personalize it and enjoy a more tailored and convenient mobile payment experience.
Update Your Google Name in Google Fit
If you want to update your Google name specifically for Google Fit, you can do so by following these steps.
To update your Google name in Google Fit:
- Open the Google Fit app on your Android or iOS device.
- Ensure that you are signed in to your Google Account.
- Tap on your profile picture or initial in the top-right corner of the app to access the account settings.
- Select “Settings” from the menu that appears.
- In the Settings menu, tap on your name.
- Edit your name by entering the new name that you want to use in the provided fields.
- Tap on the “Save” button to apply the changes to your Google Fit account.
After saving the changes, your updated Google name will be displayed in Google Fit, and it will be associated with your fitness activities, progress, and achievements tracked through the app.
It’s important to note that updating your Google name in Google Fit may also update your name in other Google services, such as Gmail, Google Drive, YouTube, and more, depending on the interconnectedness of those services with your Google Account.
Choose a name that accurately represents you and aligns with your personal or fitness goals. Having a recognizable name can help you stay motivated and track your progress effectively in Google Fit.
Now that you know how to update your Google name in Google Fit, take the opportunity to personalize it and make your fitness journey more engaging and meaningful.