
Adding a Solid Color Background
One of the simplest ways to change the background color in Photoshop is by adding a solid color background. This technique is perfect if you want a clean and consistent color for your background.
To begin, open your image in Photoshop and make sure you have the Layers panel visible. If not, go to Window > Layers to bring it up.
Next, create a new layer by clicking on the “Create a new layer” button at the bottom of the Layers panel. This will ensure that your background color is on a separate layer, allowing you to make adjustments if needed.
Now, select the “Paint Bucket Tool” from the Tools panel on the left side of the screen. This tool is represented by an icon of a paint bucket pouring paint.
With the Paint Bucket Tool selected, choose the color you want for your background by clicking on the Foreground Color swatch located in the Tools panel. This will bring up the Color Picker dialog box where you can select a color or enter a specific color value.
After selecting your desired color, simply click anywhere on the new layer to fill it with the selected color. The entire layer will now be filled with the chosen background color.
If you are not satisfied with the opacity of the color, you can adjust it by reducing the opacity of the layer. Simply locate the Opacity slider in the Layers panel and decrease the value until you achieve the desired transparency.
Remember to save your work by going to File > Save or by using the keyboard shortcut Ctrl+S (Command+S on a Mac). This will ensure that your changes are preserved.
You have now successfully added a solid color background to your image in Photoshop! This technique provides a quick and easy way to change the background color while maintaining flexibility for further editing.
Changing the Background Color using the Fill Tool
If you want to change the background color of your image in Photoshop but still preserve the original image, you can use the Fill Tool. This method allows you to apply a new color directly to the background layer without creating a new layer.
To start, open your image in Photoshop and make sure the Layers panel is visible by going to Window > Layers.
Next, select the Background layer in the Layers panel. If your image doesn’t have a separate background layer, you can create one by double-clicking on the layer and renaming it to “Background”.
With the Background layer selected, choose the Fill Tool from the Tools panel. The Fill Tool is represented by a paint bucket icon, located in the same group as the Gradient Tool and Paint Bucket Tool.
Once you have the Fill Tool selected, click on the Foreground Color swatch in the Tools panel to bring up the Color Picker dialog box. Here, you can choose a new color for your background by either selecting one from the color spectrum or entering a specific color value.
After selecting your desired color, make sure the “Use:” option is set to “Foreground Color” in the Fill Tool options bar at the top of the screen.
Now, click anywhere on the background layer with the Fill Tool to apply the new color. The entire background layer will be filled with the chosen color.
If necessary, you can further adjust the opacity of the background color by reducing the opacity of the background layer in the Layers panel.
Remember to save your work by going to File > Save or using the keyboard shortcut Ctrl+S (Command+S on a Mac).
By using the Fill Tool, you can easily change the background color of your image while keeping the original image intact. This method is ideal if you want to experiment with different background colors or if you need to quickly modify the background for a specific purpose.
Using the Magic Wand Tool to Change Background Color
If you want to change the background color of your image in Photoshop with precision, the Magic Wand Tool can be a powerful tool. This tool allows you to select specific areas of similar color so you can easily modify the background color without affecting other parts of the image.
To get started, open your image in Photoshop and ensure that the Layers panel is visible (Window > Layers).
Select the Magic Wand Tool from the Tools panel on the left side of the screen. It is represented by a magic wand icon.
In the options bar at the top of the screen, you can adjust the tolerance of the Magic Wand Tool. Tolerance determines the range of colors that will be selected. If you set a low tolerance, only pixels with almost identical colors to the clicked area will be selected. If you set a high tolerance, a broader range of colors will be selected.
With the Magic Wand Tool selected, click on the background color you want to change. The tool will automatically select all pixels of similar color within the tolerance range.
If the selection does not cover the entire background, hold down the Shift key and click on additional areas to add them to the selection. Conversely, if you accidentally include unwanted areas in the selection, hold down the Alt key and click on those areas to remove them from the selection.
Once you have the desired background area selected, go to the Edit menu and choose the Fill option. In the Fill dialog box, select “Foreground Color” from the Contents dropdown menu so you can fill the selection with a new color.
Click OK, and the selected background area will be filled with the new color.
If you want to refine the edges of the filled background, go to Select > Modify > Expand. Enter a small value, such as 1 or 2 pixels, and click OK to expand the selection. Then, go to Edit > Fill and choose “Foreground Color” again to fill the expanded selection.
Remember to save your work by going to File > Save or using the keyboard shortcut Ctrl+S (Command+S on a Mac).
Using the Magic Wand Tool provides a precise method for changing the background color in a specific area of your image. This tool allows you to selectively modify the background without affecting other elements, giving you greater control over your design or editing process.
Applying a Gradient Background in Photoshop
If you want to add a professional and visually appealing touch to your image, applying a gradient background in Photoshop can be a great option. A gradient background transitions smoothly between two or more colors, creating a subtle or dramatic effect that can enhance the overall aesthetic of your image.
To get started, open your image in Photoshop and make sure the Layers panel is visible (Window > Layers).
Create a new layer by clicking on the “Create a new layer” button at the bottom of the Layers panel. This will ensure that your gradient background is on a separate layer, allowing you to make adjustments if needed.
Select the Gradient Tool from the Tools panel on the left side of the screen. The Gradient Tool is represented by a gradient icon.
In the options bar at the top of the screen, you can customize the properties of the gradient. First, make sure the Gradient Type is set to “Linear” for a smooth transition. You can also select the desired gradient preset from the Gradient Picker, or create a custom gradient by clicking on the gradient preview.
Choose the colors for your gradient by clicking on the Gradient Editor button in the options bar. Here, you can select colors from the color spectrum or enter specific color values.
With the Gradient Tool and your desired gradient settings selected, click and drag on the new layer to create the gradient background. The direction and length of the drag will determine the angle and size of the gradient.
If you’re not satisfied with the result, you can experiment with different gradient presets, adjust the opacity of the layer, or refine the gradient using layer blending modes and adjustments.
Remember to save your work by going to File > Save or using the keyboard shortcut Ctrl+S (Command+S on a Mac).
Applying a gradient background in Photoshop allows you to add depth and visual interest to your image. Whether you prefer a subtle or vibrant gradient, this technique can elevate your image and make it stand out.
Removing Background Color with the Eraser Tool
If you want to remove the background color from your image in Photoshop, the Eraser Tool can come in handy. This tool allows you to manually erase specific portions of the background, revealing transparency or the layer beneath it.
To begin, open your image in Photoshop and ensure that the Layers panel is visible (Window > Layers).
If your background color is on a separate layer, select that layer in the Layers panel. However, if your image does not have a separate background layer and the background color is part of the image itself, it is recommended to duplicate the image layer before proceeding.
Select the Eraser Tool from the Tools panel, which is represented by an icon resembling an eraser.
In the options bar at the top of the screen, choose the brush size and hardness according to your preference. A larger brush size can help cover larger areas, while a smaller brush size provides more precision.
Make sure the eraser mode is set to “Brush” for general erasing purposes. However, you can experiment with other eraser modes like “Pencil” or “Block” for more specific effects.
With the Eraser Tool and desired options selected, start erasing the background color by clicking and dragging over the areas to be removed. Take care while erasing near the edges to maintain a clean transition between the subject and the background.
If you accidentally erase too much or need to restore parts of the background, switch to the Brush Tool and paint with the foreground color (typically white) to bring back the background color.
Remember to save your work by going to File > Save or using the keyboard shortcut Ctrl+S (Command+S on a Mac).
The Eraser Tool is a useful tool for removing background color in Photoshop. However, it is important to work carefully and consider duplicating your image layer as a backup to ensure that you can make further adjustments if necessary.
Creating a Transparent Background in Photoshop
Having a transparent background in your image can be useful for a variety of reasons, such as overlaying the image on different backgrounds or integrating it into designs seamlessly. In Photoshop, you can easily create a transparent background using a few simple steps.
To begin, open your image in Photoshop and ensure that the Layers panel is visible (Window > Layers).
If your image has a background layer, you need to convert it to a regular layer first. To do this, simply double-click on the background layer in the Layers panel and rename it. Click OK to finalize the conversion.
Select the Magic Wand Tool from the Tools panel on the left side of the screen. It is represented by a magic wand icon.
In the options bar at the top of the screen, set the tolerance of the Magic Wand Tool according to your preference. A higher tolerance will select a broader range of colors, while a lower tolerance will only select similar colors.
With the Magic Wand Tool selected, click on the background color you want to make transparent. The tool will automatically select all the pixels of similar color within the tolerance range.
If the selection does not cover the entire background, hold down the Shift key and click on additional areas to add them to the selection. Conversely, if you accidentally include unwanted areas in the selection, hold down the Alt key and click on those areas to remove them from the selection.
Once you have the desired background area selected, simply hit the Delete key on your keyboard. This will remove the selected background color and create a transparent background.
Remember to save your work by going to File > Save or using the keyboard shortcut Ctrl+S (Command+S on a Mac).
Creating a transparent background in Photoshop allows you to use your image in versatile ways. Whether you want to blend it seamlessly into designs or superimpose it on different backgrounds, a transparent background gives you the flexibility to create eye-catching visuals.
Using the Paint Bucket Tool to Change Background Color
If you want to quickly and easily change the background color of your image in Photoshop, the Paint Bucket Tool can be a convenient option. This tool allows you to fill an entire area with a new color, making it ideal for changing the background color with a single click.
To start, open your image in Photoshop and ensure that the Layers panel is visible (Window > Layers).
Create a new layer by clicking on the “Create a new layer” button at the bottom of the Layers panel. This will ensure that your background color is on a separate layer, allowing you to make adjustments if needed.
Select the Paint Bucket Tool from the Tools panel on the left side of the screen. The Paint Bucket Tool is represented by an icon resembling a paint bucket pouring paint.
In the options bar at the top of the screen, choose the desired foreground color by clicking on the Foreground Color swatch. This will bring up the Color Picker dialog box, where you can either select a color or enter specific color values.
Make sure the “Use:” option in the options bar is set to “Foreground” so that the Paint Bucket Tool will fill the area with the selected foreground color.
With the Paint Bucket Tool and the desired color selected, simply click anywhere on the new layer to fill it with the chosen color. The entire layer will now be filled with the selected background color.
If necessary, you can further adjust the opacity of the background color by reducing the opacity of the layer in the Layers panel.
Remember to save your work by going to File > Save or using the keyboard shortcut Ctrl+S (Command+S on a Mac).
By using the Paint Bucket Tool, you can easily change the background color of your image in Photoshop with a single click. This tool provides a quick and straightforward method to achieve a new background color, perfect for when you need to make fast edits or adjustments to your image.
Blending Background Colors with Layer Styles
If you want to create a visually appealing and dynamic background for your image in Photoshop, you can utilize layer styles to blend multiple background colors seamlessly. Layer styles offer a wide range of effects and customizable options that can enhance the overall look and feel of your image.
To begin, open your image in Photoshop and ensure that the Layers panel is visible (Window > Layers).
Create a new layer by clicking on the “Create a new layer” button at the bottom of the Layers panel. This will serve as your background layer where you will apply the layer styles.
Select the new layer and make sure it is the active layer in the Layers panel.
With the layer selected, go to Layer > Layer Style > Gradient Overlay. This will open the Layer Style dialog box with the Gradient Overlay options.
In the Layer Style dialog box, you can adjust the settings for the gradient overlay effect. You can choose the gradient style, such as linear, radial, or angle, and customize the colors and position of each gradient stop. You can also experiment with blending modes and opacity to achieve the desired effect.
Additionally, you can explore other layer styles like Color Overlay, Pattern Overlay, or Bevel and Emboss to further enhance the background. These additional layer styles can add texture, depth, and dimension to the background.
Preview the changes in real-time by checking the “Preview” box in the Layer Style dialog box. This allows you to see the effects applied to the background layer and adjust them until you’re satisfied with the result.
Once you’re happy with the layer styles and their settings, click on the “OK” button to apply them to the background layer. Your image now has a blended background with multiple colors seamlessly integrated.
Remember to save your work by going to File > Save or using the keyboard shortcut Ctrl+S (Command+S on a Mac).
Blending background colors with layer styles in Photoshop allows you to create visually striking backgrounds that add depth and interest to your image. Experiment with different layer styles and their settings to achieve the desired effect and make your image truly captivating.
Adjusting Background Color with the Hue/Saturation Tool
If you want to fine-tune the background color of your image in Photoshop, the Hue/Saturation tool can be a powerful ally. This tool allows you to adjust the hue, saturation, and lightness of specific colors, giving you precise control over the background color.
To start, open your image in Photoshop and make sure the Layers panel is visible (Window > Layers).
Create a new adjustment layer by clicking on the “Create a new fill or adjustment layer” button at the bottom of the Layers panel. From the dropdown menu that appears, select “Hue/Saturation”.
The Hue/Saturation dialog box will open, displaying options to adjust the color properties. In the dialog box, you will find sliders for “Hue”, “Saturation”, and “Lightness”. These sliders control the color, intensity, and brightness of the background.
First, make sure that the “Colorize” checkbox is unchecked. This ensures that you are making precise adjustments to the existing colors rather than applying a single color overlay.
Next, work with the “Hue” slider to alter the color of the background. Moving the slider to the left or right will shift the hue of the background hues, allowing you to explore different color variations.
If you want to intensify or desaturate the background color, use the “Saturation” slider. Sliding to the right increases saturation, making the colors more vibrant. Sliding to the left decreases saturation, creating a more muted effect.
Should you wish to adjust the brightness or darkness of the background, utilize the “Lightness” slider. Sliding to the right increases the lightness, while sliding to the left darkens the background.
While making adjustments, keep an eye on the image preview to see the real-time effects. This will help you achieve the desired background color.
Remember to save your work by going to File > Save or using the keyboard shortcut Ctrl+S (Command+S on a Mac).
The hue/saturation tool in Photoshop gives you precise control over the background color. By adjusting the hue, saturation, and lightness, you have the ability to fine-tune the background to perfectly complement your image and bring out its full visual impact.
Creating a Custom Background Color using the Color Picker
If you have a specific color in mind for your image background in Photoshop, you can create a custom background color using the Color Picker. This allows you to choose any color from the color spectrum or input specific color values to achieve the exact background color you desire.
To begin, open your image in Photoshop and make sure the Layers panel is visible (Window > Layers).
Create a new layer by clicking on the “Create a new layer” button at the bottom of the Layers panel. This will ensure that your custom background color is on a separate layer, allowing you to make adjustments if needed.
Select the new layer and make sure it is the active layer in the Layers panel.
In the Tools panel on the left side of the screen, select the Brush Tool. This tool is represented by an icon resembling a brush.
Click on the Foreground Color swatch located in the Tools panel. This will open the Color Picker dialog box.
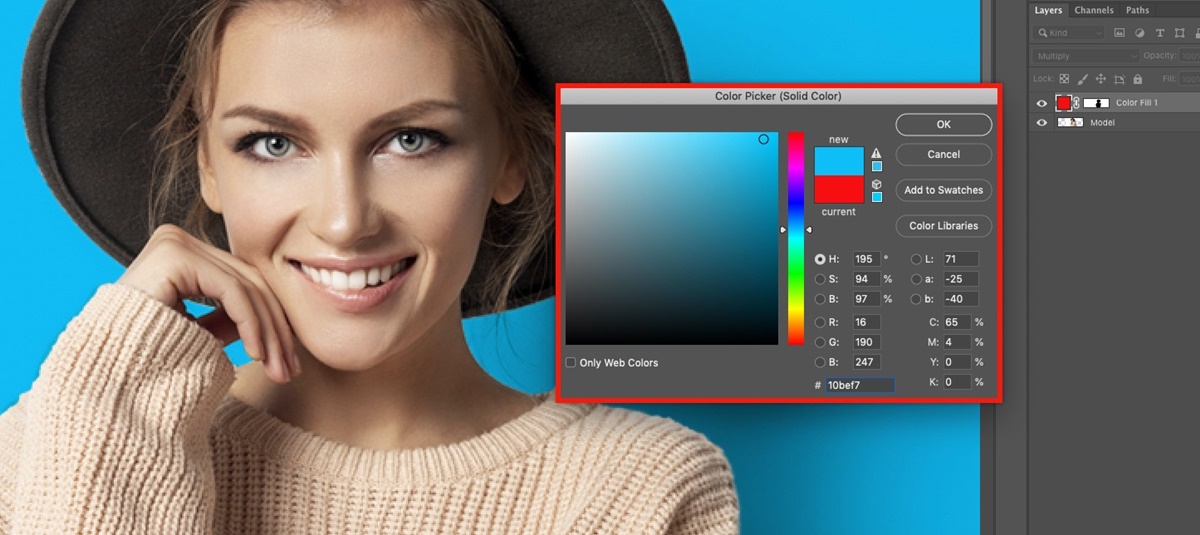
In the Color Picker dialog box, you can select a color in a few different ways. You can click and drag within the color spectrum to choose a color, or you can enter specific color values in the RGB, HSB, or hexadecimal fields. Additionally, you can save your custom color to the Swatches panel by clicking on the “Add to Swatches” button.
Once you have chosen your custom background color, click OK to exit the Color Picker dialog box.
Now, select the Paint Bucket Tool from the Tools panel. This tool is represented by an icon resembling a paint bucket pouring paint.
With the Paint Bucket Tool selected, simply click anywhere on the new layer to fill it with the chosen custom background color.
If necessary, you can adjust the opacity of the layer in the Layers panel to make the background color more or less transparent.
Remember to save your work by going to File > Save or using the keyboard shortcut Ctrl+S (Command+S on a Mac).
Creating a custom background color using the Color Picker in Photoshop allows you to have complete control over the visual aspect of your image. Whether you want to match a specific color scheme or achieve a unique look, this technique empowers you to create a background color that perfectly suits your creative vision.