
What is the Refine Edge tool?
The Refine Edge tool is a powerful feature in Adobe Photoshop that allows users to create precise and detailed selections, especially when dealing with complex or fine elements such as hair, fur, or intricate edges. It provides advanced options and controls for refining the selection’s edges, resulting in cleaner, more accurate cutouts.
When making selections in Photoshop, the default selection tools like the Magic Wand or Quick Selection Tool can often leave jagged or rough edges, making the final result look unnatural or poorly defined. The Refine Edge tool addresses this issue by providing additional tools and settings that allow users to fine-tune the selection’s appearance and create more polished, professional-looking images.
By accessing the Refine Edge dialog box, users gain access to a wide array of options for refining their selections. This tool offers features such as the Refine Edge brush tool, Smart Radius, Edge Detection, Global Refinements, and various output settings.
The Refine Edge brush tool is particularly useful when dealing with intricate edges, as it allows users to paint over problematic areas and instruct Photoshop to better understand the desired selection. This brush tool essentially helps to refine and enhance the edges by intelligently modifying the selection boundary.
One of the standout features of the Refine Edge tool is the Smart Radius option. This option employs advanced algorithms to automatically detect and adjust the radius of the selection based on the image’s content. It is particularly effective when dealing with subjects that have fine details or complex edges, such as wispy hair or fur.
In addition to the Smart Radius option, the Edge Detection feature further enhances the accuracy of selections. It uses intelligent algorithms to detect and snap the selection to the edges of the subject, producing cleaner and more precise cutouts.
The Global Refinements section allows users to fine-tune the overall selection by adjusting parameters like Smooth, Feather, Contrast, and Shift Edge. These settings provide control over the selection’s appearance, allowing for adjustments to be made to achieve the desired result.
The Output settings in the Refine Edge dialog box enable users to choose how they want to output the refined selection. Whether it’s saving the selection as a new layer with a layer mask, applying the selection to a new layer with a mask, or saving it as a new document with a transparent background, these options provide flexibility and convenience in working with the refined selection.
Overall, the Refine Edge tool in Photoshop offers a comprehensive set of features and controls for fine-tuning selections and creating clean and accurate cutouts. Whether you’re working on portraits, landscapes, or intricate designs, mastering this tool will greatly enhance your ability to create professional-looking images with precise selections and beautifully defined edges.
Opening the Refine Edge dialog box
The Refine Edge dialog box is a powerful tool in Adobe Photoshop that allows users to access advanced selection refining options. Opening this dialog box is straightforward and can be done in a few different ways.
One way to open the Refine Edge dialog box is to make a selection using any of the selection tools available in Photoshop. Once you have made the initial selection, navigate to the top menu and click on “Select.” From the dropdown menu, choose “Refine Edge” or “Select and Mask.” Both options will open the Refine Edge dialog box.
An alternative method is to right-click on the selection and select “Refine Edge” or “Select and Mask” from the context menu that appears. This quick access method is especially convenient when working with a tablet or other input devices.
Additionally, you can use keyboard shortcuts to open the Refine Edge dialog box. On Windows, the shortcut is Ctrl + Alt + R, while on Mac, it is Command + Option + R. Pressing these keys will immediately open the Refine Edge dialog box, allowing you to fine-tune your selection.
Once the Refine Edge dialog box is open, you will be presented with a range of options and tools to refine your selection. The dialog box includes a preview area where you can see the selection in real-time and make adjustments accordingly.
By default, the Refine Edge dialog box shows the original selection with a transparent background. However, you can change the view mode to see different representations of the selection, such as “On White,” “On Black,” or “On Layers.”
Furthermore, the Refine Edge dialog box offers options to adjust the view magnification, which can be useful for zooming in and out to inspect the details of your selection more closely.
Opening the Refine Edge dialog box gives you access to a variety of tools and settings that will help you refine your selection more accurately. Whether you need to adjust the edge brush, utilize the Smart Radius option, or apply global refinements, the Refine Edge dialog box provides a comprehensive set of tools to enhance your selection techniques.
Once you have made the necessary refinements in the dialog box, you can choose to output the selection as a new layer with a layer mask, apply it to a new layer with a mask, or save it as a new document with a transparent background, depending on your specific workflow needs.
Opening the Refine Edge dialog box is an essential step towards achieving precise and detailed selections in Photoshop. Take advantage of this powerful tool to refine your selection technique and create professional-quality images with clean and accurate cutouts.
Using the Refine Edge brush tool
The Refine Edge brush tool is a valuable feature within the Refine Edge dialog box in Adobe Photoshop. It allows users to make precise adjustments to the edges of a selection, enhancing the overall accuracy and quality of the cutout. Here’s how to utilize this powerful tool:
1. After opening the Refine Edge dialog box, locate the Refine Edge brush tool on the left-hand side of the dialog box. It is represented by a brush icon.
2. Adjust the size of the brush using the brush size slider or by entering a specific value. Use a smaller brush size for fine details and a larger one for broader areas.
3. To refine the edges of the selection, simply paint over the areas that require adjustment using the Refine Edge brush tool. You can click and drag to paint over the edges or use short, quick strokes for more precise control.
4. As you paint with the Refine Edge brush tool, Photoshop analyzes the surrounding pixels and intelligently modifies the selection’s boundary to achieve a smoother and more accurate result.
5. If you accidentally paint outside the desired area, you can use the Erase Refinements brush tool, located next to the Refine Edge brush, to remove any unwanted modifications. This brush behaves in the opposite manner, subtracting from the refinements made by the Refine Edge brush.
6. To further refine the brush tool’s behavior, adjust the sliders in the Options bar. The Smooth slider softens the transitions at the selection’s edges, while the Feather slider adds a gradual transition from the selection to the background. The Contrast slider enhances the contrast along the selection’s edge, providing more definition.
7. If you need to make additional refinements to a specific area, you can zoom in using the Zoom tool (magnifying glass icon) located in the Refine Edge dialog box. This allows for better precision when painting over the edges.
The Refine Edge brush tool is particularly useful when it comes to complex selections, such as hair, fur, or intricate objects, where the default selection tools struggle to produce smooth results. With its intuitive brush-based interface and intelligent adjustments, it enables users to achieve more natural-looking cutouts with refined and well-defined edges.
By using the Refine Edge brush tool in combination with other refining options available in the dialog box, such as Smart Radius and Global Refinements, users can elevate their selection techniques and create professional-quality images with precise selections.
Experiment with the Refine Edge brush tool’s settings and practice on various types of selections to become more proficient in utilizing its capabilities. It will undoubtedly become one of your go-to tools for achieving clean and accurate cutouts in Photoshop.
Making selections with the Smart Radius option
The Smart Radius option in the Refine Edge dialog box is a powerful tool in Adobe Photoshop that aids in making selections with fine details, such as hair or fur. This intelligent feature automatically adjusts the selection’s radius based on the image’s content, resulting in more precise and accurate cutouts. Here’s how to effectively use the Smart Radius option:
1. Open the Refine Edge dialog box by making a selection using any of the selection tools in Photoshop, then clicking on “Select” in the top menu and choosing “Refine Edge” or “Select and Mask.”
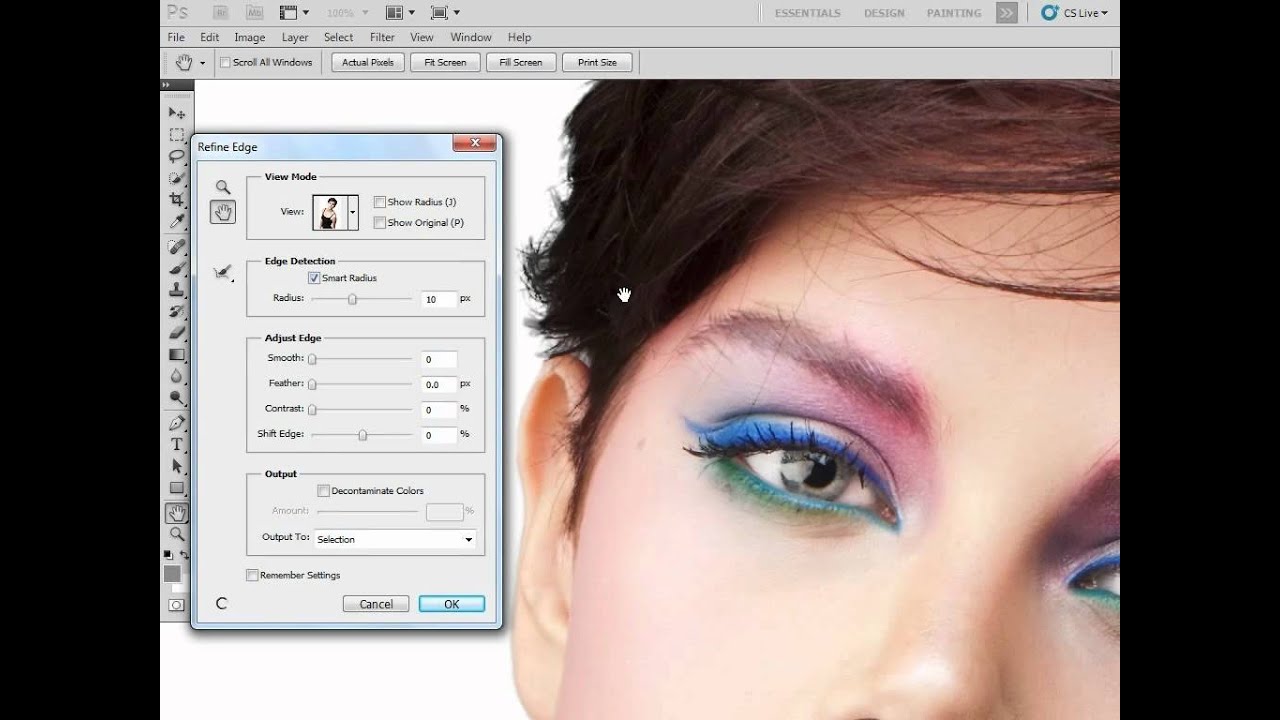
2. In the Refine Edge dialog box, locate the Smart Radius checkbox, usually found in the Edge Detection section.
3. Enable the Smart Radius checkbox by clicking on it. Once enabled, Photoshop will automatically analyze the image and adjust the selection’s radius to account for fine details.
4. Adjust the radius manually by moving the Smart Radius slider. This slider determines the range of pixels that Photoshop considers when making the selection. A smaller radius is suitable for images with intricate details, while a larger radius works well for subjects with broader edges.
5. Use the Refine Edge brush tool to paint over areas where the automatic selection may not be accurate enough. The Smart Radius option works in conjunction with the brush tool, refining the selection based on the painted areas and the surrounding pixels.
6. To preview the selection in different contexts, change the view mode to “On White,” “On Black,” or “On Layers.” This allows you to evaluate how well the Smart Radius option is working and make any necessary adjustments.
The Smart Radius option is particularly effective when dealing with complex or fine details, where traditional selection tools struggle to produce accurate results. Whether it’s wispy strands of hair or delicate fur textures, the Smart Radius option helps to preserve the integrity and intricate details of the subject.
To achieve the best results when using the Smart Radius option, it’s important to have a high-resolution image and a clean, well-contrasted background. These factors enable the algorithm to analyze the edges more accurately.
Experiment with the Smart Radius option, adjusting the radius and utilizing the Refine Edge brush tool to refine the selection as needed. It may take some trial and error to find the optimal settings for each image and selection, but with practice, you will achieve exceptional results.
By incorporating the Smart Radius option into your selection workflow, you can create more precise and detailed cutouts, allowing for seamless integration into various backgrounds or composited images. Take advantage of this powerful tool to elevate your selection techniques and produce professional-quality images in Adobe Photoshop.
Using the Edge Detection option
The Edge Detection option in the Refine Edge dialog box in Adobe Photoshop is a useful tool that enhances the accuracy of selections by automatically detecting and snapping the selection to the edges of the subject. This feature uses intelligent algorithms to analyze the image and create more precise and refined cutouts. Here’s how to effectively utilize the Edge Detection option:
1. Open the Refine Edge dialog box by making a selection using any of the selection tools in Photoshop and then clicking on “Select” in the top menu and choosing “Refine Edge” or “Select and Mask.”
2. In the Refine Edge dialog box, look for the Edge Detection checkbox, usually located in the Edge Detection section. Enable the checkbox by clicking on it.
3. Adjust the Edge Detection settings to refine the selection. Start by adjusting the Radius slider, which determines the size of the area Photoshop examines for edge detection. A larger radius is suitable for images with clear and distinct edges, while a smaller radius is ideal for images with more intricate or fine details.
4. Fine-tune the Smart Radius slider to adjust the algorithm’s sensitivity to the edges. This slider works in conjunction with the Edge Detection settings and allows you to maintain finer details while still snapping the selection to the subject’s edges.
5. Paint over any problem areas where the automatic edge detection might not be accurate enough using the Refine Edge brush tool. The Edge Detection option, combined with manual refinements, ensures a precise and refined selection.
6. Preview the result by changing the view mode to “On White,” “On Black,” or “On Layers.” This allows you to see how well the Edge Detection option is working and make adjustments accordingly.
The Edge Detection option is particularly beneficial when dealing with subjects that have intricate or complex edges. It helps create clean and accurate cutouts while minimizing the need for manual refinements, saving time and effort in the selection process.
It is important to note that the effectiveness of the Edge Detection option relies on having a well-defined contrast between the subject and the background. Images with low contrast or semi-transparent edges may require additional refinement using the Refine Edge brush tool or other manual selection techniques.
Experiment with different Edge Detection settings, adjusting the radius and Smart Radius sliders, to find the optimal balance for each image and selection. It may take some trial and error to achieve the desired result, but with practice, you will be able to create precise selections with ease.
By utilizing the Edge Detection option, you can enhance the accuracy and refinement of your selections, resulting in seamless integrations into different backgrounds or composite images. Take advantage of this powerful tool and elevate your selection techniques in Adobe Photoshop.
Adjusting the Global Refinements
The Global Refinements feature in the Refine Edge dialog box of Adobe Photoshop allows users to make precise adjustments to the overall appearance of selections. These refinements include options such as Smooth, Feather, Contrast, and Shift Edge, providing greater control over the selection’s final look. Here’s how to effectively adjust the Global Refinements:
1. Open the Refine Edge dialog box by making a selection using any of the selection tools in Photoshop and then clicking on “Select” in the top menu and choosing “Refine Edge” or “Select and Mask.”
2. In the Refine Edge dialog box, navigate to the Global Refinements section, usually located at the bottom. Here, you’ll find various sliders and settings to fine-tune the appearance of your selection.
3. Experiment with the Smooth slider to adjust the selection’s boundary. Moving the slider to the right will soften the transition between the selection and the background, while moving it to the left will retain more details and preserve the original edges.
4. Use the Feather slider to add a gradual transition from the selection to the background. This can create a more natural and seamless integration, especially when compositing the selection into a new image. Moving the slider to the right increases the feathering effect, while moving it to the left reduces it.
5. Adjust the Contrast slider to enhance the definition of the selection’s edges. Increasing the contrast can make the edges appear sharper and more well-defined, whereas decreasing it can create a softer and more blended look.
6. If you need to shift the selection’s edge inward or outward, utilize the Shift Edge slider. Moving the slider to the right will contract the selection’s edge, while moving it to the left will expand it. This adjustment can be useful in situations where you want to fine-tune the coverage or positioning of the selection.
7. Continually evaluate the changes by previewing the selection in different color variations or background settings using the view mode options, such as “On White,” “On Black,” or “On Layers.” This allows you to assess how the Global Refinements affect the overall appearance of the selection.
The Global Refinements feature in the Refine Edge dialog box provides extensive options for refining the selection’s edges and appearance. By adjusting the Smooth, Feather, Contrast, and Shift Edge sliders, you can achieve the desired result that seamlessly integrates the selection into your composition.
Keep in mind that the optimal settings for each image may vary depending on factors such as the subject’s characteristics, the background, and the specific artistic intent. Experimentation and practice will help you develop an understanding of how these refinements influence the overall outcome.
Take advantage of the Global Refinements in the Refine Edge dialog box to finetune your selections and create professional-quality images with precise and well-defined edges. These adjustments allow for seamless integration into various backgrounds or composite images, enhancing the overall visual impact of your work.
Utilizing the Output settings
The Output settings in the Refine Edge dialog box of Adobe Photoshop offer a range of options for how you want to utilize the refined selection. Whether you’re looking to save the selection as a new layer with a layer mask, apply it to a new layer with a mask, or save it as a new document with a transparent background, these settings provide flexibility and convenience in your workflow. Here’s how to effectively utilize the Output settings:
1. Open the Refine Edge dialog box by making a selection using any of the selection tools in Photoshop and then clicking on “Select” in the top menu and choosing “Refine Edge” or “Select and Mask.”
2. Within the Refine Edge dialog box, located on the right-hand side, you’ll find the Output settings section.
3. Choose the desired output option based on your specific needs. If you wish to create a new layer based on the refined selection, select the “New Layer with Layer Mask” option. This will generate a new layer with the refined selection as a layer mask, allowing for non-destructive editing.
4. If you want to apply the refined selection to a new layer with a mask, select the “Layer Mask” option. This will create a new layer with the refined selection applied as a mask, revealing only the selected areas on the new layer.
5. The “New Document” option allows you to save the refined selection as a new document with a transparent background. This can be useful if you need to use the selection in a different project or if you want to isolate the selected subject for other graphic design purposes.
6. You can also choose color options for the background when using the “New Layer with Layer Mask” or “Layer Mask” output options. Select either white or black as the background color, depending on your intended composition.
7. Preview the output by choosing different view modes such as “On White,” “On Black,” or “On Layers.” This allows you to assess how the refined selection will appear in various contexts.
The Output settings in the Refine Edge dialog box provide convenient and efficient ways to utilize the refined selection based on your specific requirements. Whether you need a new layer with a layer mask, a layer mask itself, or a separate document with a transparent background, these options allow for greater versatility and flexibility in your post-processing workflow.
Take advantage of the Output settings to streamline your workflow and create professional-quality images. These options provide the foundation for seamless integration of your refined selection into different backgrounds or composite images, and they assist in preserving the non-destructive nature of your editing process.
Consider the context and purpose of your final image when choosing the appropriate Output setting. This will not only save you time and effort but also ensure that your artwork is visually compelling and visually coherent with its intended application.
Outputting selections to a new layer or mask
When working with selections in Adobe Photoshop, the ability to output the refined selection to a new layer or layer mask provides flexibility and creative control. These options allow for non-destructive editing and seamless integration of the selection into your composition. Here’s how to effectively output selections to a new layer or mask:
1. Open the Refine Edge dialog box by making a selection using any of the selection tools in Photoshop and then clicking on “Select” in the top menu and choosing “Refine Edge” or “Select and Mask.”
2. Within the Refine Edge dialog box, navigate to the Output settings section on the right-hand side.
3. Choose the output option that best suits your needs. If you want to create a new layer based on the refined selection, select the “New Layer with Layer Mask” option. This will generate a new layer with the refined selection applied as a layer mask.
4. Once you’ve chosen the “New Layer with Layer Mask” option, click on the “OK” button to exit the dialog box. Photoshop will automatically create a new layer with the refined selection as a layer mask. You can then manipulate the layer independently while preserving the original selection.
5. If you prefer to apply the refined selection to an existing layer, make sure that layer is selected before opening the Refine Edge dialog box. Choose the “Layer Mask” option in the Output settings section. This will apply the refined selection as a mask to the active layer, revealing only the selected areas.
6. After selecting the “Layer Mask” option, click on “OK” to exit the dialog box. Photoshop will automatically apply the refined selection as a layer mask to the active layer. You can further adjust the mask or edit the layer’s contents without permanently altering the original image.
Outputting selections to a new layer or layer mask allows for non-destructive editing, as the original image remains untouched. This provides the flexibility to fine-tune the selection, make adjustments to the layer, or experiment with different blending modes and effects.
When working with a new layer based on the refined selection, you can freely modify the layer’s content, apply adjustment layers, or add various effects. The layer mask ensures that only the selected areas are visible, allowing for seamless blending with the underlying layers.
By applying the refined selection as a layer mask to an existing layer, you can selectively reveal or hide specific parts of the layer, creating intricate compositions and precise edits. This is particularly useful when working with complex or detailed selections that require more control over the layer’s visibility.
Outputting selections to new layers or layer masks grants artistic freedom and opens up a wide range of possibilities for creating professional-quality images. Explore these options to refine your selections and enhance your compositions with precise control over every element.
Saving selections as a new layer with a layer mask
When working with selections in Adobe Photoshop, saving the refined selection as a new layer with a layer mask offers flexibility, non-destructive editing, and seamless integration into your composition. This approach allows you to make adjustments and modifications while preserving the original selection. Here’s how to effectively save selections as a new layer with a layer mask:
1. Open the Refine Edge dialog box by making a selection using any of the selection tools in Photoshop and then clicking on “Select” in the top menu and choosing “Refine Edge” or “Select and Mask.”
2. Within the Refine Edge dialog box, navigate to the Output settings section on the right-hand side.
3. Choose the “New Layer with Layer Mask” option. This output setting will create a new layer based on the refined selection, with the selection applied as a layer mask.
4. Once you’ve selected the “New Layer with Layer Mask” option, click on the “OK” button to exit the dialog box. Photoshop will automatically generate a new layer that contains the refined selection as a layer mask.
5. The newly created layer will appear in the Layers panel, with the original image on the background layer. The layer mask will be represented as a grayscale thumbnail next to the layer’s name.
6. To modify the visibility of the selected areas, paint on the layer mask with black or white using the Brush tool. Painting with black will hide the corresponding areas, while painting with white will reveal them.
7. You can make additional adjustments to the new layer, such as applying adjustments and filters, adding text or graphics, or experimenting with different blending modes. These edits will only affect the visible areas determined by the layer mask.
By saving selections as a new layer with a layer mask, you retain the flexibility to modify and refine the selection as needed. The layer mask allows for selective visibility and blending, giving you precise control over the elements and their integration into the composition.
This approach also keeps the original image intact on the background layer, preserving the ability to make further changes or create alternative selections without starting from scratch.
Utilize the layer mask to make fine adjustments to the selection’s visibility by painting on it with a soft-edged brush. This technique enables seamless blending between the refined selection and the surrounding elements, ensuring a professional, polished result.
Saving selections as new layers with layer masks empowers you to maintain a non-destructive workflow, making it easier to refine your composition, try different effects, and experiment with different editing techniques. Embrace this approach to enhance your design process and achieve stunning results in Adobe Photoshop.
Applying the selection to a new layer with a layer mask
When working with selections in Adobe Photoshop, applying the refined selection to a new layer with a layer mask offers a powerful way to isolate and manipulate specific areas of an image. This technique allows you to make adjustments to the selected areas independently while maintaining the original image on separate layers. Here’s how to effectively apply selections to a new layer with a layer mask:
1. Open the Refine Edge dialog box by making a selection using any of the selection tools in Photoshop and then clicking on “Select” in the top menu and choosing “Refine Edge” or “Select and Mask.”
2. Within the Refine Edge dialog box, navigate to the Output settings section on the right-hand side.
3. Choose the “Layer Mask” option. This output setting will apply the refined selection as a layer mask to the currently active layer.
4. Once you’ve selected the “Layer Mask” option, click on the “OK” button to exit the dialog box. Photoshop will automatically apply the refined selection as a layer mask to the active layer.
5. The layer mask will be represented as a grayscale thumbnail next to the layer’s name in the Layers panel. The selected areas are visible where the layer mask is white and hidden where it is black.
6. To modify the visibility of the selected areas, paint on the layer mask with black or white using the Brush tool. Painting with black will hide the corresponding areas, while painting with white will reveal them.
7. You can make further adjustments to the active layer, such as applying adjustments and filters, adding text or graphics, or experimenting with different blending modes. These edits will only affect the visible areas determined by the layer mask while preserving the rest of the image.
Applying selections to a new layer with a layer mask allows you to isolate specific areas and apply edits solely to those regions. This technique provides greater control and flexibility in your editing process, enabling precise adjustments and refinements.
The layer mask serves as a non-destructive editing tool, allowing you to hide or reveal parts of the layer without permanently altering the underlying image. It also makes it easier to refine the selection or make further modifications, as the mask can be edited at any time.
As you paint on the layer mask, using black to hide and white to reveal, you can seamlessly blend the selected areas with the surrounding elements of the composition, enhancing the overall visual impact of your image.
Embrace the flexibility granted by the layer mask and experiment with different adjustments and effects to transform your selected areas. By applying selections to a new layer with a layer mask, you can achieve stunning and professional results while maintaining an organized and non-destructive workflow in Adobe Photoshop.
Saving the selection as a new document with a transparent background
When working with selections in Adobe Photoshop, saving the refined selection as a new document with a transparent background offers versatility and convenience. This allows you to isolate the selected subject and use it in various contexts or integrate it seamlessly into other projects. Here’s how to effectively save selections as a new document with a transparent background:
1. Open the Refine Edge dialog box by making a selection using any of the selection tools in Photoshop and then clicking on “Select” in the top menu and choosing “Refine Edge” or “Select and Mask.”
2. Within the Refine Edge dialog box, navigate to the Output settings section on the right-hand side.
3. Choose the “New Document” option. By selecting this output setting, Photoshop will create a new document based on the refined selection with a transparent background.
4. Once you’ve chosen the “New Document” option, click on the “OK” button to exit the dialog box. Photoshop will automatically generate a new document that contains the selected subject on a transparent background.
5. The new document will open separately, containing only the isolated subject. You can now save this document to your desired file format, such as PNG or TIFF, to preserve the transparency of the background.
6. Utilize the isolated subject with the transparent background for various purposes. You can easily integrate it into other projects, overlay it onto different backgrounds, or create composite images by combining it with other elements.
7. To further enhance the versatility of the new document, consider using adjustment layers, filters, text, or graphic elements to customize the isolated subject to your liking.
Saving selections as a new document with a transparent background allows for easy integration and reuse of the isolated subject in various creative endeavors. Whether you’re designing graphics, creating collages, or compositing images, this approach gives you the freedom to incorporate the subject seamlessly into different projects.
The transparent background provides flexibility, enabling you to place the subject onto any background color or image without any unwanted artifacts or edges. The isolated subject becomes a stand-alone element that can be easily manipulated and combined with other elements to achieve the desired visual impact.
By saving selections as new documents with transparent backgrounds, you can build a library of isolated subjects that can be reused and repurposed, saving you time and effort in future projects. This workflow enhances your creative possibilities and streamlines your design process in Adobe Photoshop.
Using the Refine Edge tool for hair and fur selections
The Refine Edge tool in Adobe Photoshop is particularly useful when making selections involving hair or fur. These types of selections are often challenging due to their intricate and fine details. However, with the Refine Edge tool’s advanced features, you can achieve more precise and realistic hair or fur cutouts. Here’s how to effectively use the Refine Edge tool for hair and fur selections:
1. Open the Refine Edge dialog box by making a selection using any of the selection tools in Photoshop, and then clicking on “Select” in the top menu and choosing “Refine Edge” or “Select and Mask.”
2. Use the basic selection tool, such as the Quick Selection or Magic Wand, to select the general area that includes the hair or fur. You don’t need to make an extremely accurate selection at this stage.
3. Once you’re in the Refine Edge dialog box, use the Refine Edge brush tool to paint over the hair or fur areas. The brush tool helps Photoshop understand the fine details and edges of the hair or fur, refining the selection accordingly.
4. Adjust the brush size based on the hair or fur’s thickness and intricacy. Use smaller brush sizes for finer details and larger brush sizes for broader areas.
5. Experiment with the Smart Radius option to enhance the refinement process. This feature automatically detects and adjusts the selection’s radius based on the image’s content. It helps preserve the intricate details of the hair or fur, resulting in a more accurate selection.
6. Utilize the Edge Detection feature to further improve the precision of the selection. This tool intelligently detects and snaps the selection to the edges of the hair or fur, ensuring cleaner and more natural-looking cutouts.
7. Adjust the Global Refinement settings such as Smooth, Feather, or Contrast to fine-tune the appearance of the hair or fur selection. These adjustments help achieve a smoother transition between the selected areas and the background.
8. Preview the selection by changing the view mode to “On White,” “On Black,” or “On Layers.” This allows you to evaluate how well the Refine Edge tool is capturing the intricate details of the hair or fur and make any necessary adjustments.
Making selections for hair or fur requires careful attention to detail, and the Refine Edge tool provides invaluable assistance in achieving realistic and accurate results. By using the Refine Edge brush tool, Smart Radius, Edge Detection, and Global Refinement options, you can effectively overcome the challenges associated with selecting fine details.
With patience and practice, you will be able to create selections that seamlessly integrate hair or fur into various backgrounds or composite images. This level of precision and realism enhances the overall visual appeal and professionalism of your Photoshop projects.
Remember to experiment with different settings and take advantage of the Refine Edge tool’s robust features to refine hair or fur selections. The more you familiarize yourself with these tools, the more confident and proficient you will become in capturing the intricate beauty of hair and fur in your Photoshop compositions.
Tips and tricks for working with the Refine Edge tool
The Refine Edge tool in Adobe Photoshop is a powerful feature that can greatly enhance the accuracy and quality of your selections. To make the most of this tool and achieve seamless results, consider these helpful tips and tricks:
1. Start with a good initial selection: Before opening the Refine Edge dialog box, ensure that you have a solid initial selection using the appropriate selection tools in Photoshop. The Refine Edge tool is designed to refine and enhance selections, so starting with a decent initial selection will yield better results.
2. Zoom in for detailed work: When working with intricate details like hair or fine edges, zoom in on the image to get a closer view. This will allow you to see and refine the selection with greater precision.
3. Use a combination of tools: While the Refine Edge brush tool is excellent for refining selections, don’t hesitate to use other selection tools in combination. For example, start with the Quick Selection Tool to make a rough selection, then use the Refine Edge tool to further refine it.
4. Experiment with different brush sizes: Adjust the brush size in the Refine Edge dialog box to fit the specific details of your selection. Use smaller brushes for intricate details and larger brushes for larger areas that require refinement.
5. Utilize the Smart Radius option wisely: The Smart Radius option automatically adjusts the selection’s radius based on the image’s content. Experiment with different settings to find the right balance for your selection. This can help preserve the fine details and produce smoother results.
6. Refine edges with the brush tool: The Refine Edge brush tool is one of the key components of the Refine Edge tool. Use it to paint over areas that need refinement or those where the automatic selection may not be accurate enough. Remember to use short, quick strokes for more precise control.
7. Take advantage of edge detection: The Edge Detection feature is especially useful when working with complex edges. Experiment with different settings to see how it impacts the selection. It can help enhance the accuracy by snapping the selection to the edges of the subject more effectively.
8. Fine-tune with Global Refinements: The Global Refinements settings in the Refine Edge dialog box offer further control over the selection’s appearance. Adjust parameters like Smooth, Feather, Contrast, and Shift Edge to refine and polish your selection to perfection.
9. Preview in different view modes: Use the view mode options, such as “On White,” “On Black,” or “On Layers,” to preview how the refined selection will look in different contexts. This can help you evaluate the accuracy and overall quality of the selection.
10. Practice and explore: The Refine Edge tool requires practice to become proficient. Take the time to experiment with its various settings and tools, and explore different techniques for specific types of selections. The more you work with it, the better you’ll become at leveraging its capabilities.
By implementing these tips and tricks when using the Refine Edge tool, you can refine and enhance your selections with greater precision and achieve seamless results. Use the tool’s features to your advantage and adapt them to the specific needs of each image, ultimately elevating your Photoshop skills and producing professional-quality compositions.