
File
The File menu in Adobe Photoshop is where you can access a variety of options related to creating, opening, saving, and printing documents. It is an important menu that provides essential functions for managing your project files.
Here are some key options you will find in the File menu:
- New: This option allows you to create a new Photoshop document. You can specify the dimensions, resolution, and color mode of your new project.
- Open: Use this option to open an existing Photoshop file or import images and other media files into your current project.
- Save: This option allows you to save your project with its current state, including all layers, adjustments, and effects. You can choose the file format and location to save your work.
- Save As: If you want to save a copy of your project under a different name or file format, select this option. It is useful when you want to preserve the original file while experimenting with different versions.
- Print: This option provides settings and configurations for printing your images directly from Photoshop. You can specify the paper size, orientation, and other print-related options.
- Exit: When you are done working in Photoshop, select this option to close the software. It is important to save your work before exiting to avoid losing any changes.
The File menu is a crucial starting point for managing your project files in Adobe Photoshop. It provides essential options for creating and opening documents, saving your work, and preparing it for printing. Familiarize yourself with the functions available in the File menu to efficiently navigate and manage your Photoshop projects.
Edit
The Edit menu in Adobe Photoshop offers a range of powerful tools and options for editing and manipulating your images and graphics. It is where you can find functions related to selecting, transforming, and modifying your artwork to achieve the desired results.
Here are some key options in the Edit menu:
- Undo/Redo: These options allow you to reverse or redo your recent actions. If you made a mistake or want to revert changes, simply select the Undo option or use the keyboard shortcut (Ctrl/Cmd + Z).
- Cut/Copy/Paste: These options enable you to cut, copy, and paste selected elements in your project. You can use them to move or duplicate content within the same document or across different Photoshop documents.
- Transform: In this submenu, you will find various transformation options such as Scale, Rotate, Skew, Distort, and more. These tools help you resize, rotate, and warp your selected elements to achieve the desired composition.
- Fill: This option allows you to fill a selected area with a solid color, gradient, pattern, or even content-aware fill. It is useful for quickly adding or changing colors or textures within your artwork.
- Content-Aware: This submenu contains powerful tools like Content-Aware Move, Fill, and Scale. These intelligent features use advanced algorithms to automatically generate content based on the surroundings, making complex edits easier and faster.
- Transform Again: This option allows you to repeat the last transformation you applied to an element. It is useful when you want to duplicate an action without having to go through all the steps again.
The Edit menu in Adobe Photoshop provides a wide range of editing tools and options to enhance and modify your artwork. From undoing actions to transforming elements, cutting, copying, and pasting, and using advanced content-aware features, the Edit menu empowers you to manipulate your images with precision and creativity.
Image
The Image menu in Adobe Photoshop is where you can find various options and tools for modifying and enhancing your images. It provides a range of functions related to adjusting the appearance, color, and size of your artwork.
Here are some key options in the Image menu:
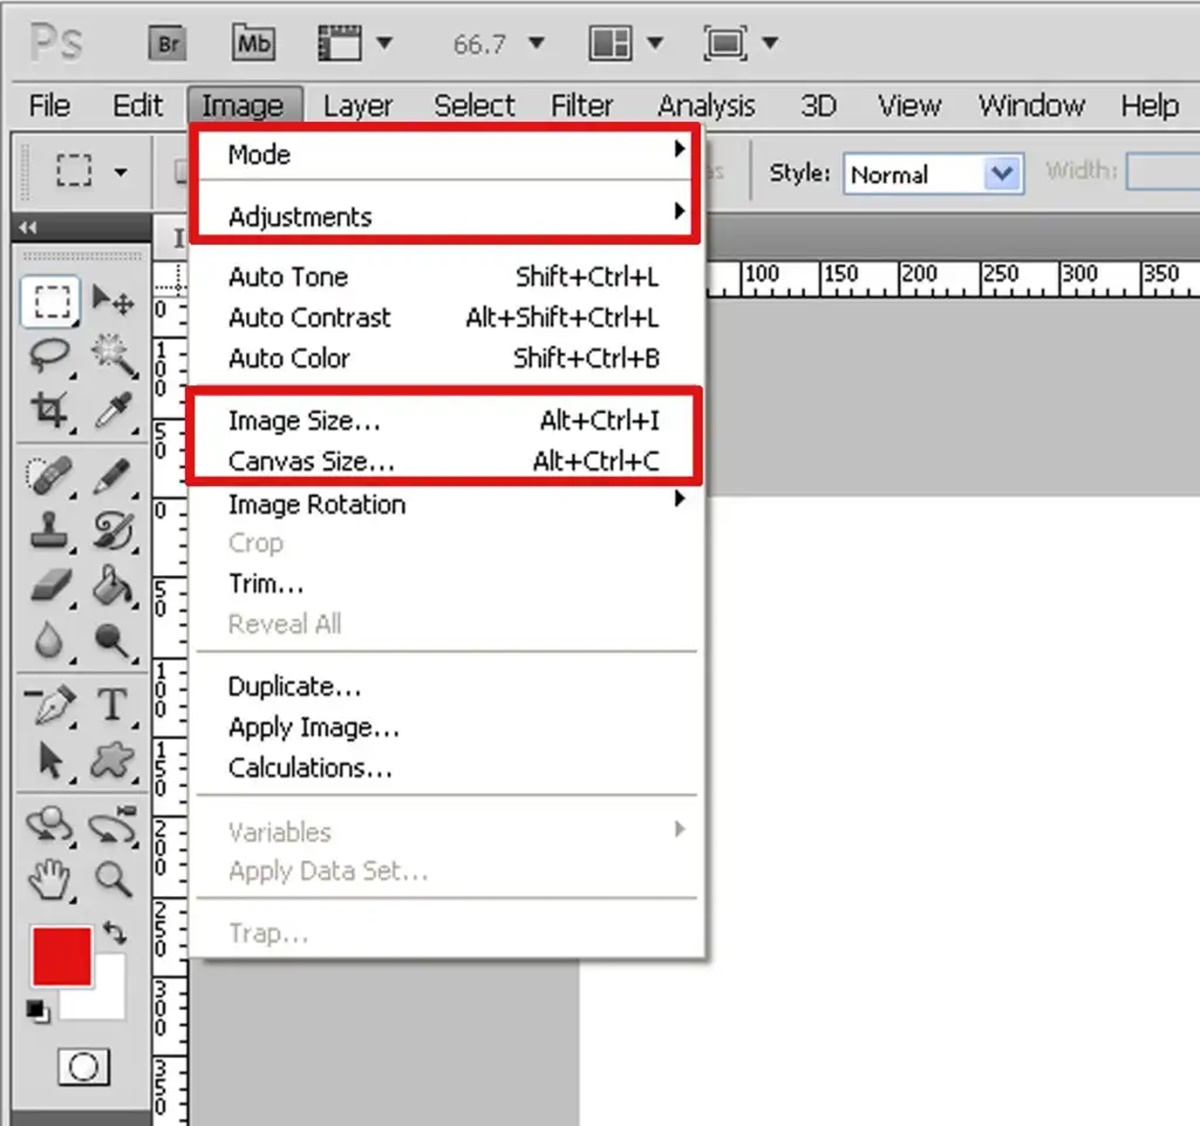
- Adjustments: This submenu offers a collection of adjustment layers and tools that allow you to fine-tune the brightness, contrast, color balance, levels, and other parameters of your image. It provides a non-destructive way to make edits and experiment with different looks.
- Image Size: Use this option to resize your image by adjusting its dimensions and resolution. You can specify the desired width, height, and resolution values, and choose the resampling method for the resizing process.
- Canvas Size: This option allows you to modify the size of your canvas without affecting the actual image. You can increase or decrease the canvas dimensions and choose how the existing content is positioned or adjusted within the new canvas size.
- Crop: Using the Crop tool, you can trim or remove unwanted areas from your image, adjust the aspect ratio, or straighten a crooked composition. It helps you focus on the main subject and improve the overall visual balance.
- Rotate Canvas: If you need to rotate the entire canvas, select this option. It enables you to rotate the canvas in clockwise or counterclockwise directions by custom angles, allowing you to correct or achieve a desired orientation for your artwork.
- Auto-Align Layers: When working with multiple layers, this option automatically aligns and blends them for enhanced composition. It is useful for combining multiple images or merging exposures to create perfectly aligned and blended results.
- Auto-Blend Layers: If you have multiple layers with varying focus or exposure, this option automatically blends them to create a seamless and natural-looking composite image. It is particularly beneficial for creating panoramas or HDR photos.
The Image menu in Adobe Photoshop provides powerful tools and options for adjusting and manipulating the appearance and size of your images. Whether you need to make color corrections, resize your artwork, crop unwanted areas, or align and blend multiple layers, the Image menu equips you with the necessary tools to enhance your images with precision and creativity.
Layer
The Layer menu in Adobe Photoshop is where you can access a range of options and features related to managing and manipulating layers in your artwork. Layers are fundamental building blocks that allow you to work with different elements independently, making it easier to edit, arrange, and organize your composition.
Here are some key options in the Layer menu:
- New Layer: This option allows you to create a new layer in your project. Layers provide a way to separate different elements, such as text, shapes, images, or effects, allowing you to make edits to specific parts of your composition without affecting the rest.
- Layer Style: By selecting this option, you can apply various styles and effects to your layers, such as drop shadows, glows, gradients, and more. Layer styles enhance the visual appearance of your artwork and allow you to create unique and eye-catching designs.
- Blending Options: This option opens a dialog box where you can customize blending modes, opacity, and other settings to control how layers interact and blend with each other. Blending options give you precise control over the transparency and appearance of your layers.
- Group Layers: Grouping layers allows you to organize and manage them more efficiently. It enables you to collapse or expand layer groups, apply transformations or styles to multiple layers simultaneously, and create a hierarchical structure within your composition.
- Rasterize: Rasterizing a layer converts it into a standard bitmap image, which is helpful when you want to apply certain filters or adjustments that are not compatible with vector or text layers. Keep in mind that rasterizing a layer is irreversible, so it’s advisable to keep a backup of the original layer.
- Merge Layers: If you want to combine multiple layers into a single layer, select this option. It can help simplify your composition or prepare it for further processing or exporting.
- Layer Mask: Layer masks allow you to selectively reveal or hide parts of a layer by painting on it with black, white, or shades of gray. They are non-destructive and provide a flexible way to make precise adjustments or create complex compositions.
The Layer menu in Adobe Photoshop offers a range of options and features that empower you to manage, manipulate, and enhance the layers in your artwork. Whether you need to create new layers, apply styles and effects, organize layers in groups, or work with layer masks, the Layer menu provides the necessary tools for achieving professional and creative results.
Select
The Select menu in Adobe Photoshop contains various tools and options that allow you to make precise selections of specific areas or elements within your artwork. Selections are essential for isolating parts of an image, applying edits or effects to specific areas, or combining multiple images seamlessly.
Here are some key options in the Select menu:
- Selection Tool: This submenu provides a set of selection tools, including the Marquee, Lasso, and Magic Wand tools. They enable you to make selections based on geometric shapes, freehand drawing, or color and tone similarities.
- Select and Mask: This option opens up a dedicated workspace where you can refine or modify your selections using advanced tools like the Refine Edge Brush, the Brush Tool, or the Quick Selection Tool. It is particularly useful for selecting complex subjects with fine details or challenging edges.
- Transform Selection: Selecting this option allows you to resize, rotate, skew, or distort your existing selection using the Transform tools. It provides flexibility when you need to fine-tune or adjust the shape or position of your selection.
- Feather: The Feather option softens the edges of your selections, creating a smoother and more natural transition between the selected and non-selected areas. It helps blend the selected elements seamlessly into the rest of the composition.
- Load Selection: This option allows you to load a saved selection from a specific channel, layer, or file. It is useful when you want to reuse or modify a selection you have previously saved.
- Save Selection: Use this option to save your current selection as an alpha channel, making it easily accessible for future use or modification. It is helpful when you need to apply the same selection to other parts of your artwork.
- Inverse: The Inverse option selects everything that was not initially selected, effectively flipping the selection. It is beneficial when you want to work on the non-selected area instead.
The Select menu in Adobe Photoshop provides a range of tools and options to facilitate precise and accurate selections of specific areas within your artwork. Whether you need to select geometric shapes, refine complex edges, transform selections, or save and reload them for future use, the Select menu equips you with the necessary tools to achieve the desired composition and edits with precision and efficiency.
Filter
The Filter menu in Adobe Photoshop offers a wide range of creative and practical effects that can be applied to your images. Filters allow you to transform the appearance of your artwork, enhancing its visual impact and adding unique stylistic elements.
Here are some key options in the Filter menu:
- Blur: This submenu contains various blur filters that help create a soft and out-of-focus effect on your images. You can choose from options like Gaussian Blur, Lens Blur, or Motion Blur to add depth or simulate motion in your compositions.
- Sharpen: The Sharpen submenu provides filters that enhance the clarity and sharpness of your images, making details stand out. Options like Sharpen, Unsharp Mask, or Smart Sharpen allow you to refine the edges and improve the overall crispness of your artwork.
- Distort: This submenu includes filters that allow you to distort or warp your images to create unique effects. With options like Liquify, you can manipulate the pixels, pushing, pulling, and reshaping them to create exaggerations or alterations in your composition.
- Artistic: The Artistic submenu offers a selection of filters that transform your images into artistic renditions. You can apply effects like Cutout, Watercolor, or Oil Paint to convert your photographs into stylized paintings or illustrations.
- Stylize: This submenu contains filters that add distinctive visual styles or effects to your images. From options like Glowing Edges, Find Edges, or Solarize, you can create unique looks or emphasize specific details in your artwork.
- Render: Render filters generate patterns, textures, or 3D effects within your images. With options like Clouds, Fibers, or Lighting Effects, you can add complexity or create realistic lighting scenarios to enhance the overall visual impact of your composition.
- Filter Gallery: This option opens a dialog box where you can preview and apply a wide range of filters to your images. It provides a convenient way to experiment with different filter combinations and settings to achieve the desired artistic or creative result.
The Filter menu in Adobe Photoshop offers a multitude of effects and transformations that allow you to unleash your creativity and enhance the visual impact of your artwork. Whether you want to add blur, sharpen details, distort shapes, or apply artistic and stylized effects, the Filter menu provides a comprehensive collection of tools to elevate your compositions and make them visually captivating.
View
The View menu in Adobe Photoshop allows you to control the display and visualization of your artwork on the screen. It provides a variety of options to customize the view and navigate through your composition more effectively.
Here are some key options in the View menu:
- Zoom In/Out: These options allow you to zoom in or out of your image to get a closer or wider view. You can also use the zoom tools or keyboard shortcuts (Ctrl/Cmd + “+/-“) to adjust the zoom level more precisely.
- Fit on Screen: This option automatically adjusts the zoom level to fit your entire image within the workspace. It is useful when you want to quickly view your entire composition without the need for manual zoom adjustments.
- Actual Pixels: Use this option to display your image at its actual size, where one screen pixel corresponds to one image pixel. It is helpful for accurate inspection of details or when you need to assess the overall clarity of your image.
- Rulers: Enabling the Rulers option displays horizontal and vertical rulers along the edges of your workspace. Rulers help you measure distances and align elements more precisely within your artwork.
- Show: This submenu provides various options to display or hide specific elements in your workspace, such as grids, guides, selection edges, or layer edges. It allows you to customize the visibility of these elements based on your workflow requirements.
- Rotate View: If you need to rotate the view of your image while keeping the actual image intact, select this option. It is particularly useful when working on an angled or tilted composition and makes it easier to manipulate and edit elements at different angles.
- FullScreen Mode: This option maximizes your workspace to occupy the entire screen, hiding other interface elements temporarily. It provides a distraction-free environment to focus solely on your artwork and allows for a more immersive editing experience.
The View menu in Adobe Photoshop offers a range of options to customize and optimize the display of your artwork. From zooming in and out to fitting the image on the screen, displaying rulers, grids, and guides, or rotating the view, the View menu enhances your navigation and viewing experience, making it easier to work with precision and attention to detail.
Window
The Window menu in Adobe Photoshop provides access to various panels and workspaces that help you navigate, manage, and customize the interface to suit your specific needs and workflow.
Here are some key options in the Window menu:
- Workspace: This submenu allows you to choose from different pre-defined workspaces or create and save your custom workspace. Each workspace is a combination of specific panels and layout configurations designed for different tasks or workflows, such as Photography, Painting, or 3D.
- Tools: Enabling the Tools option displays the Tools panel, which contains a wide range of tools for selecting, painting, retouching, and performing various tasks in Photoshop. The Tools panel is an essential component of the interface and provides easy access to the tools you need for your editing tasks.
- Properties: This option displays the Properties panel, which shows the properties and settings for the currently selected tool or the active layer. It allows you to adjust tool-specific options or modify layer properties conveniently, without the need to navigate through multiple menus or dialog boxes.
- Layers: Enabling the Layers option displays the Layers panel, which is used for managing and organizing layers in your artwork. It provides options to create, rename, rearrange, or apply layer styles and blending modes, making it easier to work with complex compositions that involve multiple layers.
- Color: This option displays the Color panel, which provides various color-related tools and options. It allows you to select and manage colors, create custom color swatches, adjust color balance, or apply color effects to your artwork.
- History: Enabling the History option displays the History panel, which keeps a record of the actions you have performed on your image. It allows you to undo or redo specific steps in your editing process, providing a useful way to backtrack and experiment with different edits.
- Info: This option displays the Info panel, where you can view real-time information about the pixel values, size, and position of your cursor or selected area. It provides precise measurements and coordinates, enabling accurate positioning and adjustment of elements in your composition.
The Window menu in Adobe Photoshop offers a range of panels and workspaces that allow you to customize the interface and access the tools and information you need for your editing tasks. Whether you need to manage layers, adjust colors, track editing history, or view real-time information, the Window menu empowers you to work efficiently and tailor the Photoshop environment to suit your specific requirements.
Help
The Help menu in Adobe Photoshop provides access to resources and support options that can assist you in solving problems, learning new techniques, and maximizing your productivity with the software.
Here are some key options in the Help menu:
- Photoshop Help: This option opens the official Adobe Photoshop Help documentation, where you can find detailed tutorials, guides, and articles covering various aspects of Photoshop. It is a valuable resource for learning new features, understanding complex techniques, or troubleshooting issues.
- Online Support: Enabling the Online Support option takes you to Adobe’s online support portal, where you can search for answers to your questions, participate in community discussions, and submit support tickets for assistance from the Adobe support team. It is a great resource for troubleshooting specific issues or finding solutions to common problems.
- Keyboard Shortcuts: This option displays a list of keyboard shortcuts for common Photoshop functions. It can help you work more efficiently by reducing the need to navigate menus and toolbars. Familiarize yourself with these shortcuts to streamline your workflow.
- Updates: Selecting the Updates option allows you to check for and download the latest updates and bug fixes for Adobe Photoshop. Keeping your software up to date ensures that you have access to the latest features, enhancements, and security patches.
- Deactivate: If you want to deactivate your Adobe Photoshop license on a particular device, choose the Deactivate option. This is useful when you want to install and activate Photoshop on a different computer or if you no longer need to use Photoshop on a specific device.
- Manage Extensions: This option opens a dialog box where you can manage and control installed extensions and add-ons for Photoshop. Extensions provide additional functionality and customization options, and the Manage Extensions option allows you to enable, disable, or remove them as needed.
The Help menu in Adobe Photoshop offers a range of resources and support options to assist you in using the software effectively. From accessing official documentation and online support to finding keyboard shortcuts, checking for updates, and managing extensions, the Help menu provides a valuable toolkit to ensure you have the knowledge and assistance you need to make the most of Adobe Photoshop.