
Finding a Legitimate Source
When it comes to getting a free trial of Photoshop, finding a legitimate source is crucial. While there might be tempting offers and unofficial websites claiming to offer free trials, it’s important to stick to reputable sources to ensure you’re getting a genuine and legal version of the software. Here are some tips to help you find a legitimate source for your Photoshop free trial:
- Visit Adobe’s Official Website: The first step in finding a legitimate source is to visit Adobe’s official website. Adobe is the developer of Photoshop, and their website is the most reliable and trustworthy source for obtaining a free trial. Avoid any other websites claiming to offer free trials, as they may be unauthorized and potentially harmful.
- Navigate to the Photoshop Page: Once you’re on Adobe’s website, navigate to the Photoshop product page. You can do this by either searching for Photoshop in the product section or by using the search bar on the Adobe website. Make sure you’re on the official Photoshop page to ensure you’re downloading the legitimate trial version.
- Verify the URL: Before proceeding, double-check the URL in your web browser to confirm that you’re still on the official Adobe website. Scammers often create fake websites that look similar to the official ones, so verifying the URL can prevent you from downloading potentially harmful software.
- Read the System Requirements: On the official Photoshop page, you’ll find the system requirements for running the software. Make sure your computer meets the minimum requirements to avoid any compatibility issues during the trial period.
- Check for Reviews and Testimonials: To further ensure the legitimacy of the trial, check for reviews and testimonials from other users who have successfully downloaded and used the Photoshop free trial. Positive feedback from reputable sources can give you peace of mind that you’re making the right choice.
- Avoid Suspicious Offers: If you come across websites or ads promising a free Photoshop trial that seems too good to be true, it probably is. Avoid clicking on these offers as they may lead to unauthorized downloads or even malware that can harm your computer.
By following these tips, you can find a legitimate source for your Photoshop free trial and avoid any potential risks. Adobe’s official website is the most reliable and secure platform to obtain the genuine version of Photoshop, ensuring that you can explore the software’s features and capabilities without any concerns.
Exploring Adobe’s Official Website
Adobe’s official website is the go-to destination for accessing the free trial of Photoshop. Navigating the website effectively will help you find the necessary information and resources to begin your Photoshop trial successfully. Here’s a guide on how to explore Adobe’s official website:
- Homepage: Start by visiting Adobe’s homepage at www.adobe.com. This is where you can access a wide range of Adobe products and services.
- Products Section: Look for the “Products” section on the top menu bar or the homepage. Hover over it, and you will find a dropdown menu with various Adobe products.
- Locating Photoshop: In the dropdown menu, click on “Photoshop” to access the dedicated Photoshop product page. This page provides more detailed information about Photoshop and its features.
- Product Page: On the Photoshop product page, you’ll find an overview of the software, along with key features, benefits, and pricing options.
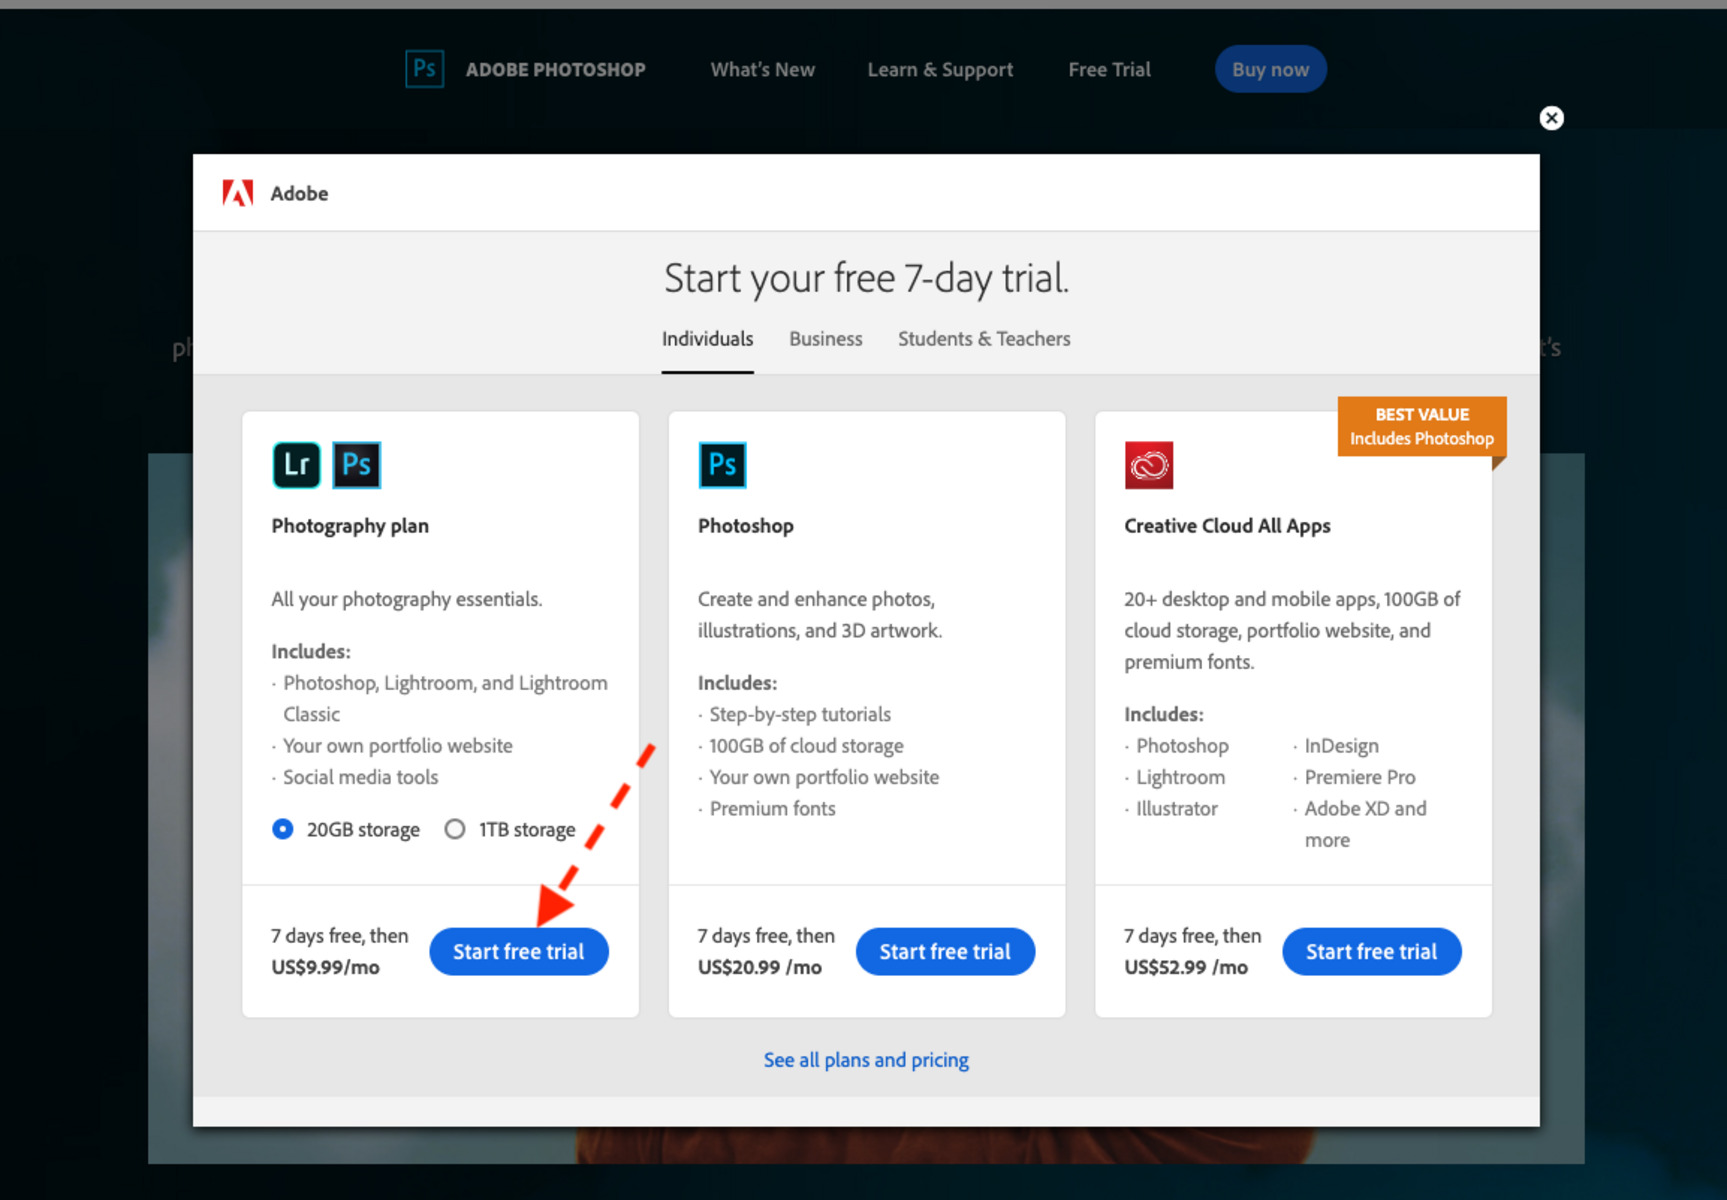
- Free Trial Information: Look for a prominent section that mentions the availability of a free trial. It may include a button or a link to start your free trial.
- System Requirements: Verify that your computer meets the minimum system requirements needed to run Photoshop. This information is usually listed on the product page or in a separate system requirements section.
- Downloading the Free Trial: Once you have confirmed your eligibility and checked the system requirements, click on the link or button to start the download process. Follow any prompts or instructions provided by Adobe.
- Support and Resources: Adobe’s official website offers a wealth of resources to help you get started with Photoshop. Look for sections such as “Support,” “Tutorials,” or “Learn,” where you can find guides, tutorials, and forums to expand your Photoshop knowledge.
- Contact Adobe: If you have any questions or encounter issues during the trial process, Adobe’s website provides contact information to reach their customer support team. Use this resource for assistance with any technical or billing-related inquiries.
Navigating Adobe’s official website effectively will ensure that you find the necessary information and resources to access the Photoshop free trial hassle-free. Take the time to explore the various sections of the website, read the provided information thoroughly, and make the most of the available resources to enhance your Photoshop experience.
Choosing the Right Plan for You
When it comes to selecting a plan for using Photoshop, Adobe offers several options to cater to different needs and budgets. It’s essential to choose the right plan that aligns with your requirements and ensures a smooth experience throughout your Photoshop journey. Here are some considerations to keep in mind when selecting the plan that suits you:
- Individual vs. Business: Determine whether you’re using Photoshop for personal or professional purposes. Adobe offers plans specifically tailored for individuals and businesses, each with its own features and pricing structure.
- Subscription Model: Adobe operates on a subscription-based model, where you pay a monthly or annual fee to access and use Photoshop. Evaluate your budget and decide whether a monthly or annual subscription is more convenient for you.
- Single App vs. Creative Cloud: Adobe offers a single app plan, where you only have access to Photoshop, and the Creative Cloud plan, which includes multiple Adobe applications. Consider your needs and the additional software you may require for your projects.
- Feature Comparison: Review the features available in each plan to ensure they meet your specific requirements. Take note of any advanced features or functionalities that may be essential for your Photoshop projects.
- Cloud Storage: Take into account the amount of cloud storage provided with each plan. If you work with large files or require a significant amount of storage for your projects, opt for a plan that offers ample cloud storage space.
- Upgrade Options: Consider whether you may need to upgrade your plan in the future. Evaluate the upgrade options offered by Adobe to ensure a seamless transition and compatibility with your evolving needs.
- Customer Reviews: Read reviews and testimonials from other Adobe users to gauge the satisfaction level with different plans. This can provide valuable insights into the pros and cons of each plan and help you make an informed decision.
- Flexibility: Keep in mind that Adobe’s subscription plans offer flexibility, allowing you to cancel or modify your plan if needed. This gives you the opportunity to adjust your subscription based on changing circumstances or project requirements.
By considering these factors, you can choose the right plan that suits your needs and budget. Take your time to evaluate the options, explore the features and pricing structure, and make an informed decision that will enable you to maximize your Photoshop experience.
Creating an Adobe ID
Before you can start using the free trial of Photoshop, you will need to create an Adobe ID. An Adobe ID is a unique identifier that allows you to access Adobe’s products and services, including the Photoshop trial. Here’s a step-by-step guide on creating an Adobe ID:
- Go to Adobe’s Website: Visit Adobe’s official website at www.adobe.com and navigate to the sign-in page.
- Click on “Sign in”: On the top-right corner of the Adobe website, you’ll find a “Sign In” button. Click on it to proceed.
- Select “Get an Adobe ID”: On the login page, you’ll have the option to either sign in with an existing Adobe ID or create a new one. Choose the “Get an Adobe ID” option to create a new account.
- Fill in the Required Information: Fill out the registration form with your personal information, including your email address, name, and password. Make sure to choose a strong password to keep your account secure.
- Verify Your Email Address: After filling in the required information, Adobe will send a verification email to the email address you provided. Go to your inbox, open the email, and follow the instructions to verify your email address.
- Complete the Registration Process: Once your email is verified, you’ll be directed to a page where you can complete the remaining steps of the registration process. You may be asked to provide additional information, such as your country and language preferences.
- Accept Terms and Conditions: Review Adobe’s terms and conditions, and if you agree, check the box indicating your acceptance.
- Click “Continue”: After accepting the terms and conditions, click on the “Continue” button to proceed with the creation of your Adobe ID.
- Confirmation: Once you’ve completed all the necessary steps, Adobe will confirm that your Adobe ID has been successfully created.
By following these steps, you will have successfully created an Adobe ID, which is essential for accessing the free trial of Photoshop. Your Adobe ID will also grant you access to other Adobe products and services, allowing you to explore the full range of Adobe’s offerings.
Downloading the Photoshop Trial
Once you have created an Adobe ID, you can proceed to download the Photoshop trial version. The trial version allows you to experience the full functionality of Photoshop for a limited period. Here’s a step-by-step guide on how to download the Photoshop trial:
- Visit the Photoshop Product Page: Go to Adobe’s official website and navigate to the Photoshop product page. You can find it by searching for Photoshop in the product section or using the search bar on the Adobe website.
- Find the Free Trial Option: On the Photoshop product page, look for a section that mentions the availability of a free trial. It may be a button or a link that says “Free Trial” or “Try for Free.” Click on this option to start the download process.
- Choose Your Plan: Adobe may prompt you to choose a plan before proceeding with the download. If you’re only interested in the trial version, select the appropriate option to proceed.
- Sign In with your Adobe ID: After selecting your plan, you may be asked to sign in with your Adobe ID. Enter your email address and password associated with your Adobe ID to continue.
- Confirm Trial Download: Adobe may display a confirmation page or pop-up message, notifying you about the trial download. Verify the details and click on “Download” or “Start your trial.”
- Select the Platform: Choose your operating system, such as Windows or macOS, before starting the download. Ensure that you select the correct platform that matches your computer’s operating system.
- Download Process: The download will begin, and the Adobe Creative Cloud desktop application may automatically launch. This application manages your Adobe software installations and updates. Wait for the Photoshop trial to finish downloading.
- Installation: Once the download is complete, the installation process will begin. Follow the on-screen prompts to install Photoshop on your computer. The installation process may vary depending on your operating system.
- Launch Photoshop: After successfully installing Photoshop, you can launch the application. Look for the Photoshop icon in your application folder or desktop, and double-click to open it.
By following these steps, you will be able to download and install the Photoshop trial version on your computer. Remember that the trial period is limited, typically lasting around 7 to 14 days, depending on Adobe’s promotions or offers. Make the most of this trial period to explore the features and functionalities of Photoshop and determine if it meets your editing needs.
Installing and Launching Photoshop
After downloading the Photoshop trial, the next step is to install and launch the software on your computer. This process ensures that Photoshop is properly installed and ready to use. Here’s a step-by-step guide on how to install and launch Photoshop:
- Locate the Installation File: Once the download is complete, navigate to the location where the Photoshop installation file was saved. It is typically found in your computer’s “Downloads” folder.
- Run the Installation File: Double-click on the installation file to begin the installation process. This will launch the installer, which will guide you through the installation steps.
- Choose Language and Preferences: Select your preferred language and any additional preferences during the installation process. These preferences can include the installation location and shortcuts for launching Photoshop.
- Read and Accept the License Agreement: Review the license agreement provided by Adobe. If you agree to the terms and conditions, check the box indicating your acceptance. Proceed with the installation by clicking “Next” or “Install.”
- Wait for the Installation to Complete: The installation process may take a few minutes to complete. It’s important to be patient and avoid interrupting the installation. Your computer’s performance may be temporarily affected during this time.
- Launch Photoshop: After the installation is finished, you should see an option to launch Photoshop. Check the box or click the “Launch” button to open the application.
- Sign In with your Adobe ID: Upon launching Photoshop, you may be asked to sign in with your Adobe ID. Enter your email address and password associated with your Adobe ID to continue. This step is necessary to verify your trial period.
- Activation and Verification: Adobe may require you to activate and verify your installation of Photoshop. Follow the prompts and provide the necessary information to complete this process. Activation is typically done online.
- Update Photoshop (if necessary): Once you have successfully launched Photoshop, it’s advisable to check for any available updates. Adobe regularly releases updates to enhance performance and fix any bugs or security issues. Go to the “Help” menu in Photoshop and click on “Updates” to check for and install any available updates.
By following these steps, you will be able to properly install and launch Photoshop on your computer. Remember to sign in with your Adobe ID and complete any necessary activation or verification processes to fully activate the trial version. Once you have successfully launched Photoshop, you can begin exploring its various features and tools to unleash your creativity and edit your photos and designs.
Getting Familiar with the Interface
As you begin your journey with Photoshop, it’s important to familiarize yourself with the interface and layout of the software. Understanding the different elements and features of the interface will help you navigate through Photoshop with ease. Here are some key components of the Photoshop interface to get you started:
- Menu Bar: The menu bar is located at the top of the screen and provides access to various menus such as File, Edit, Image, and more. It houses several commands and options for managing your files and manipulating images.
- Tool Options Bar: Below the menu bar, you’ll find the tool options bar. This bar displays specific options and settings for the selected tool, allowing you to customize the tool’s behavior according to your needs. It dynamically changes as you switch between different tools.
- Workspace: Photoshop offers different workspaces tailored for different tasks or users. The workspace consists of panels, toolbars, and windows arranged in a specific layout to optimize productivity. You can choose from pre-defined workspaces like Essentials, Photography, or create your own custom workspace.
- Canvas: The canvas is the main area where you work on your images or designs. It displays the currently opened document and can be resized, zoomed in or out, and manipulated using various tools and commands.
- Tools Panel: Located on the left side of the interface, the tools panel contains a wide range of tools and functions that you can use to edit and manipulate your images. Some essential tools include the Move Tool, Brush Tool, Selection Tools, and Transform Tools.
- Layers Panel: The Layers panel is a vital component of Photoshop, allowing you to work with different layers in your projects. Layers help you organize and manipulate elements independently, making it easier to edit and apply effects without affecting the rest of your image.
- Properties Panel: The properties panel provides contextual settings for the currently selected tool or layer. It allows you to make adjustments and modifications specific to the chosen element, such as color adjustments for a selected layer or brush settings for the brush tool.
- Color Swatches and Palette: Photoshop offers various options for selecting and managing colors. The swatches panel allows you to choose from pre-defined color swatches, while the color picker and color palette offer more advanced options for selecting and creating custom colors.
- Tool Presets: Photoshop allows you to save and load tool presets, enabling you to save time by quickly accessing frequently used tool settings or creating your own customized tool configurations.
- Zoom and Navigation Tools: Located at the bottom of the interface, the zoom and navigation tools help you navigate through your image, zoom in or out, and pan across the canvas for precise editing.
By familiarizing yourself with these key elements of the Photoshop interface, you will be able to navigate the software efficiently and access the necessary tools and features for your editing tasks. Take the time to explore the different panels, experiment with different tools, and customize your workspace to create a productive and personalized editing environment in Photoshop.
Exploring Basic Tools and Features
When starting with Photoshop, it’s crucial to familiarize yourself with the basic tools and features that form the foundation of the software. These tools and features allow you to perform fundamental editing tasks and enhance your images. Here are some essential tools and features in Photoshop to help you get started:
- Selection Tools: Photoshop offers a variety of selection tools, including the Rectangular Marquee, Elliptical Marquee, Lasso, and Magic Wand tools. These tools allow you to make precise selections, isolate specific areas of your image, and perform targeted edits.
- Brush Tool: The Brush tool is one of the most versatile tools in Photoshop. It allows you to paint, draw, and apply various effects to your images. You can adjust the size, hardness, and opacity of the brush, select different brush presets, and even create custom brushes.
- Eraser Tool: The Eraser tool is used to remove parts of your image or delete specific areas. It can be useful for refining selections, cleaning up unwanted elements, or creating transparent areas on layers.
- Clone Stamp Tool: The Clone Stamp tool is excellent for duplicating or cloning parts of your image. It allows you to copy pixels from one area and seamlessly apply them to another part, helping you remove imperfections or duplicate objects.
- Adjustment Layers: Adjustment layers are essential for non-destructive editing in Photoshop. They enable you to make changes to the color, brightness, contrast, and other aspects of your image without directly modifying the original pixels. Adjustment layers can be easily edited or removed, providing flexibility in editing.
- Layers and Layer Masks: Understanding layers and layer masks is fundamental to Photoshop. Layers allow you to stack different elements or parts of your image, providing easy control over individual elements. Layer masks, on the other hand, enable you to hide or reveal specific areas of a layer, allowing for precise blending and editing.
- Text Tool: Photoshop includes a text tool that allows you to add and customize text in your images or designs. You can choose from a variety of fonts, adjust the size, color, and style, and apply various text effects.
- Transformations: Photoshop provides various transformation tools, such as Scale, Rotate, and Free Transform, which allow you to resize, rotate, and distort your images or selected areas. These tools are beneficial for adjusting proportions, aligning elements, and creating perspective effects.
- Smart Objects: Smart Objects are a powerful feature in Photoshop that allows you to preserve the original quality and flexibility of imported images or objects. By converting a layer into a Smart Object, you can apply non-destructive transformations, filters, and adjustments without permanently altering the original content.
- Canvas Size and Cropping: Photoshop allows you to adjust the canvas size and crop your images to remove unwanted areas or create specific ratios. The canvas size determines the overall dimensions of your image, while cropping helps you focus on specific elements or compositions.
These are just a few of the basic tools and features that Photoshop offers. As you continue to explore the software, you’ll discover many more tools and functionalities that will enhance your editing capabilities. Take the time to experiment with these basic tools and features, and gradually expand your Photoshop knowledge to unlock its full potential.
Learning about Advanced Editing Techniques
Once you have grasped the basics of Photoshop, it’s time to dive into advanced editing techniques that can take your images to the next level. These techniques allow you to apply professional-grade edits and enhance your images with precision and creativity. Here are some advanced editing techniques to explore in Photoshop:
- Advanced Selections: Mastering advanced selection techniques can significantly improve your editing workflow. Techniques such as refining selections, using the Pen tool for precise paths, or utilizing the Quick Mask mode for intricate selections can help you make more accurate selections and achieve complex edits.
- Layer Blending Modes: Understanding layer blending modes can transform the way you combine and blend different layers in Photoshop. Experiment with blending modes like Multiply, Screen, Overlay, and others to create unique effects, enhance colors, or add depth to your compositions.
- Adjustment Layers and Masks: Take your editing skills further by learning advanced techniques for using adjustment layers and layer masks. Explore features like selective color adjustments, curves adjustments, and gradient maps to fine-tune the tonal range, color balance, and contrast in your images.
- Retouching Techniques: Advanced retouching techniques allow you to achieve flawless and natural-looking results. Learn how to remove blemishes, smooth skin, fix imperfections, and enhance details using tools like the Healing Brush, Clone Stamp, and Frequency Separation. These techniques are particularly valuable for portrait and beauty retouching.
- Photo Manipulation: Photoshop’s extensive toolset opens up a world of creative possibilities for photo manipulation. Learn techniques like composite imaging, object removal or replacement, creating realistic shadows and reflections, and integrating multiple images seamlessly into captivating compositions.
- Advanced Filters and Effects: Experiment with advanced filters and effects to add artistic flair and unique styles to your images. Techniques like adding blur or bokeh effects, creating vintage or cinematic looks, applying texture overlays, or using liquefy and warp tools can help you transform ordinary images into stunning visuals.
- Non-Destructive Editing: Embrace non-destructive editing techniques to maintain flexibility and preserve the original image quality. Use adjustment layers, layer masks, and Smart Objects to make reversible edits without permanently altering the underlying content. This allows you to fine-tune your edits and make adjustments at any point in the editing process.
- Working with 3D and Typography: Explore the 3D capabilities of Photoshop to create engaging three-dimensional objects or text effects. Learn how to manipulate lighting, textures, and materials to achieve realistic or artistic 3D compositions. Additionally, experiment with advanced typography techniques to create visually appealing text designs and effects.
- Automation and Batch Processing: Utilize Photoshop’s automation tools to streamline repetitive tasks and enhance productivity. Learn about actions, scripts, and batch processing to apply edits or perform actions on multiple images simultaneously, saving time and effort.
- Video Editing: Photoshop also offers basic video editing capabilities. Learn how to import, trim, arrange, and apply edits to video clips. Explore features like adding text, transitions, and audio to create visually compelling video projects or enhance your social media content.
By exploring these advanced editing techniques, you can unlock the full potential of Photoshop and elevate the quality and creativity of your edits. Constant experimentation and practice will help you refine your skills and develop your unique editing style. Remember to take advantage of online tutorials, forums, and resources to expand your knowledge and stay up to date with the latest editing techniques in Photoshop.
Using Photoshop for Your Projects
Now that you have gained knowledge of basic and advanced editing techniques in Photoshop, it’s time to apply your skills to real projects. Photoshop is a versatile tool that can be used for various types of projects, from photo editing and retouching to graphic design and digital art. Here are some ideas on how you can use Photoshop for your projects:
- Photo Editing: Use Photoshop to enhance your photographs by adjusting the exposure, color balance, and contrast. Remove unwanted elements, retouch imperfections, and apply creative effects to transform your photos.
- Graphic Design: Create eye-catching graphics, posters, flyers, and social media posts using Photoshop’s design tools. Incorporate text, images, and illustrations to produce visually appealing designs for personal or professional projects.
- Digital Art: Unleash your creativity by using Photoshop as a digital canvas. Explore digital painting techniques, create stunning illustrations, and experiment with textures, brushes, and blending modes to produce unique and captivating digital artwork.
- Web Design: Design engaging and user-friendly websites using Photoshop’s layout and design features. Create wireframes and mockups, design website elements, and optimize images for web use. Export your designs for web development purposes.
- Photo Restoration: Restore old or damaged photographs using Photoshop’s retouching tools and techniques. Repair torn or faded images, remove scratches or stains, and bring old memories back to life by enhancing their quality.
- Typography and Logo Design: Utilize Photoshop to design custom typography and logos. Experiment with different fonts, effects, and arrangements to create impactful and memorable typographic compositions or brand identities.
- Collage and Mixed Media: Combine multiple images, textures, and elements to create collages or mixed media artwork. Blend different elements seamlessly, experiment with layering and masking techniques, and create visually stunning compositions.
- Special Effects and Cinemagraphs: Delve into the world of special effects by adding surreal or magical elements to your photos or designs. Experiment with lighting effects, create cinemagraphs by combining static images with subtle moving elements, or apply artistic filters and styles to produce unique visual effects.
- Product Packaging and Branding: Design product packaging, labels, and branding materials using Photoshop’s layout and design tools. Create custom product mockups or prototypes and visualize how your designs will look in real-world applications.
- Social Media Graphics: Design eye-catching visuals for your social media platforms. Create attention-grabbing posts, banners, profile pictures, and cover images that reflect your brand or personal style.
These are just a few examples of how you can use Photoshop for a wide range of projects. The possibilities are endless, and Photoshop allows you to unleash your creativity and bring your ideas to life. Whether it’s for personal use, professional projects, or artistic endeavors, let Photoshop be your tool for creating stunning visuals and making a lasting impact.
Troubleshooting Common Issues
While using Photoshop, you may encounter various issues that can hinder your workflow. It’s essential to be familiar with common problems and their solutions to ensure a smooth editing experience. Here are some troubleshooting tips for common issues in Photoshop:
- Performance Issues: If Photoshop is running slowly, try closing any unnecessary applications or processes running in the background. You can also adjust the performance settings in Photoshop preferences by allocating more RAM for the software.
- Crashing or Freezing: If Photoshop crashes or freezes frequently, ensure that you have the latest updates installed. Resetting Photoshop preferences can also resolve software conflicts that may be causing crashes. If the issue persists, check for conflicting plugins or check Adobe’s support website for specific troubleshooting steps.
- Brush Lag: If you experience lag or delays when using brushes, try reducing the brush size or adjusting the brush hardness. You can also increase the amount of allocated RAM for Photoshop or lower the document resolution to improve brush performance.
- Color Inconsistencies: If colors appear different in Photoshop compared to other software or when printed, ensure that you are working in the correct color profile. Consider calibrating your monitor to ensure accurate color representation. Additionally, check that your Photoshop color settings are properly configured.
- Missing Fonts: If a document uses fonts that are not installed on your system, Photoshop will display a missing font warning. You can either install the missing fonts on your computer or replace them with alternative fonts. Be mindful of font licensing restrictions when using third-party fonts.
- File Corruption: To prevent file corruption, regularly save your work in multiple iterations. Use the Save As feature to create backup copies of your files. In case of a corrupted file, you can try opening a previous version, using file recovery software, or utilizing Photoshop’s built-in recovery feature.
- Tool or Menu Issues: If certain tools or menus are not working as expected, try resetting the Photoshop preferences. Navigate to Edit > Preferences > General (Windows) or Photoshop > Preferences > General (Mac), and click on the “Reset Preferences on Quit” button. This will restore the default settings of Photoshop.
- Undo Limit: By default, Photoshop limits the number of undo steps. If you need to increase the number of undos available, go to Edit > Preferences > Performance (Windows) or Photoshop > Preferences > Performance (Mac), and adjust the number of History States.
- Brush or Tool Settings: If a brush or tool is not working as expected, double-check the settings in the tool options bar. Adjust the brush size, hardness, opacity, and flow values to achieve the desired effect. You can also reset the tool settings by right-clicking on the tool icon in the options bar and choosing “Reset Tool” from the contextual menu.
- Software Updates: Keep Photoshop up to date by installing the latest updates from Adobe. These updates often include bug fixes, performance improvements, and new features. Regularly check for updates by going to Help > Updates in Photoshop’s menu.
By following these troubleshooting tips, you can overcome common issues that may arise while using Photoshop. Remember to regularly back up your work, keep your software updated, and refer to Adobe’s support resources or community forums for further assistance with specific problems. Troubleshooting requires patience and persistence, so don’t hesitate to seek help or explore alternative solutions to ensure a seamless editing experience in Photoshop.
Making the Most of Your Free Trial
During your free trial of Photoshop, it’s important to make the most of the limited time you have. By utilizing your trial period effectively, you can explore the software’s features, practice your editing skills, and determine if Photoshop is the right tool for your needs. Here are some tips to maximize your Photoshop free trial:
- Set Goals and Plan: Before diving into Photoshop, identify your goals for the trial period. Determine the specific skills you want to develop or the projects you want to work on. Having a clear plan will help you stay focused and make the most of your time.
- Start with Tutorials and Resources: Familiarize yourself with Photoshop’s interface and tools by following online tutorials, watching video courses, or exploring Adobe’s official learning resources. This will help you understand the basics and gain confidence in using Photoshop.
- Experiment and Explore: Use the trial period to experiment with different tools, features, and techniques in Photoshop. Try out various filters, adjustments, and effects to understand how they can transform your images. Explore different workflows, shortcuts, and plugins to enhance your editing process.
- Practice with Sample Images: If you don’t have your own images to work with, utilize sample images provided by Adobe or freely available online. These images can serve as a starting point for practicing different editing techniques and trying out various features of Photoshop.
- Take Advantage of Community and Support: Engage with the Photoshop community by joining forums, participating in online groups, or connecting with fellow designers and photographers. Share your work, ask for feedback, and learn from others. Additionally, utilize Adobe’s support resources for any technical issues or questions you have during your trial period.
- Focus on Specific Skills or Projects: Use your trial period to focus on developing specific skills or working on projects that align with your interests or professional goals. Explore retouching techniques, graphic design principles, or digital painting styles, depending on your area of focus.
- Save Your Work and Create a Portfolio: As you go through the trial, make sure to save your work regularly. This will allow you to review your progress and build a portfolio showcasing your newly acquired Photoshop skills. A portfolio can be a valuable asset for showcasing your talent or applying for creative opportunities.
- Collaborate with Others: If possible, collaborate with other Photoshop users or creative professionals during your trial period. This can provide valuable insights, feedback, and inspiration. Collaborative projects can also help you learn how to work effectively in a team and understand different perspectives on editing techniques.
- Document Your Process: Keep track of the techniques and tools you discover during your trial period. Take notes, create reference sheets, or record video tutorials demonstrating your workflow. This documentation will be valuable for future reference and will assist in reinforcing your learning.
- Evaluate and Reflect: Towards the end of your trial period, take some time to reflect on your experience with Photoshop. Assess the skills you have learned, the projects you have completed, and the overall value of Photoshop for your creative endeavors. This reflection will help you make an informed decision about whether to continue using Photoshop after the trial.
By following these tips, you can make the most of your Photoshop free trial. Gain a solid understanding of the software, develop skills, and assess whether Photoshop aligns with your editing needs and creative ambitions. Whether you decide to continue using Photoshop or explore alternative tools, the knowledge and experience gained during the trial will be invaluable in your creative journey.