
Selecting Background Eraser Tool
Removing the background from an image is a common task in graphic design and photo editing. One of the most effective tools for this purpose is the Background Eraser Tool in Adobe Photoshop. With this tool, you can easily erase the unwanted background and create a clean and transparent background for your images.
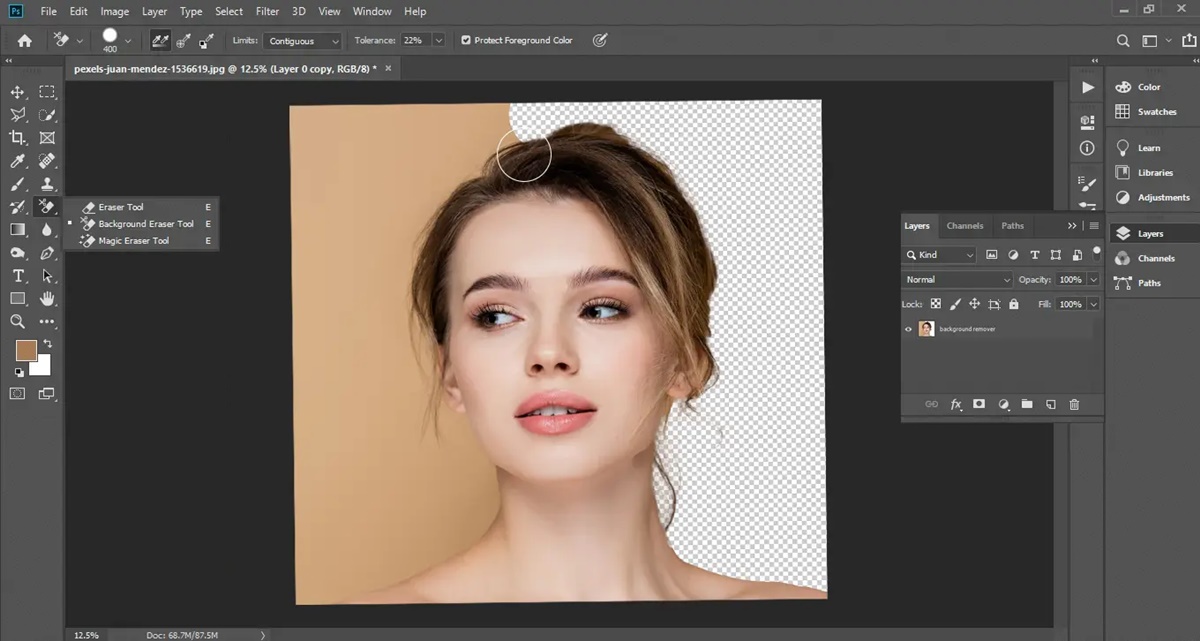
To select the Background Eraser Tool, first, open your image in Photoshop. Then, locate the Eraser Tool in the toolbar and right-click on it to reveal a dropdown menu. From the menu, select the Background Eraser Tool. Alternatively, you can press ‘E’ on your keyboard to quickly switch to the Background Eraser Tool.
Once you have selected the tool, you can customize its settings to suit your needs. In the Options bar at the top of the screen, you will find several settings to control the behavior of the Background Eraser Tool. The most important settings are the brush size, hardness, and tolerance.
The brush size determines the size of the eraser tool. For larger areas, you might want to use a larger brush size, while for more precise work, a smaller brush size is recommended. The hardness setting determines the edge sharpness of the eraser tool. A higher hardness value creates a sharper edge, while a lower value produces a softer edge. Experiment with different brush sizes and hardness values to find the best settings for your particular image.
The tolerance setting determines how similar the pixels need to be to be considered part of the background. A higher tolerance value will erase a broader range of colors, while a lower value will be more selective. Adjust the tolerance setting based on the complexity of the background and the contrast between the foreground and background elements.
After selecting the desired brush settings, you can now start erasing the background. Simply click and drag the eraser tool over the areas you want to remove. Keep an eye on the foreground elements to ensure they are not erased accidentally. You can adjust the brush size and hardness on the fly by using the bracket keys ‘[‘ and ‘]’. To quickly switch between erasing and restoring, press and hold the ‘Alt’ key (Windows) or the ‘Option’ key (Mac) while dragging the tool.
The Background Eraser Tool works by sampling the color under the central crosshair of the brush and erasing similar colors within the brush diameter. This tool is particularly useful for removing backgrounds with solid colors or simple gradients. For more complex backgrounds, further refinements may be necessary using additional techniques, as discussed in the following sections.
Adjusting the Brush Settings
When using the Background Eraser Tool in Photoshop, adjusting the brush settings is crucial to achieve precise and accurate results. The brush settings allow you to customize the size, hardness, and tolerance of the tool, giving you more control over the background removal process.
To adjust the brush settings, you can find the options in the toolbar at the top of the screen when the Background Eraser Tool is selected. Here’s a closer look at these settings and how they impact your background removal:
- Brush Size: The brush size determines the diameter of the eraser tool. For larger areas, you’ll want to use a larger brush size, while for more intricate details, a smaller brush size is recommended. You can adjust the brush size by clicking on the drop-down menu in the Options bar or using the bracket keys ‘[‘ and ‘]’.
- Hardness: The hardness setting controls the edge sharpness of the eraser tool. A higher hardness value creates a sharper edge, ideal for removing backgrounds with well-defined edges. On the other hand, a lower hardness value produces a softer edge, useful for blending backgrounds seamlessly with complex foreground elements. Experiment with different hardness levels to find the right balance for your image.
- Tolerance: The tolerance setting determines how similar the pixels need to be for the eraser tool to erase them. A higher tolerance value erases a broader range of colors, while a lower value is more selective. Adjust the tolerance based on the complexity of the background and the contrast between the foreground and background elements. If the eraser tool is removing too much of the foreground, lower the tolerance value, and vice versa.
It’s important to note that the brush settings are not set in stone, and you can experiment with different combinations to achieve the desired effect. Start with the default settings and make adjustments based on the specific image you’re working with.
Remember, when removing the background, precision is key. Take your time to refine the brush settings according to the complexity of the image and the level of detail you want to preserve. By finding the right balance in the brush size, hardness, and tolerance settings, you’ll have greater control over the background removal process, resulting in a clean and professional-looking image.
Erasing the Background with the Background Eraser Tool
Once you have adjusted the brush settings, you can now start erasing the background using the Background Eraser Tool in Photoshop. This tool utilizes a brush that erases pixels based on the selected settings, allowing you to remove the unwanted background and create a transparent background for your image.
To begin, ensure that the Background Eraser Tool is selected from the toolbar. Position the tool over the area you want to erase and click and drag the brush over the background. As you move the brush, it automatically samples the color under the center of the brush and erases any similar colors within the brush diameter.
Pay close attention to the foreground elements as you erase the background to avoid unintentionally removing important details. To restore parts of the background or fine-tune the erasing process, press and hold the ‘Alt’ key (Windows) or the ‘Option’ key (Mac) while dragging the tool. This temporarily switches the tool to the ‘Sampling’ mode and allows you to paint back the erased areas.
While erasing the background, it is recommended to work in smaller sections rather than erasing the entire background at once. This allows for better control and accuracy. Zoom in on the image if needed to ensure precise erasing along edges and intricate areas. You can do this by using the zoom tool or by pressing ‘Ctrl’ and the plus (+) key (Windows) or ‘Cmd’ and the plus (+) key (Mac).
For areas with more complex backgrounds or low-contrast edges, you may encounter challenges with the Background Eraser Tool. In such cases, you can switch to other tools or techniques to refine the background removal further. For example, you can use the Magic Wand tool to select simpler backgrounds or the Pen Tool for more precise selections.
Remember to save your progress frequently while working. This way, if you make a mistake or need to make changes later, you can easily revert to a previous version of the image.
By using the Background Eraser Tool in Photoshop and mastering its techniques, you can effortlessly remove the background from your images, resulting in clean and professional-looking visuals. Take your time to practice and experiment with different brush settings to achieve the desired outcome for your specific image.
Refining the Edges using the Refine Edge Brush Tool
When removing the background with the Background Eraser Tool, you may encounter situations where the edges appear jagged or have remnants of the background. To achieve a more polished and seamless result, Photoshop provides the Refine Edge Brush Tool. This tool allows you to refine the edges of your selection, making them appear more natural and precise.
To access the Refine Edge Brush Tool, make sure you have an active selection or layer mask. Then, go to the top menu and select ‘Select’ followed by ‘Refine Edge.’ Alternatively, you can use the shortcut key ‘Ctrl’ + ‘Alt’ + ‘R’ (Windows) or ‘Cmd’ + ‘Option’ + ‘R’ (Mac).
Once you’re in the Refine Edge dialog box, you’ll find a range of options to enhance the edges of your selection. The most important tool within this dialog box is the Refine Edge Brush Tool, symbolized by a brush icon with a “+” sign. Select this brush and begin painting over the edges of the object you want to refine. The Refine Edge Brush Tool automatically detects the edges and refines them accordingly.
Adjusting the brush size and hardness can greatly affect the refinement process. Use a smaller brush size for fine details and a larger brush size for broader areas. The hardness setting determines the smoothness of the edges. A higher hardness value results in sharper edges, while a lower value produces softer edges.
As you brush over the edges, pay attention to areas where the object and background intersect. The Refine Edge Brush Tool will help smooth out any rough edges or halos. You can also use the smart radius option in the Refine Edge dialog box to automatically detect and adjust the radius of the brush for optimum edge refinement.
Additionally, the Refine Edge dialog box offers options like Feather, Contract/Expand, and Decontaminate Colors to further refine your selection. Feathering softens the edges, while Contract/Expand adjusts the size of the selection. Decontaminate Colors reduces color fringing caused by remnants of the background color.
Once you’re satisfied with the refinement of the edges, you can output the selection as a new layer with a layer mask or a new image with a transparent background. This allows you to seamlessly integrate the object into a new design or apply different backgrounds to your image.
By utilizing the Refine Edge Brush Tool, you can fine-tune the edges of your selection and achieve a more polished and professional look. Experiment with different brush sizes, hardness, and other options within the Refine Edge dialog box to achieve the desired effect for your specific image.
Using the Magic Wand Tool for Simple Backgrounds
When you’re dealing with images that have simple or solid color backgrounds, the Magic Wand tool in Photoshop can be a quick and effective tool for removing the background. The Magic Wand tool allows you to select pixels based on their color similarity, making it ideal for images with uniform or well-defined backgrounds. Here’s how you can utilize the Magic Wand tool for simple background removal.
To use the Magic Wand tool, first, open your image in Photoshop and select the Magic Wand tool from the toolbar on the left side of your screen. Alternatively, you can press the shortcut key ‘W’ to select the Magic Wand tool quickly. Once selected, adjust the tolerance setting in the Options bar at the top of the screen. The tolerance setting determines how similar the pixels need to be for them to be selected. For simple backgrounds, a lower tolerance value, such as 10 or 20, usually works well.
With the Magic Wand tool and the appropriate tolerance setting, click on a part of the background you want to remove. The tool will select pixels that share a similar color to the clicked area. If the initial selection is incomplete, hold down the ‘Shift’ key and click on other areas of the background to add to the selection. You can also hold down the ‘Alt’ key (Windows) or ‘Option’ key (Mac) and click on areas to remove them from the selection.
To refine the selection, go to the top menu, click on ‘Select,’ and choose ‘Refine Edge.’ This will open the Refine Edge dialog box where you can adjust the selection further using options like Feather, Smooth, and Contrast. These options help to smooth out the edges of the selection and make it appear more natural and seamless.
Once you are satisfied with the selection, simply press ‘Delete’ on your keyboard to remove the selected background pixels. The selected area will now have a transparent background, allowing you to integrate it into other designs or backgrounds seamlessly.
While the Magic Wand tool is effective for simple backgrounds, it may not always work perfectly on complex or detailed backgrounds. In such cases, you may need to combine the Magic Wand tool with other selection tools, like the Lasso tool or the Pen tool, to achieve more accurate results.
By utilizing the Magic Wand tool, you can quickly and efficiently remove simple backgrounds in your images. Remember to adjust the tolerance setting and refine the selection using the Refine Edge dialog box for optimal results. Experiment with different settings and combine the Magic Wand tool with other selection tools as needed to achieve the desired background removal effect for your specific image.
Making a Precise Selection with the Pen Tool
When it comes to removing complex backgrounds or making highly precise selections, the Pen Tool in Photoshop is an invaluable tool. Unlike other selection tools that rely on clicking and dragging, the Pen Tool allows you to create smooth and accurate paths by placing anchor points and manipulating their control handles. Here’s how you can use the Pen Tool to make a precise selection.
To use the Pen Tool, open your image in Photoshop and select the Pen Tool from the toolbar on the left side of the screen or press the shortcut key ‘P’. With the Pen Tool selected, click on the image to create an anchor point. Keep clicking to add more anchor points along the edges of the object you want to select.
To create curves and smooth lines, click and drag to create control handles on the anchor points. The control handles allow you to adjust the shape and direction of the path segment. By manipulating the handles, you can create precise curves and lines that perfectly follow the contours of the object.
Continue placing anchor points and adjusting the control handles until you have outlined the entire object. To close the path, click on the first anchor point you created, or simply hover over it and click again to create the final segment. This will create a closed path that encloses the object you want to select.
Once you have created the path, you can refine it further by adjusting the position of the anchor points and control handles. To move an anchor point, simply click and drag it to a new position. To adjust the shape of a curve, click and drag the control handle connected to the anchor point.
Once you are satisfied with the path, right-click on it and select ‘Make Selection’ from the context menu. This will convert the path into a selection based on the specified settings. Adjust the Feather Radius if desired to soften the edges of the selection.
With the selection in place, you can now remove the background or perform other edits as needed. Use the ‘Ctrl’ + ‘X’ (Windows) or ‘Cmd’ + ‘X’ (Mac) shortcut to cut out the selected area and create a transparent background. Alternatively, you can add a layer mask to hide the background or apply adjustments selectively.
Mastering the Pen Tool may take some practice, but it provides unparalleled control and precision when making selections. Take your time to place anchor points and manipulate control handles with accuracy. By utilizing the Pen Tool, you can achieve highly accurate and intricate selections, making it a valuable asset in your Photoshop workflow.
How to Remove Background from Transparent Objects
Removing the background from transparent objects, such as glassware or jewelry, can be a bit challenging due to the intricate details and complex reflections. However, with the right techniques in Photoshop, you can achieve a clean and seamless removal of the background while preserving the transparency of the object. Here’s how you can remove the background from transparent objects.
Start by opening your image in Photoshop and creating a new layer. This will ensure that the original image is preserved while you work on the background removal. Place the new layer below the transparent object layer.
Next, select the Magic Wand tool from the toolbar or press the shortcut key ‘W’. Adjust the tolerance setting in the Options bar to a relatively low value, around 20 to 30. Click on the background area outside of the object to make the initial selection.
To refine the selection, go to the top menu and select ‘Select’, followed by ‘Modify’ and ‘Expand’. Enter a small value, such as 1 or 2 pixels, to expand the selection slightly. This helps prevent any remaining background from showing through after removal.
With the expanded selection, click on the original transparent object layer to make it active. Then, click on the layer mask icon at the bottom of the Layers panel to create a layer mask based on the selection. The layer mask will hide the selected background area, revealing the transparency of the object layer.
To fine-tune the layer mask, select the layer mask thumbnail in the Layers panel and use the Brush tool (shortcut key ‘B’) with a soft brush and low opacity. Paint over any remaining background areas to refine the mask and ensure a clean transition between the object and the transparent areas. Use a combination of black and white paint to hide or reveal parts of the background as needed.
If the object has intricate details or subtle transparency, you may need to use more advanced techniques like blending modes or adjustment layers to achieve the desired result. Experiment with techniques like Multiply or Overlay blending modes, or use adjustment layers like Levels or Curves to enhance the transparency and eliminate any lingering background elements.
Remember to save your work in a format that supports transparency, such as PNG or TIFF, to preserve the transparency of the object layer. This allows you to easily integrate the transparent object into other designs or backgrounds.
Removing the background from transparent objects requires attention to detail and careful masking techniques. Take your time and be patient while refining the layer mask to achieve a clean and professional result. With practice and experimentation, you’ll be able to remove the background from transparent objects effectively and create visually appealing and versatile compositions.
Removing Background from Hair or Fur
Removing the background from images that include hair or fur can be particularly challenging due to their fine and intricate details. However, with the right techniques and tools in Photoshop, you can achieve a clean and realistic background removal while preserving the natural look of the hair or fur. Here’s how you can effectively remove the background from images with hair or fur.
Start by opening your image in Photoshop and creating a duplicate layer. This will allow you to work on the background removal without altering the original image. Select the duplicate layer to make it active.
To begin the background removal process, select the Quick Selection tool from the toolbar or press the shortcut key ‘W’. Use the tool to make a rough selection of the object, avoiding the hair or fur.
Next, go to the Select menu and choose ‘Refine Edge’ or ‘Select and Mask’, depending on your Photoshop version. This will open a dialog box where you can further refine the selection and deal with the hair or fur.
In the Refine Edge or Select and Mask dialog box, use the Refine Edge Brush tool or the Brush tool with the “+” and “-” options to paint over the areas of hair or fur. The goal is to include as much of the hair or fur in the selection as possible while excluding the background.
Experiment with the various settings within the Refine Edge or Select and Mask dialog box, such as adjusting the Radius, Smoothness, and Feathering. These adjustments will help refine the selection and create a smoother transition between the hair or fur and the background.
If needed, utilize the Decontaminate Colors option within the Refine Edge or Select and Mask dialog box. This feature reduces color fringing caused by remnants of the background color in the hair or fur.
Once you’re satisfied with the refined selection, click OK to apply the changes. You can then use a layer mask to hide the background and reveal the subject with its natural hair or fur.
To further fine-tune the result, select the layer mask and use a soft brush with low opacity to manually paint over any areas that require additional refinement. This may include small strands of hair or fur that weren’t perfectly captured during the initial selection process.
Remember to frequently zoom in and out of the image to check for any missed areas or inconsistencies. This will help ensure a seamless and realistic transition between the hair or fur and the background.
Removing the background from images with hair or fur requires patience and attention to detail. Practice and experimentation are key to achieving the best results. By combining the selection tools, refining options, and manual adjustments, you can successfully remove the background while maintaining the natural and intricate look of the hair or fur.
Using Layer Masks for Non-Destructive Editing
Layer masks are an essential tool in Photoshop that allows for non-destructive editing. They enable you to make changes to an image without permanently altering the original pixels. Layer masks act as a transparent overlay on a layer, controlling the visibility of different areas and allowing for precise adjustments. Here’s how you can use layer masks for non-destructive editing in Photoshop.
To start, open your image in Photoshop and make sure you have the Layers panel visible (if it’s not already, go to the top menu and click on ‘Window’ > ‘Layers’ to display it). Create a duplicate layer of the image by right-clicking the original layer and selecting ‘Duplicate Layer’. This duplicate layer is where you’ll apply the non-destructive edits.
With the duplicate layer selected, click on the Layer Mask icon at the bottom of the Layers panel. This will add a layer mask to the duplicate layer. The layer mask appears as a white rectangle next to the layer thumbnail.
The layer mask is initially white, indicating that the entire layer is visible. To apply non-destructive edits, you’ll need to paint on the layer mask using the Brush tool (shortcut key ‘B’). Select a soft brush with black as the foreground color and start painting over the areas you want to hide or remove from the image. As you paint with black on the layer mask, those areas will become transparent, revealing the layers below.
To bring back any hidden areas, simply switch your brush color to white and paint over those areas on the layer mask. This will make those areas visible again. You can switch between black and white quickly by pressing the ‘X’ key on your keyboard.
One of the advantages of using layer masks is that they allow for precise edits and adjustments. You can vary the opacity and flow of the brush to control the transparency of the masked areas. By painting with different brush opacities, you can achieve smooth transitions and blend different layers seamlessly.
In addition to brush painting, you can also use selection tools, such as the Quick Selection tool or the Pen tool, to create more intricate masks. Once you have the selection, click on the ‘Add Layer Mask’ button in the Layers panel to apply the mask.
Using layer masks, you can make multiple adjustments and experiments without permanently altering your image. You can add adjustment layers, such as Levels or Curves, and apply filters or effects selectively to specific areas of your image. By editing the adjustment layers or modifying the layer masks, you can fine-tune the edits as needed.
Remember that layer masks are non-destructive and reversible. If you make a mistake or want to change the edits, you can simply paint with the opposite color on the layer mask or delete the mask altogether without affecting the original image or underlying layers.
Layer masks are a powerful tool for non-destructive editing in Photoshop, giving you the flexibility to make adjustments and explore creative possibilities while preserving the integrity of your original image. By mastering layer masks, you can enhance your editing workflow and achieve professional and polished results.
Tips for a Clean and Professional Background Removal
Achieving a clean and professional background removal in Photoshop requires attention to detail and a few proven techniques. Whether you’re removing backgrounds for product images, portraits, or other visuals, consider these helpful tips to enhance the quality of your background removal results.
1. Use high-resolution images: Starting with high-resolution images provides more detail to work with and produces cleaner results. It allows for more precise selection and better edge refinement.
2. Make precise selections: Take your time to create accurate selections using tools like the Pen Tool, Quick Selection tool, or Magic Wand tool. Zoom in and carefully trace the outlines of the object to ensure a clean cut.
3. Refine edges: Utilize tools like the Refine Edge Brush Tool or Select and Mask to refine the edges of your selection, especially around complex or detailed areas like hair and fur.
4. Adjust brush settings: Experiment with brush size, hardness, and opacity to achieve smoother transitions and precise removal. Use a soft brush with low opacity for delicate areas and harder brushes for clean and well-defined edges.
5. Pay attention to lighting and shadows: Take note of the lighting conditions and shadows in the original image. Adjust the brightness, contrast, or color of the foreground and background to ensure a seamless integration after removing the background.
6. Consider the background replacement: Keep in mind the intended use or context of the image. Plan for a background that complements and enhances the subject, ensuring a coherent and professional-looking final composition.
7. Retain fine details: Take extra care when removing backgrounds around intricate and delicate elements like jewelry, lace, or wispy hair. Preserve the natural textures by utilizing layer masks or the Eraser tool with a soft brush for controlled removal.
8. Utilize blending modes and adjustment layers: Experiment with blending modes to seamlessly integrate the subject into the new background. Adjustment layers like Levels or Curves can fine-tune the color and tones for a more cohesive final image.
9. Pay attention to color fringing: Watch out for color fringing or remnants of the original background around the edges of the subject. Use tools like the Refine Edge Brush Tool or manually paint on a layer mask to eliminate any unwanted artifacts.
10. Evaluate the result: Step back and evaluate the background removal to ensure a clean and professional finish. Zoom in and review the edges for any imperfections or areas that need further refinement.
By following these tips, you can enhance the quality of your background removal and achieve clean and professional results in Photoshop. Remember to practice, experiment with different techniques, and take your time to ensure meticulous attention to detail. With patience and persistence, you’ll be able to remove backgrounds seamlessly and create visually stunning images.
Saving the Image with a Transparent Background
Once you have successfully removed the background and are satisfied with the result, it’s important to save the image correctly to preserve the transparent background. By saving the image in a format that supports transparency, such as PNG or TIFF, you can retain the transparency for future use or integration into other designs. Here’s how you can save an image with a transparent background in Photoshop.
First, ensure that the background is completely removed and that you have a transparent background on your image. Check the areas where the background used to be and make any necessary adjustments or refinements to smooth out edges or details.
Next, go to the top menu and click on ‘File’ > ‘Save As’ to open the Save As dialog box. Choose the destination folder and enter a name for your file.
In the Save As dialog box, select the desired file format that supports transparency, such as PNG or TIFF. These formats preserve the alpha channel, which stores the transparency information.
Once you have selected the file format, double-check that the ‘Transparency’ option is enabled. This ensures that the transparency of the image is preserved when saving. Depending on the version of Photoshop you’re using, this option may be labeled as ‘Alpha Channels’ or ‘Save Transparency.’
Configure any additional settings or compression options as needed. For PNG, you can choose between different compression levels, such as PNG-8 or PNG-24. The PNG-24 format provides higher quality but results in a larger file size.
After setting the desired options, click ‘Save’ to save the image with the transparent background. Photoshop will create a new file with the specified format and maintain the transparency of the image.
Keep in mind that when saving an image with a transparent background, it’s important to consider how and where you’ll use the image. Different file formats may be more suitable depending on the specific requirements of your project. For web-based images, PNG is often preferred, while TIFF is commonly used for print or high-quality images.
By saving the image with a transparent background using the appropriate file format, you can easily incorporate it into other designs, overlay it on various backgrounds, or maintain its transparency for future editing. Additionally, saving the image correctly ensures that the transparent areas remain intact, providing a clean and professional outcome.