
Choosing the Right Font
When it comes to creating visually appealing text in Photoshop Elements, choosing the right font can make all the difference. The font you select sets the tone and conveys the message of your text. Here are some tips to help you choose the perfect font:
- Consider the context: Think about the overall design and theme of your project. Is it formal or informal? Modern or traditional? Your font choice should align with the style and purpose of your project.
- Readability: Ensure that your selected font is easy to read, even at smaller sizes. Avoid overly decorative or elaborate fonts that may hinder legibility.
- Contrast: If you have a busy or complex background, opt for a font with high contrast to ensure it stands out. Conversely, choose a font with lower contrast for a subtle and harmonious effect on a simple background.
- Personality: Each font has its own personality and evokes different emotions. Consider the message you want to convey and choose a font that reflects that tone. Playful, elegant, bold, or professional – pick a font that matches the desired personality.
- Consistency: If your project includes multiple sections or pages, maintaining font consistency is crucial. Stick to a consistent font family and style throughout to create a cohesive and polished look.
Keep in mind that while there are countless fonts available, it’s best to limit your choices to a few well-selected options. Mixing too many fonts can create visual chaos and distract from your message. Take the time to experiment with different fonts, sizes, and spacing to find the perfect combination that enhances your design.
Adjusting Font Size and Style
In Photoshop Elements, you have complete control over the size and style of your text, allowing you to customize it to your liking. Here are some techniques for adjusting font size and style:
- Scaling: To resize your text, select the Text tool and click on the text layer. Then, use the handles around the text box to adjust the size. You can also change the font size in the Options bar at the top of the screen. Experiment with different sizes to find the perfect fit for your design.
- Font Styles: Photoshop Elements offers a variety of font styles to choose from, such as regular, bold, italic, and underline. To apply these styles, select the desired text and click on the corresponding buttons in the Options bar. Mix and match font styles to add emphasis and create visual interest.
- Combining Fonts: Another way to enhance your text is by combining different fonts. You can use one font for the main body of your text and another for headlines or emphasis. However, be cautious not to use too many fonts, as it can make your design appear cluttered. Stick to two or three complementary fonts for a cohesive look.
- Kerning and Tracking: Photoshop Elements allows you to adjust the spacing between letters using the Kerning and Tracking options. Kerning adjusts the spacing between specific pairs of letters, while Tracking adjusts the overall spacing between all letters in a text block. Use these options to fine-tune the readability and visual balance of your text.
Remember that the size and style of your text should align with the overall design and purpose of your project. A larger, bolder font may be suitable for headlines or important information, while a smaller, more subtle font may work well for supporting text. Take the time to experiment and find the perfect combination that enhances the overall aesthetic of your design.
Adding Bold, Italic, and Underline Effects
When working with text in Photoshop Elements, you have the ability to enhance your words by applying bold, italic, and underline effects. These effects can help emphasize certain parts of your text and add visual interest. Here’s how to add these effects to your text:
- Bold: To make your text bold, select the desired text layer and click on the “B” button in the Options bar. This will apply a bold effect to the selected text, making it appear thicker and more prominent. Use bold text sparingly to highlight important information or to make a statement.
- Italic: Applying an italic effect to your text can add a touch of style or emphasis. To make your text italicized, select the text layer and click on the “I” button in the Options bar. The text will slant to the right, giving it a unique appearance. Use italics to convey a sense of sophistication or to differentiate specific text elements.
- Underline: Sometimes you may want to underline certain words or phrases to draw attention to them. To add an underline effect, select the text layer and click on the “U” button in the Options bar. This will place a line beneath the text. Underline text when you want to indicate a link or highlight important details.
It’s important to note that when using these effects, it’s best to exercise restraint and use them sparingly. Applying bold, italic, or underline effects to too much text can make it overwhelming and difficult to read. Instead, use these effects strategically to draw attention to key elements or to create visual hierarchy within your design.
Additionally, remember that these effects can be combined with other techniques, such as adjusting font size and style, to create unique and impactful text designs. Play around with different combinations and experiment to find the perfect balance for your project.
Changing Text Color
One of the most effective ways to make your text stand out in Photoshop Elements is by changing its color. By selecting the right color, you can enhance readability, create contrast, and add visual interest to your text. Here’s how you can change the color of your text:
- Using the Color Picker: With the text layer selected, click on the color swatch in the Options bar to open the Color Picker. Here, you can choose a color by either entering specific color values or by selecting a color from the color wheel. Experiment with different colors to find the perfect match for your design.
- Utilizing the Eyedropper Tool: If you want to match the color of an object in your design or any other color on your canvas, you can use the Eyedropper tool. Simply select the text layer, activate the Eyedropper tool, and click on the desired color. The text will then adopt that color.
- Adding Gradient Colors: Another way to make your text visually appealing is by applying gradient colors. Select the text layer and open the Gradient Editor. Here, you can create custom gradients or choose from pre-set gradients. Experiment with different gradient styles and directions to achieve the desired effect.
- Applying Layer Styles: In Photoshop Elements, you can apply layer styles to your text to change its color dynamically. Right-click on the text layer and select “Blending Options.” In the Layer Style dialog box, you can choose from various options, such as color overlays, gradients, and patterns, to customize the color of your text.
When choosing text colors, consider the overall design and purpose of your project. Contrast is key to ensure readability, so be mindful of the background color and the legibility of the text. High contrast, such as black text on a white background or vice versa, generally works well, but don’t be afraid to play with complementary or analogous color schemes to create visual interest.
Remember, color can evoke emotions and convey messages. Consider the associations and meanings commonly associated with certain colors. For example, warm colors like red and orange can create a sense of energy and urgency, while cool colors like blue and green can evoke a feeling of calmness and tranquility.
By changing the color of your text, you can elevate the visual impact of your design. Experiment with different color combinations and techniques to find the perfect color scheme that enhances your project and effectively communicates your message.
Applying Text Effects
In Photoshop Elements, you have a wide range of options to apply various text effects that can add depth, style, and creativity to your text. These effects can help make your text stand out and make a lasting impression. Here are some popular text effects you can apply:
- Bevel and Emboss: This effect adds a three-dimensional appearance to your text, giving it a raised or carved look. You can control the depth, size, and angle of the bevel to achieve the desired effect. Experiment with different bevel styles to add depth and dimension to your text.
- Inner and Outer Glow: The glow effect can make your text appear as if it’s emitting light. The inner glow adds a soft luminous halo within the text, while the outer glow creates a glow around the text. You can adjust the color, size, and opacity of the glow to match your design aesthetic.
- Drop Shadow: Adding a drop shadow to your text creates the illusion of depth and makes the text appear lifted off the background. You can control the distance, size, and opacity of the drop shadow to achieve the desired effect. Experiment with different shadow angles and settings to create a realistic or dramatic effect.
- Gradient Overlay: Applying a gradient overlay to your text allows you to smoothly blend multiple colors across the text. This effect creates a gradient transition that adds depth and visual interest. You can choose from predefined gradients or create custom gradients that match your design theme.
- Pattern Overlay: The pattern overlay effect enables you to apply a pattern to your text. You can choose from a variety of pattern options or create your own custom pattern. This effect adds texture and uniqueness to your text, making it visually captivating.
- Stroke: Applying a stroke to your text adds a border or outline around the characters, helping them stand out from the background. You can choose the size, color, and positioning of the stroke to achieve the desired effect. Experiment with different stroke settings to enhance the visibility and style of your text.
When applying text effects, it’s important to strike a balance between creativity and readability. Avoid overusing effects to the point where they distract from the actual message of the text. Select effects that complement your design and enhance the overall aesthetic without overwhelming the viewer.
Experiment with different combinations of text effects, such as combining a bevel and emboss effect with a gradient overlay, or a drop shadow effect with a stroke, to create unique and visually appealing text designs. Remember to adjust the settings and customize each effect to achieve the desired look.
By applying these text effects in Photoshop Elements, you can take your text designs to the next level and make them visually captivating, allowing your message to truly stand out.
Using Layer Styles and Blending Modes
Layer styles and blending modes in Photoshop Elements offer a powerful way to transform the appearance of your text by applying various effects to the text layer itself. These features provide endless opportunities for creativity and customization. Here’s how you can utilize layer styles and blending modes to enhance your text:
- Layer Styles: Photoshop Elements provides a wide range of layer styles that you can apply to your text, such as bevel, emboss, drop shadow, and stroke. Simply right-click on the text layer, select “Blending Options,” and choose the desired layer style. Each style offers different settings and parameters that allow you to fine-tune the effect to fit your design. Layer styles provide an easy and convenient way to apply professional-looking effects to your text with just a few clicks.
- Blending Modes: Blending modes determine how the pixels of one layer interact with the pixels of other layers. By changing the blending mode of the text layer, you can create unique interactions and effects. Experiment with different blending modes, such as Overlay, Multiply, Screen, or Soft Light, to achieve various results. Blending modes can alter the color, contrast, and transparency of your text, allowing you to create intriguing and visually captivating designs.
Combining layer styles and blending modes can produce even more impressive effects. For example, you can apply a drop shadow layer style to create depth and then experiment with different blending modes to further enhance the text’s appearance. The possibilities are endless, so don’t be afraid to experiment and explore different combinations.
Remember to consider the context and purpose of your design when using layer styles and blending modes. Ensure that the effects you apply align with the overall aesthetic and message you want to convey. Keep in mind that subtlety is key; it’s often better to apply effects with a light touch rather than overdoing them.
Lastly, always make sure to organize your layers and keep them editable. This allows you to make adjustments and modifications later on without losing any work or having to start from scratch.
By exploring and utilizing layer styles and blending modes in Photoshop Elements, you can take your text designs to new heights and create visually stunning and captivating compositions.
Adding a Stroke or Outline to Text
In Photoshop Elements, you have the ability to add a stroke or outline to your text, giving it a defined border that helps it stand out from the background. This effect can be used to emphasize your text and make it more visually impactful. Here’s how you can add a stroke or outline to your text:
- Select the Text Layer: Start by selecting the text layer in the Layers panel. Ensure that the text you want to add a stroke or outline to is active and highlighted.
- Access the Layer Styles: Right-click on the text layer and select “Blending Options” from the menu. This will open the Layer Style dialog box, displaying various effects that can be applied to your text.
- Apply the Stroke Effect: In the Layer Style dialog box, locate and click on the “Stroke” option on the left-hand side. This will enable the stroke effect settings on the right-hand side of the dialog box.
- Tweak the Stroke Settings: Adjust the size, color, and position of the stroke to achieve the desired effect. You can experiment with different stroke sizes, colors, and blending modes to match the style of your design.
- Customize the Outline: If you want to create an outline around the text, set the blend mode to “Normal” and increase the stroke size until it forms a defined outline. Adjust the color and opacity to achieve the desired look.
- Add Multiple Strokes/Outlines: If you want to create multiple strokes or outlines with different styles or colors, click on the “New Style” button in the Layer Style dialog box. This will allow you to apply additional stroke effects to your text and customize them individually.
Adding a stroke or outline to your text can help make it more legible, especially when placed on a complex or busy background. It can also be used to create a distinct visual style or make your text stand out as a focal point in your design.
Remember to consider the contrast between the stroke color and the text color, as well as the overall color scheme of your design. A stroke that contrasts with the text color will make the text more visible and eye-catching. Experiment with different stroke sizes and colors to find the perfect balance that enhances your text.
By utilizing the stroke or outline effect in Photoshop Elements, you can give your text a polished and professional look that commands attention and adds impact to your designs.
Creating a Drop Shadow for Text
One way to add depth and dimension to your text in Photoshop Elements is by creating a drop shadow effect. This effect creates the illusion that your text is casting a subtle shadow on the background, making it appear as if it’s floating above the surface. Here’s how you can create a drop shadow for your text:
- Select the Text Layer: Start by selecting the text layer in the Layers panel. Make sure that the text you want to apply the drop shadow effect to is the active and highlighted layer.
- Access the Layer Styles: Right-click on the text layer and select “Blending Options” from the menu. This will open the Layer Style dialog box, where you can find various effects to apply to your text.
- Apply the Drop Shadow Effect: In the Layer Style dialog box, locate and click on the “Drop Shadow” option on the left-hand side. This will enable the drop shadow effect settings on the right-hand side of the dialog box.
- Tweak the Drop Shadow Settings: Adjust the distance, spread, size, and opacity of the drop shadow to achieve the desired effect. You can experiment with different settings to create a subtle or dramatic drop shadow.
- Customize the Drop Shadow Appearance: Change the color of the drop shadow by clicking on the color swatch next to the “Blend Mode” option. This allows you to match the color of the drop shadow with your design or create a contrasting effect.
- Refine the Drop Shadow: Use the angle and perspective controls in the drop shadow settings to adjust the direction and angle of the shadow. You can drag the shadow within the preview area to reposition it and create a realistic or desired effect.
Adding a drop shadow to your text can add depth, make it stand out from the background, and create a sense of realism. The drop shadow effect works well for various design styles, from professional and sleek to creative and playful.
When applying a drop shadow, consider the background color and lighting in your design. Adjust the opacity and blending mode of the shadow to achieve the desired balance between visibility and subtlety. Experiment with different settings to create the perfect drop shadow that complements your text and enhances the overall visual appeal of your design.
By creating a drop shadow effect for your text in Photoshop Elements, you can make it visually engaging and give it a sense of depth, allowing it to stand out and capture attention.
Adding a Glow or Outer Glow Effect to Text
If you want to add a touch of visual flair to your text in Photoshop Elements, consider applying a glow or outer glow effect. These effects can create a soft, luminous halo around your text, making it appear more vibrant and eye-catching. Here’s how you can add a glow or outer glow effect to your text:
- Select the Text Layer: Start by choosing the text layer in the Layers panel. Ensure that the text you wish to apply the effect to is highlighted and active.
- Access the Layer Styles: Right-click on the text layer and choose “Blending Options” from the menu. This will open the Layer Style dialog box, where you can find various effects to enhance your text.
- Apply the Glow Effect: In the Layer Style dialog box, locate and click on the “Outer Glow” or “Glow” option on the left-hand side. This will enable the glow effect settings on the right-hand side of the dialog box.
- Tweak the Glow Settings: Adjust the size, spread, and intensity of the glow effect to achieve the desired look. You can experiment with different settings to create a subtle or bold glow effect that suits your design.
- Customize the Glow Appearance: Change the color of the glow by clicking on the color swatch next to the “Blend Mode” option. This allows you to match the glow color with your design or create a contrasting effect.
- Refine the Outer Glow: If you choose the “Outer Glow” option, you can also adjust the opacity, size, and color of the outer glow effect. This allows for more control over the appearance of the glow around the text.
Adding a glow or outer glow effect to your text can give it a magical, ethereal quality and make it stand out from the background. These effects work particularly well for creating attention-grabbing headlines, promotional materials, or any design that requires a touch of elegance and allure.
When applying a glow, consider the background color and overall color scheme of your design. Choose a glow color that complements the text color or provides a pleasant contrast. Experiment with different intensity levels and sizes to achieve the desired effect. Remember, subtlety is key; aim for a soft and natural glow that enhances the text without overpowering it.
By adding a glow or outer glow effect to your text in Photoshop Elements, you can give it an enchanting and captivating appearance, making it impossible to overlook.
Creating an Embossed or Engraved Effect for Text
If you want to add a tasteful and sophisticated touch to your text in Photoshop Elements, consider creating an embossed or engraved effect. These effects can give your text a raised or carved appearance, adding depth and texture to make it stand out. Here’s how you can create an embossed or engraved effect for your text:
- Select the Text Layer: Start by choosing the text layer in the Layers panel. Ensure that the text you want to apply the effect to is active and highlighted.
- Access the Layer Styles: Right-click on the text layer and select “Blending Options” from the menu. This will open the Layer Style dialog box, where you can find various effects to enhance your text.
- Apply the Bevel and Emboss Effect: In the Layer Style dialog box, locate and click on the “Bevel and Emboss” option on the left-hand side. This will enable the bevel and emboss effect settings on the right-hand side of the dialog box.
- Tweak the Bevel and Emboss Settings: Adjust the depth, size, and angle of the bevel and emboss effect to achieve the desired texture and appearance. You can experiment with different settings to create a subtle or pronounced embossed or engraved effect.
- Customize the Bevel and Emboss Appearance: Change the highlight and shadow colors by clicking on the color swatches next to the “Blend Mode” and “Shadow Mode” options. This allows you to match the effect colors with your design or create a pleasing contrast.
- Refine the Embossed or Engraved Effect: Fine-tune the effect by adjusting the contour, gloss contour, and opacity settings. These options allow for more control over the shape and highlights of the embossed or engraved text.
Creating an embossed or engraved effect for your text can add elegance and depth to your design. These effects work well for various purposes, such as creating stylish logos, sophisticated headings, or adding a touch of craftsmanship to your artwork.
When applying an embossed or engraved effect, consider the lighting and shading in your design. Pay attention to the direction and angle of the effect to create a realistic and believable appearance. Experiment with different settings to achieve the desired texture and depth for your text.
Remember to consider the overall design aesthetic and purpose of your project. The embossed or engraved effect should enhance and complement the text without overwhelming it. Subtle and tasteful adjustments often yield the most effective and visually appealing results.
By creating an embossed or engraved effect for your text in Photoshop Elements, you can add a touch of sophistication and professionalism, making your text a focal point that commands attention.
Using Text Warp and Distort Tools
In Photoshop Elements, you have the ability to apply text warp and distort tools to create unique and eye-catching text effects. These tools allow you to manipulate the shape and appearance of your text, giving you even more creative control. Here’s how you can use text warp and distort tools:
- Select the Text Layer: Start by selecting the text layer in the Layers panel. Make sure that the text you want to apply the effect to is active and highlighted.
- Access the Text Warp Tool: With the text layer selected, go to the top menu and choose “Edit” > “Transform” > “Warp.” This will open the text warp tool, which provides various warp options to reshape your text.
- Choose a Warp Style: In the text warp tool options bar, you’ll find a list of different warp styles to choose from. Click on the style that best suits your design or experiment with different options to achieve the desired effect.
- Manipulate the Warp Controls: Once you’ve selected a warp style, you can manipulate the custom warp grid to distort your text. Click and drag each handle or point on the grid to reshape the text. You can also adjust the bend, horizontal distortion, vertical distortion, and other settings to fine-tune the warp effect.
- Use the Distort Tools: Photoshop Elements also offers various distort tools that you can use on your text. These tools, such as the puppet warp, liquify, and perspective warp, allow you to reshape, stretch, or distort your text in unique ways. You can access these tools by going to “Filter” > “Distort” or “Edit” > “Transform.”
- Experiment with Different Effects: Combine different warp styles and distort tools to create even more complex and creative text effects. You can use a combination of warping, stretching, and distorting to achieve truly unique and intriguing text designs.
Using text warp and distort tools in Photoshop Elements provides you with endless possibilities for customizing and transforming your text. You can create curved, arched, twisted, or stretched text, giving it a dynamic and expressive appearance.
When using these tools, consider the overall design and purpose of your project. Experiment with different warp styles and distortions to find the effect that best complements your design concept. Remember to maintain legibility and readability, even when applying more complex distortions.
By utilizing text warp and distort tools creatively in Photoshop Elements, you can add a unique and captivating dimension to your text, making it truly stand out in your design.
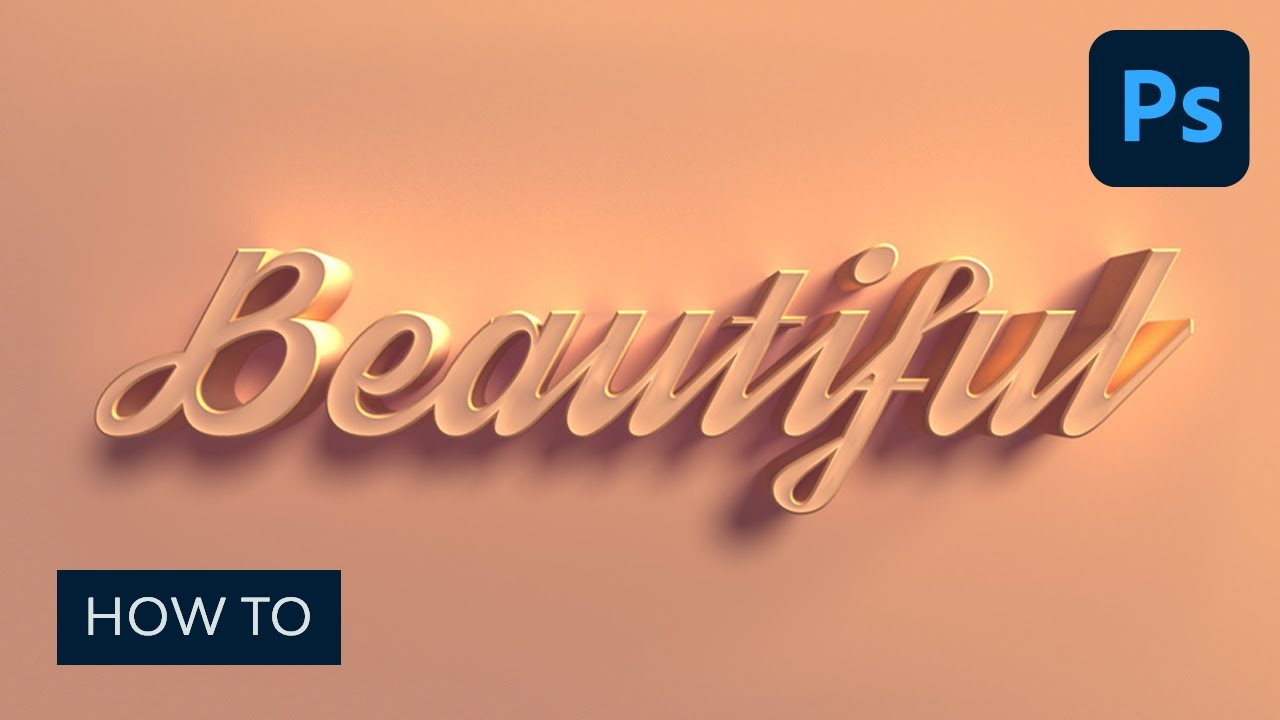
Making Text 3D
If you want to add depth and an extra dimension to your text in Photoshop Elements, you can create a 3D effect. Making text 3D can give it a realistic and dynamic appearance, making it visually captivating. Here’s how you can achieve this effect:
- Select the Text Layer: Start by choosing the text layer in the Layers panel. Ensure that the text you want to make 3D is active and highlighted.
- Convert Text to a 3D Layer: Right-click on the text layer and choose “Convert to Shape” > “3D Repoussé” from the menu. This will convert your text into a 3D layer and open the 3D workspace.
- Adjust the 3D Settings: In the 3D workspace, you’ll find the 3D panel and various tools and options to modify your text. Use the 3D panel to manipulate the extrusion depth, rotation, lighting, and other settings to achieve the desired 3D effect. You can also experiment with different materials, textures, and shading to enhance the realism of your 3D text.
- Apply Textures and Materials: To add more depth and realism to your 3D text, you can apply textures and materials by selecting different presets or creating custom ones. This allows you to give your text a metallic, glass, or other materials look, enhancing the overall visual impact.
- Position and Rotate the 3D Text: Use the 3D workspace tools, such as the move tool and the 3D camera, to position and rotate your 3D text in the workspace. This allows you to find the perfect angle and perspective to showcase the 3D effect.
- Finalize the 3D Text: Once you’re satisfied with the 3D effect and positioning, click on the “Return to Layers Panel” button in the 3D panel to exit the 3D workspace and return to the normal Layers panel. Your text will now be a 3D layer.
Making text 3D can add a sense of depth and realism to your designs, making them visually striking and engaging. This effect is particularly useful for creating impactful titles, logos, or any other design element that needs to stand out.
When creating 3D text, consider the lighting and shading in your design to maintain consistency with the overall scene. Experiment with different materials, textures, and lighting effects to achieve the desired visual impact and realism. Keep in mind that subtle adjustments can often yield more effective results than exaggerated 3D effects.
By making your text 3D in Photoshop Elements, you can elevate your designs and create visually stunning and immersive compositions.
Adding a Gradient Fill to Text
In Photoshop Elements, you have the ability to add a gradient fill to your text, giving it a smooth transition of colors. This effect can add depth, visual interest, and a contemporary look to your text. Here’s how you can add a gradient fill to your text:
- Select the Text Layer: Start by selecting the text layer in the Layers panel. Ensure that the text you want to apply the gradient fill to is active and highlighted.
- Choose the Gradient Tool: Select the Gradient tool from the Toolbar, or press the “G” key to activate it. The Gradient tool is located in the same group as the Paint Bucket tool.
- Select a Gradient: In the options bar at the top of the screen, you’ll find a gradient preview that shows the currently selected gradient. Click on the gradient preview to open the Gradient Editor, where you can choose from various gradient presets or create a custom gradient.
- Apply the Gradient Fill: With the Gradient tool selected and the desired gradient chosen, click and drag the tool horizontally, vertically, or diagonally across your text to apply the gradient fill. The direction of the drag will determine the direction of the gradient.
- Adjust the Gradient: To further customize the gradient fill, you can adjust the angle, scale, and opacity of the gradient in the options bar. Experiment with different settings and gradients to achieve the desired effect.
Adding a gradient fill to your text can transform its appearance and make it more visually captivating. Gradients can range from subtle to bold and can be used to create various effects, such as a fading or blending of colors, a metallic or glossy appearance, or a vibrant and colorful text.
Consider the color scheme and the mood you want to convey when choosing and applying the gradient fill. Harmonious gradients that complement or contrast with the text color can create a balanced and appealing visual effect. Experiment with different gradients and settings to achieve the desired result.
By adding a gradient fill to your text in Photoshop Elements, you can enhance its visual impact, add depth and dimension, and create eye-catching designs that stand out.
Creating a Text Mask
In Photoshop Elements, you can create a text mask to creatively incorporate an image or pattern into your text. This technique allows you to fill your text with an image or pattern, resulting in a visually captivating effect. Here’s how you can create a text mask:
- Create a New Document: Start by creating a new document in Photoshop Elements. Set the dimensions and resolution according to your design requirements.
- Add Text: Use the Text tool to add the desired text to your document. Adjust the font, size, and style as needed.
- Import an Image or Pattern: Import the image or pattern you want to use as the fill for your text. Open the image or pattern file and select it.
- Apply the Image as a Layer: Drag and drop the image or pattern onto the text layer in the Layers panel. This will create a new layer with the image or pattern above the text layer.
- Create a Clipping Mask: Right-click on the image or pattern layer and choose “Create Clipping Mask” from the menu. This will mask the image or pattern within the boundaries of the text, resulting in the text becoming filled with the image or pattern.
- Adjust the Image or Pattern: Use the transform tools, such as Scale, Rotate, and Warp, to position and adjust the image or pattern within the text. This allows you to align the elements of the image or pattern to suit your design vision.
- Refine the Text Mask: To refine the text mask further, you can apply layer styles, blending modes, or adjustments to the text or image or pattern layer. This will allow you to add additional effects or enhance the overall appearance of the text mask.
A text mask can create a visually stunning effect by seamlessly blending an image or pattern into your text. This technique can be used for various design purposes, such as creating eye-catching headlines, intricate logos, or unique elements within your compositions.
When choosing an image or pattern for your text mask, consider the contrast and legibility. Ensure that the text remains clear and readable against the background image or pattern. Experiment with different layer styles, blending modes, and adjustments to achieve the desired effect while maintaining a cohesive and harmonious design.
By creating a text mask in Photoshop Elements, you can add an element of creativity and intrigue to your text, resulting in a visually captivating and unique design.
Applying a Pattern Overlay to Text
In Photoshop Elements, you can apply a pattern overlay to your text to add texture, depth, and visual interest. This technique allows you to fill your text with a pattern, creating a unique and captivating design element. Here’s how you can apply a pattern overlay to your text:
- Create a New Document: Start by creating a new document in Photoshop Elements. Set the dimensions and resolution according to your design requirements.
- Add Text: Use the Text tool to add the desired text to your document. Adjust the font, size, and style as needed.
- Import or Create a Pattern: You can either import an existing pattern into Photoshop Elements or create your own custom pattern. To import a pattern, open the pattern file and select it. To create a custom pattern, use the Shape or Brush tools to design the pattern on a new layer.
- Apply the Pattern as a Layer: Drag and drop the pattern onto the text layer in the Layers panel. This will create a new layer with the pattern above the text layer.
- Create a Clipping Mask: Right-click on the pattern layer and choose “Create Clipping Mask” from the menu. This will mask the pattern within the boundaries of the text, resulting in the text becoming filled with the pattern.
- Adjust the Pattern: Use the transform tools, such as Scale, Rotate, and Warp, to position and adjust the pattern within the text. This allows you to align the elements of the pattern to achieve the desired effect.
- Refine the Pattern Overlay: To further enhance the pattern overlay, you can adjust the layer blending mode, opacity, or apply layer styles to the text or pattern layer. This allows for additional effects and customization options to make the pattern overlay more visually appealing.
Applying a pattern overlay to your text can elevate your design by adding texture, visual interest, and a unique aesthetic. This technique can be used to create standout typography, attention-grabbing titles, or decorative elements within your compositions.
When choosing or creating a pattern for your text overlay, consider the contrast, legibility, and overall design aesthetic. Ensure that the text remains clear and readable against the pattern. Experiment with different blending modes, opacity levels, and adjustments to achieve the desired effect while maintaining a cohesive and balanced design.
By applying a pattern overlay to your text in Photoshop Elements, you can breathe new life into your designs, adding depth and captivating visual elements that make your text truly stand out.