
What is Text on a Path or in a Shape?
Text on a path or in a shape refers to the technique of placing text along a drawn path or within a predefined shape in Adobe Photoshop CC. This feature allows you to create visually appealing and unique text effects that can make your designs stand out. Instead of the usual straight and horizontal text placement, text on a path or in a shape can follow a curved or custom-shaped path, adding a dynamic and artistic touch to your artwork.
In Photoshop, you have the flexibility to bend, warp, or distort the text to conform to any path or shape you create. You can choose from pre-defined shapes like circles, squares, or custom shapes, or draw a freehand path to follow. Text on a path or in a shape is commonly used in logo design, typography art, or adding captions or labels to images. It offers endless creative possibilities, allowing you to incorporate text seamlessly into the overall design, making it an essential technique for graphic designers and digital artists.
By utilizing text on a path or in a shape, you can create visually stunning graphics without needing to rely solely on images. It offers more flexibility and creativity in presenting textual information, allowing you to integrate text elements harmoniously with the aesthetic aspects of your design. Whether you want to create a professional logo, a captivating advertisement, or a unique illustration, text on a path or in a shape is a valuable tool that can elevate your designs to the next level.
Why Use Text on a Path or in a Shape?
Text on a path or in a shape is a powerful feature in Adobe Photoshop CC that offers numerous benefits and creative possibilities. Here are a few reasons why you should consider using text on a path or in a shape in your designs:
- Visual Interest: Placing text on a path or in a shape adds visual interest and creates a unique design element. It allows you to break away from traditional horizontal or vertical text and experiment with different curves, angles, and shapes.
- Emphasis and Focus: By following a path or fitting into a shape, text can be used to emphasize or draw attention to specific areas of your design. This can help guide the viewer’s eye and ensure important information is noticed.
- Enhanced Typography: Using text on a path or in a shape opens up opportunities for creative typography. You can apply various effects, such as warping, bending, or distorting the text, to create unique and eye-catching typographic designs.
- Seamless Integration: Text on a path or in a shape seamlessly integrates with your design, making it appear as if the text belongs there naturally. This can create a cohesive and polished look for your artwork.
- Flexibility and Customization: With text on a path or in a shape, you have full control over the placement, size, and orientation of the text. You can easily adjust and customize the text to fit your specific design requirements.
- Expanded Design Options: By using text on a path or in a shape, you can explore new and innovative design possibilities. It allows you to think outside the box and create engaging and impactful visuals.
These are just a few of the many reasons why text on a path or in a shape is a valuable tool for designers. It offers endless creative opportunities and helps you achieve visually compelling designs that grab attention and leave a lasting impression.
How to Put Text on a Path in Adobe Photoshop CC
Adding text on a path in Adobe Photoshop CC is a straightforward process that allows you to create curved or circular text effects. Follow the step-by-step guide below to put text on a path:
Step 1: Select the Path
First, select the path on which you want to place the text. You can use the Pen Tool or any other shape tool to create a custom path, or you can select an existing shape or path from the Paths panel.
Step 2: Activate the Type Tool
Next, activate the Type Tool by selecting it from the toolbar or by pressing the ‘T’ key on your keyboard. This will enable you to type the text onto the selected path.
Step 3: Click on the Path
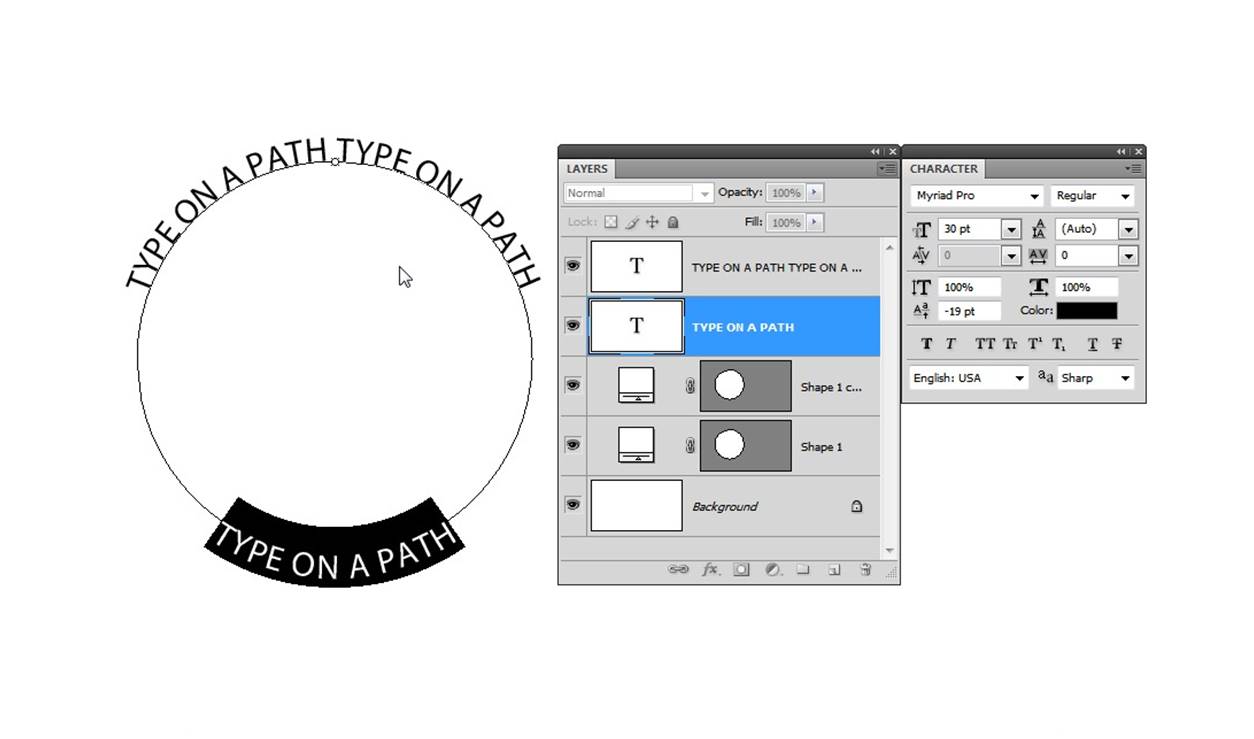
With the Type Tool active, move your cursor over the selected path. The cursor will transform into an I-beam with a wavy line. Click on the path to set the starting point for your text.
Step 4: Type the Text
Once you’ve clicked on the path, start typing the desired text. As you type, you’ll notice the text follows the path you selected. Don’t worry about the text overflowing; you can adjust its positioning in the next step.
Step 5: Adjust the Text on the Path
To adjust the position or orientation of the text on the path, use the Direct Selection Tool (A) to select the text layer. Then, you can move the text along the path or rotate it to achieve the desired effect. You can also modify the font, size, color, and other text properties as needed.
With these simple steps, you can easily create text on a path in Adobe Photoshop CC. Experiment with different paths and text adjustments to achieve the desired typography effect in your designs.
Step 1: Select the Path
Before you can put text on a path in Adobe Photoshop CC, you need to select the path onto which the text will be placed. Follow these steps to select the path:
1. Open Adobe Photoshop CC and open the document containing the path you want to use for your text.
2. If you have already created the path, select the Path Selection Tool (A) from the toolbar on the left side of the screen. It is typically located under the Direct Selection Tool (the white arrow).
3. Click on the path you want to use for your text. The path will become highlighted, indicating that it is selected and ready for text placement.
If you haven’t created the path yet, you can use the Pen Tool (P) or any other shape tool to draw a custom path. The path can be a simple curve, a circle, or a complex shape, depending on your design requirements.
To create a custom path using the Pen Tool, simply click to set anchor points, and drag the mouse to create curves. Use the Direct Selection Tool (A) to adjust the position and shape of the path as needed.
By selecting the appropriate path or creating a custom path, you are now ready to move on to the next step of putting text on a path in Adobe Photoshop CC.
Step 2: Activate the Type Tool
After selecting the path onto which you want to put text, the next step is to activate the Type Tool in Adobe Photoshop CC. Follow these simple instructions to activate the Type Tool:
1. Open Adobe Photoshop CC and open the document containing the selected path.
Make sure you have the document open in Photoshop that contains the path you want to use for your text. If you don’t have a document open, open a new document or open an existing one.
2. Select the Type Tool from the toolbar.
The Type Tool icon is represented by a large “T” in the toolbar. You can find it on the left side of the Photoshop interface. Clicking on the Type Tool icon will activate it for use in your document.
3. Customize the Type Tool settings, if necessary.
Once you have activated the Type Tool, you can customize its settings by adjusting the options in the Options bar at the top of the Photoshop interface. Here, you can modify the font, size, color, and other formatting properties of your text.
For advanced text effects, you can also adjust the leading (the space between lines of text), tracking (the space between letters), and other typographic settings using the Character panel in Photoshop.
4. Ensure the Type Tool is selected and ready for use.
Make sure that the Type Tool is selected and active. You can double-check by looking at the toolbar and confirming that the Type Tool is highlighted or has a dotted outline around it.
By following these steps, you are now ready to move on to the next step of putting text on a path in Adobe Photoshop CC.
Step 3: Click on the Path
Once you have activated the Type Tool and customized the necessary settings, it’s time to click on the selected path to set the starting point for your text. Follow these steps to click on the path in Adobe Photoshop CC:
1. Activate the Type Tool.
If you haven’t done so already, select the Type Tool from the toolbar and ensure it is active for use.
2. Move your cursor over the selected path.
With the Type Tool active, position your cursor over the selected path where you want the text to begin. As you move your cursor, you will notice it transforms into an I-beam icon with a wavy line running through it.
3. Click on the path.
Once your cursor is positioned correctly over the path, click on it to set the starting point for your text. Your cursor will be replaced by a text entry point, indicating that you are ready to start typing.
It is important to note that clicking on the path is a single click, not a click-and-drag motion. When you click on the path, Photoshop will automatically create a text layer that is linked to the path, allowing the text to follow its curvature.
By clicking on the path, you have successfully positioned the starting point for your text. You are now ready to move on to the next step and begin typing the desired text onto the selected path in Adobe Photoshop CC.
Step 4: Type the Text
After clicking on the selected path in Adobe Photoshop CC, you can begin typing the desired text onto the path. Follow these steps to type the text onto the path:
1. Make sure the Text Tool is active and the text layer is selected.
Ensure that the Type Tool is active and the text layer you created by clicking on the path is selected. You can confirm this by checking the Layers panel on the right side of the Photoshop interface.
2. Start typing your desired text.
With the text layer selected, simply start typing the text you want to place on the path. As you type, the text will automatically follow the shape and curvature of the path you selected.
Don’t worry about the text overflowing or not fitting perfectly on the path at this stage; you can adjust its position and size in the next step.
3. Customize the text properties, if necessary.
Once you have typed the desired text onto the path, you can customize its properties using the options available in the Options bar at the top of the Photoshop interface.
You can change the font, font size, alignment, color, and other formatting options to achieve the desired look for your text. Experiment with different settings to find the perfect style for your design.
4. Make additional adjustments as needed.
If the text doesn’t align or fit precisely on the path, you can make further adjustments. Use the Direct Selection Tool (A) to select the text layer and nudge it along the path or rotate it slightly until it is positioned correctly.
By following these steps, you can easily type the desired text onto the selected path in Adobe Photoshop CC. Remember to experiment and refine the positioning and appearance of the text until you achieve the desired effect.
Step 5: Adjust the Text on the Path
After typing the desired text onto the selected path in Adobe Photoshop CC, you may need to make further adjustments to ensure the text is positioned correctly and achieves the desired effect. Follow these steps to adjust the text on the path:
1. Select the text layer.
In order to make adjustments to the text on the path, you need to select the corresponding text layer. You can do this by clicking on the text layer in the Layers panel on the right side of the Photoshop interface.
2. Use the Direct Selection Tool (A) to modify the text placement.
With the text layer selected, choose the Direct Selection Tool (the white arrow) from the toolbar on the left side of the screen. It is typically located below the Path Selection Tool (the black arrow).
Click and drag the text along the path to reposition it, or rotate it slightly if needed. This allows you to fine-tune the placement of the text to ensure it aligns perfectly with the path and fits within the desired area of your design.
3. Adjust the size and spacing of the text.
If the text appears too small or too large on the path, you can adjust its size by selecting the text layer and using the options in the Options bar at the top of the Photoshop interface. Increase or decrease the font size until you are satisfied with the text’s appearance.
Additionally, you can adjust the spacing between letters and lines of text by modifying the tracking and leading options. This can be done using either the Character panel or the options in the Options bar.
4. Customize the text properties further, if desired.
You can continue to customize and refine the text properties to achieve the desired look for your design. Experiment with different font styles, colors, and other formatting options to make the text stand out or blend in seamlessly with the rest of your artwork.
Remember to save your work regularly to ensure you don’t lose any progress you’ve made in adjusting the text on the path.
By following these steps, you can easily adjust the text on the selected path in Adobe Photoshop CC and achieve the perfect placement and appearance for your design.
How to Put Text in a Shape in Adobe Photoshop CC
Placing text within a shape in Adobe Photoshop CC allows you to create more visually engaging and creative designs. Follow these steps to put text in a shape:
Step 1: Create or Select the Shape
First, create a shape or select an existing shape in your Photoshop document. You can use the Shape Tool (U) located in the toolbar on the left side of the screen to create various shapes such as rectangles, circles, polygons, or custom shapes.
To create a shape, simply select the Shape Tool and click and drag on the canvas to define the shape’s dimensions. To select an existing shape, use the Path Selection Tool (A) to click on the desired shape and make sure it is selected.
Step 2: Activate the Type Tool
Next, activate the Type Tool by selecting it from the toolbar or by pressing the ‘T’ key on your keyboard. This tool allows you to type and edit text in Photoshop.
Step 3: Click Inside the Shape
With the Type Tool active, move your cursor inside the selected shape. The cursor will transform into an I-beam indicating that you can now start typing inside the shape.
Step 4: Type the Text
Start typing the desired text inside the shape. It will automatically wrap within the boundaries of the shape. You can type a single word, a phrase, or even multiple lines of text, depending on the size and shape of the selected shape.
Step 5: Customize the Text in the Shape
To further customize the text, select the text layer in the Layers panel on the right side of the Photoshop interface. You can modify the font, font size, color, alignment, and other formatting options using the options available in the Options bar or the Character panel.
Additionally, you can adjust the position of the text within the shape by clicking and dragging the text layer using the Move Tool (V) or by using the alignment options in the Options bar.
By following these steps, you can easily put text within a shape in Adobe Photoshop CC. Experiment with different shapes and text formatting options to achieve the desired visual effect and enhance your designs.
Step 1: Create or Select the Shape
The first step in putting text in a shape in Adobe Photoshop CC is to create or select the desired shape. Follow these steps to create or select the shape:
1. Open Adobe Photoshop CC and open your document.
Make sure you have Adobe Photoshop CC open and your document ready to work on. If you don’t have a document open, you can either create a new one or open an existing document.
2. Choose the Shape Tool from the toolbar.
The Shape Tool (U) can be found in the toolbar on the left side of the Photoshop interface. It is represented by a rectangle icon, and clicking on it will reveal a dropdown menu with various shape options.
Choose the shape that you want to use for placing the text. Photoshop offers a range of shapes, including rectangles, circles, polygons, stars, and custom shapes.
3. Create the shape.
To create the shape, click and drag on the canvas while holding down the mouse button. This will define the dimensions of the shape. If you want to create a perfect square or circle, hold down the Shift key while dragging.
Alternatively, if you already have a shape in your document and want to use it to place text, use the Path Selection Tool (A) to click on the desired shape layer. This will select the shape, indicating that it is ready for text placement.
Be sure to position the shape where you want the text to be contained. If necessary, resize or reposition the shape using the Transform controls.
By creating or selecting the shape, you have completed the first step to putting text within a shape in Adobe Photoshop CC. Proceed to the next step to activate the Type Tool and continue the process of incorporating text into the shape.
Step 2: Activate the Type Tool
After creating or selecting the desired shape in Adobe Photoshop CC, the next step is to activate the Type Tool, which will allow you to add and edit text within the shape. Follow these instructions to activate the Type Tool:
1. Open Adobe Photoshop CC and open your document.
Ensure that you have Adobe Photoshop CC open and the document in which you want to add text within a shape is open and ready for editing.
2. Select the Type Tool from the toolbar.
Locate the Type Tool in the toolbar on the left side of the Photoshop interface. The Type Tool is represented by a large “T” icon. Clicking on the Type Tool icon will activate it for use in your document.
Alternatively, you can also access the Type Tool by pressing the letter “T” on your keyboard, which is the keyboard shortcut for the Type Tool.
3. Customize the Type Tool settings if needed.
Once you have activated the Type Tool, you may want to customize its settings. This includes choosing the desired font, font size, text color, alignment, and other text formatting options. You can modify these settings using the options available in the Options bar at the top of the Photoshop interface.
Additionally, you can access more advanced text formatting options by opening the Character panel in Photoshop. The Character panel allows you to control properties such as leading (line spacing), kerning (letter spacing), and other typographic settings.
By activating the Type Tool and customizing its settings, you are now ready to proceed to the next step and start placing text within the selected shape in Adobe Photoshop CC.
Step 3: Click Inside the Shape
After activating the Type Tool in Adobe Photoshop CC, the next step is to click inside the selected shape where you want to place the text. Follow these instructions to click inside the shape:
1. Make sure the Type Tool is active.
Ensure that the Type Tool is still selected and active. You can confirm this by checking the toolbar on the left side of the Photoshop interface. The selected tool should appear with a highlighted or outlined appearance.
2. Position your cursor inside the selected shape.
Move your cursor over the selected shape in your document. As you move the cursor, you will notice that it transforms into an I-beam cursor indicating that you are now able to input text.
3. Click inside the shape.
Once your cursor is inside the shape, click on the desired spot to set the starting point for your text. This is where the text will begin to appear within the shape.
By clicking inside the shape, Photoshop will place an insertion point, and you can start typing your text directly within the boundaries of the chosen shape. The text will automatically wrap within the shape, conforming to its contours.
It’s important to note that you have the flexibility to reposition the text within the shape at a later stage if needed. Additionally, you can adjust the size, font, and other text properties to achieve the desired aesthetic for your design.
With these simple steps, you have successfully clicked inside the shape and are now ready to proceed to the next step of typing the text within the selected shape in Adobe Photoshop CC.
Step 4: Type the Text
With the Type Tool active and the cursor inside the selected shape in Adobe Photoshop CC, you can now start typing the desired text within the boundaries of the shape. Follow these steps to type the text:
1. Ensure that the Type Tool is still selected and active.
Make sure that the Type Tool is still selected in the toolbar on the left side of the Photoshop interface. If it is not selected, choose the Type Tool (represented by a large “T” icon) to activate it.
2. Start typing your desired text.
With the Type Tool active, click once inside the shape where you want the text to begin. This will set the starting point for your text. Start typing the desired text directly onto the canvas. As you type, the text will appear within the boundaries of the selected shape.
You can enter a single word, a phrase, or even multiple lines of text depending on the size and shape of the selected shape. The text will automatically wrap within the shape, adjusting to fit its dimensions.
3. Customize the text properties, if necessary.
Once you have typed the desired text within the shape, you can customize its properties using the options available in the Options bar at the top of the Photoshop interface. This includes adjusting the font, font size, color, alignment, and other formatting options.
To modify the text properties, simply select the text by clicking and dragging the cursor over the text within the shape. Then, make the desired changes using the options available in the Options bar or the Character panel.
By following these steps, you can easily type the desired text within the selected shape in Adobe Photoshop CC. Remember to experiment with different text options and formats to achieve the desired visual effect for your design.
Step 5: Customize the Text in the Shape
After typing the desired text within the selected shape in Adobe Photoshop CC, you may want to further customize the appearance of the text to achieve the desired effect. Follow these steps to customize the text in the shape:
1. Select the text layer.
To make adjustments to the text within the shape, you need to select the corresponding text layer in the Layers panel. Click on the text layer to ensure it is selected.
2. Modify the text properties.
Using the options available in the Options bar and the Character panel, you can customize various properties of the text. These properties include the font, font size, color, alignment, and more. Experiment with different settings to achieve the desired visual effect.
3. Adjust the position of the text within the shape.
If the text within the shape needs to be repositioned, you can use the Move Tool (V) to click and drag the text layer within the Layers panel or directly on the canvas. This allows you to precisely position the text within the shape or align it to the desired location.
4. Apply layer styles and effects.
To further enhance the appearance of the text within the shape, you can apply various layer styles and effects. These include drop shadows, bevel and emboss, gradients, and more. You can access these options by right-clicking on the text layer in the Layers panel and choosing “Layer Styles”.
5. Experiment and refine.
Don’t be afraid to experiment and try different settings and effects. Adjust the text properties, try different fonts, colors, and styles. Use the available tools and options in Photoshop to refine the appearance of the text until it perfectly suits your design vision.
By following these steps, you can easily customize the text within the selected shape in Adobe Photoshop CC. Remember to save your work regularly and experiment with different options to achieve the desired visual outcome for your design.
Tips and Tricks for Text on a Path or in a Shape
Working with text on a path or in a shape in Adobe Photoshop CC opens up a world of creative possibilities. Here are some tips and tricks to help you make the most out of this feature:
- Experiment with different paths and shapes: Don’t be afraid to try out different paths or shapes to add variety to your designs. Explore curves, spirals, waves, or custom shapes to create unique and eye-catching text effects.
- Use a font that complements the shape: Choose a font that works well with the shape you’re using. For example, curvy fonts can work nicely with circular shapes, while blocky fonts can enhance rectangular or square shapes.
- Adjust the spacing and size: Play around with the tracking and leading options to adjust the spacing between letters and lines of text. You can also experiment with different font sizes to achieve the right balance and legibility.
- Consider the text orientation: Depending on the path or shape, you may want to rotate or flip the text to ensure it flows in the right direction or fits within the shape naturally.
- Blend the text with the background: To create a harmonious design, experiment with blending modes and opacity settings to make the text blend seamlessly with the background or other elements in your artwork.
- Apply selective stylization: Use layer styles and effects, such as drop shadows, bevel and emboss, or gradients, to add depth and dimension to the text. Be selective and apply these effects sparingly to avoid overwhelming the design.
- Combine text on a path with other design elements: Incorporate text on a path or in a shape with other graphic elements, such as images or illustrations, to create visually engaging compositions. Experiment with layering and positioning to achieve a cohesive and balanced design.
- Utilize guides for precision: When aligning text on a path or in a shape, consider using guides to ensure accurate placement and symmetry. Guides can assist you in maintaining consistency and achieving a polished look.
- Save and reuse custom shapes: If you create a custom shape that works well with text, save it as a custom shape preset. This allows you to reuse it in future projects or share it with others, saving time and maintaining a consistent style.
By applying these tips and tricks, you can elevate your designs and create stunning text effects using the text on a path or in a shape feature in Adobe Photoshop CC. Don’t be afraid to experiment and let your creativity flow as you explore the possibilities this feature offers.