
Reasons Why You May Need to Change AirPod Pro Tips
As an AirPods Pro user, you might have experienced instances where the fit of the ear tips isn’t optimal, resulting in discomfort or the earbuds not staying securely in place. This is where the option to change the AirPod Pro tips comes in handy. There are several reasons why you may need to consider swapping out your existing tips for new ones:
- Poor Fit: Each person’s ears are unique, and the standard AirPod Pro tips may not fit everyone perfectly. If you find that the earbuds are loose, falling out, or causing discomfort, it’s a clear sign that you need to change the tips.
- Damage: Over time, the AirPod Pro tips can become worn out or damaged due to frequent use or accidental mishaps. If you notice tears, cracks, or any other signs of wear and tear, it’s advisable to replace them for optimal performance.
- Hygiene: Maintaining good hygiene is essential, especially when it comes to items that come in direct contact with your ears. If you’ve been using your AirPods Pro for a while without changing the tips, it’s a good idea to switch them out to ensure cleanliness and prevent the buildup of dust, earwax, or other debris.
- Compatibility: Some users may find that the default AirPod Pro tips don’t provide the desired level of noise isolation or sound quality. In such cases, experimenting with different tip sizes or materials can help you find the perfect fit that enhances your listening experience.
- Cosmetic Preference: Changing AirPod Pro tips is not only a functional choice but also an opportunity to customize the appearance of your earbuds. If you prefer a different color or style, there are aftermarket options available that allow you to personalize your AirPods Pro.
Remember, changing the AirPod Pro tips is a simple and cost-effective solution to address any fit or comfort issues you may be facing. By identifying the reasons mentioned above, you can determine if it’s time to swap out your current tips for new ones and enjoy a better overall experience with your AirPods Pro.
Choosing the Right Size AirPod Pro Tips
When it comes to getting the perfect fit and optimal audio experience with your AirPods Pro, selecting the right size of tips is crucial. Apple provides three sizes of ear tips: small, medium, and large, to cater to different ear shapes and sizes. Here are some essential steps to follow for choosing the right size AirPod Pro tips:
- Start with the Medium Size: Apple ships the AirPods Pro with medium-sized tips pre-installed. Before trying other sizes, it’s recommended to test the medium tips first, as they fit the majority of users comfortably.
- Check for a Secure and Comfortable Fit: Insert the AirPods Pro into your ears with the medium-sized tips and gently twist them into place. Ensure they sit snugly in your ears without applying excessive pressure or causing discomfort.
- Assess Noise Isolation: Play some audio and pay attention to the quality of noise isolation. The tips should create a seal that blocks out external sounds, allowing you to fully immerse yourself in your music or podcasts without distractions.
- Consider Trying Other Sizes: If you find that the medium-sized tips don’t provide an optimal fit or sufficient noise isolation, it’s time to experiment with the other available sizes. Remove the medium tips and try the small ones first, followed by the large ones.
- Don’t Forget Symmetry: Ensure that you choose the same size for both ear tips. Different-sized tips can affect the audio balance and overall comfort of your AirPods Pro.
- Listen and Compare: After trying each size, listen to your favorite audio content and compare the fit and audio quality. Focus on finding the size that offers the best balance of comfort, noise isolation, and audio performance.
Remember, the AirPods Pro tips are designed to create a secure and comfortable seal in your ears, promoting an immersive audio experience. By following these steps and choosing the right size, you can ensure a perfect fit and enjoy your AirPods Pro to the fullest.
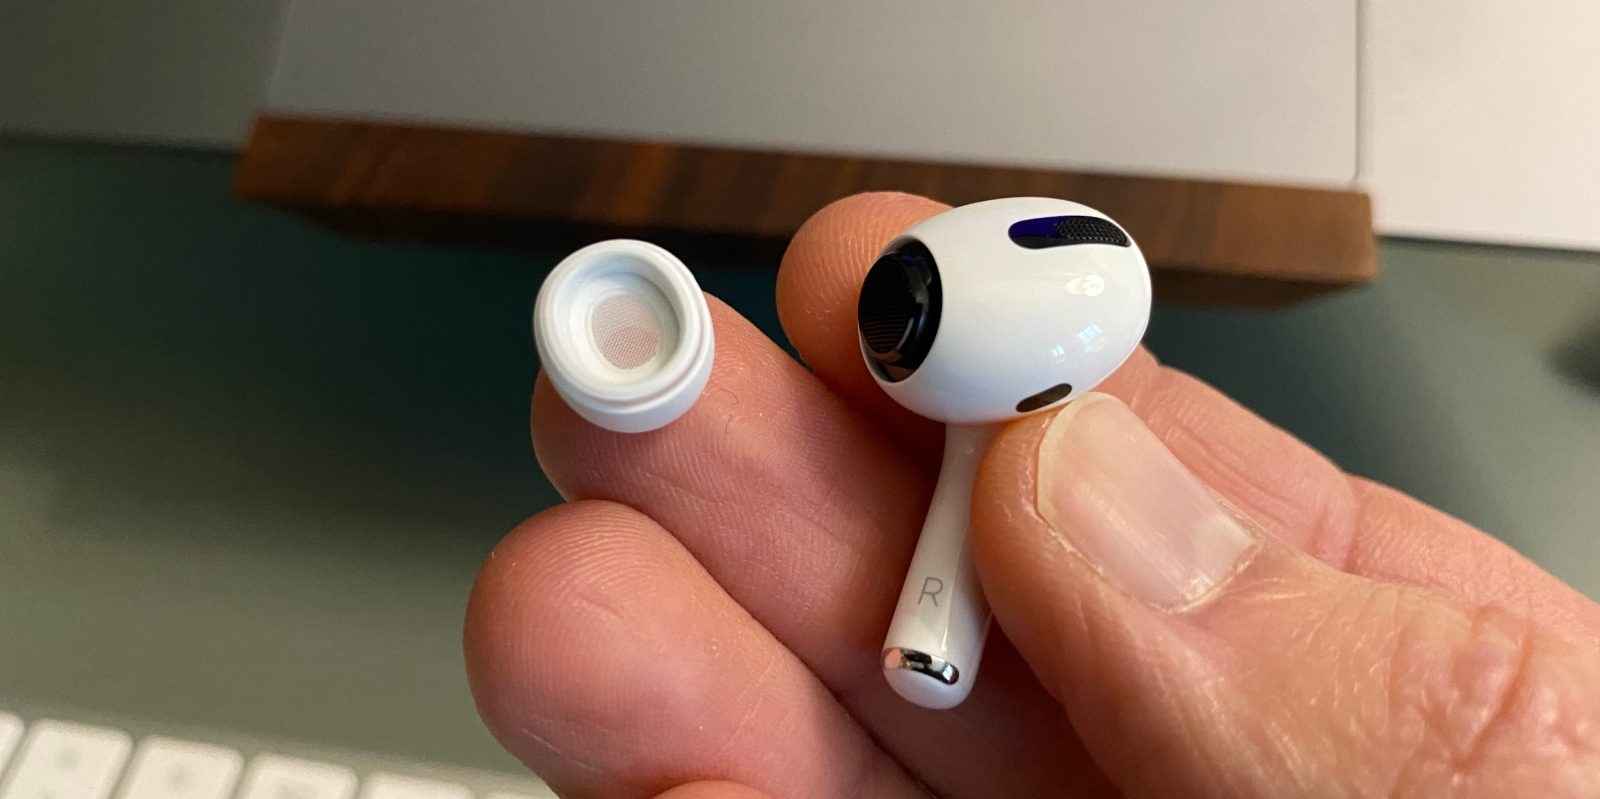
Removing the Old AirPod Pro Tips
Before you can replace your AirPod Pro tips with a new set, you need to know how to properly remove the old ones. While it may seem like a simple task, taking a few extra precautions can prevent any damage to your AirPods Pro. Here’s a step-by-step guide on removing the old AirPod Pro tips:
- Hold the AirPods Pro Firmly: To avoid any accidental dropping or damage, hold the main body of the AirPods Pro firmly between your fingers. Make sure you have a good grip without exerting excessive pressure.
- Gently Twist and Pull: Locate the ear tip that you want to remove and gently twist it counterclockwise. This twisting motion helps to dislodge the tip from the nozzle. Once the tip is loose, carefully pull it away from the AirPods Pro.
- Avoid Pulling Too Hard: It’s important to use gentle force when removing the tips. Avoid yanking or pulling too hard, as this can damage the nozzle or cause it to detach from the AirPods Pro. If you’re having trouble removing the tip, try twisting it a bit more before pulling.
- Inspect for Debris: After removing the old tip, take a moment to inspect the nozzle and the removed tip for any debris or buildup. If you notice any dirt or earwax, gently clean the area with a soft, lint-free cloth or a cotton swab dipped in a small amount of rubbing alcohol. Be careful not to push any debris further into the nozzle.
- Repeat for the Other Ear Tip: Follow the same steps to remove the old tip from the other AirPods Pro earpiece.
By following these instructions, you can safely and easily remove the old AirPod Pro tips without causing any damage to your earbuds. Once you’ve successfully removed the old tips, you’re ready to clean them or install new ones for an improved fit and listening experience.
Cleaning the AirPod Pro Tips
Keeping your AirPod Pro tips clean is essential for maintaining optimal audio quality and hygiene. Regular cleaning helps prevent the buildup of dirt, sweat, earwax, and other debris that can affect the performance and fit of your AirPods Pro. Here’s a guide on how to clean your AirPod Pro tips:
- Remove the Tips: Before you begin cleaning, ensure that you have removed the AirPod Pro tips from your earbuds following the proper removal instructions mentioned earlier.
- Inspect for Debris: Take a close look at the tips and check for any visible dirt or debris. If you notice stubborn residue or buildup, you can use a soft, lint-free cloth or a cotton swab dipped in a small amount of mild soap and water to gently wipe the tips. Be cautious not to saturate the tips or let any liquid enter the sound vents.
- Dry Thoroughly: After cleaning, make sure to dry the tips completely before reattaching them to your AirPods Pro. Airdrying is the best method, as using towels or tissues may leave lint or fibers behind.
- Disinfect (Optional): If you want to take an extra step for hygiene, you can lightly dampen a cotton ball or pad with rubbing alcohol and gently wipe the tips to disinfect them. Allow the tips to air dry completely before using them again.
- Store Properly: After cleaning and drying the AirPod Pro tips, store them in a clean and dry place. It’s recommended to keep them in the original case or use a separate case or container specifically designated for the tips to protect them from dust and debris.
By following these cleaning instructions on a regular basis, you can ensure that your AirPod Pro tips remain free from dirt and buildup, providing you with a clean and comfortable listening experience. Proper maintenance not only extends the lifespan of the tips but also contributes to the overall longevity and performance of your AirPods Pro.
Installing the New AirPod Pro Tips
Once you have selected the right size and cleaned your new AirPod Pro tips, it’s time to install them onto your earbuds. Proper installation ensures a secure fit and optimal audio experience. Follow these steps to install the new AirPod Pro tips:
- Hold the AirPods Pro Firmly: Similar to removing the old tips, hold the main body of the AirPods Pro securely between your fingers to prevent any accidental dropping or damage.
- Align the Tips: Take the new tip and align it with the nozzle of the AirPods Pro. The tip should have a conical shape, with the wider opening at the bottom and a narrower end that fits onto the nozzle.
- Gently Push and Twist: Apply gentle pressure and push the tip onto the nozzle, ensuring it fits securely. Then, twist the tip clockwise to ensure a locked and stable position. The twisting motion helps create a tight seal and prevents the tip from easily coming off during use. Repeat these steps for the other AirPod Pro earpiece.
- Perform a Fit Test: Once the new tips are installed, it’s a good idea to perform a quick fit test to ensure they are properly seated and providing a secure fit. Insert the AirPods Pro into your ears and gently tug on them to check if they remain secure. If they feel loose, try reinserting the tips or consider trying a different size.
With the new AirPod Pro tips correctly installed, you can enjoy a comfortable and secure fit, improving the noise isolation and overall audio quality of your AirPods Pro. If you find that the new tips are still not providing the desired fit or audio experience, you may need to try a different size or consult the manufacturer for further assistance.
How to Test the Fit of Your New AirPod Pro Tips
After installing the new AirPod Pro tips, it’s important to perform a fit test to ensure they provide the desired level of comfort and secure fit. Testing the fit helps optimize the audio quality, noise isolation, and overall experience with your AirPods Pro. Here’s how to test the fit of your new AirPod Pro tips:
- Insert the AirPods Pro: Begin by inserting the AirPods Pro with the new tips into your ears. Make sure they are properly aligned and inserted fully into your ear canal.
- Listen for a Complete Seal: Pay attention to the sound quality and external noise isolation. The new tips should create a seal that blocks out most of the ambient noise, allowing you to focus on your audio content without distractions. You should hear a noticeable improvement in audio clarity and bass response compared to when the tips are not sealed properly.
- Check for Comfort: Assess the comfort of the tips as you wear them. They should feel snug and secure in your ears, without exerting excessive pressure or causing discomfort. If you experience any pain or discomfort, try adjusting the position of the AirPods Pro or consider trying a different size of tips.
- Perform Physical Activities: Engage in some physical activities or gentle movements, such as walking or jogging, while wearing the AirPods Pro. The new tips should stay securely in your ears without falling out or requiring constant readjustment. If they feel loose or unstable, it may be necessary to try a different size of tips or experiment with different techniques to achieve a better fit.
- Assess Audio Performance: Lastly, listen to various types of audio content, including music, podcasts, or phone calls, and evaluate the overall audio performance. The new tips should enhance the audio quality, providing better clarity, detail, and depth to your audio experience.
By following these testing steps, you can ensure that the new AirPod Pro tips provide a comfortable and secure fit, superior noise isolation, and optimized audio performance. If you encounter any issues during the fit test, don’t hesitate to try different sizes of tips or seek further assistance from Apple support or authorized service providers.
Troubleshooting Common Issues with AirPod Pro Tips
While the AirPods Pro tips are designed to provide a comfortable and secure fit, you may encounter some common issues that can affect their performance. Here are a few troubleshooting steps to address these issues:
- Loose Tips: If you find that the AirPod Pro tips are not staying securely in your ears, try twisting them slightly clockwise upon insertion. This twisting motion helps create a tighter seal and prevents them from easily falling out.
- Discomfort or Pain: If you experience discomfort or pain after prolonged use, ensure that you are using the correct size of tips that fit your ears properly. Consider trying different sizes to find the most comfortable fit. Additionally, cleaning the tips regularly and ensuring they are free from debris can help alleviate discomfort.
- Inadequate Noise Isolation: If the noise isolation of your AirPods Pro is not satisfactory, confirm that the tips are properly seated in your ears. Pushing them slightly deeper into your ear canal can improve the seal and enhance the noise isolation. If the issue persists, try a different size of tips to achieve a better fit.
- Audio Imbalance: In some cases, you may experience audio imbalance where one earbud sounds louder than the other. This can be resolved by ensuring that both AirPod Pro tips are the same size and properly installed. Cleaning the nozzles and contacts with a soft, lint-free cloth can also help improve audio balance.
- Limited Bass Response: If the bass response seems weak or lacking, double-check that the AirPod Pro tips are creating a complete seal in your ears. A proper seal is essential for optimal bass performance. Adjusting the placement and depth of the tips or trying a larger size can often improve bass response.
Remember, troubleshooting common issues with AirPod Pro tips often involves adjusting the fit, cleaning the tips, and trying different sizes. By following these steps, you can enhance the comfort, fit, and sound quality of your AirPods Pro. If the issues persist, consider reaching out to Apple support or visiting an authorized service provider for further assistance.
Final Thoughts: Enjoying the Perfect Fit with AirPod Pro Tips
Choosing the right size and maintaining the proper fit of your AirPod Pro tips is essential for maximizing your listening experience. By addressing fit issues, cleaning the tips regularly, and troubleshooting common problems, you can enjoy the perfect fit and optimal audio performance with your AirPods Pro. Here are a few final thoughts to keep in mind:
First and foremost, take the time to choose the right size of AirPod Pro tips that provide a secure and comfortable fit. Everyone’s ears are unique, so experimenting with different sizes can help you find the one that works best for you. Remember to assess the fit, comfort, and noise isolation when testing out different sizes.
Regularly cleaning your AirPod Pro tips is crucial for maintaining hygiene and audio quality. By removing debris and buildup, you can ensure a clean and comfortable fit. Make it a habit to inspect and clean the tips on a regular basis, using gentle techniques and avoiding any excessive moisture.
If you encounter any issues with the fit or performance of your AirPod Pro tips, don’t hesitate to troubleshoot. From adjusting the placement to trying different sizes, there are various steps you can take to address common problems. Take the time to experiment and find the solutions that work best for you.
Lastly, remember that the AirPod Pro tips are not only functional but also customizable. If you want to add a personal touch to your AirPods Pro, consider exploring aftermarket options that offer different colors and styles. This way, you can enjoy a customized look while still maintaining the perfect fit.
By following these tips and taking the necessary steps to find and maintain the perfect fit, you can enhance your overall experience with your AirPods Pro. Enjoy immersive sound, unparalleled comfort, and a secure fit, whether you’re using them for music, calls, or any other audio activity!