
Why Use Noise Canceling on AirPods
Noise canceling technology has become increasingly popular in recent years, and for good reason. Whether you’re a frequent traveler, an office worker, or simply someone who enjoys their music without distractions, noise canceling on AirPods can greatly enhance your listening experience. Here’s why you should consider using noise canceling on your AirPods.
First and foremost, noise canceling allows you to immerse yourself in your favorite music or podcasts without any interruptions. Whether you’re in a noisy coffee shop, on a crowded train, or in a bustling office, noise canceling technology works by actively blocking external sounds, creating a serene bubble of tranquility. This means you can fully enjoy the rich, detailed sound of your audio content without having to turn up the volume to drown out surrounding noise.
Additionally, noise canceling can significantly reduce stress and fatigue caused by constant exposure to noise pollution. Research has shown that being exposed to continuous noise can impact our overall well-being and cognitive function. By using noise canceling on AirPods, you can create a peaceful environment that promotes relaxation and focus, allowing you to be more productive and stay mentally sharp.
Furthermore, noise canceling can enhance the clarity of phone calls and virtual meetings. Whether you’re taking an important business call or connecting with loved ones, background noise can be a significant distraction for both you and the person on the other end of the line. Activating noise canceling on your AirPods can minimize or eliminate background noise, allowing for clearer communication and a more enjoyable conversation.
Lastly, noise canceling is not limited to audio playback. It can also be beneficial in quiet environments where you need to concentrate or relax. By activating noise canceling on your AirPods, you can create a quiet sanctuary for reading, studying, or practicing mindfulness, even if there is external noise present.
Overall, noise canceling on AirPods provides a multitude of benefits. It allows you to fully immerse yourself in your audio content, reduces stress and fatigue caused by noise pollution, enhances the clarity of phone calls and virtual meetings, and creates a peaceful environment for concentrated work or relaxation. With noise canceling, you can experience sound in a whole new way and make the most of your AirPods.
How to Enable Noise Canceling on AirPods Pro
If you own a pair of AirPods Pro, you can easily enable the noise canceling feature to enjoy an immersive audio experience. Follow these simple steps to activate noise canceling on your AirPods Pro.
Step 1: Put on Your AirPods Pro
Make sure your AirPods Pro are snugly fit in your ears. The noise canceling feature works best when there is a tight seal, so adjust the ear tips if necessary to ensure a comfortable and secure fit.
Step 2: Access Control Center
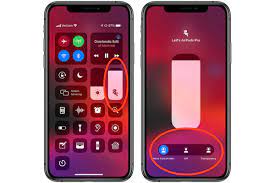
Swipe down from the top-right corner of your iPhone or iPad to open the Control Center. Alternatively, on devices with Face ID, swipe down from the top-right corner of the screen. For devices with Home Button, swipe up from the bottom of the screen.
Step 3: Tap on the Noise Control Button
In the Control Center, locate the volume slider, which is represented by a speaker icon. Tap and hold on the volume slider to expand it and reveal additional controls.
Step 4: Select Noise Cancelation
Within the expanded volume controls, you will see three noise control options: Noise Cancelation, Transparency, and Off. Tap on the Noise Cancelation button to activate the noise canceling feature on your AirPods Pro.
Step 5: Enjoy Noise Canceling on AirPods Pro
Once you have selected Noise Cancelation, your AirPods Pro will now actively reduce external noise, allowing you to enjoy your audio content without distractions. Adjust the volume to your desired level and experience the enhanced sound quality provided by the noise canceling feature.
Note: Remember to disable noise canceling when you no longer need it to preserve battery life.
Enabling noise canceling on your AirPods Pro is a simple and convenient process. By following these steps, you can create a personalized audio experience and enjoy immersive sound quality even in noisy environments.
Step 1: Put on Your AirPods Pro
Before you can enable noise canceling on your AirPods Pro, ensure that you have them securely placed in your ears. Properly fitting AirPods Pro are crucial for optimizing the noise canceling functionality and achieving the best audio experience.
To put on your AirPods Pro, carefully remove them from the charging case. Each AirPod Pro has a designated left and right ear placement, which is indicated by an “L” or “R” on the respective earbud. Align the AirPods Pro with your ears, gently inserting them into the ear canals.
It’s important to note that the AirPods Pro come with three sets of silicone ear tips—small, medium, and large—designed to accommodate different ear sizes and shapes. Start with the medium-sized ear tips, as they are pre-installed on the AirPods Pro by default.
Once inserted, ensure that the AirPods Pro form a secure seal in your ears. This seal is essential for effective noise cancellation, as it helps block out external sounds. To check the seal, lightly press on the AirPods Pro to ensure they are snugly in place.
If you find that the default ear tip size doesn’t provide a comfortable or secure fit, you can try the other sizes. Simply remove the existing ear tips and insert the desired size until you find the one that fits your ears comfortably and creates a proper seal.
Remember that a proper fit is crucial not only for maximizing noise canceling capabilities but also for improving audio quality and comfort during extended use. It’s worth spending a few extra moments to ensure that your AirPods Pro are properly positioned and seated in your ears.
Once you have put on your AirPods Pro and verified a secure fit, you are ready to proceed to the next step and enable noise canceling in order to fully enjoy your audio content without any distractions.
Step 2: Access Control Center
To enable noise canceling on your AirPods Pro, you’ll need to access the Control Center on your iPhone or iPad. The Control Center is a convenient hub that provides quick access to various settings and features, including the noise control options for your AirPods Pro.
Accessing the Control Center differs slightly depending on the device you’re using:
- If you’re using an iPhone X or later or an iPad with Face ID, swipe down from the top-right corner of the screen to open the Control Center.
- If you’re using an iPhone 8 or earlier or an iPad with a Home Button, swipe up from the bottom of the screen to open the Control Center.
Once you perform the appropriate gesture, you’ll see a panel with various controls and shortcuts. The Control Center provides a centralized location for managing essential settings on your device.
If the Control Center is not visible at first, ensure that you’re performing the gesture correctly. It’s also possible that you may have disabled the Control Center access from within your device settings. In this case, you can enable it by navigating to the “Control Center” settings in your device’s settings menu and toggling the appropriate switch.
Upon successfully opening the Control Center, you’ll be presented with a range of options. These include volume controls, screen brightness adjustment, music playback, and more, depending on your device and settings.
Now that you’ve accessed the Control Center, you’re ready to proceed to the next step and navigate to the noise control options to enable noise canceling on your AirPods Pro.
Step 3: Tap on the Noise Control Button
Once you have accessed the Control Center on your iPhone or iPad, it’s time to tap on the noise control button to enable the noise canceling feature on your AirPods Pro.
In the Control Center, locate the volume slider, which is represented by a speaker icon. The volume slider allows you to adjust the audio volume on your device, but it also contains additional controls, including the noise control options for your AirPods Pro.
To expand the volume controls and reveal the noise control options, tap and hold on the volume slider. This action will open up an expanded view with more controls and settings.
Within the expanded volume controls, you’ll notice three distinct noise control buttons: Noise Cancelation, Transparency, and Off. These options offer different sound modes and functionalities for your AirPods Pro.
For enabling noise canceling specifically, tap on the Noise Cancelation button. This selection activates the noise canceling feature on your AirPods Pro, allowing them to actively reduce external noise and provide a more immersive audio experience.
When you tap on the Noise Cancelation button, you may feel a slight change in the audio or experience a momentary quietness as the noise canceling technology kicks in. This indicates that your AirPods Pro are now actively blocking external sounds and optimizing your listening environment.
By selecting the noise canceling option, you are able to enjoy your audio content without distractions from background noise. Whether you’re in a noisy coffee shop, on a crowded train, or in a bustling office, the noise canceling feature on your AirPods Pro will create a peaceful and immersive listening experience.
Now that you’ve successfully chosen the noise canceling option, you’re ready to move on to the next step and experience the benefits of noise canceling on your AirPods Pro.
Step 4: Select Noise Cancelation
Once you have accessed the expanded volume controls in the Control Center and tapped on the volume slider, you will notice three distinct noise control options: Noise Cancelation, Transparency, and Off. In this step, we will focus on selecting the Noise Cancelation option to activate the noise canceling feature on your AirPods Pro.
The Noise Cancelation option, represented by an ear icon with soundwaves being blocked, is designed to significantly reduce external noise and create a more immersive audio experience. This feature is particularly useful in noisy environments where you want to eliminate distractions and fully enjoy your favorite music, podcasts, or any other audio content.
To select the Noise Cancelation option, simply tap on the corresponding icon in the expanded volume controls. As you tap, you may feel a subtle change in the audio or experience a momentary quietness. This indicates that the noise canceling feature is being activated, and your AirPods Pro will start actively blocking external sounds.
Once you have selected Noise Cancelation, your AirPods Pro will utilize their advanced technology to analyze the surrounding noise and generate counteracting soundwaves that cancel out unwanted sounds. This creates a serene audio environment where you can fully immerse yourself in your audio content, without the distraction of background noise.
It’s important to note that the Noise Cancelation option is recommended for most situations where you want to enjoy an immersive audio experience. However, there may be instances where you want to be aware of your surroundings or have conversations without taking off your AirPods Pro. In such cases, you can choose the Transparency mode, which amplifies external sounds, allowing you to remain connected to the world around you while still wearing your AirPods Pro.
By selecting the Noise Cancelation option, you can enhance your audio experience and create a tranquil listening environment wherever you go. Now that you have successfully enabled noise canceling on your AirPods Pro, it’s time to enjoy the uninterrupted and immersive sound quality they provide.
Step 5: Enjoy Noise Canceling on AirPods Pro
With noise canceling activated on your AirPods Pro, you can now immerse yourself in a world of high-quality audio without distraction. In this final step, we’ll explore how you can make the most of the noise canceling feature and fully enjoy your AirPods Pro.
Adjust the volume: With noise canceling enabled, you can experience your audio content at a comfortable volume without the need to raise it to drown out external noise. Experiment with different volume levels to find the balance that suits your preferences and provides the best listening experience.
Engage in focused activities: Whether you’re studying, working, or simply looking to relax, noise canceling can help create a conducive environment. By blocking out external distractions, you can fully concentrate on your tasks or enjoy moments of peace and tranquility.
Travel with tranquility: AirPods Pro’s noise canceling feature is especially beneficial during travel. Whether you’re flying, riding a train, or commuting in a busy city, noise canceling can make your journey more enjoyable by minimizing the impact of surrounding noises and allowing you to focus on your selected audio content.
Quality phone calls: When making phone calls, noise canceling helps ensure crystal-clear audio for both you and the person on the other end. The minimized background noise enhances the clarity of your voice, leading to better communication and reducing the need for repetition or straining to hear.
Try different audio genres: Noise canceling on AirPods Pro enhances the richness and detail of audio across all genres. Whether you’re a fan of classical music, rock, podcasts, or audiobooks, the isolated sound environment created by noise canceling will undoubtedly enhance your listening experience.
Remember to disable noise canceling when appropriate: While noise canceling can vastly improve your audio experience, there may be times when you want to remain aware of your surroundings or conserve battery life. To disable noise canceling, simply follow the same steps outlined earlier and select the “Transparency” or “Off” option in the expanded volume controls.
With noise canceling on AirPods Pro, you can elevate your audio experience and enjoy unparalleled immersion in your favorite content. Take advantage of this remarkable feature to block out distractions, enhance clarity, and create an environment tailored to your audio preferences.
Congratulations! You have successfully enabled and learned how to enjoy noise canceling on your AirPods Pro. Now, sit back, relax, and revel in the rich, uninterrupted sound quality provided by your AirPods Pro.
How to Enable Noise Canceling on AirPods Max
Enabling noise canceling on your AirPods Max is a straightforward process that allows you to enjoy an immersive audio experience, cutting out external noise. Follow these simple steps to activate noise canceling on your AirPods Max.
Step 1: Connect Your AirPods Max
Make sure your AirPods Max are connected to your iPhone, iPad, or any compatible device. The connection can be established via Bluetooth, and the AirPods Max should appear as an available device on your device’s Bluetooth settings. Once connected, you’re ready to proceed to the next step.
Step 2: Access the Control Center
Swipe down from the top-right corner of your iPhone or iPad screen to open the Control Center. This action will reveal a range of quick-access settings and controls, including the noise control options for your AirPods Max.
Step 3: Tap on the Noise Control Button
In the Control Center, locate the volume slider. It is represented by a speaker icon and allows you to adjust the audio volume on your device. Tap and hold on the volume slider to expand it and unveil additional controls.
Step 4: Choose Noise Cancellation
Within the expanded volume controls, you will see various noise control options for your AirPods Max. Look for the Noise Cancellation button and tap on it to activate the noise canceling feature.
Step 5: Experience Noise Canceling on AirPods Max
Once you have selected Noise Cancellation, your AirPods Max will start actively reducing external noise and providing you with a more immersive audio experience. Adjust the volume to your preferred level and enjoy your audio content without distractions from the surrounding environment.
It’s worth noting that AirPods Max offer additional controls and customization options for noise canceling, including modes such as Transparency mode that allows you to hear your surroundings. These options can be accessed and adjusted through the AirPods Max settings on your paired device.
With noise canceling enabled on your AirPods Max, you can enjoy your audio content with heightened clarity and immersion, whether you’re in a noisy office, on public transportation, or simply looking to create a serene listening environment.
Now that you’ve successfully enabled noise canceling on your AirPods Max, you’re ready to experience the remarkable audio quality and tranquil sound environment they provide.
Step 1: Connect Your AirPods Max
Before you can enable noise canceling on your AirPods Max, you need to ensure they are properly connected to your iPhone, iPad, Mac, or any other compatible device. Establishing a stable Bluetooth connection is essential for the seamless functioning of your AirPods Max.
To connect your AirPods Max, follow these simple steps:
1. Activate Bluetooth: Make sure the Bluetooth function is turned on for your device. You can usually find this option in the settings menu of your iPhone, iPad, Mac, or other compatible devices. Confirm that Bluetooth is enabled and ready to connect to nearby devices.
2. Put your AirPods Max in pairing mode: Locate the noise control dial on one of the earcups of your AirPods Max. Press and hold the noise control button until the LED light near the button starts flashing white. This indicates that your AirPods Max are now in pairing mode.
3. Open Bluetooth settings on your device: Access the Bluetooth settings on your device. This can usually be found in the device’s settings menu. Look for the list of available Bluetooth devices, and you should see your AirPods Max listed as an option.
4. Select your AirPods Max: Tap on the AirPods Max in the list of available Bluetooth devices on your device’s Bluetooth settings screen. This will initiate the pairing process and establish a connection between your AirPods Max and your device.
5. Confirm the pairing: After selecting your AirPods Max, your device will attempt to connect to them. Once the connection is established, you will typically see an on-screen confirmation message or an icon indicating that your AirPods Max are connected and ready to use.
Now that your AirPods Max are successfully connected to your device, you’re ready to proceed with enabling noise canceling and enjoying an immersive audio experience.
Note that once you have successfully paired your AirPods Max with a device, they will automatically connect to that device whenever Bluetooth is enabled and in range. If you want to connect your AirPods Max to a different device, you may need to repeat the connection process outlined above.
By following these simple steps, you can quickly establish a connection between your AirPods Max and your device, setting the stage for a seamless noise canceling experience.
Step 2: Access the Control Center
To enable noise canceling on your AirPods Max, you’ll need to access the Control Center on your iPhone or iPad. The Control Center serves as a centralized hub for various settings and features, including the noise control options for your AirPods Max.
Accessing the Control Center can be done by following these steps:
1. Unlock your device: If your iPhone or iPad is locked, unlock it using Face ID, Touch ID, or your passcode. This will give you access to the home screen of your device.
2. Locate the Control Center: On devices with Face ID, swipe down from the top-right corner of the screen. On devices with a Home button, swipe up from the bottom of the screen. This action will reveal the Control Center.
3. Identify the Control Center: The Control Center is a panel that displays various controls and shortcuts. It provides efficient access to essential settings on your device.
4. Ensure Control Center is visible: If the Control Center is not immediately visible, ensure that you’re performing the correct gesture. Make sure your swipe originates from the correct location on the screen (top-right or bottom, depending on your device model). Additionally, you can check your device’s settings to ensure that the Control Center is enabled and visible.
5. Explore the Control Center: Once you have accessed the Control Center, take a moment to familiarize yourself with the available controls. This may include brightness adjustment, volume control, music playback, and more.
The Control Center provides quick access to vital features and settings for a seamless user experience. For our purposes, we will focus on the noise control options needed to enable noise canceling on your AirPods Max.
With the Control Center open, you’re ready to proceed to the next step, which involves tapping on the noise control button and accessing the specific noise control options for your AirPods Max.
Note that the exact appearance and layout of the Control Center may vary depending on your device’s settings and iOS version.
By following these steps, you can easily access the Control Center and prepare to activate noise canceling on your AirPods Max for an enhanced audio experience.
Step 3: Tap on the Noise Control Button
Once you have accessed the Control Center on your iPhone or iPad, it is time to tap on the noise control button to enable the noise canceling feature on your AirPods Max.
In the Control Center, you’ll find a range of controls and shortcuts, including the volume slider and other audio-related settings. Look for the control that specifically relates to noise control and noise canceling on your AirPods Max.
To activate noise canceling, locate the noise control button, which is represented by an icon that resembles a soundwave with a line drawn through it. This button is specifically designed to enable or disable the noise canceling feature on your AirPods Max.
Once you have located the noise control button, simply tap on it. Tapping on the button will activate the noise canceling feature, allowing your AirPods Max to actively reduce external noise and provide a more immersive audio experience.
When you tap on the noise control button, you might notice a slight change in the audio or experience a momentary silence. This indicates that the noise canceling feature is being engaged and your AirPods Max are now working to block out and minimize external sounds.
By selecting the noise control button, you enable the noise canceling functionality of your AirPods Max. This advanced feature allows you to fully immerse yourself in your audio content by isolating and blocking out unwanted background noise.
Keep in mind that the noise control button is just one of the many customizable features available on your AirPods Max. You can further adjust and personalize the noise canceling settings using the AirPods Max settings on your connected device.
With noise canceling activated, you can now enjoy your audio content with enhanced clarity and without the distractions of external noises. Immerse yourself in your music, podcasts, or movies like never before and experience the impeccable audio quality that AirPods Max can deliver.
Now that you have successfully tapped the noise control button, you’re ready for the next step, where you can fully embrace and enjoy the noise-canceling capabilities of your AirPods Max.
Step 4: Choose Noise Cancelling
Once you have accessed the Control Center on your iPhone or iPad and tapped on the noise control button, you will be presented with various noise control options for your AirPods Max. In this step, we will focus on selecting the “Noise Cancelling” mode to activate the noise canceling feature on your AirPods Max.
Within the Control Center, after tapping on the noise control button, you will find a set of noise control options specifically designed for your AirPods Max. These options allow you to customize your audio experience and choose the level of noise cancellation that suits your preferences.
To enable noise canceling, locate the “Noise Cancelling” option among the available noise control settings. The “Noise Cancelling” option is often represented by an icon or label indicating its purpose, which is to actively reduce external noise and create a more immersive audio experience.
To select the “Noise Cancelling” mode, simply tap on the corresponding option. This action will activate the noise canceling feature on your AirPods Max, and you’ll notice a difference in sound as the external noise is actively reduced and minimized.
By choosing the “Noise Cancelling” mode, your AirPods Max will utilize their advanced computational audio technology to analyze and counteract external noise, allowing you to enjoy your audio content with enhanced clarity and immersion.
It’s important to note that the “Noise Cancelling” mode is effective for blocking out most external sounds and creating a peaceful audio environment. However, there may be instances when you want to be aware of your surroundings or have conversations without removing your AirPods Max. In such cases, you can switch to the “Transparency” mode, which amplifies external sounds, making them more audible while still providing a rich audio experience.
With noise canceling activated, you can fully immerse yourself in your audio content, whether it’s music, podcasts, movies, or any other form of entertainment. Experience the clarity, depth, and detail of the sound without distractions from the surrounding environment.
Now that you have successfully chosen the “Noise Cancelling” mode, you’re ready to move on to the next step where you can fully enjoy the benefits of noise canceling and indulge in a captivating audio experience with your AirPods Max.
Step 5: Experience Noise Canceling on AirPods Max
With noise canceling now enabled on your AirPods Max, you can fully immerse yourself in a world of captivating sound, free from the distractions of external noise. In this final step, we’ll explore how you can make the most of the noise canceling feature and fully experience the exceptional audio quality of your AirPods Max.
Uninterrupted Audio: The noise canceling feature on your AirPods Max actively reduces background noise, allowing you to enjoy your audio content without any distractions. Whether you’re listening to music, podcast, or watching a movie, each sound will come through with enhanced clarity and focus.
Immersive Surroundings: With noise canceling engaged, you can create a personal sanctuary regardless of your location. Whether you’re in a noisy office, a crowded coffee shop, or on a busy commute, the noise canceling technology of your AirPods Max will help create a peaceful environment, allowing you to fully focus on your audio and escape into your own world.
Conversations and Phone Calls: Noise canceling is not limited to audio playback; it also enhances your conversations. When making or receiving phone calls, the noise canceling feature reduces background noise, ensuring crystal-clear communication for both you and the person on the other end. Enjoy uninterrupted conversations without the need to strain or repeat yourself.
Long-haul Travel: AirPods Max’s noise canceling capability is especially beneficial during long flights or train rides. By reducing the noise of the engine, cabin, or surrounding environment, noise canceling allows you to enjoy your entertainment without having to increase the volume to compensate for external noise. Immerse yourself in your favorite movies, TV shows, or audiobooks effortlessly.
Precise Sound: The noise canceling feature of your AirPods Max enhances the precision of audio playback. By reducing background noise, you’ll be able to pick up finer details and nuances in music, dialogue, and sound effects. Rediscover your favorite songs or fully immerse yourself in the audio of your favorite movies with an unprecedented level of sonic accuracy.
Tailor the Experience: Your AirPods Max allows you to further customize the noise canceling experience. Try adjusting the equalizer settings on your device or experimenting with different audio genres to find the perfect balance. Personalize your soundstage by tweaking the settings to match your preferences and create an audio experience that is uniquely yours.
Remember to disable noise canceling when necessary. There may be times when it’s important to remain aware of your surroundings, especially in busy or potentially unsafe situations. To disable noise canceling, follow the same steps outlined earlier and choose the “Transparency” or “Off” mode in the noise control options of your AirPods Max.
With noise canceling enabled on your AirPods Max, you can elevate your audio experience to new heights. Enjoy flawless sound quality, escape the world around you, and indulge in an immersive audio experience that will enhance your favorite content.
Congratulations! You have successfully experienced and learned how to make the most of the noise canceling feature on your AirPods Max. Now, sit back, relax, and embrace the exceptional audio quality that your AirPods Max offers.
Tips for Getting the Most out of Noise Canceling
While noise canceling technology on AirPods Pro and AirPods Max can greatly enhance your audio experience, there are a few tips and tricks you can employ to maximize its effectiveness. Here are some tips for getting the most out of noise canceling:
1. Find the Right Fit for Your AirPods: A proper fit is crucial for effective noise canceling. Ensure that your AirPods Pro have the right-sized ear tips and that your AirPods Max are snugly placed on your head. This helps create a proper seal, enhancing the noise cancellation capabilities.
2. Use Noise Canceling in Noisy Environments: Noise canceling works best in situations with constant background noise, such as airplane cabins, crowded cafes, or busy city streets. Activate noise canceling to block out those distractions and immerse yourself in your audio content.
3. Experiment with Transparency Mode: While noise canceling is excellent for blocking out noise, try using the Transparency mode to let ambient sounds in when necessary. This is helpful when you want to remain aware of your surroundings or have conversations without removing your AirPods.
4. Adjust Sound and Noise Cancellation Settings in Control Center: The Control Center allows you to adjust the volume, alter sound settings, and toggle noise cancellation on/off. Play around with these settings to find the perfect balance for your audio preferences and the environment you’re in.
5. Enjoy the Silence for Concentration or Meditation: Utilize noise canceling to create a quiet and serene space for concentration, meditation, or relaxation. Blocking out external noise can help improve focus and reduce stress, allowing for a more immersive and peaceful experience.
6. Protect Your Hearing: With noise canceling, you can enjoy audio at lower volumes since you don’t need to compensate for external sounds. Taking care of your hearing by keeping volumes at moderate levels can help prevent long-term hearing damage.
7. Keep Your AirPods Charged: Noise canceling requires power, so make sure to keep your AirPods Pro and AirPods Max charged. Regularly check the battery level and charge them when needed to ensure the noise canceling feature functions properly when you need it.
8. Use Noise Canceling for Calls and Meetings: Noise canceling can also improve voice clarity during phone calls or virtual meetings. By reducing background noise, it enhances the overall listening experience for both you and the person on the other end of the call.
9. Take Breaks When Needed: Even though noise canceling can provide a peaceful audio environment, it’s essential to give your ears and mind breaks from constant stimulation. Take periodic breaks to give your ears a chance to rest and recharge.
By following these tips, you can optimize and make the most of the noise canceling feature on your AirPods Pro or AirPods Max. Whether you’re seeking focused concentration, immersive entertainment, or a serene environment, noise canceling can greatly enhance your audio experience.
Tip 1: Find the Right Fit for Your AirPods
One of the most important factors in maximizing the effectiveness of noise canceling on your AirPods Pro or AirPods Max is finding the right fit. A proper fit ensures not only comfort but also optimal noise cancellation capabilities. Here are some tips to help you find the right fit for your AirPods:
1. Test Different Ear Tips: AirPods Pro come with three sets of silicone ear tips in different sizes—small, medium, and large. Start by trying the medium-sized ear tips that come installed on the AirPods Pro. Experiment with the different sizes to find the ones that provide the best fit and seal in your ears.
2. Check for a Secure Seal: A tight seal is crucial for effective noise cancellation. After inserting your AirPods Pro into your ears with the chosen ear tips, gently press on each earbud to ensure a secure seal. You should feel a slight pressure and notice a decrease in the surrounding ambient noise.
3. Eliminate Background Noise: When trying different ear tips, pay attention to the background noise and how it changes with each size. The ear tips that offer the best noise isolation by blocking external sounds and creating a sealed environment will provide the most effective noise cancellation experience.
4. Consider Foam or Third-Party Ear Tips: If you find that the silicone ear tips that come with your AirPods Pro do not provide a satisfactory fit, you may opt for foam ear tips or explore third-party options. Foam ear tips conform to the shape of your ear canal, offering a more personalized fit and improved noise isolation.
5. Adjust the Position: If you’re still experiencing discomfort or suboptimal noise cancellation, gently twist or rotate the AirPods Pro in your ears to find the position that provides the best fit. This slight adjustment can make a significant difference in the comfort and seal of your AirPods Pro.
6. Test the Fit during Movement: While sitting still, your AirPods may feel secure, but they may become less stable during physical activity or movement. To ensure a secure fit in various situations, try moving your head or walking around to see if your AirPods Pro stay in place and maintain the seal.
7. Regularly Check and Clean Your AirPods: Over time, earwax or debris may accumulate on the ear tips or inside the earbuds, affecting the fit and sound quality. Regularly inspect and clean your AirPods to maintain optimal hygiene and ensure an accurate fit.
Remember, finding the right fit is essential for a comfortable and effective noise canceling experience. Experiment with different ear tips, adjust the position of your AirPods Pro, and be mindful of the seal to make the most of the noise canceling capabilities and enjoy a personalized audio experience tailored to your unique needs.
Tip 2: Use Noise Canceling in Noisy Environments
One of the key advantages of noise canceling on your AirPods Pro or AirPods Max is its ability to block out external noise, allowing you to enjoy your audio content without distractions. Here are some tips on using noise canceling in noisy environments:
1. Block Out Background Noise: Noise canceling is particularly effective in environments with constant background noise, such as airplanes, trains, or busy coffee shops. By activating noise canceling, you can effectively block out these distractions, creating a more immersive audio experience.
2. Focus on Your Audio Content: In noisy environments, it can be challenging to fully concentrate on your music, podcasts, or movies. Utilizing noise canceling helps you to immerse yourself in the audio content by reducing the impact of surrounding noise, leading to enhanced focus and enjoyment.
3. Experience Greater Clarity: External noise can often diminish the clarity and detail of audio playback. With noise canceling enabled, you can maintain the integrity of the sound, allowing you to hear nuances, intricate instrumentals, or subtle vocal inflections with improved clarity and precision.
4. Reduce the Need for Volume Increase: In noisy environments, it’s common to raise the volume of your audio to compensate for external sounds. With noise canceling, you can listen to your content at a comfortable volume, as the technology actively reduces the need for volume increase to counteract surrounding noise.
5. Enhance Travel Experiences: Whether you’re on a long flight, public transport, or in a busy airport, noise canceling on your AirPods Pro or AirPods Max can transform your travel experience. Eliminating the hum of engines, background chatter, and other disturbances allows you to enjoy your entertainment, immerse yourself in relaxation, or focus on work during your journey.
6. Minimize Listener Fatigue: Constant exposure to high levels of noise can lead to listener fatigue and increased stress levels. By using noise canceling, you can create a more peaceful auditory environment, reducing the impact of noise pollution on your well-being and enhancing your overall listening experience.
7. Remarkable Office Companion: In busy office environments with open workspaces or when working from home with household noise, noise canceling can be a real asset. Immersing yourself in your work or conference calls without the disturbances of background noise can improve focus, productivity, and overall work performance.
Remember, noise canceling is designed to significantly reduce external noise, but it may not eliminate all sounds. It is important to remain aware of your surroundings, especially in situations where safety may be a concern. Use noise canceling responsibly and adapt it to different environments to fully enjoy the benefits of this advanced audio technology.
Tip 3: Experiment with Transparency Mode
While noise canceling is ideal for blocking out external noise, there are times when you may want to remain aware of your surroundings or engage in conversations without removing your AirPods Pro or AirPods Max. This is where Transparency mode comes in. Here are some useful tips for experimenting with Transparency mode:
1. Activate Transparency Mode: To enable Transparency mode, access the Control Center on your iPhone or iPad and tap on the volume slider. In the expanded volume controls, select the Transparency icon, typically represented by an ear symbol with soundwaves around it. This mode allows external sounds to pass through your AirPods, keeping you connected to your environment.
2. Amplify Ambient Sounds: Transparency mode amplifies the sounds around you, allowing you to hear and engage in conversations, listen to important announcements, or remain aware of potential hazards while still enjoying your audio content. It provides a balanced blend of your audio and ambient sounds.
3. Customize Your Listening Experience: Depending on your preferences and the environment you’re in, you can adjust the level of transparency. Use the volume controls on your AirPods or within the Control Center to increase or decrease the amount of external sound that gets mixed with your audio.
4. Useful in Commuting and Outdoor Activities: Transparency mode proves particularly beneficial when commuting in busy streets, jogging in the park, or cycling, as it allows you to safely hear important sounds, such as traffic, pedestrians, or environmental cues, while enjoying your audio content simultaneously.
5. Ideal for Conversations: When someone approaches you or wants to have a conversation, Transparency mode saves you the hassle of removing your AirPods. By activating this mode, you can engage in conversations without missing a beat or struggling to hear the other person over your audio content.
6. Experiment with Music Mixing: Transparency mode opens up possibilities for creative music mixing. Musicians and audio enthusiasts can use this feature to blend live sound from their surroundings with their audio tracks, enhancing the listening experience or inspiring new musical ideas.
7. Fine-tune with the AirPods Max Digital Crown: If you own AirPods Max, you can fine-tune the level of transparency by using the Digital Crown. Rotate it forward or backward to adjust the intensity of external sound, finding the perfect balance between your audio and the environment.
Remember, Transparency mode is a versatile feature that allows you to strike the right balance between your audio experience and being aware of your surroundings. Experiment with this mode in different situations to fully appreciate its functionality and make it seamlessly integrate with your daily activities.
Tip 4: Adjust Sound and Noise Cancellation Settings in Control Center
The Control Center provides a convenient way to adjust various sound settings and noise cancellation options for your AirPods Pro or AirPods Max. By customizing these settings, you can personalize your audio experience and optimize the performance of your AirPods. Here are some tips for adjusting sound and noise cancellation settings in the Control Center:
1. Access the Control Center: Swipe down from the top-right corner of your iPhone or iPad screen to open the Control Center. It’s the central hub for quick access to settings and features, including your AirPods’ audio controls.
2. Expand the Volume Controls: Locate the volume slider within the Control Center. Tap and hold on the volume slider to expand it and reveal additional audio controls specific to your AirPods.
3. Adjust Volume, Balance, and Levels: Within the expanded audio controls, you can adjust the volume of your AirPods up or down using the slider. This allows you to find the perfect volume level for your listening preference.
4. Customize Noise Cancellation Options: Alongside volume controls, you’ll find noise cancellation options specific to your AirPods Pro or AirPods Max. Tap on these options to toggle noise cancellation on or off, or to switch to Transparency mode. Experiment with different settings to find the mode that suits your current environment and preferences.
5. Fine-tune Sound and Bass Levels: Within the audio controls, you may have additional options to fine-tune the sound profile of your AirPods. Some models allow you to adjust the bass levels or choose different equalizer presets to enhance your audio experience.
6. Maximize Battery Life: Adjusting the sound and noise cancellation settings can also help conserve battery life. Lowering the volume or using noise cancellation only when necessary can prolong the battery performance of your AirPods.
7. Explore Accessibility Options: For users with specific hearing needs, the Control Center may offer accessibility features like Live Listen. Live Listen uses the microphone on your iPhone to amplify sounds, providing enhanced clarity for individuals with hearing challenges.
8. Reset or Reconfigure Settings: If you encounter any issues with sound or noise cancellation, you have the option to reset or reconfigure your AirPods settings from within the Control Center. This can help resolve minor glitches and restore optimal performance.
By taking advantage of the sound and noise cancellation settings in the Control Center, you can adjust your audio experience to suit your preferences and the unique requirements of different environments. Experiment with different options to find the perfect balance, creating an immersive and personalized audio experience with your AirPods.
Final Thoughts on Noise Canceling
Noise canceling technology has revolutionized the audio experience for users of AirPods Pro and AirPods Max. Whether you’re a frequent traveler, a student studying in a noisy environment, or simply someone who wants to zone out and enjoy their music without distractions, noise canceling is a game-changer.
By actively reducing external noise, noise canceling allows you to create a serene listening environment wherever you go. It enhances the clarity and quality of your audio content, immersing you in a world of captivating sound. Whether it’s your favorite songs, podcasts, or movies, noise canceling helps you focus on the details and nuances that may otherwise be lost in a noisy setting.
Noise canceling isn’t limited to audio playback alone. It can improve the quality of phone calls and virtual meetings, allowing for clearer communication by minimizing background noise. It also provides a sense of tranquility and concentration, making it ideal for activities such as studying, working, or practicing mindfulness.
While noise canceling is a powerful tool, it’s important to find the right fit for your AirPods Pro or AirPods Max. Ensuring a secure and comfortable fit will optimize noise cancellation capabilities and overall sound quality. Experiment with different ear tips or adjustments to achieve the best fit for your ears.
It’s worth mentioning that noise canceling technology should be used responsibly. It’s essential to remain aware of your surroundings in certain situations, particularly when safety is a concern. Utilize transparency mode or adjust noise cancellation settings accordingly to strike the desired balance between isolation and environmental awareness.
Lastly, keep in mind that noise canceling can impact battery life. Charging your AirPods Pro or AirPods Max regularly and adjusting noise cancellation usage when needed will help ensure uninterrupted listening experiences.
In summary, noise canceling has become an invaluable feature for AirPods Pro and AirPods Max users, enhancing audio immersion and minimizing external disturbances. Whether you’re traveling, working, or simply seeking moments of tranquility, noise canceling provides an unparalleled audio experience, allowing you to escape into your world of sound.