
Pairing Your AirPods
Pairing your AirPods with your iPhone, iPad, or Mac is a straightforward process that ensures a seamless connection between your devices. Here’s how to do it:
1. Place your AirPods in their charging case and open the lid.
2. On your iPhone or iPad, go to the home screen and open the lid of the charging case near your device. A setup animation will appear on your screen.
3. Tap “Connect” to pair your AirPods with your iPhone or iPad. Follow the on-screen instructions to complete the setup process. Your AirPods will now be paired and ready to use.
If you’re using a Mac, follow these steps:
1. Place your AirPods in their charging case and open the lid.
2. On your Mac, click on the Apple menu and go to “System Preferences.”
3. Click on “Bluetooth” and make sure that Bluetooth is turned on.
4. Open the lid of the charging case near your Mac. Your AirPods should appear in the list of available devices.
5. Click on “Connect” next to your AirPods to pair them with your Mac.
Once your AirPods are paired with your devices, they will automatically connect whenever they are in range and the Bluetooth is enabled.
If you want to pair your AirPods with a different device, simply repeat the pairing process on the desired device.
Pairing your AirPods allows you to enjoy the convenience of wireless listening and easy switching between your devices. Whether you’re listening to music, taking calls, or using Siri, your AirPods will provide a seamless audio experience.
Changing the Name of Your AirPods
By default, your AirPods are named based on the device they are paired with (e.g., “John’s AirPods” or “Jane’s AirPods”). However, you have the option to personalize the name of your AirPods to make them easily identifiable. Here’s how you can change the name:
1. Ensure that your AirPods are connected to your iPhone or iPad.
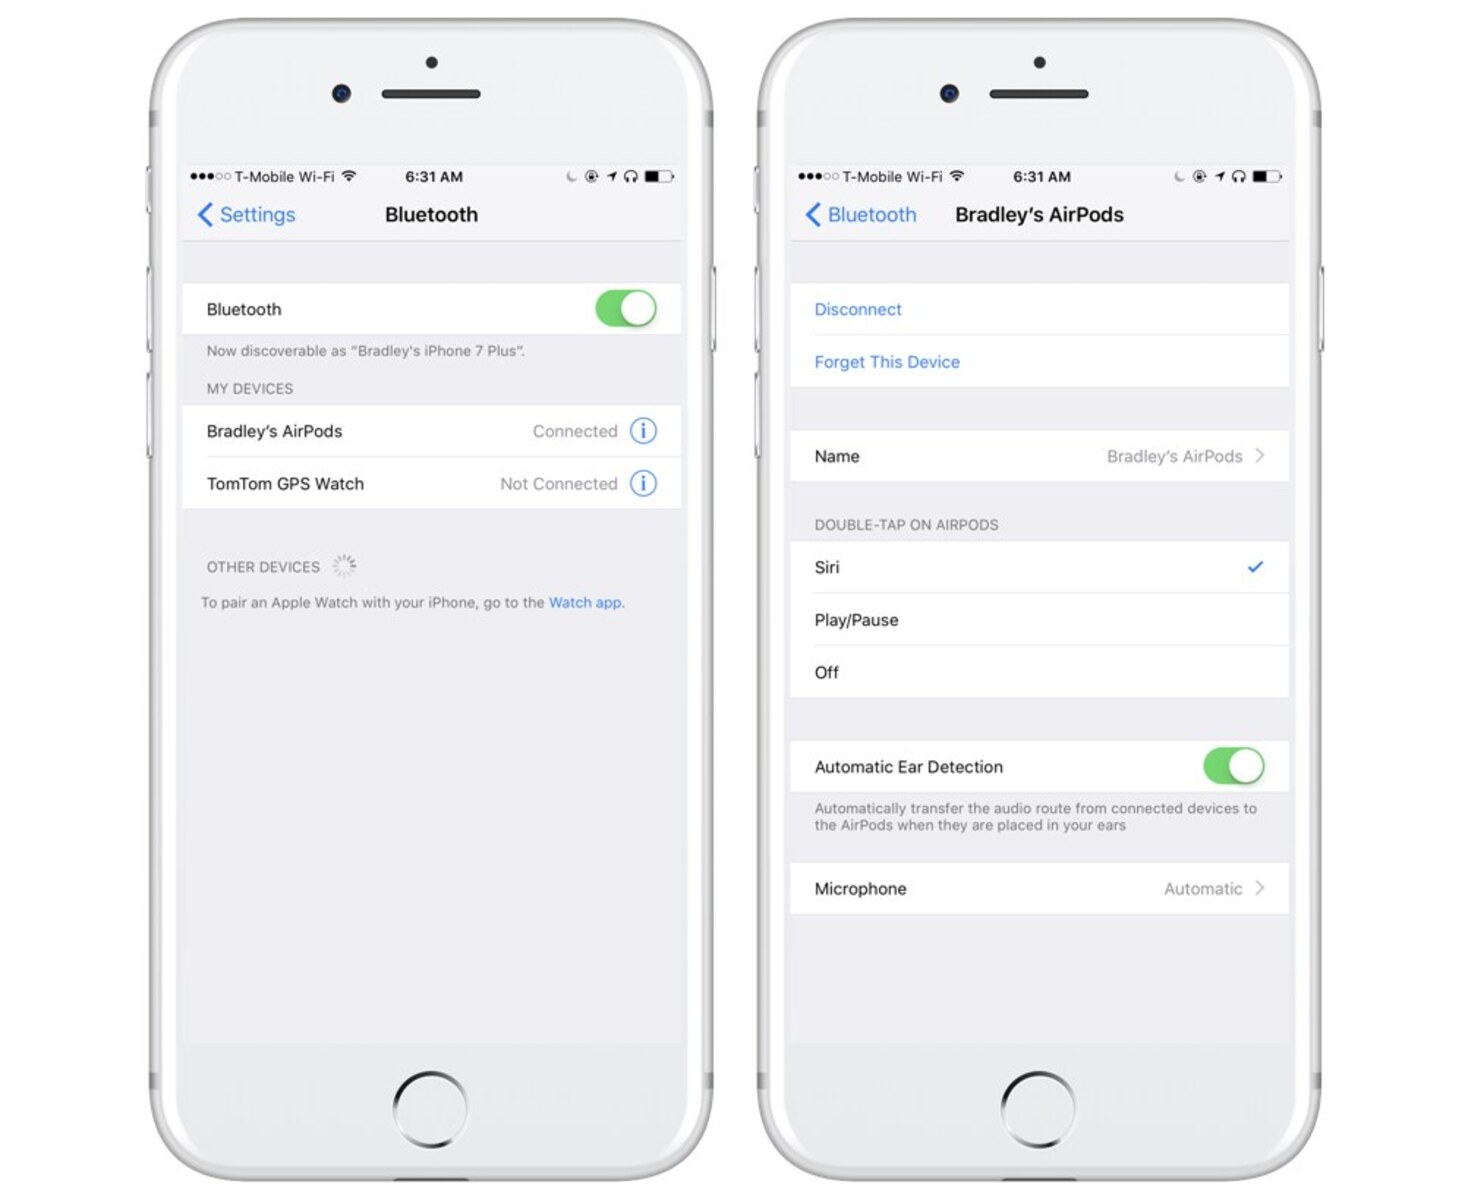
2. Open the Settings app on your device and tap on “Bluetooth.”
3. Find your AirPods in the list of paired devices and tap on the (i) icon next to them.
4. On the AirPods settings screen, tap on the current name under the “Name” section.
5. Enter a new name for your AirPods using the on-screen keyboard.
6. Tap “Done” to save the new name.
Your AirPods will now be renamed with the new name you have chosen. This new name will be displayed when your AirPods are connected to your device.
Changing the name of your AirPods can be helpful when you have multiple pairs of AirPods or if you want to give them a more personalized touch. You can choose to name them based on their primary use (e.g., “Work AirPods” or “Gym AirPods”) or simply give them a fun and unique name.
Please note that changing the name of your AirPods does not affect their functionality or performance. It is solely a cosmetic change to make it easier for you to identify your AirPods when connecting them to your devices.
Adjusting the Microphone Settings
Your AirPods come equipped with a built-in microphone, allowing you to make calls and interact with Siri without having to reach for your iPhone or iPad. If you want to customize the microphone settings to suit your preferences, here’s how:
1. Ensure that your AirPods are connected to your iPhone or iPad.
2. Open the Settings app on your device and tap on “Bluetooth.”
3. Find your AirPods in the list of paired devices and tap on the (i) icon next to them.
4. On the AirPods settings screen, you will see the “Microphone” section.
5. By default, the microphone is set to “Automatic,” which uses the microphone that offers the best audio quality based on the positioning of your AirPods. However, you can choose to use either the left or right AirPod as the microphone.
6. Tap on your preferred option to select it.
If you select the “Always Left AirPod” or “Always Right AirPod” option, the chosen AirPod will be used as the microphone regardless of its position in your ear.
By customizing the microphone settings, you can ensure that your voice is clear and audible during calls and voice commands. Experiment with different settings to find the option that works best for you.
It’s important to note that the microphone settings are specific to your AirPods and will apply when using them with any device they are paired with. So, whether you’re making a call on your iPhone or talking to Siri on your iPad, your microphone preferences will remain consistent.
Having control over the microphone settings allows you to tailor your AirPods to your specific needs. Whether you prioritize optimum audio quality or prefer the convenience of using a specific AirPod as the microphone, adjusting the microphone settings can greatly enhance your overall experience with your AirPods.
Customizing the Double-Tap and Press and Hold Functions
Your AirPods offer convenient control options through the double-tap and press and hold gestures. These gestures allow you to play/pause audio, skip tracks, activate Siri, and more. To customize these functions, follow these steps:
1. Ensure that your AirPods are connected to your iPhone or iPad.
2. Open the Settings app on your device and tap on “Bluetooth.”
3. Find your AirPods in the list of paired devices and tap on the (i) icon next to them.
4. On the AirPods settings screen, you will see the “Double-Tap on AirPod” section.
5. Tap on the left or right AirPod option to customize the double-tap gesture for that specific AirPod.
6. Choose the function you want to assign to the double-tap gesture from the available options, such as “Play/Pause,” “Next Track,” “Previous Track,” or “Siri.”
Repeat the same steps for the other AirPod to set its double-tap function.
In addition to the double-tap gesture, you can also customize the press and hold function on your AirPods Pro. This function allows you to switch between Active Noise Cancellation and Transparency mode. Here’s how:
1. Ensure that your AirPods Pro are connected to your iPhone or iPad.
2. Open the Settings app on your device and tap on “Bluetooth.”
3. Find your AirPods Pro in the list of paired devices and tap on the (i) icon next to them.
4. On the AirPods Pro settings screen, you will see the “Press and Hold AirPods” section.
5. Tap on the “Left AirPod” or “Right AirPod” option to customize the press and hold gesture for that specific AirPod.
6. Choose between “Noise Control” (to switch between Noise Cancellation and Transparency mode) or “Siri.” Note that the “Noise Control” option is only available on AirPods Pro.
Repeat the same steps for the other AirPod Pro to set its press and hold function.
Customizing the double-tap and press and hold functions allows you to have quick and easy access to the features you use most frequently. Whether it’s controlling playback, activating Siri, or toggling between noise settings, personalizing these gestures will streamline your experience with your AirPods.
Enabling Automatic Ear Detection
One of the convenient features of AirPods is the ability to automatically detect when they are in your ears. This allows for seamless audio playback and pausing, ensuring a hassle-free experience. Here’s how to enable automatic ear detection:
1. Ensure that your AirPods are connected to your iPhone or iPad.
2. Open the Settings app on your device and tap on “Bluetooth.”
3. Find your AirPods in the list of paired devices and tap on the (i) icon next to them.
4. On the AirPods settings screen, you will see the “Automatic Ear Detection” option. Toggle it on.
Enabling automatic ear detection means that your AirPods will automatically play audio when you put them in your ears and pause playback when you take them out. This feature is especially handy for those moments when you need to quickly remove your AirPods to have a conversation or listen to your surroundings.
When automatic ear detection is enabled, your AirPods will also automatically switch between audio sources. For example, if you’re listening to music on your iPhone and receive a call on your iPhone, your AirPods will seamlessly switch to the call audio. Once the call ends, they will switch back to the music playback.
Please note that automatic ear detection is available only on the 2nd generation AirPods and AirPods Pro. If you have the 1st generation AirPods, this feature may not be available.
Enabling automatic ear detection ensures that your AirPods are ready to go whenever you need them. It provides a seamless and convenient listening experience, allowing you to enjoy your favorite music, podcasts, and calls without any interruptions.
Changing the Ear Tip Fit Test
The AirPods Pro come with customizable ear tips to provide a secure and comfortable fit. To ensure optimal audio quality and noise cancellation, Apple has introduced the Ear Tip Fit Test feature. This feature helps you determine if you have the right-sized ear tips for your AirPods Pro. Here’s how you can change the Ear Tip Fit Test:
1. Ensure that your AirPods Pro are connected to your iPhone or iPad.
2. Open the Settings app on your device and tap on “Bluetooth.”
3. Find your AirPods Pro in the list of paired devices and tap on the (i) icon next to them.
4. On the AirPods Pro settings screen, you will see the “Ear Tip Fit Test” option. Tap on it.
5. Follow the on-screen instructions to perform the fit test. Make sure your AirPods Pro are properly inserted in your ears and create a seal.
The fit test plays a short audio sample and analyzes the sound to determine if the ear tips are providing an optimal fit. Based on the results, you can adjust the ear tips or try different sizes for a better fit.
If the fit test indicates that the ear tips are not providing a good fit, you can change the ear tips to improve the seal and overall listening experience. The AirPods Pro come with three sizes of silicone ear tips (small, medium, and large), ensuring a customizable fit for a wide variety of ear shapes and sizes.
To change the ear tips:
1. Remove the currently attached ear tips by gently pulling them off the AirPods Pro.
2. Select the desired size of the new ear tips that you think will provide a better fit.
3. Push the new ear tips onto the AirPods Pro until they are securely attached.
You can repeat the fit test after changing the ear tips to ensure that you have achieved an optimal fit.
The Ear Tip Fit Test is a useful feature that allows you to customize the fit of your AirPods Pro for optimal comfort and audio quality. By finding the right-sized ear tips, you can enjoy enhanced noise cancellation and a secure fit that stays in place, even during activities like workouts or running.
Using Spatial Audio
Spatial Audio is a captivating feature available on AirPods Pro that brings a realistic and immersive surround sound experience to your ears. With Spatial Audio, you can enjoy an enhanced audio experience that mimics the way sound is heard in the real world. Here is how you can use Spatial Audio:
1. Ensure that your AirPods Pro are connected to your iPhone or iPad.
2. Open the Control Center on your iPhone or iPad by swiping down from the top right corner of the screen (iPhone X or later) or up from the bottom of the screen (iPhone 8 or earlier).
3. Long-press or firmly press on the volume slider.
4. On the expanded volume control screen, you will see an option for “Spatial Audio.” Tap on it to enable it.
Once enabled, Spatial Audio works with content that supports surround sound, such as movies and TV shows with Dolby Atmos audio. As you move your head or device, the sound field remains fixed relative to your device, creating a realistic and immersive audio experience.
Spatial Audio utilizes the gyroscope and accelerometer sensors in your AirPods Pro and iOS device to track the movement of your head and adjust the sound accordingly. This means that if you turn your head to the left or right, the sound will appear to come from the same direction, just like in real life.
It’s important to note that Spatial Audio is currently supported on certain devices running iOS 14 or later. Make sure your device is compatible before attempting to use this feature.
Experience your favorite movies, TV shows, and other content like never before with the immersive and realistic audio provided by Spatial Audio. Allow yourself to be fully immersed in the action, feeling as if you’re in the center of the scene with the sound coming from all directions.
Through the combination of advanced technology and intelligent audio processing, Spatial Audio adds an extra layer of depth and realism to your audio experience, making your AirPods Pro even more versatile and enjoyable to use.
Adjusting the Volume Balance
The volume balance feature on AirPods allows you to fine-tune the audio playback for each ear individually. This can be especially useful if you have different levels of hearing or prefer the sound to be louder in one ear than the other. Here’s how to adjust the volume balance on your AirPods:
1. Ensure that your AirPods are connected to your iPhone or iPad.
2. Open the Settings app on your device and tap on “Accessibility.”
3. Scroll down and tap on “Audio/Visual.”
4. Under the “Hearing” section, you will find the “Volume Balance” option.
5. Drag the slider left or right to adjust the volume balance between the left and right ear.
As you move the slider to the left, it will decrease the volume in the left ear and increase it in the right ear. On the other hand, moving the slider to the right will decrease the volume in the right ear and increase it in the left ear.
By adjusting the volume balance, you can achieve a better audio experience that is tailored to your hearing preferences or unique needs. This feature ensures that you can enjoy audio playback without any imbalances and ensures a more comfortable listening experience.
It’s worth noting that adjusting the volume balance on your AirPods does not affect the volume control on your iPhone or iPad. It only modifies the audio output specifically for your AirPods.
Remember to adjust the volume balance gradually and find the sweet spot that works best for you. Experiment with different settings until you achieve the ideal balance between your ears.
The volume balance feature is just one example of how AirPods provide customizable options to enhance your listening experience. Whether you have a hearing impairment or simply prefer a personalized audio setup, being able to adjust the volume balance allows you to enjoy your favorite music, podcasts, and more with greater clarity and comfort.
Enabling Automatic Headphone Notifications
Automatic Headphone Notifications is a handy feature available on your AirPods that allows you to receive notifications when your AirPods are connected to your iPhone or iPad. This feature ensures that you never miss important notifications, even when your device is not in your immediate vicinity. Here’s how to enable Automatic Headphone Notifications:
1. Ensure that your AirPods are connected to your iPhone or iPad.
2. Open the Settings app on your device and tap on “Bluetooth.”
3. Find your AirPods in the list of paired devices and tap on the (i) icon next to them.
4. On the AirPods settings screen, you will see the “Announce Messages with Siri” option. Tap on it.
5. You will see various options for when the notifications should be announced. Select your preferred option, such as “Always,” “Headphones Only,” or “Off.”
Choosing “Always” will announce messages through your AirPods, even when you are using them, while “Headphones Only” will only announce messages when you are actively using your AirPods. Select “Off” if you prefer not to receive automatic headphone notifications.
When notifications are announced through your AirPods, Siri will read your incoming messages aloud, allowing you to hear them without having to check your device visually.
This feature is especially useful when you’re unable to reach for your iPhone or iPad, such as when you’re driving or in a situation where you need to keep your hands free. You can catch up on important messages or notifications without interrupting your current activity.
Note that in order for this feature to work, you need to have Siri enabled on your device and the message notifications enabled for Siri to read them aloud.
Enabling Automatic Headphone Notifications ensures that you stay informed and connected, even when your iPhone or iPad isn’t within reach. By having Siri announce your messages through your AirPods, you can conveniently keep up with notifications and respond promptly, all while enjoying the freedom of wireless listening.
Controlling Noise Cancellation and Transparency Mode
The AirPods Pro offer two powerful audio modes – Active Noise Cancellation and Transparency mode. These modes allow you to control how much external sound you hear while wearing your AirPods Pro. Here’s how you can switch between these modes:
1. Ensure that your AirPods Pro are connected to your iPhone or iPad.
2. Open the Control Center on your device. Swipe down from the top right corner (iPhone X or later) or up from the bottom (iPhone 8 or earlier) to access the Control Center.
3. In the Control Center, locate the volume slider.
4. Tap on the “Noise Cancellation” button to enable Active Noise Cancellation. This mode uses advanced technology to block external noises, providing you with a quiet and immersive listening experience.
5. If you want to switch to Transparency mode, simply tap on the “Transparency” button in the Control Center. This mode allows external sound to pass through, making it easier to hear your surroundings. Transparency mode is useful when you want to stay aware of your environment, such as when walking on busy streets or having a conversation without removing your AirPods Pro.
You can also control these modes using your AirPods Pro directly:
– To switch between Active Noise Cancellation and Transparency mode, press and hold the force sensor on the stem of either AirPod until you hear a chime indicating the mode has changed.
– If you prefer to turn off both modes and hear sound naturally, you can disable both modes by turning off Active Noise Cancellation and Transparency mode in the Control Center or by pressing and holding the force sensor on the stem of either AirPod until you hear a second chime.
Adjusting noise cancellation and transparency modes allows you to customize your audio experience based on your surroundings and preferences. Whether you need a quiet space for focused work or want to engage with your surroundings while listening to music, these modes provide the flexibility to adapt to different environments.
With active noise cancellation and transparency mode, your AirPods Pro can cater to your audio needs, providing an immersive experience or allowing you to stay connected to the world around you, all at your fingertips.
Finding Your Lost AirPods
Losing your AirPods can be a frustrating experience, but Apple has included a helpful feature to assist you in locating them. With the Find My app, you can track down your lost AirPods and hopefully retrieve them. Here’s how you can find your lost AirPods:
1. Ensure that you have the Find My app installed on your iPhone or iPad.
2. Open the Find My app and tap on the “Devices” tab at the bottom of the screen.
3. Under the “Devices” tab, you will see a list of your connected Apple devices, including your AirPods.
4. Tap on your AirPods from the list, and it will show you the last known location of your AirPods on the map.
If your AirPods are nearby, you can use the “Play Sound” feature to help you locate them. Tap on “Play Sound,” and your AirPods will start emitting a loud sound, helping you find them even if they are buried under cushions or hidden in a bag.
If your AirPods are not nearby or the last known location is not helpful, you can use the “Lost Mode” feature. Tap on “Lost Mode,” and it will enable notifications to alert you if the AirPods are found by someone else. You can also enter a contact phone number for anyone who finds your AirPods to reach out and return them to you.
It’s worth mentioning that the Find My app relies on the location of your paired iPhone or iPad to determine the last known location of your AirPods. Therefore, it’s important to enable location services on your device and keep it connected to the internet for accurate tracking.
If you are unable to find your lost AirPods using the Find My app, you may need to consider looking in places you frequently visit, reaching out to Apple Support for further assistance, or considering a replacement if necessary.
Though losing your AirPods can be stressful, the Find My app provides a means to track and locate them, increasing the likelihood of a successful recovery. So, if you misplace your AirPods, don’t panic! Take advantage of the Find My app and its features to help you find your missing AirPods and resume enjoying your wireless listening experience.
Updating the Firmware on Your AirPods
Like any other electronic device, your AirPods may receive firmware updates from Apple to enhance their performance, reliability, and add new features. Updating the firmware on your AirPods is important to ensure that you have access to the latest improvements and bug fixes. Here’s how you can update the firmware on your AirPods:
1. Ensure that your AirPods are connected to your iPhone or iPad.
2. Place your AirPods in their charging case and ensure that the case is fully charged.
3. Make sure that your iPhone or iPad is connected to the internet.
4. Open the lid of the charging case with your AirPods inside, and bring it close to your iPhone or iPad.
5. A pop-up message should appear on your device’s screen, indicating that an update is available for your AirPods. Tap “Update.”
6. Follow the on-screen instructions to complete the firmware update process. This may take a few minutes, so make sure not to disconnect your AirPods or close the lid of the charging case during the update.
Once the firmware update is complete, your AirPods will restart and be ready to use with the updated firmware.
It’s important to note that firmware updates for AirPods happen automatically, but you can also check for updates manually by following these steps:
1. Ensure that your AirPods are connected to your iPhone or iPad.
2. Go to the home screen and open the Settings app on your device.
3. Scroll down and tap on “General.”
4. Tap on “About.”
5. Scroll down to find and tap on your AirPods.
6. If an update is available, you will see a message indicating it. Tap “Install” to update your AirPods’ firmware.
Regularly updating the firmware on your AirPods can ensure that you have access to the latest features and improvements. It’s recommended to keep your AirPods up to date to ensure optimal performance and compatibility with other Apple devices.
By performing firmware updates for your AirPods, you can make the most out of your wireless listening experience and stay at the forefront of the latest advancements and enhancements from Apple.
Resetting Your AirPods
If you’re experiencing issues with your AirPods such as connectivity problems, audio glitches, or pairing difficulties, resetting your AirPods can often resolve these issues. Resetting your AirPods essentially restores them to their default factory settings. Here’s how you can reset your AirPods:
1. Place your AirPods in their charging case and close the lid.
2. Wait for at least 30 seconds to ensure that your AirPods are completely disconnected from any connected devices.
3. Open the lid of the charging case.
4. On the back of the charging case, you will find a small button. Press and hold this button until the LED light on the front of the case starts flashing white.
5. Keep holding the button until the LED light on the case flashes amber and then white again. This indicates that your AirPods have been reset.
Once you’ve reset your AirPods, you will need to re-pair them with your devices using the standard pairing process. Place your AirPods near your iPhone or iPad and follow the on-screen instructions to complete the pairing process.
Resetting your AirPods is also useful if you want to give them to someone else to use. By resetting them, you ensure that all personal data and custom settings are erased, allowing the new user to set them up as if they were brand new.
It’s important to note that resetting your AirPods will not update or change their firmware. If you’re experiencing issues related to the firmware, consider updating the firmware (refer to section 12 for instructions).
Resetting your AirPods can be a helpful troubleshooting step to resolve connectivity or pairing issues. By returning them to their default settings, you can eliminate any software-related problems that may be affecting their performance and enjoy a seamless wireless listening experience once again.