
What is AirPods Auto Switch
The AirPods Auto Switch feature is a convenient functionality introduced with iOS 14. It allows your AirPods to seamlessly switch between your Apple devices without any manual adjustments. Whether you’re listening to music on your iPhone or taking a call on your Mac, the AirPods Auto Switch feature automatically routes the audio to the active device.
This technology uses Bluetooth and the proprietary Apple W1 or H1 chip to detect which device you are currently using and instantly transfer the audio stream. For example, if you’re watching a movie on your iPad, but then receive a call on your iPhone, the AirPods will automatically switch the audio to your iPhone so you can answer the call without any interruptions.
With AirPods Auto Switch, you no longer need to manually connect or disconnect your AirPods when switching between devices. This seamless transition makes it easier than ever to enjoy a continuous listening experience as you move from one device to another.
It’s worth noting that AirPods Auto Switch is compatible with second-generation AirPods, AirPods Pro, and AirPods Max, as well as other Apple devices running iOS 14.0 or later, iPadOS 14.0 or later, macOS Big Sur or later, and watchOS 7.0 or later.
Overall, AirPods Auto Switch is a powerful feature that enhances the usability and convenience of your AirPods. By automatically switching between devices, it allows you to seamlessly enjoy your favorite content without interruption, making it a valuable addition to the AirPods lineup.
Why you might want to turn off AirPods Auto Switch
While AirPods Auto Switch is designed to enhance the user experience, there may be instances where you prefer to disable this feature. Here are a few reasons why you might want to turn off AirPods Auto Switch:
- Prevent accidental audio switching: If you frequently use multiple Apple devices in close proximity, the AirPods Auto Switch feature may inadvertently switch the audio source when you didn’t intend it to. This can be especially frustrating if you’re engrossed in a movie or listening to important audio.
- Conserving battery life: Each time the AirPods switch between devices, it requires some extra power. If you’re concerned about maximizing the battery life of your AirPods, disabling Auto Switch can help preserve the charge by eliminating unnecessary switches.
- Smoother audio experience: In some cases, the AirPods might take a slight moment to connect and switch the audio stream when Auto Switch is enabled. If you prefer a seamless and uninterrupted audio experience, turning off Auto Switch can help eliminate any potential delays or hiccups.
- Personal preference: Ultimately, some users simply prefer manual control over their audio sources. By disabling AirPods Auto Switch, you can manually select the desired device for audio playback without any automatic switching.
Keep in mind that disabling AirPods Auto Switch does not mean you cannot switch between devices at all. You can still manually connect your AirPods to different devices through the Bluetooth settings on each device, allowing you to have full control over the audio source.
It’s important to note that the decision to turn off AirPods Auto Switch is a matter of personal preference and specific usage scenarios. If you find that the feature is causing inconvenience or disrupting your desired audio setup, disabling it can offer a more tailored experience to suit your needs.
How to turn off AirPods Auto Switch on iPhone
If you want to disable AirPods Auto Switch on your iPhone, follow these simple steps:
- On your iPhone, open the Settings app.
- Scroll down and tap on Bluetooth.
- Under the My Devices section, locate your AirPods and tap on the “i” icon next to it.
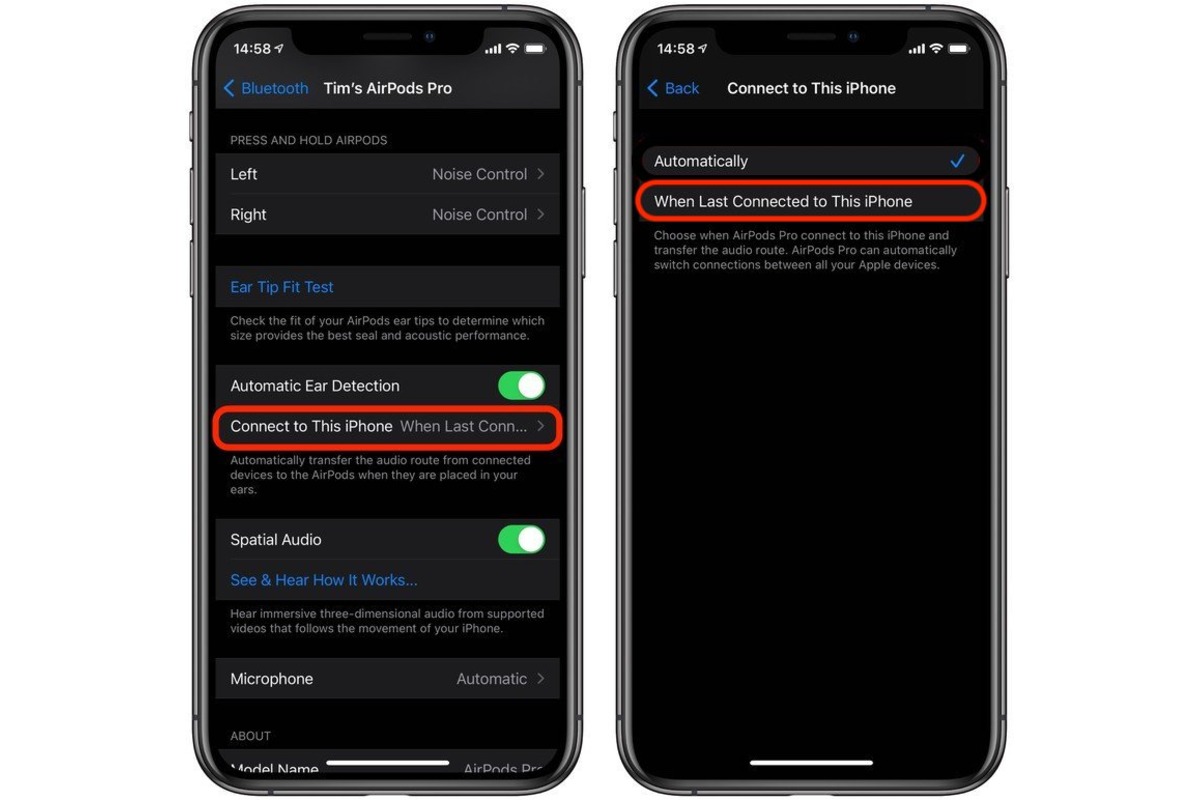
- In the AirPods settings, you will see the Connect to This iPhone section. Tap on Automatically.
- A submenu will appear with three options: Automatically, When Last Connected to This iPhone, and Manually. Tap on Manually to disable AirPods Auto Switch.
By choosing the Manually option, you are turning off AirPods Auto Switch, and your AirPods will no longer automatically switch between your iPhone and other Apple devices when they are nearby.
If you ever want to re-enable the AirPods Auto Switch feature on your iPhone, you can follow the same steps mentioned above, but select either the Automatically or When Last Connected to This iPhone option at step 5.
Keep in mind that disabling AirPods Auto Switch on your iPhone will only apply to that particular device. If you want to turn off the feature on other Apple devices, you need to follow similar steps specific to those devices.
How to turn off AirPods Auto Switch on iPad
If you want to disable AirPods Auto Switch on your iPad, you can easily do so by following these steps:
- Open the Settings app on your iPad.
- Scroll down and tap on Bluetooth.
- Locate your AirPods in the My Devices section, and tap on the “i” icon next to them.
- In the AirPods settings, look for the Connect to This iPad section and tap on Automatically.
- A menu will appear with three options: Automatically, When Last Connected to This iPad, and Manually. Tap on Manually to disable AirPods Auto Switch.
By selecting the Manually option, you are turning off AirPods Auto Switch on your iPad. This means that your AirPods will no longer automatically switch to your iPad when it is in proximity.
If you ever want to enable AirPods Auto Switch again on your iPad, simply follow the same steps mentioned above, but choose either the Automatically or When Last Connected to This iPad option at step 5.
Remember that turning off AirPods Auto Switch on your iPad affects only that specific device. If you want to disable the feature on other Apple devices, you will need to follow similar steps specific to those devices.
How to turn off AirPods Auto Switch on Mac
To disable AirPods Auto Switch on your Mac, follow the steps below:
- Click on the Apple menu in the top-left corner of your Mac screen.
- Choose System Preferences from the dropdown menu.
- In the System Preferences window, click on Bluetooth.
- Locate your AirPods in the device list and click on the “i” icon next to them.
- In the AirPods settings, you will see a checkbox next to Connect to This Mac. Uncheck this box to disable AirPods Auto Switch.
By unchecking the Connect to This Mac box, you are turning off AirPods Auto Switch on your Mac. This means that your AirPods will no longer automatically switch to your Mac when it is within range.
If you wish to enable AirPods Auto Switch on your Mac again, simply follow the same steps mentioned above and check the Connect to This Mac box.
Keep in mind that disabling AirPods Auto Switch on your Mac only affects that particular device. If you want to turn off the feature on other Apple devices, you will need to follow similar steps specific to those devices.
How to turn off AirPods Auto Switch on Apple Watch
If you want to disable AirPods Auto Switch on your Apple Watch, you can do so by following these steps:
- On your Apple Watch, open the Settings app.
- Scroll down and tap on Bluetooth.
- Locate your AirPods in the list of available devices and tap on them.
- In the AirPods settings, you will see an option to enable or disable Automatically Connect to Apple Watch. Tap on the toggle button to turn it off.
By disabling the Automatically Connect to Apple Watch option, you are turning off AirPods Auto Switch on your Apple Watch. This means that your AirPods will no longer automatically switch to your Apple Watch when it is in range.
If you decide to enable AirPods Auto Switch again on your Apple Watch, repeat the steps above and toggle the Automatically Connect to Apple Watch option back on.
Remember, disabling AirPods Auto Switch on your Apple Watch only affects that specific device. If you want to turn off the feature on other Apple devices, you will need to follow similar steps specific to those devices.
How to turn off AirPods Auto Switch on Apple TV
To disable AirPods Auto Switch on your Apple TV, follow the steps below:
- Using your Apple TV remote, navigate to the Settings app.
- Select Remotes and Devices from the list of options.
- Choose Bluetooth from the submenu.
- Locate your AirPods in the list of paired devices and select them.
- On the AirPods settings screen, you will see an option to Connect to This Apple TV. Toggle this option off to disable AirPods Auto Switch.
By turning off the Connect to This Apple TV option, you are disabling AirPods Auto Switch on your Apple TV. Your AirPods will no longer automatically switch to your Apple TV when it is in range.
If you wish to enable AirPods Auto Switch on your Apple TV again, follow the same steps mentioned above and toggle the Connect to This Apple TV option back on.
Remember that disabling AirPods Auto Switch on your Apple TV applies only to that specific device. If you want to turn off the feature on other Apple devices, you will need to follow similar steps specific to those devices.
Troubleshooting common issues with AirPods Auto Switch
While AirPods Auto Switch is a handy feature, there may be times when you encounter certain issues. Here are some common problems you may face with AirPods Auto Switch and how to troubleshoot them:
- Audio not automatically switching: If your AirPods are not automatically switching to the active device, there could be a Bluetooth connectivity issue. Try disconnecting and reconnecting your AirPods from the Bluetooth settings on the respective devices. Additionally, make sure your devices are running the latest software updates.
- Inconsistent switching behavior: If the AirPods Auto Switch feature is switching between devices inconsistently or unexpectedly, you can try resetting your AirPods. To do this, go to the Bluetooth settings of each device, forget your AirPods, and then pair them again. This can help resolve any software glitches causing the problem.
- Delays in switching: If you experience delays when your AirPods switch between devices, it could be due to network or Bluetooth interference. Make sure your devices are in close proximity and free from any obstructions. Additionally, minimizing the number of nearby Bluetooth devices or Wi-Fi routers can help improve the switching speed.
- Inability to manually switch devices: If you have disabled AirPods Auto Switch and are unable to manually switch devices, ensure that your AirPods are correctly paired with the desired device. Double-check the Bluetooth settings and try reconnecting or resetting your AirPods if needed.
- Poor audio quality after switching: If you experience a drop in audio quality after AirPods switch between devices, check the audio settings on each device. Ensure that the audio output settings are configured correctly and that the volume levels are adjusted accordingly.
If you continue to experience issues with AirPods Auto Switch, you may consider restarting your devices or contacting Apple Support for further assistance. They can provide specific troubleshooting steps or help diagnose any hardware-related problems.
Remember that troubleshooting steps may vary depending on the specific device and software version you are using. It’s always a good idea to refer to official Apple support documentation or contact Apple Support for the most accurate and up-to-date assistance.