
Checking Compatibility
AirPods are one of Apple’s most popular wireless earbuds, known for their seamless connectivity and excellent sound quality. If you own a MacBook and want to connect your AirPods or AirPods Pro to it, the first step is to check their compatibility.
Before proceeding, ensure that your MacBook is running macOS 10.12 or later, as this is the minimum requirement for AirPods compatibility. To check your macOS version, click on the Apple icon in the top-left corner of your screen, select “About This Mac,” and look for the version number.
Next, make sure that your AirPods or AirPods Pro are fully charged. When the battery is low, the connection between your AirPods and MacBook may be unstable.
If your AirPods are not connecting to your MacBook, it’s also worth checking if they are paired with any other devices. AirPods can be connected to multiple devices, but only one primary device at a time. If they are currently paired with another device, you may need to disconnect them before attempting to connect them to your MacBook.
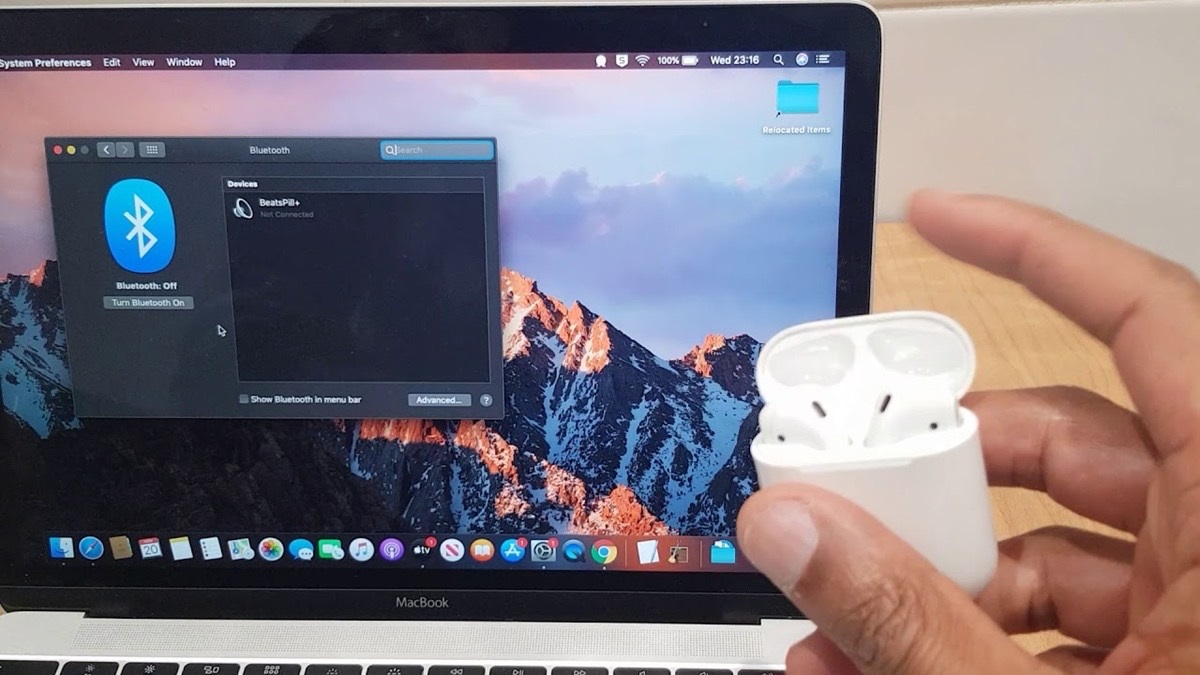
Lastly, ensure that Bluetooth is enabled on your MacBook. To do this, click on the Apple icon, go to “System Preferences,” and select “Bluetooth.” Toggle the Bluetooth switch to the “On” position, and your MacBook will begin searching for available devices.
By performing these initial checks, you can ensure that your AirPods are compatible with your MacBook and that both devices are ready for the pairing process. Now, let’s move on to the next steps to connect your AirPods to your MacBook.
Preparing Your AirPods
Before you can connect your AirPods or AirPods Pro to your MacBook, it’s important to ensure that your AirPods are ready for pairing.
The first step is to open the AirPods case. If your AirPods are already paired with another device, make sure that the device is out of range or disconnected before proceeding.
Next, check the status light on your AirPods case. If it’s green, this means that your AirPods are fully charged. If it’s amber, you need to charge your AirPods before proceeding with the pairing process.
If your AirPods are not charged, connect the Lightning cable to the charging port on the bottom of the AirPods case and plug it into a power source. Allow them to charge for a few minutes until the status light turns green.
Once your AirPods are charged and the case is open, you’ll need to ensure that Bluetooth is enabled on your AirPods. To do this, simply bring the AirPods close to your MacBook and wait for the popup window to appear on your MacBook screen.
If the popup window doesn’t appear, go to the Bluetooth settings on your MacBook by clicking on the Bluetooth icon in the menu bar or navigating to “System Preferences” > “Bluetooth.” Look for your AirPods in the list of available devices and click on “Connect.”
Your AirPods are now prepared and ready for pairing with your MacBook. In the next section, we will guide you through the process of ensuring Bluetooth is enabled on your MacBook.
Ensuring Bluetooth is Enabled on Your MacBook
Before you can connect your AirPods or AirPods Pro to your MacBook, you need to make sure that Bluetooth is enabled on your MacBook. Here’s how you can do it:
- Click on the Apple icon in the top-left corner of your screen to open the drop-down menu.
- Select “System Preferences” from the menu.
- In the System Preferences window, click on “Bluetooth.”
- Ensure that the Bluetooth switch is toggled to the “On” position.
Once Bluetooth is enabled, your MacBook will start searching for available devices. Keep in mind that it may take a few seconds for your MacBook to discover your AirPods.
If you encounter any issues with Bluetooth connectivity, try turning Bluetooth off and on again or restarting your MacBook. These simple steps often help resolve minor connectivity problems.
It’s worth noting that if your MacBook doesn’t have built-in Bluetooth, you can use a Bluetooth adapter or dongle to enable Bluetooth connectivity.
Now that Bluetooth is enabled on your MacBook, we can move on to the next step to put your AirPods in pairing mode. This will allow your MacBook to detect and establish a connection with your AirPods. We’ll cover this in detail in the next section.
Putting Your AirPods in Pairing Mode
In order to connect your AirPods or AirPods Pro to your MacBook, you need to put them in pairing mode. Follow these steps to do so:
- Make sure your AirPods are in the case and the lid is open.
- Press and hold the button on the back of the AirPods case until the LED light on the front starts flashing white.
- Keep the AirPods case open and close to your MacBook.
By putting your AirPods in pairing mode, you’re allowing your MacBook to search for and connect to your AirPods. It’s important to note that the LED light on the front of the AirPods case will continue to flash white until the pairing process is complete.
If you’ve successfully put your AirPods in pairing mode, you can now move on to the next section to learn how to connect your AirPods with your MacBook.
It’s worth mentioning that if your AirPods are already connected or paired with another device, you will need to unpair them before putting them in pairing mode. Refer to the instructions provided by Apple for your specific AirPods model to learn how to unpair them.
Pairing Your AirPods with Your MacBook
Once your AirPods are in pairing mode and Bluetooth is enabled on your MacBook, you can proceed with the process of connecting your AirPods to your MacBook. Follow these steps:
- On your MacBook, click on the Bluetooth icon in the menu bar or go to “System Preferences” > “Bluetooth.”
- In the list of available devices, you should see your AirPods listed. Click on your AirPods to select them.
- Click on the “Connect” button next to your AirPods’ name.
- Wait for the connection to be established. Your AirPods’ name should now appear as “Connected” in the Bluetooth settings.
Once the pairing process is complete, you can start using your AirPods with your MacBook right away. The sound output will automatically switch to your AirPods, and you can enjoy wireless audio while working or streaming content.
Keep in mind that if you’re using AirPods Pro, you can also take advantage of their advanced features, such as active noise cancellation and transparency mode. You can control these features through the Bluetooth settings or the AirPods settings in the menu bar on your MacBook.
If you’ve successfully paired your AirPods with your MacBook, congratulations! You’re now ready to adjust sound settings, troubleshoot any connection issues, or use your AirPods with multiple Apple devices. We’ll cover these topics in the following sections.
Adjusting Sound Settings for AirPods
After successfully pairing your AirPods with your MacBook, you may want to customize the sound settings to your preferences. Here are a few ways you can adjust the sound settings:
- Volume Control: You can adjust the volume of your AirPods directly from your MacBook’s volume controls. Use the volume keys on your keyboard or the volume slider in the menu bar to increase or decrease the volume.
- Sound Balance: If you prefer slightly different audio levels for your left and right AirPod, you can adjust the sound balance. Go to “System Preferences” > “Sound” > “Output” and drag the balance slider to the left or right to adjust the sound balance.
- Equalizer Settings: To further fine-tune the audio output, you can explore the equalizer settings on your MacBook. Open “System Preferences” > “Sound” > “Output” and click on the “Equalizer” tab. Choose from the pre-defined equalizer presets or customize the settings according to your preferences.
- Auto Switching: If you also use AirPods with other Apple devices, you can take advantage of the “Auto Switching” feature. This allows your AirPods to automatically connect and switch between your MacBook, iPhone, iPad, or Apple Watch based on which device is actively in use. You can enable or disable this feature by going to “System Preferences” > “Bluetooth” > “Options” for your AirPods.
By adjusting these sound settings, you can tailor the audio output of your AirPods to your liking. Whether you prefer a boosted bass, customized equalizer settings, or seamless device switching, the options are available for you to explore.
If you encounter any issues with the sound settings or need further assistance, you can refer to Apple’s support documentation or reach out to their customer support for guidance. Now that you’re familiar with adjusting the sound settings for your AirPods, let’s move on to troubleshooting any possible connection issues in the next section.
Troubleshooting Connection Issues
While connecting your AirPods to your MacBook is usually a smooth process, there may be instances where you encounter connection issues. Here are a few troubleshooting steps you can follow:
- Restart Bluetooth: Turn off Bluetooth on your MacBook and then turn it on again. This simple step can often resolve minor connectivity problems.
- Reset AirPods: If restarting Bluetooth doesn’t work, try resetting your AirPods. Place them in the case, close the lid, and then open it. Press and hold the setup button on the back of the case until the LED light flashes amber, and then flashes white. This resets the AirPods and clears any existing connections.
- Forget Device: If your AirPods are still not connecting, try forgetting your AirPods on your MacBook. Go to “System Preferences” > “Bluetooth” and click on the “X” next to your AirPods’ name to remove them. Then, put your AirPods in pairing mode again and try connecting them.
- Update Software: Ensure that your MacBook’s software, as well as your AirPods’ firmware, are up to date. Go to “System Preferences” > “Software Update” on your MacBook, and follow the instructions to update your system. For AirPods firmware updates, keep your AirPods connected to your MacBook and wait for any available updates to be installed automatically.
If none of these troubleshooting steps resolve the connection issues, it’s recommended to reach out to Apple Support for further assistance. They can provide personalized guidance and help you diagnose and resolve any underlying problems.
Remember, maintaining the latest software versions on both your MacBook and AirPods is crucial for optimal performance and connectivity. By keeping everything updated and following these troubleshooting steps, you can eliminate most connection issues and enjoy a seamless experience with your AirPods and MacBook.
In the next sections, we will explore how to pair multiple Apple devices with your AirPods and how to switch between devices when your AirPods are connected.
Pairing Multiple Apple Devices with AirPods
One of the advantages of AirPods is the ability to pair them with multiple Apple devices, such as your iPhone, iPad, and MacBook. Here’s how you can pair your AirPods with multiple devices:
- Make sure your AirPods are connected to one device (e.g., your MacBook) and playing audio.
- On the other device (e.g., your iPhone), go to the Bluetooth settings.
- You should see your AirPods listed as an available device. Tap on your AirPods to connect them to the second device.
Once your AirPods are paired with multiple devices, they will automatically switch between devices based on which one is currently in use. For example, if you’re listening to music on your MacBook and then receive a call on your iPhone, your AirPods will automatically switch the audio from your MacBook to your iPhone.
You can pair your AirPods with additional Apple devices following the same steps mentioned above. Keep in mind that AirPods can be connected to multiple devices simultaneously, but they can only play audio from one device at a time.
If you want to prioritize a specific device when using your AirPods, you can manually switch the audio output. On your device, go to the Control Center (or equivalent settings), tap on the audio output icon, and select your AirPods from the list of available devices.
Pairing your AirPods with multiple Apple devices provides a seamless and convenient experience, allowing you to easily switch between devices without the hassle of re-pairing. Now, let’s explore how to switch between devices when your AirPods are connected.
Switching between Devices with AirPods Connected
Once you have successfully paired your AirPods with multiple Apple devices, switching between devices is effortless. Here’s how you can switch between devices with your AirPods connected:
- Ensure that your AirPods are connected and actively playing audio from the current device.
- On the new device you want to switch to, go to the audio settings or Control Center.
- You should see your AirPods listed as an available audio output option. Select your AirPods to switch the audio to the new device.
With these simple steps, you can seamlessly switch between your MacBook, iPhone, iPad, or any other Apple device that is connected to your AirPods. The audio will automatically pause on the current device and resume on the newly selected device.
Keep in mind that switching between devices may vary depending on the device’s operating system and version. In some cases, you may need to navigate through the settings or Control Center to select your AirPods as the audio output.
Switching between devices comes in handy when you’re using your AirPods for different purposes throughout the day. For example, you can listen to music on your MacBook, then answer a phone call on your iPhone, and finally watch a video on your iPad, all without the need to manually unpair and repair your AirPods.
If you’re having trouble switching between devices or experiencing any connectivity issues, make sure that all devices are updated with the latest software versions and that Bluetooth is enabled on each device. If problems persist, refer to Apple’s support documentation or contact their customer support for further assistance.
Now that you’re familiar with switching between devices, let’s move on to the process of disconnecting your AirPods from your MacBook.
Disconnecting AirPods from Your MacBook
If you want to disconnect your AirPods from your MacBook, whether temporarily or permanently, there are a few methods you can use:
- Option 1: Open the Bluetooth settings on your MacBook. In the list of paired devices, locate your AirPods and click on the “Disconnect” button next to them. This will immediately disconnect your AirPods from your MacBook.
- Option 2: Place your AirPods back into the case and close the lid. This will automatically disconnect them from your MacBook. However, your AirPods will still remain paired and connected to your other Apple devices.
- Option 3: Turn off Bluetooth on your MacBook. This will disconnect all Bluetooth devices, including your AirPods. However, it’s worth noting that turning off Bluetooth will also disconnect any other connected Bluetooth devices, such as keyboards, mice, or other accessories.
By using any of these methods, you can easily disconnect your AirPods from your MacBook whenever needed. Whether you want to preserve battery life, switch to a different audio output source, or simply take a break from using your AirPods, disconnecting them is a convenient option.
If you want to reconnect your AirPods to your MacBook after disconnecting them, simply follow the pairing process we discussed earlier in this article. Remember to put your AirPods in pairing mode and ensure that Bluetooth is enabled on your MacBook before attempting to reconnect.
If you’re experiencing any issues with disconnecting or reconnecting your AirPods, refer to the Apple Support documentation for specific troubleshooting steps. You can also reach out to their customer support for personalized assistance.
Now that you know how to disconnect your AirPods from your MacBook, let’s explore the process of resetting your AirPods in case you encounter any persistent issues.
Resetting AirPods
If you’re experiencing persistent issues with your AirPods, such as connectivity problems or audio inconsistencies, resetting them can often resolve these issues. Here’s how you can reset your AirPods:
- Place both of your AirPods in the case.
- Close the lid of the case and wait for around 30 seconds.
- Open the lid of the case.
- Press and hold the setup button, located on the back of the case, until the LED status light on the front starts flashing white.
- Once the LED light flashes amber and then flashes white again, release the setup button.
Your AirPods have now been reset to their default settings. This clears any existing connections and preferences, allowing you to start fresh with the pairing process.
After resetting your AirPods, you’ll need to follow the initial setup steps to pair them with your devices again. Place your AirPods close to your MacBook, put them in pairing mode, and connect them following the instructions we discussed earlier in this article.
Resetting your AirPods can be a useful troubleshooting step to address persistent issues. However, keep in mind that resetting your AirPods will also remove any custom settings or personalized configurations you may have made.
If resetting your AirPods doesn’t resolve the issues you’re experiencing, it’s recommended to contact Apple Support for further guidance. They can provide further assistance and help you diagnose any hardware or software-related problems.
With the knowledge of how to reset your AirPods, you are now equipped to troubleshoot and address issues that may arise. In the next sections, we’ll cover some additional tips and tricks for getting the most out of your AirPods and MacBook integration.