
Step 1: Check the compatibility of your Lenovo laptop
Before attempting to connect your AirPods to your Lenovo laptop, it is important to ensure that your laptop supports Bluetooth connectivity. AirPods are primarily designed to work with Apple devices, but they can also be connected to certain non-Apple devices that have Bluetooth capabilities. Lenovo laptops generally come equipped with built-in Bluetooth, but it’s always a good idea to double-check.
To determine if your Lenovo laptop is compatible with AirPods, follow these steps:
- Go to the Start menu on your Lenovo laptop and click on the “Settings” gear icon.
- In the Settings menu, select “Devices.”
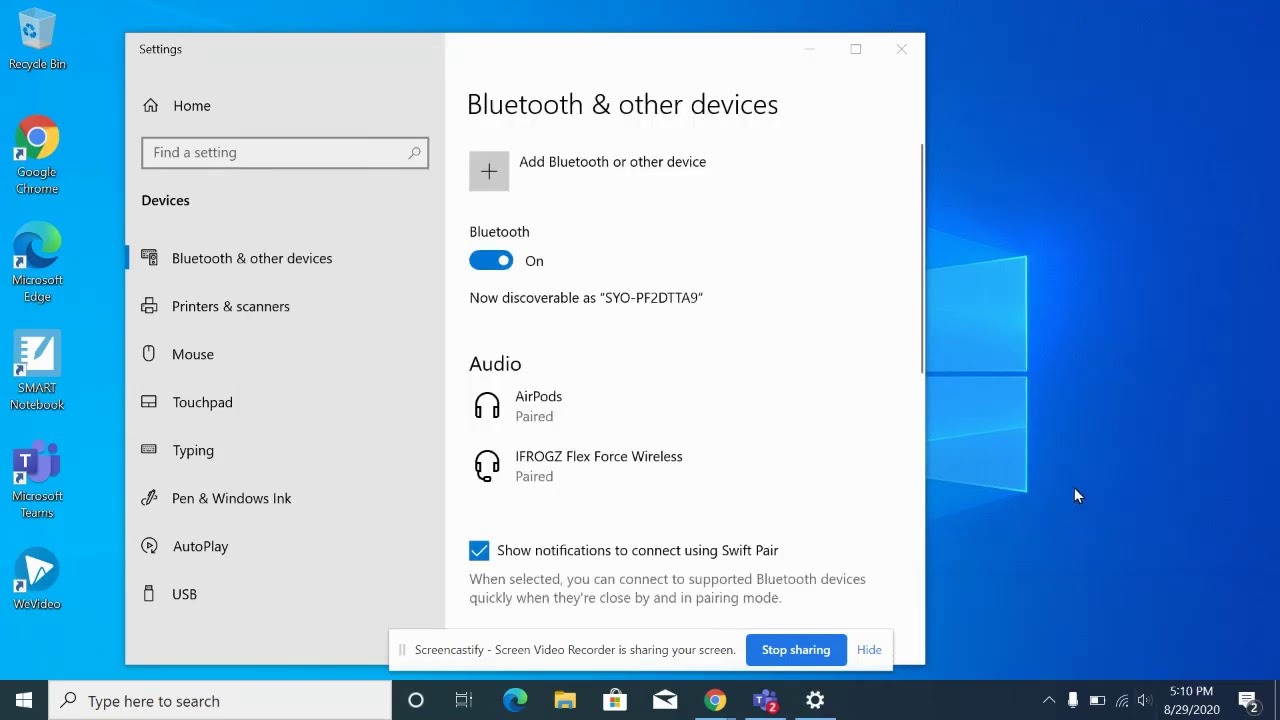
- Look for the “Bluetooth & other devices” option in the left-hand sidebar and click on it.
- If Bluetooth is available on your Lenovo laptop, you should see a toggle switch labeled “Bluetooth” at the top of the page. Make sure it is turned on.
- If you cannot find the Bluetooth option, your laptop may not have Bluetooth capabilities. In this case, you won’t be able to connect AirPods wirelessly. However, you can still use a Bluetooth dongle or adapter to enable Bluetooth connectivity.
Once you have confirmed that your Lenovo laptop is Bluetooth-enabled, you can proceed to the next step to connect your AirPods.
Step 2: Enable Bluetooth on your Lenovo laptop
In order to connect your AirPods to your Lenovo laptop, you need to ensure that Bluetooth is enabled. Follow these steps to enable Bluetooth:
- Go to the Start menu on your Lenovo laptop and click on the “Settings” gear icon to open the Settings menu.
- In the Settings menu, select “Devices.”
- Click on the “Bluetooth & other devices” option in the left-hand sidebar.
- Toggle the switch labeled “Bluetooth” to the “On” position if it isn’t already.
Enabling Bluetooth allows your Lenovo laptop to search for and connect to nearby Bluetooth devices, including your AirPods.
Once Bluetooth is enabled, your Lenovo laptop will be ready to pair and connect with your AirPods. However, it’s important to note that if your AirPods were previously connected to another device, you may need to put them back into pairing mode before they can be detected by your Lenovo laptop. This will be covered in the next step.
Step 3: Put your AirPods in pairing mode
To connect your AirPods to your Lenovo laptop, you need to put them in pairing mode. Pairing mode allows your AirPods to be discovered and connected to by other devices. Here’s how to put your AirPods in pairing mode:
- Begin by opening the lid of your AirPods case. Make sure your AirPods are inside the case.
- Next, locate the small button on the back of the AirPods case. It is usually found towards the bottom of the case, near the hinge.
- Press and hold the button on the back of the case for a few seconds. You will see the small LED light on the front of the case start to flash white.
- Keep the button pressed until the LED light on the case turns amber, and then starts flashing white again. This indicates that your AirPods are now in pairing mode.
Putting your AirPods in pairing mode allows them to be detected by your Lenovo laptop during the connection process. It’s important to note that the LED light on the AirPods case may not always flash amber and then white; it depends on the specific generation of your AirPods.
Now that your AirPods are in pairing mode, you can proceed to the next step to connect them to your Lenovo laptop.
Step 4: Connect your AirPods to your Lenovo laptop
After putting your AirPods in pairing mode, you can now connect them to your Lenovo laptop. Follow these steps to connect your AirPods:
- On your Lenovo laptop, go to the Start menu and click on the “Settings” gear icon to open the Settings menu.
- Select “Devices” from the Settings menu.
- Click on the “Bluetooth & other devices” option in the left-hand sidebar.
- Make sure the toggle switch for Bluetooth is turned on.
- Under the “Bluetooth & other devices” section, click on the “Add Bluetooth or other device” button.
- In the “Add a device” window, select the “Bluetooth” option.
- Your Lenovo laptop will now search for nearby Bluetooth devices.
- In the list of available devices, you should see your AirPods listed. Click on them to select them.
- Follow any additional on-screen prompts to complete the pairing process.
Once the pairing process is complete, your AirPods should be connected to your Lenovo laptop. You can now enjoy wireless audio playback and use the AirPods for calls and other audio-related tasks.
It’s worth noting that once your AirPods are connected to your Lenovo laptop, they will automatically connect whenever they are in range and Bluetooth is enabled on both devices. This means you don’t have to go through the pairing process every time you want to use your AirPods with your laptop.
Step 5: Test the connection and adjust settings if needed
Once you have connected your AirPods to your Lenovo laptop, it’s important to test the connection and adjust any necessary settings to ensure optimal performance. Here’s what you should do:
- Play some audio on your Lenovo laptop, such as a song or a video, to test if the sound is coming through your AirPods.
- If the audio is not playing through your AirPods, check the sound output settings on your laptop to make sure it is set to your AirPods. You can usually access these settings by clicking on the sound icon in the system tray or by going to the sound settings in the Control Panel.
- If the sound output is set correctly but you’re still not hearing audio through your AirPods, try disconnecting and reconnecting them. This can be done by turning off Bluetooth on your Lenovo laptop, waiting a few seconds, and then turning it back on. Follow the previous steps to reconnect your AirPods.
- If you’re experiencing any issues with the audio quality, such as static or distortion, try adjusting the volume levels on both your laptop and your AirPods. You can do this by using the volume controls on your laptop’s keyboard or by adjusting the volume on your AirPods using the controls on the stem.
Additionally, you may want to explore the sound settings on your Lenovo laptop to customize the audio experience further. This includes adjusting equalizer settings, enabling spatial sound effects, or configuring microphone settings if you plan to use your AirPods for calls or recording audio.
By testing the connection and making necessary adjustments, you can ensure that your AirPods are working seamlessly with your Lenovo laptop and provide you with an enjoyable audio experience.
Step 6: Troubleshooting common issues
While connecting your AirPods to your Lenovo laptop is usually a straightforward process, you may encounter some common issues along the way. Here are a few troubleshooting steps you can take to resolve common problems:
- No sound or audio playback: If you’re not hearing any sound or audio playback through your AirPods, ensure that the volume is turned up on both your Lenovo laptop and your AirPods. You can also try disconnecting and reconnecting your AirPods to see if that resolves the issue.
- Poor sound quality: If the sound quality is distorted, try adjusting the volume levels on both your laptop and your AirPods. It’s also a good idea to check if there are any software updates available for your AirPods and install them if necessary.
- Interference or connectivity issues: If you’re experiencing intermittent connectivity issues or if the audio cuts in and out, move closer to your Lenovo laptop and ensure there are no obstacles or interference, such as walls or other electronics, between your laptop and AirPods. You can also try restarting both your laptop and your AirPods to see if that resolves the problem.
- Battery draining quickly: If you notice that your AirPods’ battery life is draining quickly, make sure they are fully charged before using them. You can also check if there are any software updates available for your AirPods that might address battery-related issues.
- Unable to pair or connect: If you’re unable to pair or connect your AirPods to your Lenovo laptop, make sure they are in pairing mode and that Bluetooth is enabled on your laptop. You can also try resetting your AirPods by putting them back in the case and pressing and holding the button on the back until the LED light flashes amber and then white.
If you’ve tried these troubleshooting steps and are still experiencing issues, it may be helpful to consult the user manual or support documentation for both your Lenovo laptop and your AirPods. Additionally, reaching out to customer support for further assistance can be beneficial in resolving any persistent problems.
Step 7: Unpairing your AirPods from your Lenovo laptop
If you no longer wish to use your AirPods with your Lenovo laptop or if you want to connect them to another device, you’ll need to unpair them from your laptop. Here’s how:
- On your Lenovo laptop, go to the Start menu and click on the “Settings” gear icon to open the Settings menu.
- Select “Devices” from the Settings menu.
- Click on the “Bluetooth & other devices” option in the left-hand sidebar.
- Under the “Audio” section, you should see your connected AirPods listed. Click on them to expand the options.
- Click the “Remove device” button, and confirm the action when prompted.
By unpairing your AirPods from your Lenovo laptop, the connection between the two devices will be severed. You can now connect your AirPods to a different device or pair them with another device.
Keep in mind that when you unpair your AirPods, any custom settings and preferences associated with them on your Lenovo laptop will also be removed. If you decide to reconnect your AirPods to the same laptop in the future, you may need to reconfigure any settings you previously had.
Unpairing your AirPods from your Lenovo laptop is a simple process and allows you the flexibility to use your AirPods with different devices as needed.