
Why should you back up your contacts to your iPhone SIM card?
When it comes to safeguarding your valuable contacts, backing them up is essential. While many iPhone users rely on cloud-based services like iCloud or Google Contacts, another reliable and convenient method is to back up your contacts to your iPhone SIM card. Here’s why:
- Portability: By storing your contacts on your iPhone SIM card, you can easily transfer them to another device or SIM card. This is especially useful when switching to a new phone or traveling abroad and using a local SIM card.
- Offline Accessibility: Unlike cloud-based services that require an internet connection, contacts saved on your iPhone SIM card can be accessed even when you have limited or no connectivity. This ensures that you have access to your important contacts at all times, regardless of your internet access.
- Data Security: Keeping your contacts on your SIM card provides an added layer of security. SIM cards are physically in your possession and not susceptible to hacking or data breaches like online storage platforms. This helps protect your contact information from unauthorized access.
- No Dependence on Third-Party Services: By using your iPhone SIM card to back up your contacts, you can avoid relying on third-party services that may have subscription fees or storage limitations. This allows you to have full control over your contacts without any external dependencies.
- Quick and Easy Transfer: When you back up your contacts to your iPhone SIM card, transferring them to a new device or SIM card is a breeze. It eliminates the need for complex syncing processes or dealing with compatibility issues, making it a hassle-free way to transfer your contacts.
Ultimately, backing up your contacts to your iPhone SIM card provides a convenient and reliable way to protect your valuable contact information. It offers portability, offline accessibility, data security, independence from third-party services, and quick transferability. Don’t risk losing your contacts – take advantage of the SIM card backup feature on your iPhone and ensure that your contacts are always safe and accessible.
How to check if your iPhone supports SIM card contacts
Before you can start backing up contacts to your iPhone SIM card, it’s important to check if your iPhone supports SIM card contacts. Follow these steps to determine if your device is capable of using this feature:
- Open the “Settings” app: Locate the Settings app on your iPhone’s home screen and tap to open it.
- Scroll down and tap “Contacts”: Within the Settings menu, scroll down until you find the “Contacts” option. Tap on it to proceed.
- Look for “Import SIM Contacts”: In the Contacts settings, keep scrolling until you see the “Import SIM Contacts” section. If you see this option, it means your iPhone supports SIM card contacts.
- Check the SIM card compatibility: Apart from the software support, it’s also important to ensure that your SIM card is compatible with storing contacts. In some cases, older or incompatible SIM cards may not have this capability. You can check with your mobile service provider or refer to the SIM card documentation to confirm its compatibility.
If you don’t see the “Import SIM Contacts” section in the Contacts settings, it means that your iPhone doesn’t support storing contacts on the SIM card. In such cases, you can explore other methods like using cloud-based services or third-party apps to back up and transfer your contacts.
By following these steps and checking the compatibility, you can determine if your iPhone supports SIM card contacts. If your device supports this feature, you’re ready to proceed with exporting and importing contacts to and from your iPhone SIM card. Ensure that you have a compatible SIM card inserted in your iPhone and continue to the next steps to back up your valuable contacts.
How to export contacts from your iPhone to the SIM card
If your iPhone supports SIM card contacts, you can easily export your existing contacts and save them onto your SIM card for backup or transfer purposes. Follow these step-by-step instructions to export your contacts:
- Open the “Contacts” app: Locate and open the “Contacts” app on your iPhone’s home screen. It usually has an icon resembling a person’s silhouette.
- Select the contacts to export: Scroll through your contact list and select the contacts you want to export to the SIM card. You can tap on individual contacts to select them, or use the “Select All” option if you wish to export all your contacts.
- Tap on the “Share” icon: Once you have selected the desired contacts, look for the “Share” icon, which is typically represented by a square with an arrow pointing upward. Tap on this icon to proceed.
- Select the “Export vCard” option: In the sharing options, you will see various methods for sharing your contacts. Look for the “Export vCard” option (sometimes labeled as “Export Contacts”) and tap on it.
- Choose the SIM card as the export destination: After selecting the “Export vCard” option, a menu will appear with various export destinations. Choose the option that allows you to export the contacts to your SIM card. The name of this option may vary depending on your iPhone model and software version.
- Wait for the export process to complete: Your iPhone will begin the process of exporting the selected contacts to your SIM card. This may take a few moments, depending on the number of contacts being exported. Ensure that you do not interrupt the process.
- Verify the exported contacts: Once the export process is complete, you can verify the exported contacts by accessing the SIM card contacts section in the Contacts app. Open the app and navigate to the section where you can view SIM card contacts. Here, you should see the contacts you exported from your iPhone.
That’s it! You have successfully exported your contacts from your iPhone to the SIM card. The exported contacts are now backed up on your SIM card and can be easily transferred to another device or SIM card if needed.
Note that not all iPhones support exporting contacts to the SIM card. If you don’t see the option to export contacts to the SIM card, you may need to explore alternative methods like using cloud-based services or third-party apps to back up and transfer your contacts.
How to import contacts from the SIM card to your iPhone
If you have contacts saved on your SIM card and want to import them to your iPhone, follow these steps to easily transfer them:
- Ensure the SIM card is inserted: Before you begin, make sure that the SIM card containing the contacts you want to import is properly inserted into your iPhone’s SIM card slot. If you’re unsure how to do this, refer to your iPhone’s user manual or consult your mobile service provider.
- Open the “Settings” app: Locate and open the “Settings” app on your iPhone’s home screen. The app icon resembles a gear.
- Scroll down and tap “Contacts”: In the Settings menu, scroll down until you find the “Contacts” option. Tap on it to proceed.
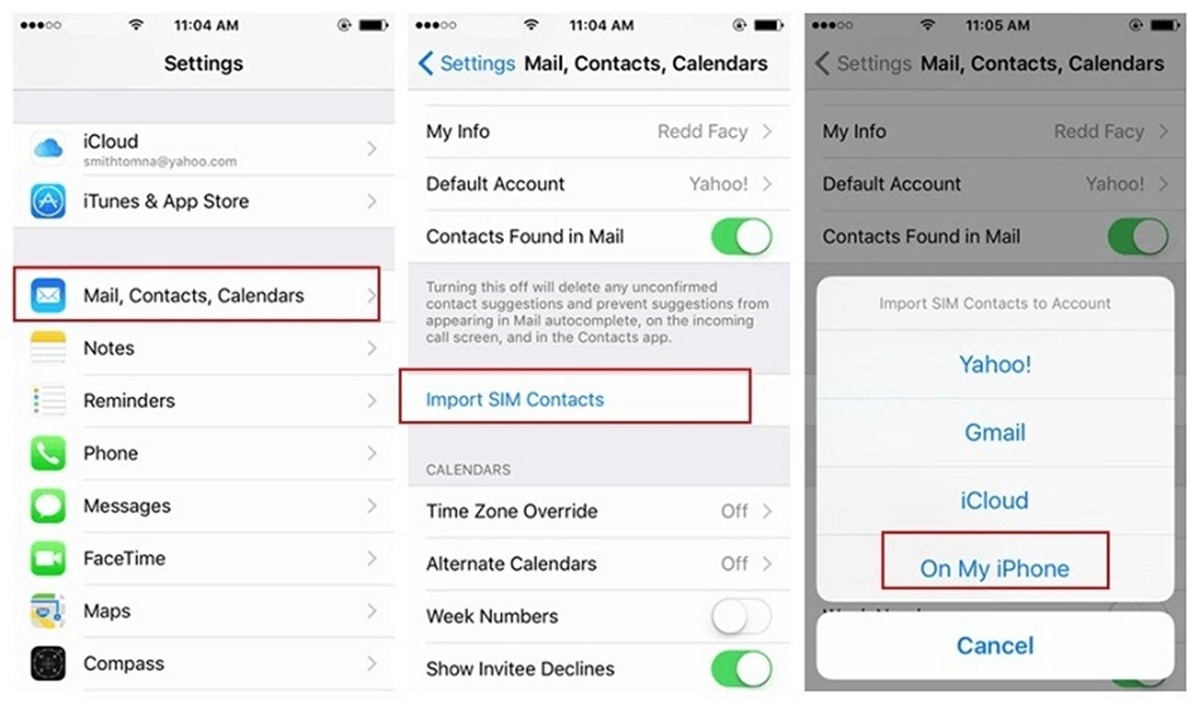
- Select “Import SIM Contacts”: In the Contacts settings, look for the “Import SIM Contacts” option and tap on it. This will initiate the process of importing contacts from your SIM card to your iPhone.
- Wait for the import process to complete: Your iPhone will now start importing the contacts from the SIM card. This may take a few moments, depending on the number of contacts being imported. Make sure not to interrupt the process.
- Verify the imported contacts: Once the import process is complete, you can verify the imported contacts by opening the “Contacts” app. Navigate to your contact list or use the search bar to find the recently imported contacts. They should now be available in your iPhone’s contact list.
That’s it! You have successfully imported contacts from your SIM card to your iPhone. The imported contacts are now saved on your iPhone and can be accessed, edited, and managed like any other contact on your device.
It’s important to note that if you have duplicate contacts between your iPhone and SIM card, the import process may create duplicates on your device. To avoid this, you can merge duplicate contacts using the built-in contact management features on your iPhone or through contact management apps available on the App Store.
By following these simple steps, you can effortlessly import contacts from your SIM card to your iPhone, ensuring that your valuable contact information is readily available on your device.
Tips for managing SIM card contacts on your iPhone
If you use your iPhone’s SIM card as a storage option for your contacts, it’s important to effectively manage and organize them. Here are some tips to help you efficiently manage SIM card contacts on your iPhone:
- Edit and update contacts: Regularly review and update your SIM card contacts to ensure they contain accurate and up-to-date information. This includes adding new contacts, removing outdated ones, and making changes such as phone numbers or email addresses.
- Create contact groups: Grouping your contacts can make it easier to find and access specific contacts. You can create contact groups on your iPhone and assign SIM card contacts to their respective groups based on categories like family, friends, or work.
- Use descriptive contact names: When saving contacts on your SIM card, use descriptive names that clearly identify who the contact is. This can help you quickly identify contacts in your list, especially when you have multiple contacts with similar names.
- Take advantage of notes and additional fields: Utilize the additional fields and notes section in the contact details to include extra information about your contacts. This can be helpful for adding important details like addresses, birthdays, or specific notes about the contact.
- Backup your SIM card contacts: While SIM cards can provide a convenient way to back up your contacts, it’s always a good idea to have an additional backup. Consider regularly exporting your SIM card contacts and saving them in a different location or using cloud-based backup services.
- Merge duplicate contacts: Over time, you may encounter duplicate contacts on your SIM card. To keep your contact list organized, merge duplicate contacts by using the “Merge” or “Link Contacts” feature available on your iPhone. This will prevent clutter and ensure you have accurate contact information.
- Sync with other devices and services: If you use multiple devices or cloud-based services, consider syncing your SIM card contacts with them. This ensures that your contacts are accessible across all your devices and platforms, providing seamless integration and backup capabilities.
- Regularly review SIM card storage: SIM cards have limited storage capacity, so it’s essential to regularly review your SIM card’s storage and ensure it’s not reaching its limit. Delete unnecessary contacts or consider transferring them to a different storage option if you’re running out of space.
By following these tips, you can effectively manage your SIM card contacts on your iPhone. Keeping your contacts organized, up to date, and properly backed up ensures that you can quickly access the information you need and maintain a tidy contact list.
Remember that managing contacts on your SIM card is just one of many options available. You may also consider using cloud-based services or syncing with other devices to ensure your contacts are securely stored and accessible across multiple platforms.
Alternative methods for backing up contacts on your iPhone
While backing up contacts to your iPhone SIM card is a convenient option, there are alternative methods available to ensure the safety and accessibility of your contacts. Explore these alternative methods for backing up contacts on your iPhone:
- iCloud Backup: One of the most popular methods is to back up your iPhone contacts using Apple’s iCloud service. iCloud allows you to sync and backup your contacts wirelessly. To enable iCloud contact backup, go to “Settings,” tap your name at the top, select “iCloud,” and toggle on the “Contacts” option. Your contacts will be automatically backed up to iCloud and can be restored to any iOS device linked to your iCloud account.
- Third-Party Contact Management Apps: Many contact management apps are available on the App Store, offering advanced features for organizing, backing up, and syncing your contacts. Popular options include “Contacts+,” “My Contacts Backup,” and “Sync.ME.” These apps often provide additional functionalities like contact deduplication, easy contact sharing, and integration with other services.
- Google Contacts Sync: If you use Google services, you can sync your iPhone contacts with Google Contacts. In the “Settings” app, go to “Passwords & Accounts,” tap “Add Account,” select “Google,” and sign in with your Google account. Enable the “Contacts” option, and your iPhone contacts will sync with your Google account. This method allows you to access and manage your contacts on multiple devices and platforms.
- Email Export: Another simple method is to export your contacts via email. Open the “Contacts” app, select the contacts you want to back up, tap the “Share” icon, and choose the “Email” option. This will create a file containing your contacts, which you can email to yourself or save as a backup on your computer.
- VCF Export: The vCard format (VCF) is a universal contact file format. You can export your contacts in this format and save them to your computer or other storage devices. Open the “Contacts” app, select the contacts you want to export, tap the “Share” icon, and choose the “Export vCard” option. This will create a VCF file that you can save and import whenever needed.
Each of these alternative methods provides its own advantages and features for backing up and managing contacts on your iPhone. It’s important to choose the method that best suits your needs and preferences.
Remember to regularly backup and update your contacts to ensure you have the latest information in case of device loss, damage, or software issues. Consider using a combination of methods to have multiple backup options and ensure the safety and accessibility of your contacts.
By utilizing these alternative methods, you can have peace of mind knowing that your contacts are securely backed up and easily recoverable whenever you need them.