
What is Avast Internet Security?
Avast Internet Security is a comprehensive cybersecurity solution designed to protect your computer and online activities from various threats such as viruses, malware, ransomware, and phishing attacks. Developed by Avast, a leading provider of digital security solutions, Avast Internet Security offers a range of advanced features and tools to safeguard your privacy, secure your sensitive data, and ensure a safe browsing experience.
With Avast Internet Security, you can benefit from real-time protection, automatic updates, and advanced threat detection algorithms. This powerful security suite not only provides essential virus protection but also offers additional layers of defense to shield your computer from emerging threats and potential vulnerabilities.
Avast Internet Security includes features such as a robust firewall, secure DNS, and Wi-Fi inspector, which scans your network for potential risks. It also incorporates a powerful anti-spam filter to block unwanted emails and a safe browser extension to protect your online transactions and sensitive information from phishing attempts.
Beyond its core security features, Avast Internet Security offers a range of additional tools to optimize your computer’s performance. These include a software updater to keep your installed programs up to date, a file shredder to securely delete sensitive files, and a password manager to protect and manage your passwords across various online platforms.
Whether you use your computer for personal or professional purposes, Avast Internet Security provides a comprehensive defense against online threats. With its user-friendly interface and intuitive controls, it offers peace of mind, allowing you to browse the web, use online banking services, and access sensitive information without worrying about cybercriminals and malicious software.
It is important to note that Avast Internet Security is a paid antivirus solution and offers different pricing plans based on the number of devices and the duration of the subscription. By investing in Avast Internet Security, you can ensure the maximum protection and security for your computer and enjoy a worry-free online experience.
Why do you need to add an exception in Avast Internet Security?
Avast Internet Security is equipped with a powerful scanning engine that is designed to detect and block potential threats to your computer’s security. However, there are cases where you may want to add an exception to the scanning process. Adding an exception allows you to specify certain files, folders, or websites that should be exempt from Avast’s security scans. Here are a few reasons why you might need to add an exception:
- False positives: Avast’s scanning engine may occasionally flag legitimate files or programs as potential threats. In such cases, adding an exception ensures that these files or programs are not mistakenly quarantined or removed.
- Software compatibility: Some software applications, especially older or specialized ones, may not work correctly if they are constantly being scanned by Avast Internet Security. Adding an exception for these applications helps prevent any conflicts and ensures smooth operation.
- Custom configurations: If you have customized settings for specific files or folders, adding an exception ensures that Avast does not interfere with those configurations. This is particularly useful for advanced users or professionals who have specific requirements for certain files or folders.
- Trusted websites: There may be certain websites or URLs that you trust implicitly and do not want Avast to block or scan. Adding an exception for these websites allows you to browse them without any interruption or false alarms from Avast’s security scans.
Adding an exception in Avast Internet Security is a simple process that allows you to tailor the level of security according to your specific needs. It gives you more control over which files, folders, or websites are exempt from Avast’s scanning and provides a flexible approach to balancing security and functionality.
However, it’s important to note that adding exceptions should be done with caution. Exercise discretion and only add exceptions for files, folders, or websites that you trust and are certain pose no risk to your computer’s security. By striking the right balance between security and convenience, you can optimize Avast Internet Security’s performance while ensuring your computer remains protected.
Step 1: Open Avast Internet Security
Before you can add an exception in Avast Internet Security, you need to open the program. Here’s how:
- Locate the Avast icon in your system tray, which is usually located in the bottom-right corner of your screen. It is represented by a blue “A” icon.
- Right-click on the Avast icon to access the context menu.
- In the context menu, hover your cursor over the “Avast shields control” option.
- From the sub-menu that appears, select the “Disable for 10 minutes” option. This temporarily disables Avast’s active protection, allowing you to access the program’s settings without interference. You may need to confirm this action depending on your system’s User Account Control settings.
- Once Avast is temporarily disabled, double-click on the Avast icon to launch the Avast Internet Security application.
After following these steps, Avast Internet Security should now be open and ready for you to make any necessary changes, including adding exceptions to its scanning process.
Remember, it is important to re-enable Avast’s active protection after you have finished making changes to the program’s settings to ensure continuous protection against potential threats. You can do this by right-clicking on the Avast icon in the system tray and selecting the “Enable all shields” option.
Step 2: Access the settings menu
After opening Avast Internet Security, the next step is to access the settings menu. Here’s how you can do it:
- Once Avast Internet Security is open, look for the menu icon located at the top-right corner of the main interface. It is represented by three horizontal lines stacked on top of each other.
- Click on the menu icon to expand a drop-down menu of options.
- In the drop-down menu, select the “Settings” option. This will open the Avast settings window.
Alternatively, you can access the settings menu through the main interface using the following steps:
- Within the main interface, locate the gear icon at the bottom-left corner of the screen and click on it. This will open the settings menu.
Once you have accessed the settings menu, you will be able to make various adjustments and customize Avast Internet Security to fit your needs. From this menu, you can modify scanning preferences, set up exclusions, manage firewall settings, and tweak other essential security features offered by Avast.
Take your time to explore the different categories and options available in the settings menu. Make sure to familiarize yourself with the customization possibilities to ensure that Avast Internet Security is tailored to your specific requirements.
Step 3: Navigate to the “General” tab
Once you have accessed the settings menu in Avast Internet Security, the next step is to navigate to the “General” tab, where you can manage various general settings of the program. Here’s how you can do it:
- In the settings menu, you will see a list of categories on the left-hand side. Click on the “General” category to select it.
- Upon selecting the “General” category, the main window will display options and settings related to general preferences and behavior of Avast Internet Security.
- Take a moment to review the available options in the “General” tab. Here, you can configure settings such as enabling or disabling the Avast CyberCapture feature, adjusting the sensitivity of the detection system, managing automatic updates, and more.
The “General” tab allows you to fine-tune Avast Internet Security according to your specific needs and preferences. Ensure that you carefully review the settings to ensure they align with your desired level of protection and functionality.
Remember, modifying the settings in the “General” tab can impact the overall behavior and performance of Avast Internet Security. Take your time to make informed decisions and tailor the program to your requirements, balancing security and usability.
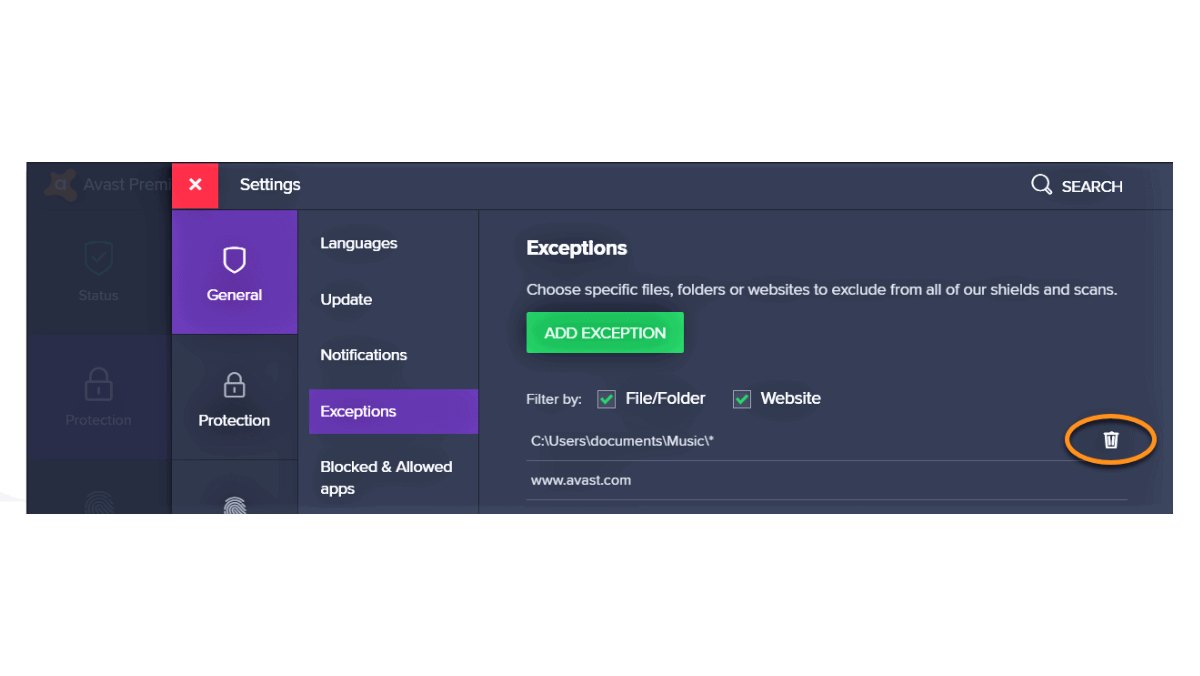
Step 4: Select “Exceptions”
After navigating to the “General” tab in Avast Internet Security’s settings menu, the next step is to select the “Exceptions” section. This is where you can manage and add specific exceptions to Avast’s scanning process. Follow these easy steps:
- In the “General” tab, look for the “Exceptions” option. It is usually located towards the bottom of the list of settings.
- Click on the “Exceptions” option to open the Exceptions settings.
By accessing the “Exceptions” section, you gain control over what files, folders, or websites Avast Internet Security will exclude from its scanning and protection processes. This flexibility allows you to ensure the smooth operation of legitimate programs and access trusted websites without interference from the antivirus software.
It is important to note that adding exceptions should be done with caution and only for files, folders, or websites that you trust and are certain pose no risk to your computer’s security. Adding exceptions for suspicious or unknown items can potentially expose your system to malware or other threats.
Avast Internet Security provides a user-friendly interface for managing exceptions, making it simple to add, modify, or remove them as needed. Take your time to familiarize yourself with the options and settings available in the “Exceptions” section to make the necessary adjustments for your specific needs.
After you have selected the “Exceptions” section, you are ready to proceed with adding the desired exceptions to Avast Internet Security.
Step 5: Add the desired exception
Once you have selected the “Exceptions” section in Avast Internet Security, you can proceed with adding the desired exceptions to the program’s scanning process. Follow these steps to add exceptions:
- Click on the “Add Exception” button within the “Exceptions” settings.
- A dialog box will appear, giving you the option to specify the type of exception you want to add. You can choose from the following options:
- File: Add an exception for a specific file on your computer.
- Folder: Add an exception for an entire folder and all its contents.
- Website: Add an exception for a specific website or URL.
- Application: Add an exception for a specific application.
- Select the desired type of exception and proceed accordingly.
- Depending on the type of exception chosen, you will be prompted to provide additional information. For example, if adding a file or folder exception, you will need to navigate to the specific file or folder in your system. If adding a website exception, you will need to enter the URL of the website.
- After providing the necessary information, click on the “Add Exception” or “Save” button to add the exception to Avast Internet Security.
Make sure to carefully review the information you enter when adding exceptions to ensure accuracy. Incorrectly configured exceptions may result in unintended consequences or compromise the security of your computer.
By adding exceptions, you are instructing Avast Internet Security to exclude specific files, folders, or websites from its scanning process, allowing them to bypass potential security checks. This can be helpful for avoiding false positives, allowing trusted applications to function properly, or accessing trusted websites without interruption.
Once you have added the desired exception, you are nearly done. The next step is to save the exception settings in Avast Internet Security.
Step 6: Save the exception settings
After adding the desired exceptions in Avast Internet Security, the next step is to save the exception settings. This ensures that the exceptions you have specified will be applied and recognized by the program’s scanning process. Follow these steps to save the exception settings:
- Within the “Exceptions” settings, review the list of exceptions you have added to ensure they are correct and accurately reflect your intended exemptions.
- Click on the “Save” or “Apply” button, usually located at the bottom of the Exceptions settings window.
- Once you have clicked the “Save” or “Apply” button, Avast Internet Security will save the exception settings and apply them to its scanning process.
It is important to note that saving the exception settings will not only apply the exceptions to future scans but also take any immediate effect on ongoing scanning processes. Avast will now exclude the specified files, folders, or websites from being scanned, ensuring they are not flagged as potential threats.
Remember to review the exception settings periodically and update or remove any exceptions that are no longer needed. Regularly reviewing and managing the exceptions ensures that Avast Internet Security continues to provide the appropriate level of protection while accommodating your specific requirements.
By saving the exception settings, you have successfully customized Avast Internet Security to exclude specific items from its scanning process. This flexibility allows you to strike the right balance between security and functionality for your computer.
The final step is to verify that the exceptions have been added correctly in Avast Internet Security, which will be covered in the next step.
Step 7: Verify the exception has been added
After adding and saving the exception settings in Avast Internet Security, it is essential to verify that the exceptions have been successfully added. This step allows you to ensure that the specified files, folders, or websites are exempt from Avast’s scanning process. Follow these steps to verify the exceptions:
- Open Avast Internet Security.
- Navigate to the area or feature where the exception should apply. For example, if you added a file or folder exception, locate and access that file or folder in your system.
- Perform the action or operation that would trigger Avast to scan or interact with the specified item. For instance, if you added a website exception, visit the URL or perform an action that triggers Avast’s web protection.
- Observe the behavior of Avast during the process. If the exception has been added correctly, Avast should not flag, block, or interfere with the specified item.
If Avast does not raise any alerts, scan, or interrupt the specified item, it indicates that the exception has been successfully applied. This means that the specified files, folders, or websites are now exempt from Avast’s scanning process and will not be flagged as potential threats.
If, however, Avast continues to block or flag the specified item, it suggests that the exception may not have been added correctly. In such cases, you may need to revisit the exception settings and ensure that you have entered the correct information or parameters.
Verifying the exception settings is an important step to confirm that Avast Internet Security is functioning as intended and applying the desired exceptions. It provides you with the assurance that trusted items are exempt from unnecessary scanning, allowing you to use your computer, applications, and websites without interruptions from Avast’s security measures.
With the exceptions successfully added and verified, you can now enjoy the benefits of Avast Internet Security’s protection while ensuring the smooth operation of trusted files, folders, and websites.