
Check System Requirements
Before adding a device to Kaspersky, it is crucial to ensure that your system meets the necessary requirements. This will ensure smooth installation and optimal performance of the software. Here are some key factors to consider:
- Operating System: Check if your device is running a compatible operating system, such as Windows, macOS, or Android.
- Processor and RAM: Verify that your device has a processor and RAM capacity that meets the minimum requirements specified by Kaspersky.
- Available Storage: Make sure you have enough free space on your device to accommodate the installation of Kaspersky software and any future updates.
- Internet Connection: A stable internet connection is necessary for downloading and updating Kaspersky software. Ensure that your device is connected to the internet before proceeding.
- Browser Compatibility: If you plan on using Kaspersky’s online dashboard or web-based features, check if your browser is supported by the software.
By verifying these system requirements, you can avoid any potential compatibility issues and ensure that your device is capable of running Kaspersky effectively. If your system falls short in any of these areas, consider upgrading or resolving the corresponding issues before proceeding to the next step.
Purchase or Renew Subscription
Before you can add a device to your Kaspersky account, you’ll need to ensure that you have an active subscription or purchase a new one. Follow these steps to purchase or renew your Kaspersky subscription:
- Visit the official Kaspersky website or authorized resellers to explore the available subscription plans.
- Choose the subscription plan that suits your needs and click on the “Buy Now” or “Renew” button.
- Provide the required information, including your name, email address, and payment details. Review the terms and conditions before proceeding.
- Complete the purchase by following the prompts and confirming the payment.
- If you’re renewing a subscription, enter your existing license key or login credentials when prompted.
Upon successful purchase or renewal, you will receive a confirmation email with details about your subscription. Keep this information handy, as you will need it during the installation and activation process.
It’s important to note that Kaspersky offers various subscription options, including different durations and coverage for multiple devices. Be sure to select the appropriate subscription that aligns with your needs and the number of devices you intend to protect.
Regularly check for any promotions or discounts that may be available, as Kaspersky often offers special deals to its customers. Taking advantage of these offers can help you save money while enjoying the robust security features provided by Kaspersky labs.
Download and Install Kaspersky
Once you have purchased or renewed your Kaspersky subscription, the next step is to download and install the software on your device. Follow these steps to get started:
- Go to the official Kaspersky website and sign in to your account using your credentials. If you don’t have an account, create one by clicking on the “Sign Up” or “Register” option.
- After signing in, locate the download section or link on the website. Click on it to initiate the download process.
- Choose the appropriate version of Kaspersky software based on your device’s operating system. For example, if you’re using Windows, select the Windows version, or if you’re using macOS, select the Mac version.
- Once the download is complete, navigate to the downloaded file and run the installer by double-clicking on it.
- Follow the on-screen instructions provided by the installation wizard to proceed with the installation. Review the end-user license agreement and accept it to continue.
- Select the installation settings that suit your preferences. You can choose to use the default settings or customize them according to your needs.
- Wait for the installation process to complete. This may take a few minutes, so be patient.
- Once the installation is finished, you may be prompted to restart your device. Follow the instructions and restart if necessary.
- Congratulations! You have successfully downloaded and installed Kaspersky on your device. It’s now ready to protect your system from various cybersecurity threats.
Remember to keep your Kaspersky software up to date by regularly checking for updates. This ensures that you have the latest security features and protection against new threats.
Now that you have Kaspersky installed, it’s time to create an account and activate your license to start safeguarding your device.
Create Kaspersky Account
In order to fully utilize the features and benefits of Kaspersky, you’ll need to create an account. This account will serve as your central hub for managing your devices and accessing additional functionalities. Follow the steps below to create your Kaspersky account:
- Open the Kaspersky software that you have installed on your device.
- On the main interface, look for the “Sign In” or “Create Account” option and click on it.
- On the account creation page, you will be asked to provide some basic information, such as your email address and a secure password. Fill in the required details, ensuring that your password is strong and unique. Avoid using common passwords.
- Read and accept the terms and conditions and the privacy policy. It’s always a good practice to review these documents to understand how your data will be handled and protected.
- Complete the registration process by clicking on the “Create Account” or “Register” button.
- You may be prompted to verify your email address. Check your inbox for a confirmation email from Kaspersky and follow the instructions provided to verify your account.
Once your account has been created and verified, you can access the Kaspersky online dashboard, where you can manage your devices, view your subscription details, and access additional security features.
Remember to keep your account credentials secure and avoid sharing them with unauthorized individuals. This will help protect your personal information and prevent unauthorized access to your Kaspersky account.
Now that you have successfully created your Kaspersky account, it’s time to activate your license to unlock the full potential of the software.
Activate Kaspersky License
After installing Kaspersky and creating your account, the next step is to activate your license. Activating your license ensures that you can fully utilize the features of the software and receive timely updates. Follow these steps to activate your Kaspersky license:
- Open the Kaspersky software on your device.
- On the main interface, look for the “Sign In” or “License” section and click on it.
- Sign in to your Kaspersky account using your registered email address and password.
- Once signed in, locate the “License” or “Activate License” option and click on it.
- Enter the activation code or license key that was provided to you during the purchase or renewal process. Ensure that you enter the code correctly to avoid any errors.
- Click on the “Activate” or “Apply” button to initiate the license activation process.
- Wait for the software to verify and validate your license. This may take a few moments.
- Once the activation is successful, you will receive a confirmation message indicating that your license has been activated.
- Restart the Kaspersky software to apply the license changes and begin using the full functionality of the software.
It’s important to note that Kaspersky licenses are typically valid for a certain period of time, such as one year or multiple years. Make sure to keep track of your license expiration date to ensure uninterrupted protection. You can also set up automatic renewal to simplify the process of extending your license.
By activating your Kaspersky license, you can access all the advanced features and benefits of the software, including real-time protection, scheduled scans, web protection, and more.
Now that your license is activated, you can proceed to add your device to your Kaspersky account for centralized management and protection.
Add Device to Kaspersky Account
Once you have installed Kaspersky and activated your license, it’s time to add your device to your Kaspersky account. Adding your device allows you to centrally manage and monitor its security status, receive important notifications, and perform remote actions if needed. Follow these steps to add your device to your Kaspersky account:
- Open the Kaspersky software on your device.
- Sign in to your Kaspersky account using your registered email address and password.
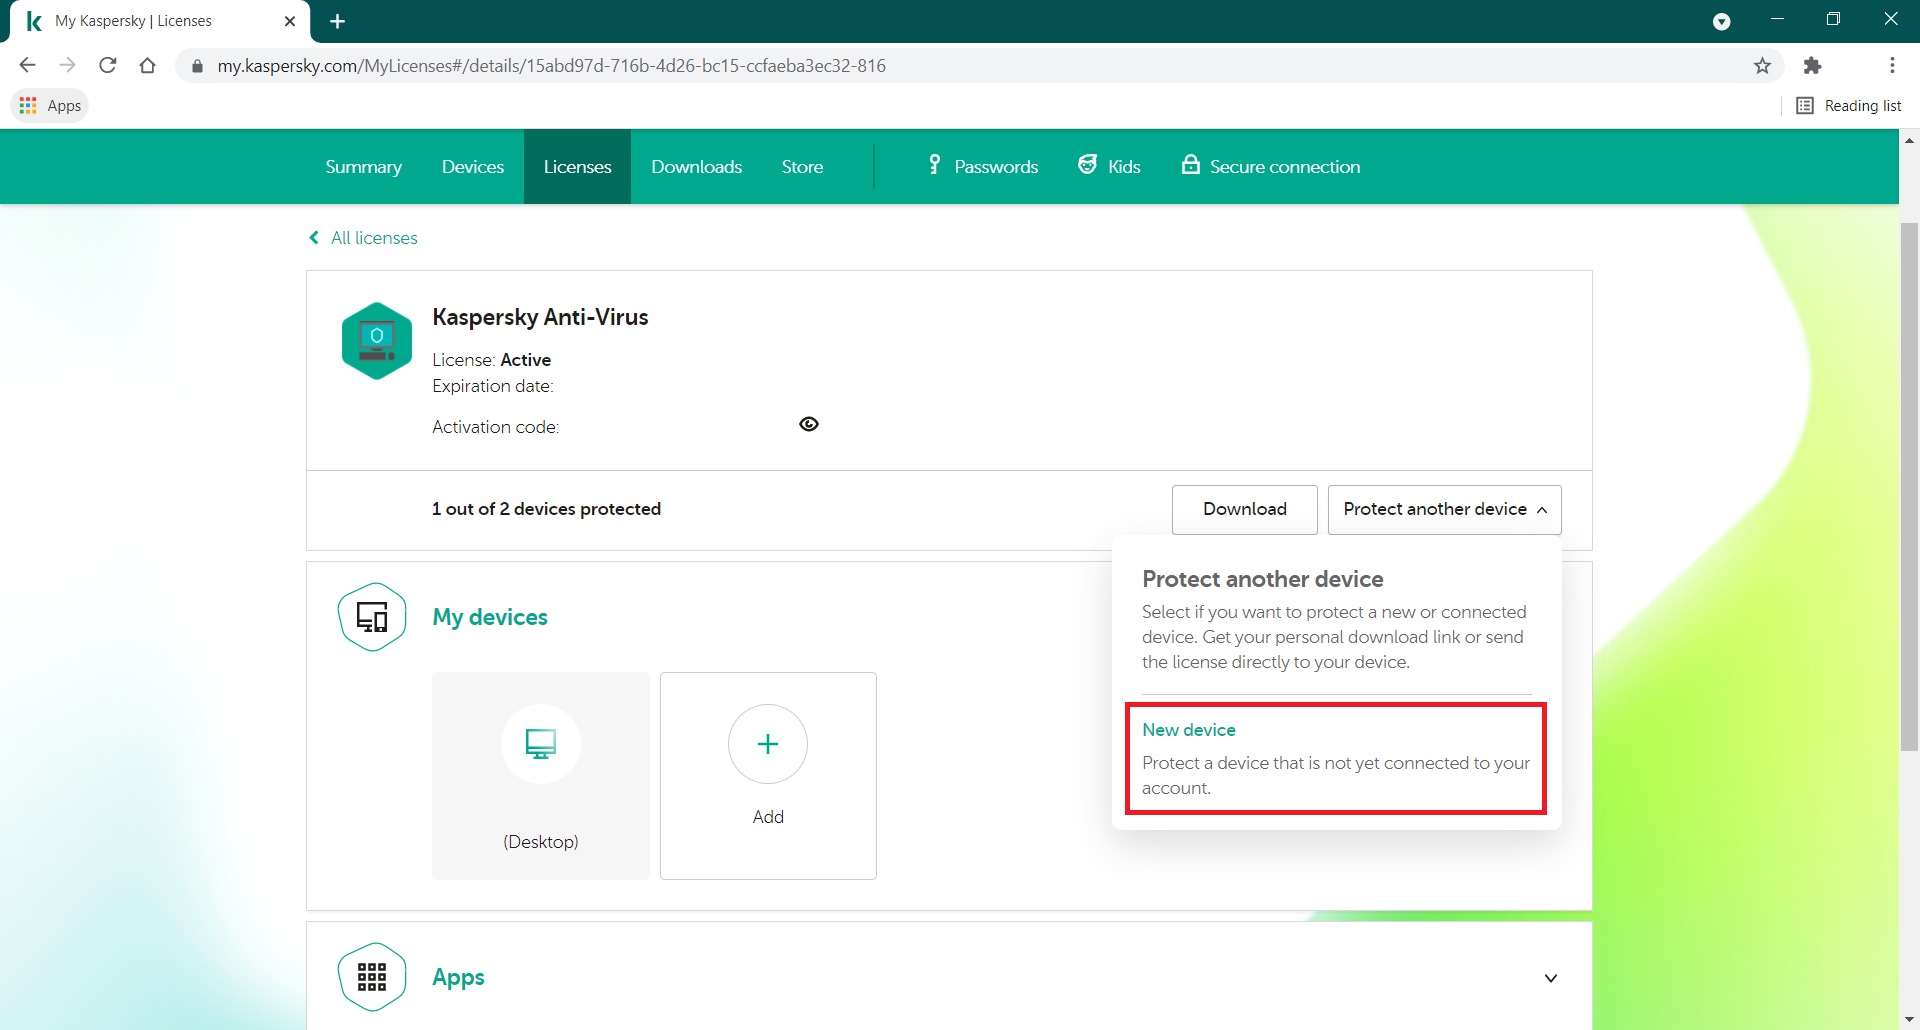
- In the main interface, look for the “Add Device” or “Add a New Device” option and click on it.
- Choose the method to add your device. You may have options such as scanning a QR code, entering an activation code, or sending an installation link to your device via email or text message.
- Follow the instructions provided based on the chosen method. For example, if you are scanning a QR code, use your device’s camera to scan the code displayed on the computer screen.
- Wait for the device to be successfully linked to your Kaspersky account. This may take a few moments.
- Once the device is added, you will see it listed in your Kaspersky account dashboard, indicating that it is now protected and being monitored.
- Repeat these steps for each additional device you want to add to your Kaspersky account.
By adding your devices to your Kaspersky account, you can have peace of mind knowing that all of your devices are protected under a single account. This streamlines security management and allows you to monitor the security status of each device, perform scans, and manage settings remotely.
It’s important to note that there may be a limit to the number of devices you can add depending on your subscription plan. Make sure to review the terms of your subscription to understand the limitations and available features.
Now that your device is added to your Kaspersky account, it’s time to configure the protection settings to align with your preferences and security needs.
Configure Protection Settings
After adding your device to your Kaspersky account, it’s important to configure the protection settings to ensure optimal security. Customizing these settings allows you to tailor the protection to meet your specific needs and preferences. Follow these steps to configure your Kaspersky protection settings:
- Open the Kaspersky software on your device.
- Sign in to your Kaspersky account using your registered email address and password.
- In the main interface, look for the “Settings” or “Preferences” option and click on it. This will open the configuration menu.
- Explore the various settings and options available to you, such as scanning preferences, web protection, firewall settings, and more.
- Review each setting option carefully and adjust them based on your requirements. You can enable or disable specific features, configure scan schedules, set up exclusions, and customize notification preferences.
- Take the time to understand the impact of each setting before making any changes. If you’re unsure about a certain setting, refer to the Kaspersky documentation or consult the support resources provided by Kaspersky.
- Once you have configured the settings to your satisfaction, save the changes and exit the configuration menu.
- Your Kaspersky software will now operate based on the configured protection settings, ensuring optimal security while addressing your specific needs.
It’s important to periodically review and update your protection settings as new threats emerge and your computing habits change. Regularly check for software updates from Kaspersky to stay up to date with the latest security features and improvements.
Remember that Kaspersky provides comprehensive protection against viruses, malware, spyware, and other online threats. By configuring the protection settings to align with your preferences, you can enhance your device’s security and ensure a safe digital experience.
Now that you have configured the protection settings, it’s time to run the first scan on your device to identify and eliminate any existing threats.
Run First Scan on Device
Once you have configured the protection settings in your Kaspersky software, it’s crucial to run a thorough scan on your device to detect and eliminate any existing threats. The first scan will help ensure that your device is clean and secure. Follow these steps to run the first scan on your device:
- Open the Kaspersky software on your device.
- Sign in to your Kaspersky account using your registered email address and password.
- In the main interface, look for the “Scan” or “Scan Now” option and click on it.
- Choose the type of scan you want to run. Kaspersky usually provides options such as a full scan, quick scan, or custom scan. A full scan will comprehensively scan all files and directories on your device, while a quick scan will focus on the most commonly infected areas. Select the appropriate scan type based on your needs.
- Click on the “Start Scan” or “Scan Now” button to begin the scanning process.
- Wait for the scan to complete. The duration will vary depending on the size of your device’s storage and the type of scan you chose.
- Once the scan finishes, review the scan results. Kaspersky will display any identified threats, potentially unwanted programs (PUPs), or suspicious files that it has detected. Take the necessary action based on the severity of the threats, such as quarantining or deleting malicious files.
- If the scan does not detect any threats, it indicates that your device is clean and secure. However, it’s recommended to perform regular scans to proactively protect your device from emerging threats.
- After reviewing the scan results, you can close the scan window.
Running the first scan on your device with Kaspersky provides peace of mind knowing that your system is protected against viruses, malware, and other threats. It is recommended to schedule regular scans to maintain a high level of security.
Now that you have completed the first scan, it’s important to keep your Kaspersky software up to date by installing the latest updates released by Kaspersky Labs.
Update Kaspersky Software
Keeping your Kaspersky software up to date is vital to ensure that you have the latest security features, bug fixes, and protection against emerging threats. Regularly updating the software helps maintain the effectiveness of your security solution and enhances your device’s overall protection. Follow these steps to update your Kaspersky software:
- Open the Kaspersky software on your device.
- Sign in to your Kaspersky account using your registered email address and password.
- In the main interface, look for the “Settings” or “Preferences” option and click on it. This will open the configuration menu.
- Navigate to the “Updates” or “Update Center” section within the configuration menu.
- Check for available updates by clicking on the “Check for Updates” button. Kaspersky will connect to its servers to determine if any new updates are available.
- If updates are found, click on the “Install Updates” or “Update Now” button to initiate the update process. It may take some time for the updates to download and install on your device.
- Follow the on-screen instructions, if any, during the installation process. The software may request you to restart your device after the updates have been applied.
- Once the update process is complete, you will have the latest version of Kaspersky software with the most up-to-date protection.
It is recommended to enable automatic updates within the Kaspersky software to ensure that you receive real-time updates without manual intervention. This allows the software to fetch updates in the background automatically.
Regularly updating your Kaspersky software is essential to stay ahead of new and evolving threats. Cybercriminals constantly develop new tactics, so it’s crucial to have the latest defenses to protect your device and data.
By staying vigilant and updating your Kaspersky software, you can maintain a strong defense against viruses, malware, and other cybersecurity risks.
Now that you have updated your Kaspersky software, it’s important to troubleshoot any common issues that may arise during the usage of the software.
Troubleshooting Common Issues
While using Kaspersky software, you may encounter some common issues that can hinder the performance or functionality of the software. Being aware of these issues and their potential solutions can help you resolve them quickly and effectively. Here are some common issues and troubleshooting steps for Kaspersky:
1. Installation Problems: If you encounter issues during the installation process, ensure that your device meets the system requirements specified by Kaspersky. Disable any conflicting software or firewall temporarily. If the problem persists, try reinstalling the software after restarting your device.
2. Slow System Performance: If you notice a significant slowdown in your device’s performance after installing Kaspersky, check if a system scan is running in the background. Adjust the scan settings to reduce its impact on system resources. Additionally, ensure that your device has sufficient resources (CPU, RAM) to accommodate the software.
3. False Positive Detection: Sometimes, Kaspersky may incorrectly label a legitimate file or program as malicious. If you encounter a false positive detection, you can add the file or program to the exclusions list within the Kaspersky settings. This will prevent it from being flagged in the future.
4. Update Issues: If you are experiencing problems with updating Kaspersky software, check your internet connection to ensure it is stable. Ensure that there are no firewall settings or network restrictions blocking the update process. If the issue persists, try manually downloading the latest updates from the official Kaspersky website and installing them.
5. Unresponsive or Crashing Software: If the Kaspersky software becomes unresponsive or crashes frequently, try restarting your device and relaunching the software. If the problem persists, consider reinstalling the software, ensuring that you completely remove the previous installation before reinstalling.
6. Activation Issues: If you are having trouble activating your Kaspersky license, double-check the activation code or license key you entered for accuracy. Make sure you have a stable internet connection during the activation process. If the issue persists, reach out to Kaspersky support for further assistance.
If you encounter any other issues with your Kaspersky software that are not addressed here, consult the Kaspersky support resources, including the knowledge base, FAQs, or community forums. Their support team is available to assist you in resolving any technical issues you may face.
By troubleshooting and addressing common issues promptly, you can ensure that your Kaspersky software functions optimally and continues to provide robust protection against cyber threats.
Now that you are aware of common troubleshooting steps, you can confidently overcome any challenges that may arise during your experience with Kaspersky.
Remove Device from Kaspersky Account
If you no longer want a particular device to be connected to your Kaspersky account or if you are replacing the device, you may want to remove it from your Kaspersky account. Removing a device allows you to free up a slot for adding a new device or simply declutter your account. Follow these steps to remove a device from your Kaspersky account:
- Open the Kaspersky software on your device.
- Sign in to your Kaspersky account using your registered email address and password.
- In the main interface, locate the “Devices” or “My Devices” section.
- Identify the device that you want to remove from your account.
- Click on the device or select it from the list, then look for the “Remove” or “Delete” option.
- Click on the option to remove the device from your Kaspersky account.
- Confirm the removal when prompted. It may ask you to confirm your decision.
- Wait for the removal process to complete. The device will be dissociated from your account and will no longer appear in your device list.
Removing a device from your Kaspersky account does not uninstall the Kaspersky software from the device itself. It simply disassociates the device from your account, meaning that it will no longer be managed or monitored centrally within your account.
It’s important to note that removing a device from your account does not affect your subscription or license. The license remains active, and you can still use it on other devices within the permitted limit.
If you decide to add the device back to your Kaspersky account at a later time, you can follow the steps mentioned in the “Add Device to Kaspersky Account” section to reconnect it.
By removing unnecessary devices from your Kaspersky account, you can keep your account organized and efficiently manage the devices that are actively protected by Kaspersky software.
With this knowledge, you can confidently add and remove devices from your Kaspersky account as needed, ensuring a streamlined and secure experience.