
What is a shared album invite?
A shared album invite is a way to collaborate and share photos and videos with friends, family, or colleagues. It allows multiple users to contribute and view content in a single album, making it a convenient and interactive way to document and relive shared experiences.
When you receive a shared album invite, it means that someone has invited you to join their album and contribute your own photos and videos. This invitation can be sent via various methods, such as through the Photos app, Messages, or even email.
Shared albums are especially useful for special occasions like weddings, vacations, or family gatherings. They provide a central platform where everyone can share their precious memories, adding an extra layer of connection and nostalgia.
One of the key benefits of shared albums is that they eliminate the need for everyone to individually send photos and videos to each other. Instead, all media files can be conveniently stored and accessed in one place, maintaining a unified album that can be viewed by all participants.
As the recipient of a shared album invite, you have the option to accept or decline the invitation. If you accept, you can start contributing your own content and gain instant access to the shared album.
Whether it’s capturing cherished family moments, showcasing a travel adventure, or collaborating on a creative project, shared album invites provide an effortless and enjoyable way to share and engage with others through media.
How to receive a shared album invite on your iPhone
Receiving a shared album invite on your iPhone is a simple and straightforward process. There are several methods through which you can receive these invites, giving you flexibility in how you connect and collaborate with others. Here’s how:
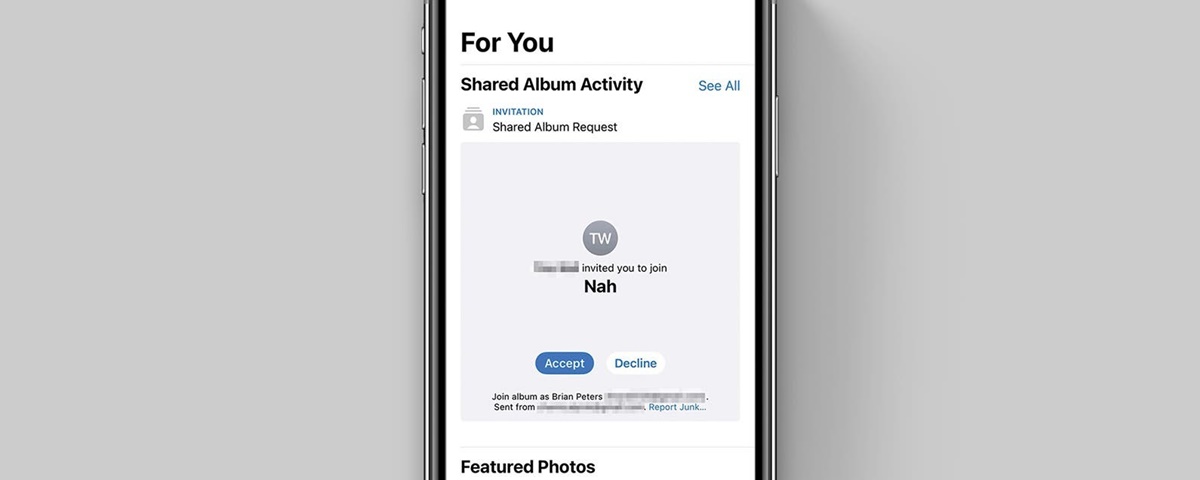
1. Accepting a shared album invite through the Photos app:
If someone sends you a shared album invite directly through the Photos app, you will receive a notification. Open the notification, and you will be presented with the option to “Join” the shared album. Tap on “Join” to accept the invitation. The shared album will now be added to your “Shared” tab in the Photos app.
2. Accepting a shared album invite through Messages or Mail:
If you receive a shared album invite via Messages or Mail, simply tap on the invitation link provided. This will redirect you to the Photos app, where you will have the option to “Join” the shared album. Tap on “Join” to accept the invitation. The shared album will be added to your Photos app and accessible from the “Shared” tab.
3. Joining a shared album through a link:
If someone shares a direct link to a shared album with you, simply tap on the link. This will open the Photos app and prompt you to “Join” the shared album. Tap on “Join” to accept the invitation. The shared album will then be added to your “Shared” tab in the Photos app.
Once you have accepted a shared album invite, you will instantly gain access to the album and all its contents. From there, you can view, comment, and contribute your own photos and videos to the shared album, creating an interactive and collaborative experience with others.
By receiving and accepting shared album invites on your iPhone, you can effortlessly stay connected with friends, family, and colleagues, sharing and reliving memories together in a seamless and engaging way.
Accepting a shared album invite through the Photos app
Accepting a shared album invite through the Photos app is a convenient way to join a shared album and start collaborating with others. Here’s how you can accept a shared album invite using the Photos app on your iPhone:
1. Open the Photos app on your iPhone:
Launch the Photos app from your home screen or app library. This app is represented by a multicolored flower icon.
2. Go to the “Shared” tab:
In the bottom navigation bar of the Photos app, tap on the “Shared” tab. This tab is represented by a silhouette image surrounded by a circle.
3. Access your shared album invites:
In the “Shared” tab, you will find a section titled “Shared Album Invitations.” Tap on this section to access the invites you have received.
4. Accept the shared album invite:
If you have received a shared album invite, you will see the invitation listed under “Shared Album Invitations.” Tap on the invite to open it.
5. Join the shared album:
Once you open the shared album invitation, you will be presented with the option to “Join” the album. Tap on “Join” to accept the invite and become a member of the shared album. The album will be added to your collection of shared albums in the “Shared” tab.
6. Start collaborating and contributing:
After accepting the shared album invite, you can start exploring and interacting with the content in the shared album. You will be able to view, comment on, and contribute your own photos and videos to the album, fostering a collaborative and engaging experience.
Accepting a shared album invite through the Photos app allows you to easily join a shared album and start sharing memories with others. It provides a platform for seamless collaboration and ensures that everyone involved can contribute their own unique perspective to the album.
Accepting a shared album invite through Messages or Mail
If you receive a shared album invite through Messages or Mail on your iPhone, you can easily accept the invitation and begin collaborating on the shared album. Here’s how to accept a shared album invite using Messages or Mail:
1. Open the Messages or Mail app:
Locate and open the Messages or Mail app on your iPhone. The Messages app is represented by a green speech bubble icon, while the Mail app is represented by a blue envelope icon.
2. Find the shared album invite:
Look for the message or email that contains the shared album invite. It may be in your inbox, a conversation, or a separate email thread. Tap on the message or email to open it.
3. Tap on the shared album invite link:
Within the message or email, you will usually find a link that says something like “Join Shared Album” or “View Album.” Tap on this link to open the invitation in the Photos app.
4. Open the invitation in the Photos app:
After tapping the invite link, you will be redirected to the Photos app automatically. The Photos app will automatically recognize the invitation and prompt you to “Join” the shared album.
5. Join the shared album:
Tap on the “Join” button to accept the shared album invite. By doing this, you will become a member of the shared album, and it will be added to your “Shared” tab in the Photos app.
6. Start collaborating and contributing:
Once you have accepted the shared album invite, you can start exploring the shared album’s content. You can view all the photos and videos shared by other members, comment on them, and contribute your own content to enrich the album.
Accepting a shared album invite through Messages or Mail is a convenient way to join a shared album and connect with others. It allows you to seamlessly transition from the messaging or email app to the Photos app, making it easy to accept and access shared albums on your iPhone.
Joining a shared album through a link
If you receive a direct link to a shared album on your iPhone, joining the album is a simple and straightforward process. Here’s how you can join a shared album through a link:
1. Open the link:
Click or tap on the direct link to the shared album that you have received. This link can be sent to you via various methods, such as email, messaging apps, or social media platforms.
2. Redirect to the Photos app:
When you open the link, your iPhone will automatically redirect you to the Photos app. This is where you will be able to join the shared album.
3. Join the shared album:
Upon redirection to the Photos app, you will be prompted to “Join” the shared album. Tap on the “Join” button to become a member of the shared album and gain access to its content.
4. Explore and contribute to the shared album:
After joining the shared album, you can start exploring and interacting with the photos and videos shared by others. You can view, comment on, and even contribute your own content to the album, making it a collaborative and engaging experience.
Joining a shared album through a direct link allows you to easily connect and participate in an album without any additional steps. It provides a quick and convenient way to join a shared album and engage with others in capturing and preserving memories.
Reviewing and managing your shared albums
Once you have joined a shared album on your iPhone, you can easily review and manage your shared albums using the Photos app. Here are some features and tips for reviewing and managing your shared albums:
1. Accessing your shared albums:
To view your shared albums, open the Photos app and go to the “Shared” tab. Here, you will find all the shared albums that you have joined or created.
2. Viewing shared album content:
Tap on a shared album to open it. You can then browse through the photos and videos shared by other members. Swipe left or right to view different media files, and tap on a specific item to view it in full screen.
3. Adding and removing photos or videos:
In a shared album, you can contribute your own photos and videos. Tap the “+” button to add media files from your iPhone to the shared album. Similarly, you can remove your own content by tapping and holding on a photo or video, then selecting “Remove” from the options that appear.
4. Commenting on shared album content:
Engage in conversations and share your thoughts by leaving comments on individual photos or videos within the shared album. Tap on a specific item, then tap on the speech bubble icon to enter your comment.
5. Adjusting shared album settings:
If you created the shared album or have been granted permission, you can manage its settings. Tap on the people icon in the toolbar of the shared album’s page to access options such as adding or removing members, enabling or disabling notifications, and controlling contributor rights.
6. Customizing shared album view:
Tap the “…” (more) button in the toolbar to access additional options for customizing how the shared album appears. You can change the album’s title, cover photo, and even turn on a Slideshow feature to enjoy a hands-free presentation of the shared album.
Reviewing and managing your shared albums allows you to stay organized and in control of the content you share and engage with. Whether it’s adding new memories, commenting on photos, or adjusting album settings, the Photos app provides a user-friendly platform for managing and enjoying shared albums on your iPhone.
Leaving a shared album
If you no longer wish to be part of a shared album on your iPhone, you have the option to leave the album. Whether you want to minimize clutter or simply no longer have a need for the album, here’s how you can leave a shared album:
1. Open the Photos app:
Launch the Photos app on your iPhone. The app icon resembles a multicolored flower.
2. Go to the “Shared” tab:
In the bottom navigation bar of the Photos app, tap on the “Shared” tab. The tab icon looks like a silhouette in a circular frame.
3. Access the shared album:
Scroll down to the “Shared Albums” section and locate the album you wish to leave. Tap on the album to open it.
4. Leave the shared album:
Once you’re inside the shared album, tap on the “People” icon in the toolbar at the bottom of the screen. This will take you to the list of album members and settings.
5. Leave the album:
To leave the shared album, scroll to the bottom of the members list and tap on the “Leave Shared Album” option. Confirm your decision when prompted to ensure you want to leave the album.
6. Confirm leaving the album:
You will be asked to confirm your decision to leave the shared album. Tap on the “Leave” button to finalize your departure. Once you’ve left the shared album, you will no longer have access to its content or be able to contribute to it.
Leaving a shared album is a simple way to remove yourself from an album that no longer interests you or is no longer relevant. It helps to keep your Photos app organized and ensures that you only have access to the albums that are meaningful and important to you.
Troubleshooting common issues when accepting a shared album invite
Accepting a shared album invite on your iPhone is usually a smooth process, but sometimes you may encounter certain issues or errors. Here are some common problems that may arise and troubleshooting steps you can take when accepting a shared album invite:
1. Invitation not received:
If you have not received a shared album invite that you were expecting, ask the person who sent the invite to double-check the email address or phone number they used. Also, ensure that your email or messaging settings allow for receiving invitations.
2. Invitation link not working:
If you click on a shared album invite link and it does not redirect you to the Photos app, try copying the link and pasting it directly into Safari or the Photos app’s Shared tab. If the link still does not work, contact the sender to verify the link’s validity or request a new invitation.
3. Unable to join the shared album:
If you are unable to join a shared album after tapping the “Join” button, check your internet connection. Ensure that you have a stable connection to the internet via Wi-Fi or cellular data. Additionally, verify that you are signed in to iCloud with the Apple ID associated with the invitation.
4. Shared album not appearing in the Photos app:
If you have accepted a shared album invite but cannot find the album in the Photos app’s “Shared” tab, try closing and reopening the Photos app or restarting your iPhone. This can help refresh the app’s data and display the shared album properly.
5. Permission issues:
If you have joined a shared album but are unable to add or contribute photos, ensure that the album’s settings allow for contributions from members. Contact the album creator or administrator to verify your permission level and address any permission issues.
6. Syncing problems:
If you encounter sync issues where the shared album does not update with new photos or comments, check your iCloud settings and ensure that iCloud Photo Library and Shared Albums are turned on. You can do this by going to Settings > [Your Name] > iCloud > Photos.
If you continue to experience issues accepting a shared album invite, consider updating your iPhone’s software to the latest version. Additionally, reach out to Apple Support for further assistance and troubleshooting specific to your device.
By troubleshooting common issues when accepting a shared album invite, you can overcome obstacles and fully enjoy the collaborative and interactive experience of sharing photos and videos with others on your iPhone.
Frequently Asked Questions about Accepting Shared Album Invites on iPhone
Accepting shared album invites on your iPhone can raise some questions and concerns. Here are answers to some frequently asked questions about accepting shared album invites:
1. Can I only accept shared album invites from other iPhone users?
No, shared album invites can be sent to and accepted by users of different platforms. You can accept shared album invites from other iPhone users, as well as users of iPads, Macs, and even Windows or Android devices. The shared album will be accessible through the Photos app or a compatible web browser.
2. Can I accept shared album invites without an iCloud account?
No, in order to accept a shared album invite, you need to have an iCloud account. The Photos app and shared albums rely on iCloud to sync and share the content seamlessly across devices. If you don’t have an iCloud account, you will need to create one to access and participate in shared albums.
3. Can I leave a shared album after accepting the invite?
Yes, you have the option to leave a shared album even after accepting the invite. To do this, go to the “Shared” tab in the Photos app, open the shared album, and tap on the “People” icon. Scroll to the bottom and select “Leave Shared Album.” Keep in mind that leaving a shared album means you will no longer have access to its content or be able to contribute to it.
4. Can I still view shared albums if I decline the invite?
No, if you decline a shared album invite, you will not have access to the shared album or its content. The content will not be visible in your Photos app or any other album on your iPhone.
5. Is there a limit to the number of shared albums I can join?
No, there is no specific limit to the number of shared albums you can join on your iPhone. You can join multiple shared albums and collaborate with different groups of people simultaneously. However, keep in mind that the storage capacity of your iCloud account may limit the number of photos and videos you can contribute to shared albums.
6. Can I control who can see my contributions in a shared album?
Yes, you have the ability to control who can see your contributions in a shared album. When adding photos or videos to a shared album, you can choose whether to make them visible to all members or restrict them to specific people within the album. This allows for greater control over privacy and who can view your shared content.
Accepting shared album invites on your iPhone opens up new opportunities for sharing and collaborating with others. By understanding these frequently asked questions, you can make the most out of shared albums and enjoy a seamless and interactive experience with your friends, family, and colleagues.