
What is My Photo Stream?
My Photo Stream is a feature offered by Apple that allows you to automatically and seamlessly sync your photos across all your Apple devices. It ensures that your recent photos are available on all your devices, including your iPhone, iPad, Mac, and even your Windows PC.
With My Photo Stream, you no longer have to manually transfer or upload your photos to each device individually. Instead, every photo you take or import on one device will automatically appear in the My Photo Stream album on your other devices, as long as they are connected to the same iCloud account.
This feature is especially useful if you have multiple Apple devices and want to access your photos on all of them without the hassle of syncing or manual transfers. It provides a convenient way to share and view your pictures across various platforms.
It’s important to note that My Photo Stream only syncs your most recent 30 days worth of photos and can store up to 1,000 photos. Older photos will be automatically removed from the stream, but they will remain in the respective albums on each device. This means you can still access your entire photo library on each device individually.
Now that you have an understanding of what My Photo Stream is, let’s explore how to turn it on for different devices.
How to Turn on My Photo Stream on an iPhone
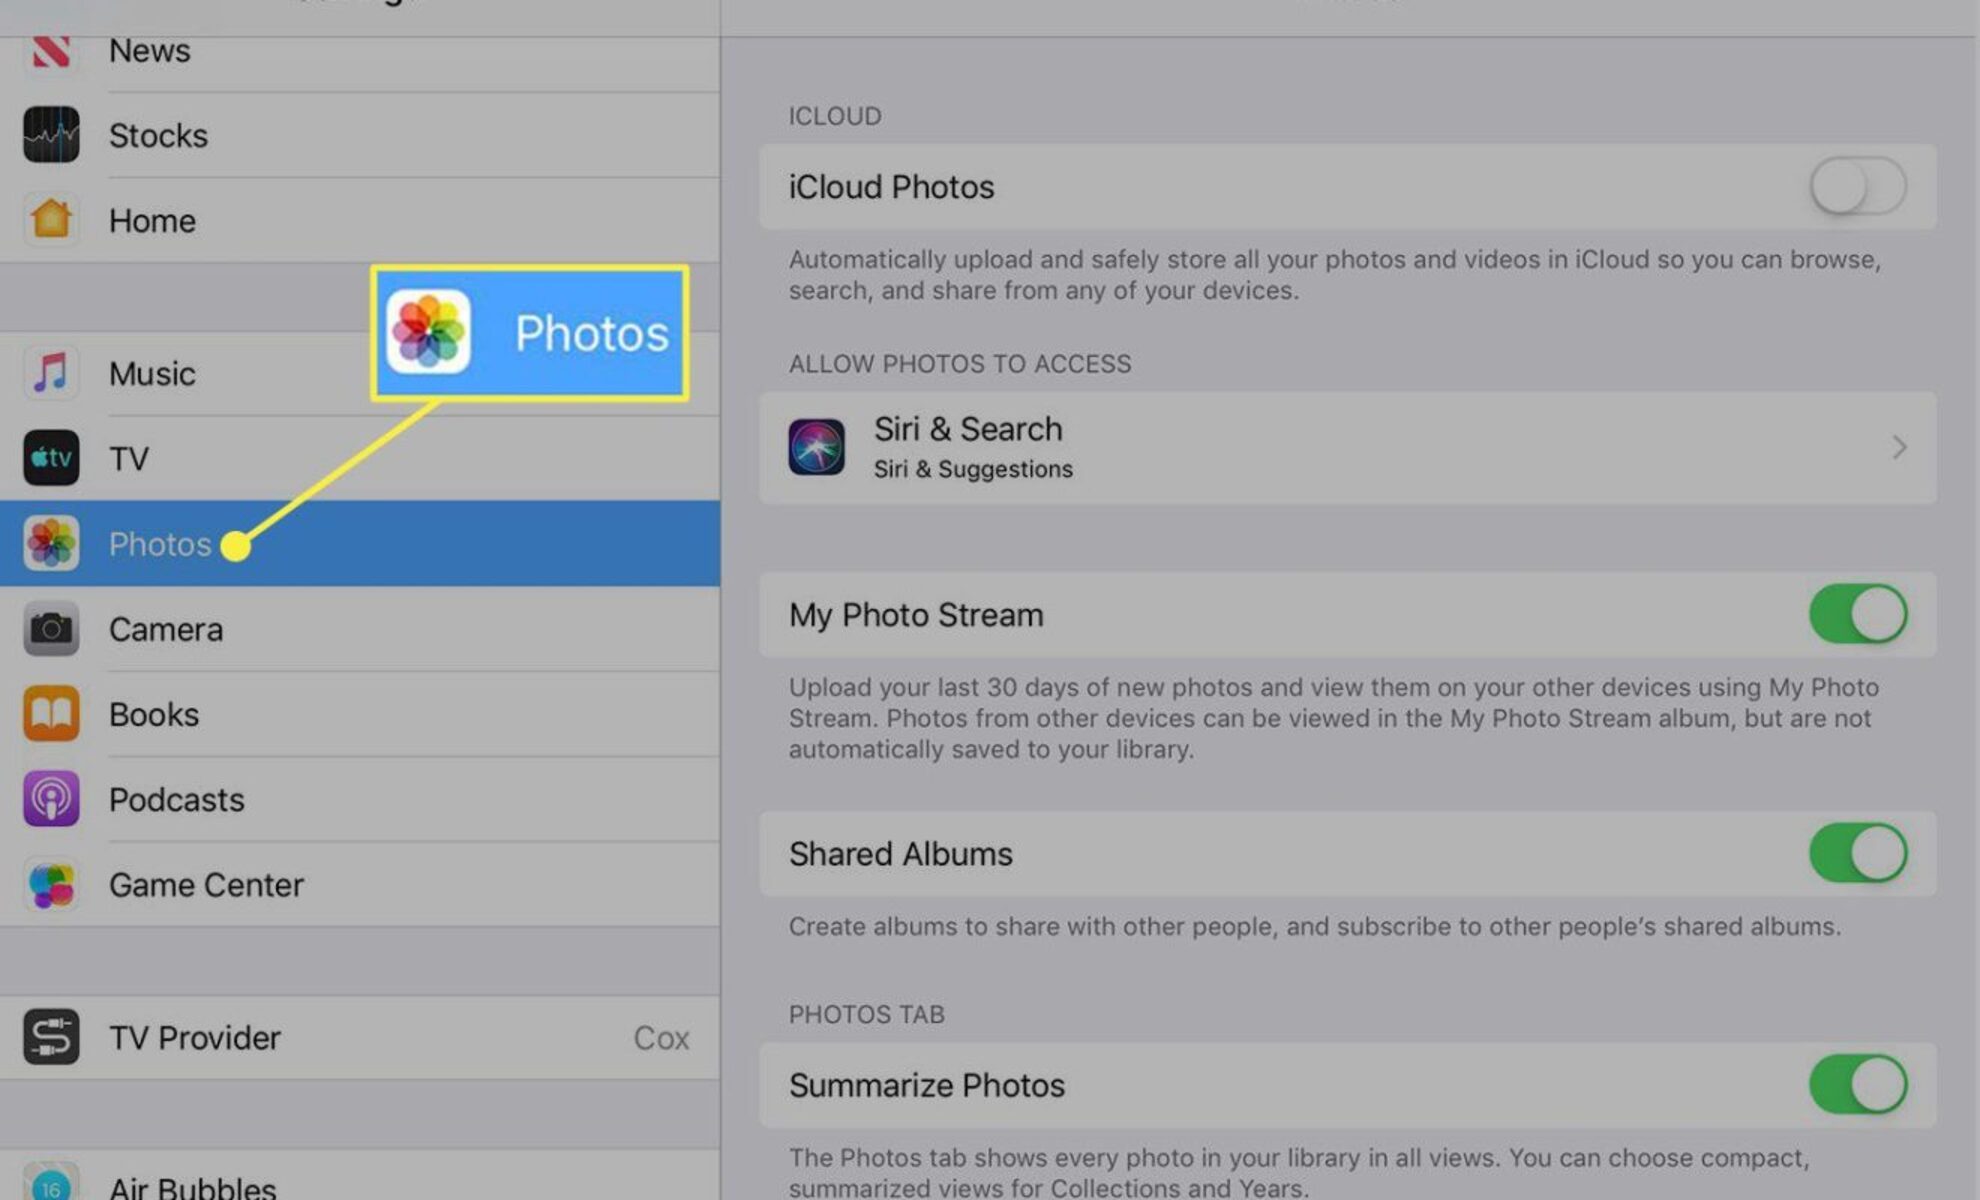
Enabling My Photo Stream on your iPhone is a straightforward process. Here’s how you can do it:
- Open the “Settings” app on your iPhone.
- Scroll down and tap on “Photos”.
- In the “Photos” settings, toggle on the “My Photo Stream” option.
- If prompted, sign in to your iCloud account.
- Wait a few moments for the photos to start syncing across your devices.
Once My Photo Stream is activated on your iPhone, any new photos you capture or save to your Camera Roll will be automatically added to your Photo Stream album. This album will then be accessible on your other Apple devices as long as they are connected to the same iCloud account.
It’s important to note that My Photo Stream only syncs your most recent 30 days worth of photos and can store up to 1,000 photos. If you exceed this limit, older photos will be automatically removed from the stream, but they will still be available in the Camera Roll on your iPhone.
With My Photo Stream enabled on your iPhone, you can easily access your recent photos on your iPad, Mac, or Windows PC without the need for manual transfers or syncing.
How to Turn on My Photo Stream on an iPad
To enable My Photo Stream on your iPad, follow these simple steps:
- Open the “Settings” app on your iPad.
- Tap on “Photos” in the left-hand side menu.
- Under the “Photos” settings, toggle on the “My Photo Stream” option.
- If prompted, sign in to your iCloud account.
- Wait a few moments for the photos to start syncing across your devices.
Once My Photo Stream is activated on your iPad, any new photos you capture or save to your Photos app will be automatically added to your Photo Stream album. This album will then be accessible on your other Apple devices as long as they are connected to the same iCloud account.
It’s important to note that My Photo Stream stores the most recent 30 days worth of photos and can hold up to 1,000 photos. If you exceed this limit, older photos will be automatically removed from the stream, but they will still be available in the Photos app on your iPad.
By turning on My Photo Stream on your iPad, you can effortlessly access your recent photos on your iPhone, Mac, or Windows PC without the need for manual transfers or syncing.
How to Turn on My Photo Stream on a Mac
To enable My Photo Stream on your Mac, you can follow these simple steps:
- Click on the Apple menu in the top-left corner of your screen and select “System Preferences”.
- In the System Preferences window, click on “iCloud”.
- Sign in to your iCloud account if you haven’t already.
- Scroll down and check the box next to “Photos” to enable the iCloud Photos feature.
- Click on the “Options” button next to Photos.
- In the Photos Options window, check the box next to “My Photo Stream” and click “Done”.
Once enabled, My Photo Stream will start syncing your photos across all your devices. Any new photos you capture or import into the Photos app on your Mac will be added to your Photo Stream album. These photos will then be accessible on your other Apple devices as long as they are connected to the same iCloud account.
Remember that My Photo Stream stores the most recent 30 days worth of photos and can store up to 1,000 photos. If you exceed this limit, older photos will be automatically removed from the stream, but they will still be available in your Photos library on your Mac.
By enabling My Photo Stream on your Mac, you can seamlessly access your recent photos on your iPhone, iPad, or Windows PC without the need for manual transfers or syncing.
How to Turn on My Photo Stream on a Windows PC
To enable My Photo Stream on your Windows PC, you can follow these steps:
- Open the iCloud for Windows application on your computer. If you don’t have it installed, you can download it from the Apple website and install it.
- Sign in to your iCloud account using your Apple ID and password.
- Select the checkbox next to “Photos” in the iCloud for Windows application.
- Click on the “Options” button next to Photos.
- In the Photos Options window, check the box next to “My Photo Stream” and click “Done”.
- Click “Apply” to save the changes.
Once you’ve completed these steps, My Photo Stream will start syncing your photos to your Windows PC. Any new photos you capture or import on your Apple devices will be added to the Photo Stream album. These photos will then be accessible on your Windows PC via the iCloud Photos folder located in your File Explorer.
Remember that My Photo Stream stores the most recent 30 days worth of photos and can hold up to 1,000 photos. If you exceed this limit, older photos will be automatically removed from the stream, but they will still be available on your Apple devices.
By turning on My Photo Stream on your Windows PC, you can easily access your recent photos across all your Apple devices without the need for manual transfers or syncing.
What is iCloud Photo Sharing?
iCloud Photo Sharing is a feature provided by Apple that allows you to share your photos and videos with your friends and family seamlessly. It is a convenient way to create shared albums and collaborate with others, regardless of whether they use Apple devices or not.
When you create a shared album using iCloud Photo Sharing, you can invite people to view and contribute to the album. You can choose who can access the album and whether they can only view the photos or also add their own. This makes it perfect for sharing vacation photos, event pictures, or any other memories you want to share with a specific group of people.
iCloud Photo Sharing makes it easy for everyone invited to stay updated with the latest photos. Whenever someone adds a new photo or video to the shared album, it will automatically appear in the album on all devices of the participants. This ensures that everyone can enjoy and contribute to the album in real-time.
In addition to the convenience of sharing albums, iCloud Photo Sharing also provides features like comments and likes. This allows participants to engage and interact with the shared content by leaving comments or expressing appreciation through likes. These comments and likes create a virtual conversation around the shared photos, enhancing the overall experience.
It’s important to note that iCloud Photo Sharing operates independently of My Photo Stream. While My Photo Stream automatically syncs your recent photos across your own devices, iCloud Photo Sharing focuses on sharing albums collaboratively with others.
Whether you want to share special moments with loved ones or collaborate on a project that involves visuals, iCloud Photo Sharing offers a user-friendly and efficient solution to share and interact with photos and videos.
How to Turn on iCloud Photo Sharing on an iPhone
To enable iCloud Photo Sharing on your iPhone, follow these steps:
- Open the “Settings” app on your iPhone.
- Scroll down and tap on “Photos”.
- In the Photos settings, toggle on the “iCloud Photos” option. If prompted, sign in to your iCloud account.
- Go back to the main settings menu and tap on your name at the top.
- Select “iCloud” and scroll down to find “Photos”. Tap on it.
- Toggle on “Shared Albums” to enable iCloud Photo Sharing.
With iCloud Photo Sharing turned on, you can now start creating shared albums and invite others to view and contribute to them. Here’s how:
- Open the Photos app on your iPhone.
- Tap on the “Albums” tab at the bottom of the screen.
- Scroll down and tap on the “Shared” album.
- Tap the “+” button to create a new shared album.
- Give your album a name and add people to invite them to view and contribute to the album.
- Choose whether you want to allow them to post their own photos or only view the shared content.
- Tap on “Create” to create the shared album.
Once you’ve created the shared album, you can start adding photos and videos to it. You can also invite more people to join the album or remove participants if needed. Everyone who has access to the shared album can view and interact with the content in real-time.
By enabling iCloud Photo Sharing on your iPhone, you can easily create and share albums with your friends and family, allowing everyone to contribute and enjoy the shared memories.
How to Turn on iCloud Photo Sharing on an iPad
To enable iCloud Photo Sharing on your iPad, follow these steps:
- Open the “Settings” app on your iPad.
- Scroll down and tap on “Photos”.
- In the Photos settings, toggle on the “iCloud Photos” option. If prompted, sign in to your iCloud account.
- Go back to the main settings menu and tap on your name at the top.
- Select “iCloud” and scroll down to find “Photos”. Tap on it.
- Toggle on “Shared Albums” to enable iCloud Photo Sharing.
With iCloud Photo Sharing turned on, you can now start creating shared albums and invite others to view and contribute to them. Here’s how:
- Open the Photos app on your iPad.
- Tap on the “Albums” tab at the bottom of the screen.
- Scroll down and tap on the “Shared” album.
- Tap the “+” button to create a new shared album.
- Give your album a name and add people to invite them to view and contribute to the album.
- Choose whether you want to allow them to post their own photos or only view the shared content.
- Tap on “Create” to create the shared album.
Once you’ve created the shared album, you can start adding photos and videos to it. You can also invite more people to join the album or remove participants if needed. Everyone who has access to the shared album can view and interact with the content in real-time.
By enabling iCloud Photo Sharing on your iPad, you can easily create and share albums with your friends and family, allowing everyone to contribute and enjoy the shared memories.
How to Turn on iCloud Photo Sharing on a Mac
Enabling iCloud Photo Sharing on your Mac allows you to create shared albums and collaboratively share photos with others. Here’s how you can turn it on:
- Click on the Apple menu in the top-left corner of your screen and select “System Preferences”.
- In the System Preferences window, click on “Apple ID” to access your iCloud settings.
- In the left-hand side menu, click on “iCloud”.
- Sign in to your iCloud account with your Apple ID and password if prompted.
- Check the box next to “Photos” to enable iCloud Photos.
- Select the “Options” button next to Photos.
- In the Photos Options window, check the box next to “Shared Albums” and click “Done”.
With iCloud Photo Sharing enabled on your Mac, you can now create shared albums and invite others to view and contribute to them. To create a shared album, follow these steps:
- Open the Photos app on your Mac.
- In the sidebar, click on “Shared” to access your shared albums.
- Click on the “+” button to create a new shared album.
- Give your album a name and add people by entering their email addresses or selecting them from your contacts.
- Choose whether you want to allow them to post their own photos or only view the shared content.
- Click “Create” to create the shared album.
Once the shared album is created, you can start adding photos and videos to it. Any changes made to the album, including adding or removing content, will be synchronized across all devices of the participants. Everyone can view and interact with the shared content, making it a convenient way to share memories and collaborate on visual projects.
By turning on iCloud Photo Sharing on your Mac, you can easily create and manage shared albums, allowing you to seamlessly share and collaborate on photos and videos with others.
How to Turn on iCloud Photo Sharing on a Windows PC
To enable iCloud Photo Sharing on your Windows PC, follow these steps:
- Download and install the iCloud for Windows application from the Apple website if you haven’t already.
- Open the iCloud for Windows application on your computer.
- Sign in to your iCloud account using your Apple ID and password.
- Check the box next to “Photos” in the iCloud for Windows application.
- Click on the “Options” button next to Photos.
- In the Photos Options window, check the box next to “Shared Albums” and click “Done”.
- Click “Apply” to save the changes.
Once iCloud Photo Sharing is enabled on your Windows PC, you can start accessing shared albums and contribute to them. Here’s how you can do it:
- Open File Explorer on your Windows PC.
- In the left-hand side menu, click on “iCloud Photos” under “Quick Access”.
- Click on “Shared” to view the shared albums.
- Select the album you want to access and view the photos and videos inside.
- If you have been invited to contribute to the album, you can add photos or videos by clicking on the “+” button.
Any changes made to the shared album, such as adding or removing content, will be synchronized across all devices of the participants. This allows for seamless collaboration on shared memories and visual projects.
By enabling iCloud Photo Sharing on your Windows PC, you can easily access and contribute to shared albums, allowing you to stay connected and engaged with the shared memories created by your friends and family.