
What is Apple Family Sharing?
Apple Family Sharing is a convenient feature that allows you to share your purchases, subscriptions, and media content with up to six family members. With Family Sharing, every member of your family can enjoy access to a wide range of digital content, including apps, music, movies, TV shows, books, and more, all without having to purchase them separately. Additionally, Family Sharing enables you to easily manage and monitor your family members’ activities, set up parental controls, and locate their devices using the Find My app.
One of the key benefits of Apple Family Sharing is the ability to share purchases. When you buy an app, song, movie, or e-book, everyone in your family can enjoy it without incurring any additional costs. This not only saves you money but also allows everyone to explore a vast library of content without limitations. Moreover, shared content can be downloaded and accessed on each family member’s individual device, ensuring that everyone can enjoy their favorite media wherever they are.
In addition to shared purchases, Family Sharing also extends to sharing subscriptions. This means that only one person in the family needs to subscribe to a service like Apple Music, Apple Arcade, or Apple TV+, and the whole family can enjoy the benefits. Each family member has their own personal preferences, playlists, and recommendations, so everyone can tailor their subscription experience to their liking.
Furthermore, Apple Family Sharing offers a built-in feature called Ask to Buy, which is especially useful for families with children. When enabled, Ask to Buy requires parental approval for any purchases initiated by children under the age of 18. This helps parents maintain control over their children’s spending and ensure that only appropriate content is being accessed.
Getting started with Apple Family Sharing is simple. All you need is an Apple ID for yourself and your family members, and you can set up your Family Sharing group in just a few steps. Once the group is set up, you can start enjoying the benefits of sharing purchases, subscriptions, photos, and more, making it easier than ever to stay connected and entertained as a family.
Overall, Apple Family Sharing is an excellent feature that promotes family connectivity and provides cost-effective access to a wide range of content. Whether you want to share purchases, subscriptions, or simply keep track of your family members’ activities, Family Sharing offers a seamless and convenient solution for all your digital needs.
Setting up Apple Family Sharing
Setting up Apple Family Sharing is a straightforward and user-friendly process. Follow the steps below to create your Family Sharing group:
- Ensure that you and your family members have Apple IDs. If anyone in your family doesn’t have an Apple ID, they can easily create one.
- On your iPhone or iPad, go to Settings and tap on your name at the top of the screen to access your Apple ID settings. On a Mac, open System Preferences and click on the “Apple ID” preference pane.
- Next, select “Family Sharing” or “iCloud & Family Sharing” from the menu, depending on your device.
- Tap on “Set Up Your Family” or “Set Up Family Sharing” and follow the on-screen instructions.
- You will be prompted to choose the features you want to share with your family, such as purchases, subscriptions, and photos. You can customize these settings later if needed.
- If you want to set up Ask to Buy for children, you will be asked to designate a parent or guardian to manage their purchases. This ensures that children cannot make purchases without parental approval.
- Finally, invite your family members to join your Family Sharing group. You can send invitations via iMessage, email, or in person using AirDrop. Each family member will receive an invitation and can accept it to join the group.
Once your family members have accepted the invitation and joined the group, they will be able to access shared content and enjoy the benefits of Family Sharing. It’s important to note that only the organizer of the Family Sharing group can add and remove members, manage payment methods, and make changes to the group settings.
That’s it! You’ve successfully set up your Apple Family Sharing group. Now you can start sharing purchases, subscriptions, and more with your loved ones, fostering a more connected and enjoyable digital experience for the whole family.
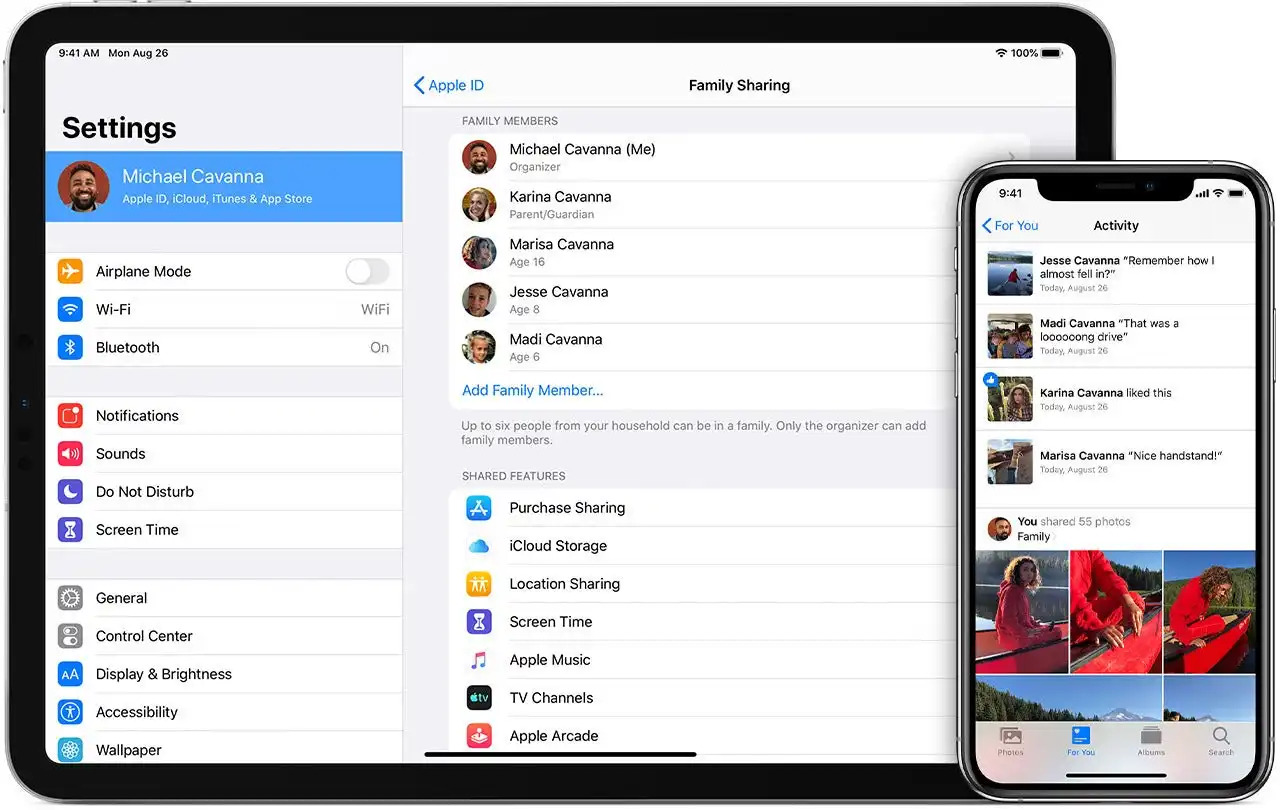
Adding Family Members to Your Apple Family Sharing Group
Once you have set up your Apple Family Sharing group, adding family members is a simple process. Follow the steps below:
- On your iPhone or iPad, go to Settings and tap on your name at the top of the screen to access your Apple ID settings. On a Mac, open System Preferences and click on the “Apple ID” preference pane.
- Tap on “Family Sharing” or “iCloud & Family Sharing” and select “Add Family Member.”
- You have several options for adding family members. You can invite them using their Apple ID email addresses, or you can choose to share a family plan for Apple Music, Apple Arcade, or Apple TV+ with them.
- If you choose to invite family members via email, enter their Apple ID email address and tap “Send.”
- If you opt to share a family plan, simply turn on the respective toggle switch for the desired service, and your family members will be added automatically. They will receive an invitation to join the service through Family Sharing.
- Once you send the invitation, the family member will receive it on their device. They can accept the invitation and follow the prompts to join the Family Sharing group.
- If needed, you can also enable Ask to Buy for specific family members. This feature requires parental approval for purchases made by children in the group. To enable Ask to Buy, select the family member’s name from the Family Sharing settings and toggle on “Ask to Buy.”
It’s worth noting that the family member you invite must have their own Apple ID to join the group. If they do not have an Apple ID, they can easily create one during the invitation process.
Once added, family members will have access to shared purchases, subscriptions, and other benefits. They will be able to download and enjoy apps, music, movies, TV shows, and books that are shared within the Family Sharing group. Additionally, they can contribute to and access shared photo albums through iCloud Photo Sharing, locate each other’s devices using the Find My app, and more.
Remember, the organizer of the Apple Family Sharing group will have control over certain settings and can add, remove, or manage family members as needed. This ensures that the group remains organized and that only authorized individuals can access shared content.
By adding family members to your Apple Family Sharing group, you can create a unified digital ecosystem for your loved ones, fostering a sense of togetherness and enhancing the overall experience of using Apple devices and services.
Choosing What to Share with Your Family Members
With Apple Family Sharing, you have the flexibility to choose what content and services you want to share with your family members. This allows you to customize the sharing experience based on your preferences and the needs of your family. Here’s how you can select what to share:
- On your iPhone or iPad, go to Settings and tap on your name at the top of the screen to access your Apple ID settings. On a Mac, open System Preferences and click on the “Apple ID” preference pane.
- Tap on “Family Sharing” or “iCloud & Family Sharing,” and select “Share Purchases.”
- You will see a list of shared features, including Purchases, Subscriptions, and Photos. Toggle the switch for each feature to enable or disable sharing.
- If you choose to enable sharing for Purchases, any app, song, movie, TV show, book, or other iTunes Store or App Store purchase made by one family member will be accessible to all other family members at no additional cost.
- Similarly, if you enable sharing for Subscriptions, services like Apple Music, Apple Arcade, and Apple TV+ can be shared among family members, allowing everyone to enjoy the benefits of the subscriptions without any extra charges.
- As for Photos, enabling sharing will give family members access to shared photo albums through iCloud Photo Sharing. This allows you to create, organize, and share albums with specific family members, creating a collaborative and personalized photo-sharing experience.
By choosing what to share, you have control over the types of content that are accessible to your family members. This allows you to align the sharing experience with your family’s interests and preferences. For example, you may choose to share all app purchases but only share specific photo albums or subscriptions.
Remember, the organizer of the Family Sharing group has the authority to manage these settings. This ensures that you can tailor the sharing experience to meet your family’s needs while maintaining control over what content is shared.
Additionally, it’s important to note that family members can still make individual purchases and subscriptions outside of the shared content. This means that they can have their own personal collections and preferences alongside the shared content.
By customizing the sharing settings, you can create a tailored and enjoyable experience for your family members within the Apple Family Sharing ecosystem. Explore the options available and choose what best suits your family’s needs and preferences.
Setting up and Managing Shared Purchases
One of the key benefits of Apple Family Sharing is the ability to share purchases with your family members. By setting up and managing shared purchases, you can save money and ensure that everyone in your family has access to a wide range of digital content. Here’s how you can get started:
- Ensure that Family Sharing is set up and enabled on your device. If you haven’t already done so, refer to the previous section on setting up Apple Family Sharing.
- When you make a purchase from the App Store, iTunes Store, Apple Books, or the Mac App Store, ensure that you select your Family Sharing account as the payment method.
- Once the purchase is complete, the content will automatically become available to all family members in your Family Sharing group. They can access and download the purchased content on their individual devices without having to pay for it separately.
- To manage shared purchases, you can go to the Apple Store app or the App Store on your device and tap on your profile picture at the top right corner. From there, select “Purchased” to view a list of all your purchases.
- In the Purchased section, you will see a tab labeled “Family Purchases.” This tab displays all the content that has been purchased by family members within your Family Sharing group.
- To download a shared purchase, simply tap on the cloud icon next to the content. It will be added to your library and become accessible on your device.
- As the organizer of the Family Sharing group, you can also manage payment methods for shared purchases. Go to Settings and tap on your name at the top of the screen. Select “Family Sharing” or “iCloud & Family Sharing,” and then tap on “Payment & Shipping.” From there, you can add or remove payment methods and designate a preferred payment method for family purchases.
By setting up and managing shared purchases, you can enjoy the benefits of a shared digital library without the need for everyone to purchase the same content individually. Whether it’s apps, music, movies, TV shows, or books, your family members can explore and enjoy a vast collection of digital content without incurring extra cost.
The ability to manage shared purchases ensures that you have control over the content within your Family Sharing group. You can view the purchases made by family members, download shared content, and make changes to payment methods when necessary. This allows you to maintain organization and ensure that everyone in the group has access to the content they desire.
With shared purchases, you can foster a sense of shared ownership and enjoyment as a family, while also maximizing the value of your digital purchases.
Organizing and Sharing Family Photos through iCloud Photo Sharing
iCloud Photo Sharing is a powerful feature that allows you to organize, share, and collaborate on photo albums with your family members. Whether you want to preserve memories, document special moments, or simply share experiences, iCloud Photo Sharing provides a seamless platform for all your family’s photo needs. Here’s how you can make the most of this feature:
- Ensure that Family Sharing is set up and enabled on your device. If you haven’t already done so, refer to the previous section on setting up Apple Family Sharing.
- Open the Photos app on your device and select the “Albums” tab at the bottom of the screen.
- Create a new album by tapping on the “+” icon or select an existing album that you want to share with your family.
- Tap on the “People” tab at the bottom of the screen and select “Invite People.”
- You can then choose to invite specific family members to view and contribute to the album. Simply enter their Apple ID email addresses or select their names from your contacts.
- Once your family members have accepted the invitation, they will be able to access the shared album and add their own photos to it. This creates a collaborative and shared photo library that everyone can contribute to.
- To view and manage the shared album, go to the “Albums” tab and select the album. From there, you can add, remove, or rearrange photos, as well as like and comment on photos contributed by others.
- All photos and videos in the shared album will be stored in iCloud, ensuring that they are accessible across all devices linked to your Family Sharing account.
- To control who can post photos and videos to the shared album, go to the “People” tab and toggle on or off the “Subscribers Can Post” option.
- If you want to share the album with someone who is not a part of your Family Sharing group, you can generate a sharing link and send it to them. Keep in mind that individuals outside of your Family Sharing group will have view-only access to the shared album.
With iCloud Photo Sharing, you can create a centralized repository of family memories, allowing everyone to contribute and access shared photos and videos. Whether it’s a holiday gathering, a special occasion, or a fun-filled adventure, the shared album enables everyone to relive the moments and stay connected with each other’s lives.
Furthermore, iCloud Photo Sharing provides a hassle-free way to back up your family’s photos and videos. By storing them in iCloud, you can ensure their safety and availability even if a device is lost or damaged.
Take advantage of this feature to capture and share the joyous moments with your loved ones, fostering a shared sense of history and togetherness within your Apple Family Sharing group.
Using Find My to Locate Family Members’ Devices
With Apple Family Sharing, you can take advantage of the Find My app to locate the devices of your family members. This feature provides peace of mind, as it allows you to easily track the whereabouts of your loved ones and ensure their safety. Here’s how you can use Find My to locate family members’ devices:
- Make sure that your family members have enabled location sharing and have granted permission for you to track their devices. They can do this by going to Settings, tapping on their name, and selecting “Find My.”
- On your device, open the Find My app. If you can’t find it, you can swipe down on the Home screen and use the search function to find the app.
- In the Find My app, tap on the “Devices” tab at the bottom of the screen.
- Under the “People” heading, you will see a list of all the family members who have enabled location sharing. Tap on a family member’s name to view their devices.
- You will see a map displaying the last known location of the selected family member’s devices. You can tap on a device to get more information about it.
- If your family member’s device is currently online and sharing its location, you can choose the “Play Sound” option to make the device emit a loud sound. This can be useful if their device is nearby but has been misplaced.
- If you need to locate a family member’s device that is currently offline or its battery is critically low, you can enable the “Notify When Found” feature. This way, you will receive a notification when the device comes online and shares its location again.
- For added security, the Find My app also includes a “Lost Mode” feature. This allows you to remotely lock the device and display a custom message with your contact information. You can also choose to receive updates on the device’s location.
- If you are unable to locate a family member’s device or have concerns about their safety, you can tap on the “Report an Issue” option within the Find My app. This will provide you with resources to contact the appropriate authorities or access additional assistance.
Using Find My to locate family members’ devices is a valuable feature that enhances the safety and security of your loved ones. It provides real-time information about their device’s location, ensuring that you can quickly find them in case of emergencies or when they are simply out of reach.
However, it’s important to respect privacy and use this feature responsibly. Always obtain proper consent from your family members before tracking their devices, and make sure to adhere to local laws and regulations.
By leveraging the power of the Find My app within Apple Family Sharing, you can stay connected to your family members and have peace of mind knowing that their devices are easily traceable in case of need.
Sharing Subscriptions with Your Family Members
With Apple Family Sharing, you can share subscriptions to various services with your family members, allowing everyone to enjoy the benefits without additional costs. This feature not only saves money but also ensures that everyone in your family has access to premium content and services. Here’s how you can share subscriptions:
- Ensure that Family Sharing is set up and enabled on your device. If you haven’t done so already, refer to the earlier section on setting up Apple Family Sharing.
- Open the App Store or the specific app associated with the subscription service that you want to share, such as Apple Music, Apple Arcade, or Apple TV+.
- Find the subscription service that you want to share with your family members and select the appropriate subscription plan.
- Tap on the “Share with Family” option, which should be located next to the subscription price.
- Your family members will receive an invitation to subscribe to the service through Family Sharing. They can accept the invitation and follow the prompts to join the shared subscription.
- Once family members have joined the shared subscription, they will have full access to the service, just like an individual subscriber. This means they can enjoy unlimited music streaming, exclusive game titles, or the latest TV shows and movies, depending on the subscription service.
- Each family member will have their own personal preferences, playlists, recommendations, and progress within the shared subscription service. This ensures a personalized experience for each individual.
- As the organizer of the Family Sharing group, you have the ability to add or remove family members from the shared subscription at any time. You can manage subscriptions by going to the App Store, tapping on your profile picture, and selecting “Subscriptions.”
Sharing subscriptions not only allows your family members to enjoy a wide range of premium content and services, but it also promotes a shared entertainment experience within your family. Whether it’s discovering new music, playing the latest games, or watching your favorite shows together, shared subscriptions foster a sense of togetherness and shared interests.
It’s important to note that each family member can still maintain their individual subscriptions outside of the shared one. This means they can have their own personal collections and preferences alongside the shared content.
By sharing subscriptions with your family members through Apple Family Sharing, you can access a variety of premium services together without the need for everyone to subscribe individually, making entertainment more accessible and enjoyable for the whole family.
Setting up Ask to Buy for Children in Your Family
Ask to Buy is a valuable feature of Apple Family Sharing that allows parents to manage their children’s purchases and ensure that only appropriate content is accessed. By enabling Ask to Buy, parents can approve or decline their children’s purchase requests, providing a level of control and supervision. Here’s how to set up Ask to Buy for children in your family:
- Ensure that Family Sharing is set up and enabled on your device. If you haven’t done so already, refer to the earlier section on setting up Apple Family Sharing.
- Go to Settings on your device and tap on your name at the top of the screen to access your Apple ID settings. On a Mac, open System Preferences and click on the “Apple ID” preference pane.
- Tap on “Family Sharing” or “iCloud & Family Sharing,” and select “Screen Time.”
- Tap on the child’s name for whom you want to enable Ask to Buy.
- Toggle on the “Ask to Buy” switch to enable the feature for that child.
- You may also want to set up other Screen Time options, such as setting time limits or content restrictions, to further manage your child’s device usage.
- Whenever your child attempts to make a purchase from the App Store, iTunes Store, Apple Books, or the Mac App Store, a notification will be sent to your device. You can then review the purchase details and choose to approve or decline it.
- If you approve the purchase, it will be completed, and the content will be downloaded to your child’s device.
- If you decline the purchase, your child will receive a notification indicating that the purchase has been declined. They will not be able to proceed with the purchase unless you override this decision.
Setting up Ask to Buy for children in your family gives parents peace of mind and control over their children’s spending and access to content. It allows parents to review purchase requests, ensuring that children only purchase items that align with their age and appropriateness.
By enabling Ask to Buy, parents can actively participate in managing and guiding their children’s digital activities. It encourages responsible spending habits and ensures that children are exposed to content that is suitable for their age and development.
It’s worth noting that Ask to Buy is designed for children under the age of 18. Once a child turns 18, they can manage their own purchases, and Ask to Buy is automatically disabled.
By setting up Ask to Buy for children in your family, you can strike a balance between granting independence and maintaining a level of oversight, ensuring a safe and appropriate digital experience for your children within the Apple Family Sharing ecosystem.
Troubleshooting Common Issues with Apple Family Sharing
Apple Family Sharing is generally a smooth and reliable feature that enhances the digital experience for families. However, like any technology, there might be occasional issues that arise. Here are some common problems with Apple Family Sharing and troubleshooting steps to resolve them:
1. Family members unable to join: If a family member is having trouble joining your Family Sharing group, ensure that they have an Apple ID and that they are using it to sign in to their device. Ask them to check their email for a Family Sharing invitation and make sure they accept it properly.
2. Shared purchases not appearing: If shared purchases are not showing up for your family members, check that you have enabled the sharing permissions correctly. On your device, go to Settings, tap on your name, and select “Family Sharing.” Make sure the toggles for purchases and subscriptions are turned on.
3. Content not syncing across devices: If shared content, such as photos or purchased media, is not syncing properly across family members’ devices, ensure that they have enabled iCloud and iCloud Photo Library on their devices. Additionally, make sure they are signed in to the same Apple ID and have the relevant sharing options enabled.
4. Payment issues: If there are problems with payment methods or billing for shared purchases or subscriptions, check that the payment information associated with your Family Sharing group is up to date. Go to Settings, tap on your name, and select “Payment & Shipping” to manage payment methods.
5. Unable to manage family members: If you are unable to add or remove family members, make sure that you are the organizer of the Family Sharing group. Only the organizer has the authority to manage members and settings. If you still encounter difficulties, check that you are signed in to the correct Apple ID with the organizer privileges.
6. Devices not displaying on Find My: If family members’ devices are not appearing on the Find My app, ensure that location sharing is enabled for each device. Check the device’s settings to make sure location services are turned on and that the device is connected to the internet. Additionally, verify that the appropriate permissions have been granted for Find My.
7. Issues with Ask to Buy: If Ask to Buy is not working as expected, confirm that it is enabled for the child’s device and that you are using the correct Apple ID for parental controls. If the problem persists, you may try disabling and re-enabling Ask to Buy or resetting the Screen Time settings for the child.
If you have exhausted these troubleshooting steps and the issue still persists, it may be helpful to visit the official Apple Support website or reach out to Apple Support directly for further assistance. They have resources and experts who can guide you through specific issues related to Apple Family Sharing.
Remember to stay patient and communicate with your family members during the troubleshooting process. With a little persistence and the right support, you can ensure that Apple Family Sharing works smoothly for everyone, enhancing the digital experience for your family.