
Basic Explanation
The boot sequence, also known as the boot order, refers to the process by which a computer’s operating system (OS) is loaded into the computer’s memory and the system is brought to an operational state. It is the initial set of operations performed by the computer from the moment it is powered on until the OS starts running.
During the boot sequence, the computer executes a series of steps that ensure the hardware is functioning properly and initializes key components of the system, such as the CPU, memory, and storage devices. These steps are collectively known as the Power-On Self-Test (POST) process.
Once the POST process is complete, the computer proceeds to find the boot device, which contains the OS. Typically, the boot device is a hard drive, solid-state drive, or a bootable USB flash drive. The computer checks the boot sequence order to determine which device to boot from.
The boot sequence is important because it determines the order in which the computer looks for a bootable device. If the primary boot device is not available or doesn’t contain a bootable OS, the computer moves on to the next device in the sequence until a bootable device is found.
It is essential to have the correct boot sequence order configured in your computer’s settings. If the order is not set correctly, the system may not boot properly, leading to errors or a failure to start the OS.
In older computers, the Basic Input/Output System (BIOS) was used to manage the boot sequence. However, modern computers often use the newer Unified Extensible Firmware Interface (UEFI) firmware instead. UEFI provides more advanced features and a graphical interface for configuring the boot sequence.
Why Is It Important?
The boot sequence is crucial for the proper functioning and operation of a computer system. Understanding why it is important can help users troubleshoot boot-related issues and optimize their computer’s startup process.
Firstly, the boot sequence ensures that the computer’s hardware is functioning correctly. The Power-On Self-Test (POST) process, which is part of the boot sequence, performs a series of self-diagnostic tests on the hardware components. These tests are designed to detect any errors or malfunctions in the CPU, memory, storage devices, and other critical components. By identifying and addressing these issues early on, the boot sequence helps prevent potential hardware failures and ensures the system’s stability.
Furthermore, the boot sequence determines the order in which the computer looks for a bootable device. This is critical because it allows the computer to locate and load the operating system (OS) into memory. If the boot sequence order is incorrect, the computer may fail to boot or attempt to boot from an unavailable or non-bootable device. By properly configuring the boot sequence, users can ensure that the system always boots from the desired device, such as the internal hard drive or a bootable USB drive.
In addition to system stability and OS loading, the boot sequence also affects the overall speed and efficiency of the computer’s startup process. By organizing the boot sequence order based on the user’s preferences, unnecessary delays can be avoided. For example, if the user frequently uses an external hard drive for booting, configuring it as the first device in the boot sequence can reduce the time it takes to start the computer. This level of customization allows users to optimize the boot process according to their specific requirements and maximize their productivity.
Lastly, understanding the boot sequence is crucial for troubleshooting boot-related issues. If the computer fails to boot or encounters errors during startup, knowing the boot sequence order can help isolate the problem. By reviewing the boot sequence settings and ensuring that the correct device is selected as the primary boot option, users can often resolve boot-related difficulties without the need for extensive technical support.
UEFI vs BIOS
In the world of computer firmware, two main technologies are commonly used for managing the boot sequence: BIOS (Basic Input/Output System) and UEFI (Unified Extensible Firmware Interface). Both serve the same purpose, but they differ in terms of features, functionality, and user interface.
BIOS, which has been used for decades, is the older technology. It operates in 16-bit real mode, which limits its capabilities and compatibility with modern hardware. BIOS firmware is text-based, and users navigate through a series of menus using the keyboard to configure settings such as the boot sequence order. Although reliable, BIOS has its limitations when it comes to advanced features and security.
On the other hand, UEFI is the newer and more advanced technology. It operates in 32 or 64-bit mode, providing better support for modern hardware and allowing for larger storage devices. UEFI offers a graphical user interface (GUI) with mouse support, making it more user-friendly compared to BIOS. This GUI enables users to navigate through settings by simply clicking on options, which is a significant improvement in terms of ease of use.
One key advantage of UEFI is its support for Secure Boot, which is a security feature that helps protect against malware and unauthorized operating systems. Secure Boot ensures that only digitally signed and trusted bootloaders and OSes are loaded during the startup process, preventing malicious code from compromising the system’s integrity.
UEFI also provides more advanced features for customization and troubleshooting. For example, it allows for the creation of multiple boot profiles, which can be handy for dual-boot systems or testing different operating systems. Additionally, UEFI supports the use of Secure Boot keys, enabling users to independently manage and control the authenticity of bootloaders and OSes.
While UEFI brings many advantages over BIOS, it is important to note that not all systems support UEFI. Some older systems may still rely on BIOS firmware. However, with the continuous advancement of computer hardware, UEFI is becoming the standard firmware for modern computers.
Overall, UEFI provides a more user-friendly interface, better hardware support, enhanced security features, and advanced customization options compared to the traditional BIOS firmware. As computer technology continues to evolve, more users are transitioning to UEFI to take advantage of its capabilities and benefits.
The POST Process
The POST process (Power-On Self-Test) is a vital component of the boot sequence. It is a series of diagnostic tests that a computer performs on its hardware components during startup. The primary purpose of the POST process is to ensure that all critical hardware components are functioning properly before the operating system (OS) is loaded.
When the computer is powered on, the CPU (Central Processing Unit) executes a small set of instructions stored in the system’s firmware, such as the BIOS (Basic Input/Output System) or UEFI (Unified Extensible Firmware Interface). These instructions initiate the POST process, which scans the hardware devices and performs various self-tests to check their integrity.
The POST process checks key hardware components such as the CPU, memory modules, storage devices, video card, and attached peripherals. It verifies that these components are correctly connected, properly seated, and free from any errors or malfunctions.
As the POST process runs, the computer emits a series of beep codes or displays error messages on the screen to indicate any issues that are detected. These codes or messages provide valuable diagnostic information that can help identify the faulty component or the underlying problem.
In addition to basic hardware functionality, the POST process may also check the system’s CMOS (Complementary Metal-Oxide-Semiconductor) settings. CMOS is responsible for storing the BIOS/UEFI configurations, including the boot sequence order, system date and time, and various other settings. If any discrepancies or errors are detected in the CMOS settings, the computer may prompt the user to enter the BIOS/UEFI setup to correct them.
Once the POST process is complete, and all hardware tests have passed, the computer proceeds to the next stage of the boot sequence, which involves finding and loading the operating system. If any errors or failures are encountered during the POST process, the computer may halt or display an error message, indicating the need for further investigation and troubleshooting.
It is worth noting that the duration of the POST process may vary depending on the system’s hardware configuration. In modern computers, the POST process is often performed quickly, allowing for faster boot times. However, on older systems or those with a large number of devices, the POST process may take longer to complete.
Overall, the POST process is a critical step in the boot sequence that ensures the proper functioning of the computer’s hardware components. By meticulously scanning and testing these components, the POST process identifies any potential issues, allowing users to address them before the operating system is loaded.
Finding and Accessing the Boot Menu
The boot menu is a feature that allows users to manually select the boot device from which the computer should start. It is particularly useful when you want to boot from a device other than the one set as the primary boot device in the boot sequence order. Here’s how you can find and access the boot menu on your computer.
The process of accessing the boot menu may vary depending on the computer’s manufacturer and the firmware being used (BIOS or UEFI). Typically, you can access the boot menu by pressing a specific key during the early stages of the boot process, before the operating system starts loading. Commonly used keys to access the boot menu include F12, F11, or ESC. However, it’s important to note that these keys can differ between different computer models.
To find the correct key to access the boot menu, you can refer to your computer’s user manual or search for the specific model online. Manufacturers often provide documentation or include instructions on accessing the boot menu in their support materials.
Once you have identified the key for your computer, follow these steps to access the boot menu:
- Restart your computer if it is on. If your computer is already off, turn it on.
- Immediately start pressing the designated key to access the boot menu. Press the key repeatedly to ensure that it is recognized during the boot process.
- If successful, you should see the boot menu screen appear, showing a list of available boot devices.
- Use the arrow keys on your keyboard to navigate through the menu and highlight the desired boot device.
- Once the desired boot device is selected, press Enter to confirm your choice.
The computer will then proceed to boot from the selected device, loading the operating system or any other software stored on that device.
It is important to note that accessing the boot menu is a temporary action and does not permanently change the boot sequence order. The next time you start your computer, it will continue to follow the boot sequence order configured in the BIOS or UEFI settings.
By knowing how to access the boot menu, you can quickly and easily boot from alternative devices, such as a USB flash drive or a CD/DVD, without having to change the boot sequence order in the BIOS/UEFI settings. This flexibility allows for convenient troubleshooting, installation of a different OS, or running special bootable tools or utilities.
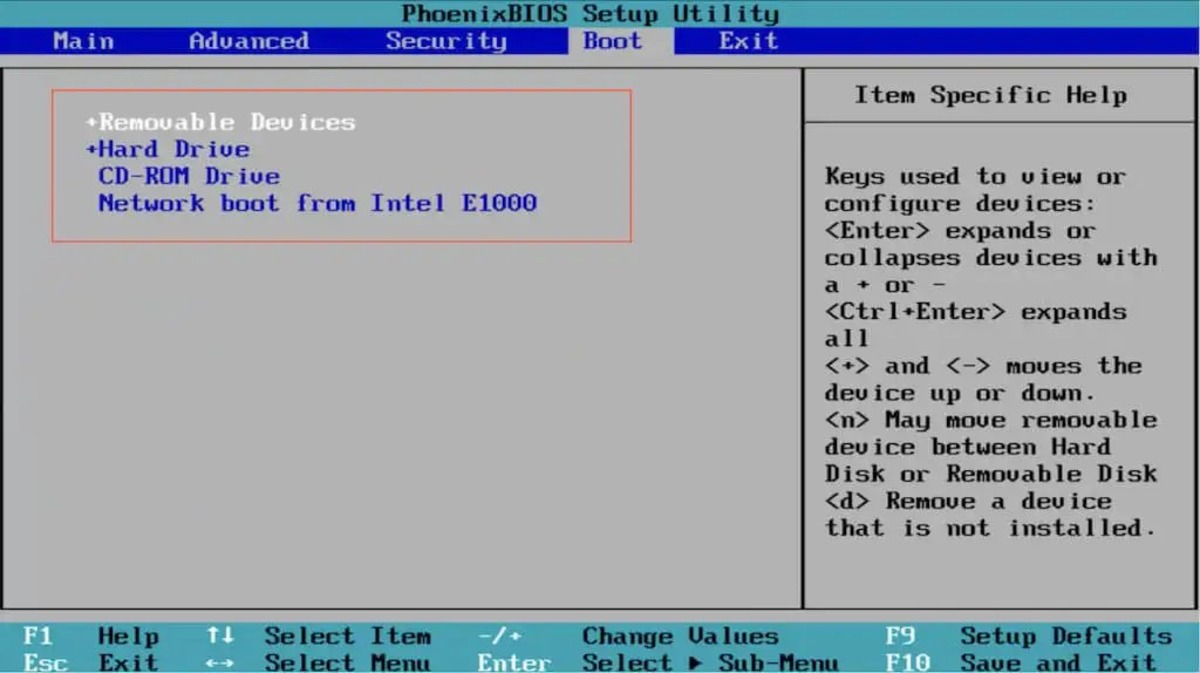
Common Boot Sequence Order
The boot sequence order refers to the order in which a computer looks for a bootable device during the startup process. It determines which device the computer will attempt to boot from first, and then moves down the list until a bootable device is found. While the specific boot sequence order can vary depending on the computer’s hardware and configuration, there are some common patterns that are frequently used.
Here are the most common boot sequence orders:
- Hard Drive (or SSD): The hard drive or solid-state drive (SSD) is the most common primary boot device. This is where the operating system (OS) is typically installed, and the computer will attempt to boot from it first if it is set as the primary boot device.
- USB Flash Drive: Many computers allow booting from a USB flash drive. This can be useful for tasks such as installing a new OS or running diagnostic tools. By setting the USB drive as a secondary boot device, you can easily boot from it by accessing the boot menu.
- CD/DVD Drive: Although less common in modern systems, the CD/DVD drive can still serve as a boot device. This is often used for bootable discs such as installation media or system recovery disks.
- Network Boot (PXE): Some computers are configured to boot from a network source, known as network boot or Preboot Execution Environment (PXE). This allows the computer to boot from a server on the network, which can be convenient in certain environments such as large organizations with centralized management.
In the default boot sequence order, the computer will attempt to boot from the first device in the list, and if it is not successful (e.g., no bootable OS is found), it will move on to the next device in the sequence. This process continues until a bootable device is found, or the list is exhausted without a successful boot.
It’s important to note that the boot sequence order can be customized in the computer’s BIOS or UEFI settings. This allows users to prioritize specific devices or change the default order to suit their needs. For example, if you frequently use a USB flash drive for booting, you can set it as the first device in the boot sequence order to simplify the process.
Understanding the common boot sequence order can be valuable when troubleshooting boot-related issues. If a computer fails to boot or boots into the wrong device, checking the boot sequence order is a good starting point. It ensures that the correct devices are in the list and in the desired order, thereby helping to identify any misconfigurations or hardware-related problems.
By familiarizing yourself with the common boot sequence orders and customizing them to your requirements, you can optimize the boot process and ensure that your computer consistently boots from the desired device.
Customizing the Boot Sequence
Customizing the boot sequence allows users to define the order in which the computer searches for a bootable device during the startup process. This customization can be done in the BIOS (Basic Input/Output System) or UEFI (Unified Extensible Firmware Interface) settings, depending on the firmware used by the computer.
To customize the boot sequence, follow these general steps:
- Restart the computer and access the BIOS or UEFI settings. This is usually done by pressing a specific key during the early stages of the boot process. Common keys to access the settings include Del, F2, or F10, but it may vary depending on the manufacturer and firmware.
- Navigate to the “Boot” or “Boot Order” section within the settings. The exact location may differ depending on the BIOS or UEFI version.
- Review the list of available boot devices and their current order. This is the default boot sequence.
- Use the designated keys (such as + or -) or follow the on-screen instructions to change the order of the devices. Typically, you can select a device and move it up or down in the list to define the desired boot sequence order.
- Save the changes and exit the BIOS or UEFI settings. This action may require pressing a specific key or selecting an option, such as “Save and Exit.”
By customizing the boot sequence, you can prioritize specific devices to boot from, depending on your preferences and requirements. For example, if you frequently use a USB flash drive for booting, you can set it as the first device in the boot sequence order, ensuring that the computer always checks it first before moving on to other devices.
Customizing the boot sequence also enables users to exclude or remove unnecessary devices from the list. This can help streamline the boot process and avoid delays caused by the computer searching for bootable devices that are not relevant to the current configuration or usage scenario.
Additionally, some advanced BIOS or UEFI firmware may offer additional customization options. For instance, you may be able to create boot profiles, where multiple boot sequence orders can be saved and easily switched between based on your needs. This can be useful for dual-boot systems or situations requiring different boot configurations.
It is important to note that improper customization of the boot sequence can lead to booting issues or failure to start the operating system. Therefore, it’s advisable to carefully review the changes before saving them and ensure that the desired boot device is included in the boot sequence order. If any issues arise, you can reset the settings to their default values or consult the computer’s user manual or manufacturer’s website for specific instructions.
Customizing the boot sequence provides flexibility and control over the startup process, allowing users to tailor it to their specific needs. Whether it’s for convenience, efficiency, or system requirements, customizing the boot sequence empowers users to optimize their computer’s booting behavior.
Troubleshooting Boot Sequence Issues
Troubleshooting boot sequence issues is necessary when a computer fails to start or encounters errors during the startup process. These issues can range from a simple misconfiguration to more complex hardware problems. Here are some common boot sequence issues and troubleshooting steps to resolve them:
1. Failed Boot: If the computer does not start or displays error messages during the boot process, first ensure that all cables are securely connected, including the power cable and data cables for storage devices. Check if any external devices are causing conflicts by disconnecting them and attempting to boot again. If the issue persists, proceed with further troubleshooting steps.
2. Incorrect Boot Device: If the computer boots into the wrong device, such as a USB drive instead of the hard drive, access the BIOS or UEFI settings to verify the boot sequence order. Ensure that the desired boot device is set as the primary option. If needed, rearrange the boot devices or remove unnecessary ones from the boot sequence order.
3. Slow Boot: If the computer takes a long time to boot, it may be due to excessive startup programs or unnecessary services running in the background. Use a utility like Task Manager (Windows) or Activity Monitor (Mac) to identify and disable these programs or services. Additionally, consider optimizing the boot sequence order by placing the most commonly used boot device as the first option.
4. Boot Loop: If the computer constantly restarts or gets stuck in a boot loop, it may indicate an issue with the boot device or the OS. Try booting into Safe Mode by pressing the designated key during startup. Safe Mode allows you to troubleshoot startup problems by using minimal drivers and services. If the computer boots successfully in Safe Mode, it suggests that a software-related issue is causing the boot loop. Consider running a malware scan or reinstalling the OS to resolve the problem.
5. BIOS/UEFI Firmware Update: Outdated firmware can lead to boot sequence issues. Check the computer manufacturer’s website for any available BIOS or UEFI firmware updates. Follow their instructions carefully to update the firmware. Be cautious during the update process to avoid any accidental interruption, which could result in irreversible damage to the system.
6. Hardware Issues: If despite trying the above troubleshooting steps, the boot sequence issues persist, it’s possible that there could be a hardware problem. Faulty components, such as a malfunctioning hard drive or faulty RAM, can impact the boot process. In such cases, it may be necessary to seek professional assistance or contact the computer manufacturer for further support.
Remember to document any error messages encountered during the troubleshooting process, as they can provide valuable information for diagnosing and resolving the boot sequence issues. If unsure about performing any troubleshooting steps, it is recommended to consult the computer’s user manual, seek help from the manufacturer’s support resources, or engage a qualified technician for assistance.
By following these troubleshooting steps, users can identify and resolve common boot sequence issues, ensuring a smooth and successful startup for their computer.