
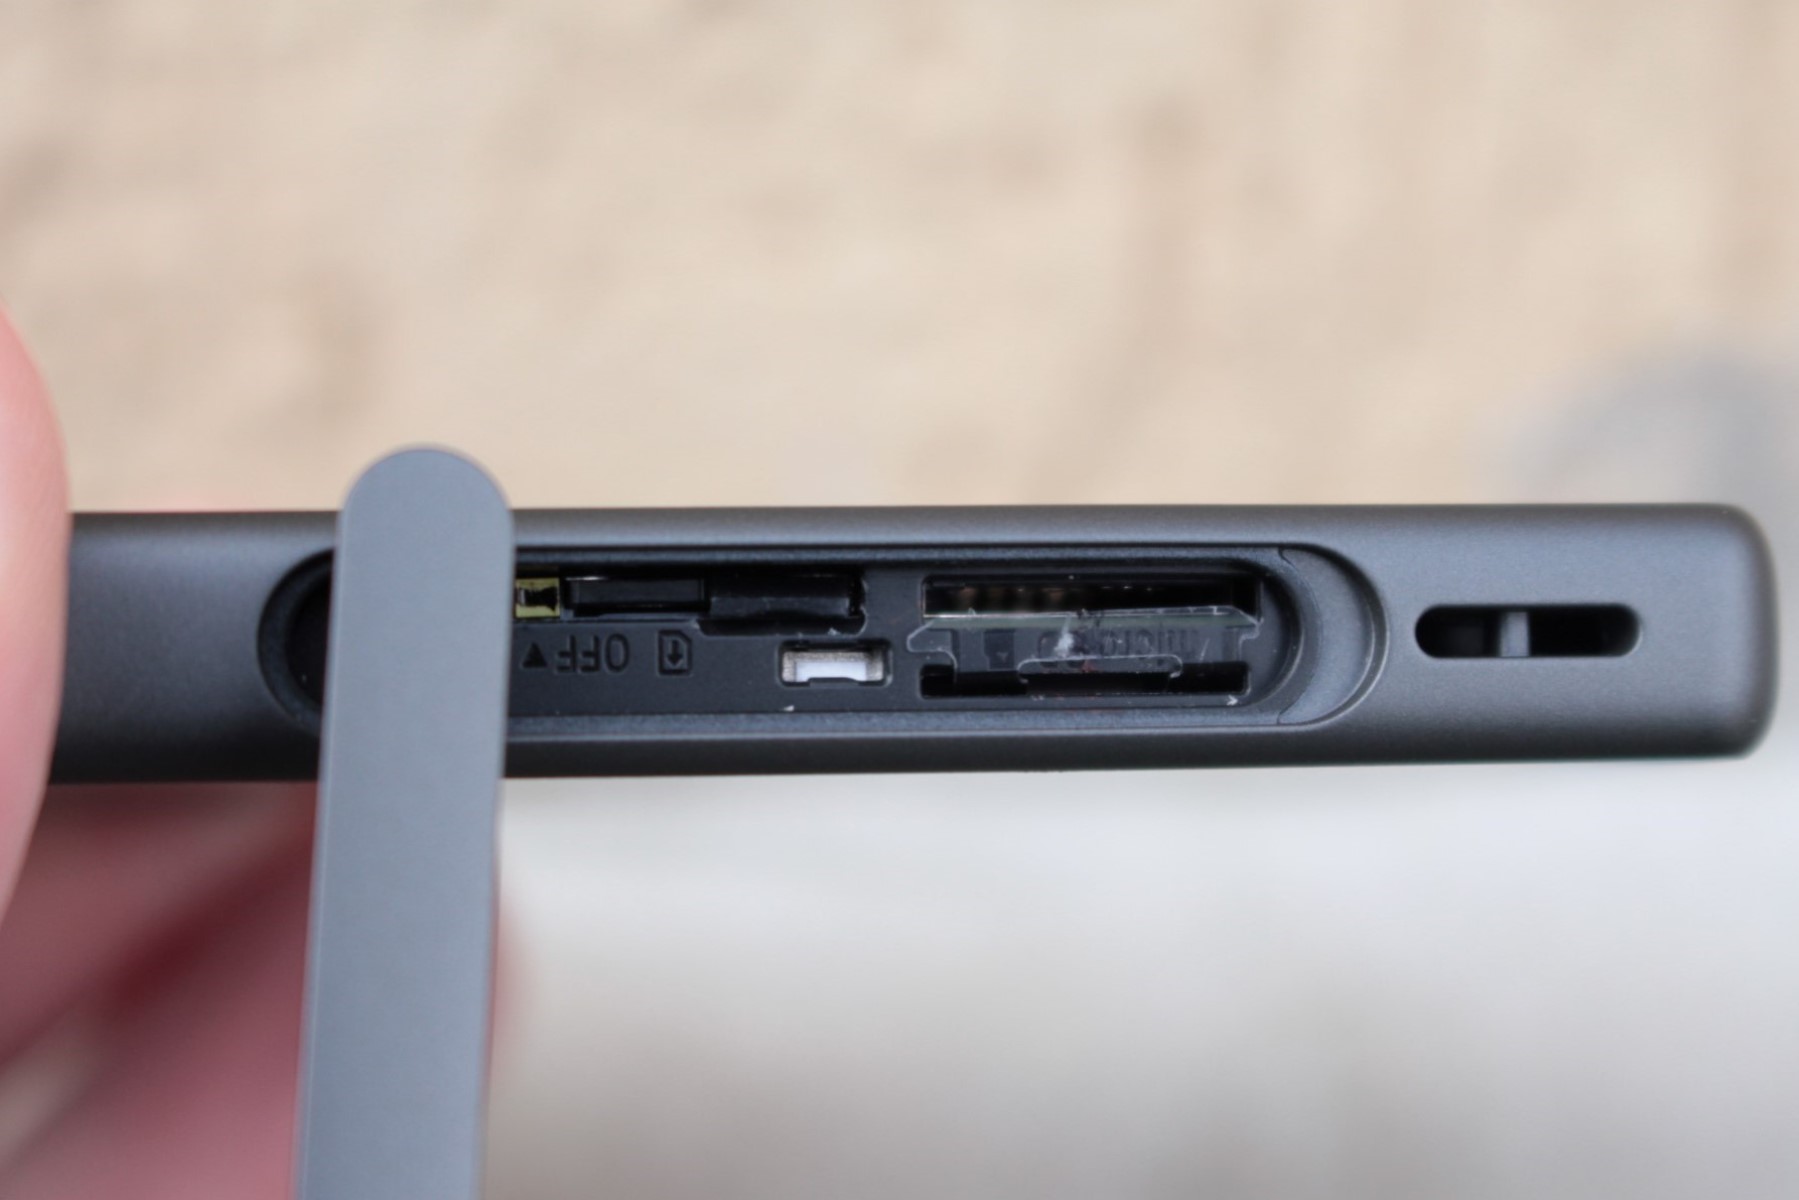
Checking the SIM Card Slot
Before inserting a SIM card into your Xperia Z, it's crucial to locate the SIM card slot. The slot is typically situated on the side of the device, often near the top or bottom edge, depending on the specific model. To identify the exact location of the SIM card slot on your Xperia Z, follow these steps:
-
Locate the SIM Card Slot: Begin by examining the sides of your Xperia Z for a small, discreet slot with a tiny pinhole. This pinhole is an indicator that the SIM card slot is nearby. The location of the slot may vary slightly depending on the model of your Xperia Z, but it is generally positioned on the left or right side of the device.
-
Refer to the User Manual: If you're unable to locate the SIM card slot visually, it's beneficial to consult the user manual that was included with your Xperia Z. The manual often contains detailed illustrations and instructions to help you pinpoint the exact location of the SIM card slot.
-
Use a SIM Eject Tool: Many Xperia Z models come with a SIM eject tool, a small pin-like instrument provided by the manufacturer for the purpose of accessing the SIM card slot. If you have this tool, it can be particularly handy for locating the slot. The SIM eject tool is designed to fit into the pinhole adjacent to the SIM card slot, allowing you to easily open the slot.
By following these steps, you should be able to quickly and effectively identify the SIM card slot on your Xperia Z. Once you've located the slot, you can proceed with the next steps for inserting or removing the SIM card as needed.
Remember, taking the time to familiarize yourself with the location of the SIM card slot ensures that you can confidently and accurately carry out the necessary steps for managing your SIM card on the Xperia Z.
Removing the SIM Card Tray
Removing the SIM card tray from your Xperia Z is a straightforward process that allows you to access the SIM card slot for insertion or replacement. Follow these steps to safely and effectively remove the SIM card tray from your device:
-
Power Off the Device: Before manipulating the SIM card tray, ensure that your Xperia Z is powered off. This precautionary measure helps prevent any potential damage to the device or the SIM card itself.
-
Locate the SIM Card Slot: As mentioned earlier, the SIM card slot is typically located on the side of the device. Once you have located the slot, identify the small pinhole next to it. This pinhole is where the SIM eject tool will be inserted to release the tray.
-
Retrieve the SIM Eject Tool: The SIM eject tool, which is often provided with the Xperia Z, is a small, pointed instrument designed specifically for ejecting the SIM card tray. If you have the SIM eject tool, retrieve it and keep it handy for the next step.
-
Insert the SIM Eject Tool: Insert the SIM eject tool into the pinhole adjacent to the SIM card slot. Apply gentle pressure to push the tool into the pinhole until the SIM card tray begins to protrude from the device.
-
Carefully Remove the Tray: Once the SIM card tray is partially ejected, carefully pull it out from the device using your fingers. Exercise caution to avoid applying excessive force, as this may cause damage to the tray or the device.
-
Handle the SIM Card Tray and SIM Card: After removing the tray, place it on a secure surface and proceed to remove or insert the SIM card as needed. Take care to handle the SIM card and tray delicately to prevent any damage to the components.
By following these steps, you can safely remove the SIM card tray from your Xperia Z, granting you access to the SIM card slot for necessary maintenance or replacement. This process is designed to be user-friendly and minimizes the risk of damage to your device or the SIM card.
Inserting the SIM Card
After successfully removing the SIM card tray from your Xperia Z, you are now ready to proceed with the insertion of the SIM card. This process is essential for enabling your device to connect to a mobile network and access voice, messaging, and data services. Follow these detailed steps to ensure a smooth and secure insertion of the SIM card:
-
Inspect the SIM Card: Before inserting the SIM card into the tray, take a moment to inspect the card itself. Ensure that it is free from any visible damage, such as cracks or bends, which could potentially hinder its functionality when inserted into the device.
-
Position the SIM Card Tray: Hold the SIM card tray securely, ensuring that it is oriented correctly to accommodate the SIM card. The tray typically features a designated slot that aligns with the size and shape of the SIM card, allowing for a precise fit.
-
Place the SIM Card: Gently place the SIM card into the designated slot on the SIM card tray. Take note of the orientation of the card, as it should align with any notches or guides within the slot. Carefully position the card to ensure that it rests securely within the tray without any protrusions or misalignments.
-
Slide the Tray into the Device: With the SIM card properly positioned on the tray, carefully slide the tray back into the SIM card slot on your Xperia Z. Apply gentle pressure to ensure that the tray fits snugly into place, allowing the SIM card to make a secure connection within the device.
-
Power On the Device: Once the SIM card tray is fully inserted, power on your Xperia Z to initiate the device's recognition and activation of the SIM card. Upon powering on the device, it will establish communication with the inserted SIM card, enabling you to access mobile network services.
By following these steps, you can confidently and effectively insert a SIM card into your Xperia Z, enabling seamless connectivity and access to essential mobile services. This process ensures that the SIM card is securely placed within the device, allowing for reliable network connectivity and communication capabilities.
Replacing the SIM Card Tray
Once you have successfully inserted the SIM card into your Xperia Z and verified that it is securely positioned within the device, the next step is to replace the SIM card tray. This final stage of the process ensures that the SIM card remains firmly in place and that the device's functionality is fully restored. Follow these steps to seamlessly replace the SIM card tray in your Xperia Z:
-
Retrieve the SIM Card Tray: After inserting the SIM card, ensure that the tray is free from any dust or debris that could potentially interfere with its proper functioning. Inspect the tray to confirm that it is clean and devoid of any obstructions.
-
Align the Tray with the Slot: Hold the SIM card tray in a position that allows you to align it accurately with the SIM card slot on your Xperia Z. Take note of the orientation of the tray, ensuring that it matches the slot's dimensions and contours for a precise fit.
-
Carefully Insert the Tray: With the tray properly aligned, gently insert it back into the SIM card slot on the device. Exercise caution to avoid applying excessive force, as the tray should seamlessly slide into place without resistance.
-
Verify Secure Placement: Once the tray is fully inserted, verify that it sits flush with the device's exterior, indicating that it is securely positioned within the slot. Ensure that the tray does not protrude or appear uneven, as this could indicate an improper fit.
-
Power On the Device: After confirming that the SIM card tray is securely in place, power on your Xperia Z to initiate the device's recognition and activation of the SIM card. Upon restarting the device, it will establish communication with the inserted SIM card, allowing you to access mobile network services seamlessly.
By following these steps, you can effectively replace the SIM card tray in your Xperia Z, ensuring that the device's connectivity and functionality are fully restored. This process enables you to securely house the SIM card within the device, providing reliable access to essential mobile services without any interruptions or complications.