
Why Remove Internet Explorer?
If you’re reading this article, chances are you’re considering removing or uninstalling Internet Explorer from your computer. You might be wondering why you should bother removing a browser that comes pre-installed on Windows systems. Well, there are several reasons why you might want to bid farewell to Internet Explorer.
Firstly, Internet Explorer has a reputation for being slow and unreliable compared to other modern browsers like Google Chrome and Mozilla Firefox. In terms of speed and performance, Internet Explorer lags behind its competitors, making browsing the web a frustrating experience.
Secondly, security is a major concern when it comes to Internet Explorer. Over the years, various security vulnerabilities have been discovered in Internet Explorer, making it an attractive target for hackers and cybercriminals. Microsoft has released several patches and updates to address these issues, but the browser’s track record has left many users looking for safer alternatives.
Thirdly, Internet Explorer lacks support for the latest web standards. This means that websites built with modern technologies may not function correctly or may appear broken when accessed through Internet Explorer. With the ever-evolving nature of the internet, using a browser that can properly render websites is crucial for a seamless browsing experience.
Furthermore, Internet Explorer has limited customization options and lacks the extensive library of browser extensions and add-ons available for other browsers. These extensions can enhance productivity, privacy, and overall browsing experience, allowing you to tailor your browsing experience to your specific needs.
Lastly, Internet Explorer is no longer actively developed by Microsoft. The company has shifted its focus to newer browsers like Microsoft Edge, which offers better performance, improved security, and enhanced features. With this in mind, it makes sense to move away from Internet Explorer and embrace a more modern and supported browser.
In summary, removing or uninstalling Internet Explorer can improve your browsing experience by providing faster speeds, better security, increased compatibility with modern websites, and access to a wider range of customization options. Whether you choose to disable or completely remove Internet Explorer, it is a step towards a more enjoyable and secure web browsing experience.
How to Disable Internet Explorer on Windows 10
If you prefer to keep Internet Explorer installed on your Windows 10 computer but want to stop it from being the default browser, you can disable it without the need for uninstallation. Disabling Internet Explorer will prevent it from opening when you click on links from other applications or on your desktop. Here’s how you can disable Internet Explorer on Windows 10:
- Open the Start menu and type “Control Panel” in the search bar. Click on the Control Panel app that appears in the search results.
- In the Control Panel window, navigate to Programs and then select “Programs and Features”.
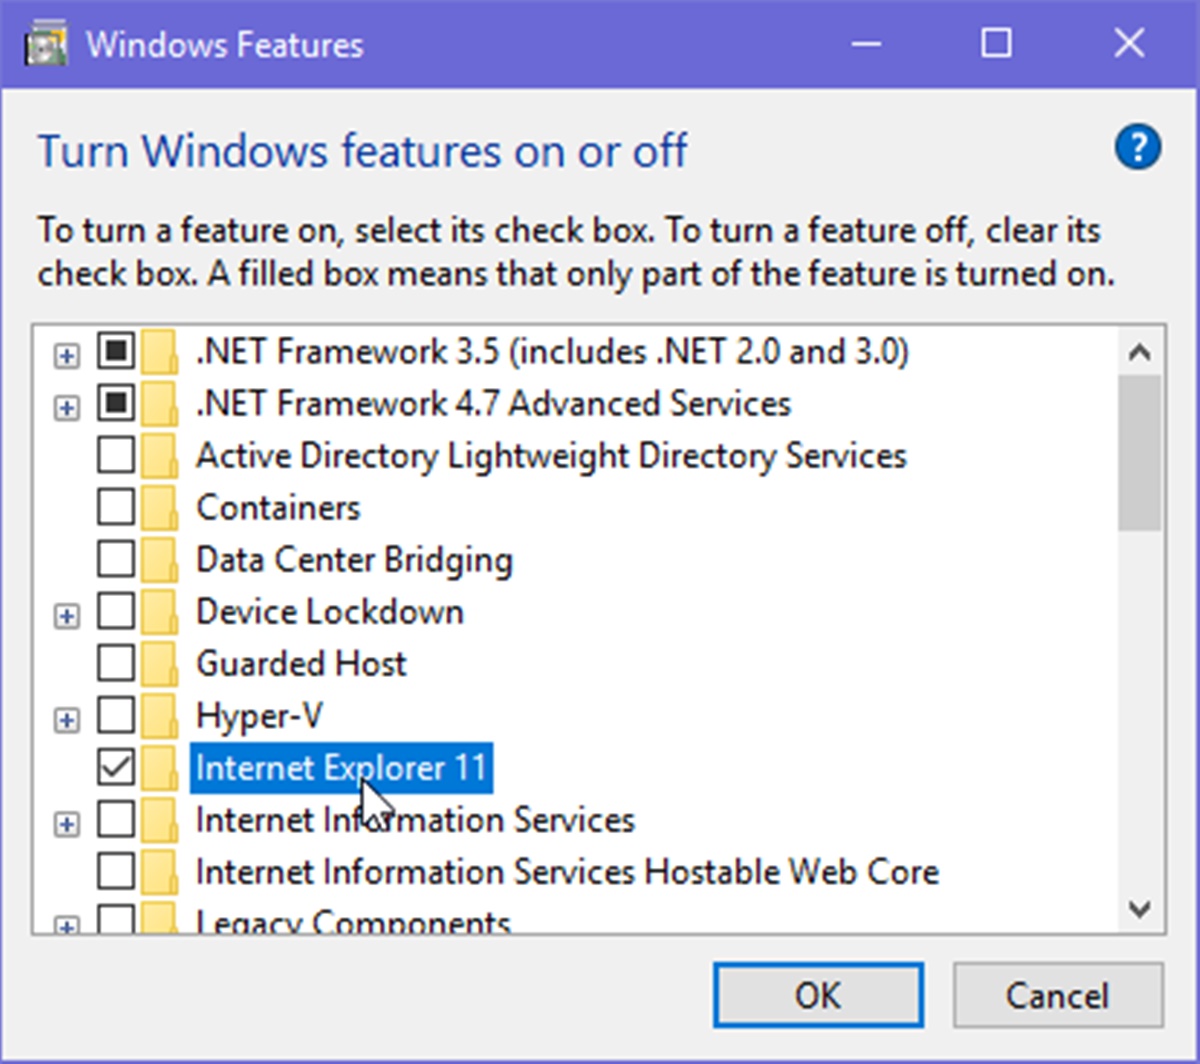
- In the left sidebar, click on the “Turn Windows features on or off” link. This will open the Windows Features dialog box.
- Scroll down until you find the entry for Internet Explorer 11. Uncheck the box next to it to disable Internet Explorer.
- Click “OK” and wait for Windows to make the necessary changes. This may take a moment.
- Once the process is complete, you will be prompted to restart your computer. Click “Restart Now” to apply the changes.
After your computer restarts, Internet Explorer will be disabled. You can still access it if needed by following the same steps and re-checking the box next to Internet Explorer 11 in the Windows Features dialog box.
Keep in mind that disabling Internet Explorer does not remove it from your computer; it simply prevents it from being the default browser and stops it from launching automatically. If you no longer want to keep Internet Explorer on your Windows 10 system, you can choose to uninstall it using the methods described in the next section.
How to Uninstall Internet Explorer on Windows 7 and 8
If you’re using Windows 7 or 8 and want to completely remove Internet Explorer from your computer, you can follow these steps:
- Click on the Start button and open the Control Panel.
- In the Control Panel window, click on “Programs” or “Programs and Features”.
- In the list of installed programs, locate and click on “Turn Windows features on or off”.
- In the Windows Features dialog box that appears, find Internet Explorer in the list of features.
- Uncheck the box next to Internet Explorer to remove it from your system.
- Click “OK” and wait for the uninstallation process to complete. This may take a few minutes.
- Once the process is finished, you will be prompted to restart your computer. Click “Restart Now” to apply the changes.
After your computer restarts, Internet Explorer will be completely uninstalled from your Windows 7 or 8 system. You will no longer have access to the browser unless you choose to reinstall it at a later time.
It’s worth noting that uninstalling Internet Explorer may have an impact on certain system functionalities that rely on the browser. Some applications and web services may not function correctly without Internet Explorer being present on your system.
If you encounter any issues after uninstalling Internet Explorer or if you change your mind and wish to reinstall it, you can do so by following the steps outlined in the next section.
How to Reinstall Internet Explorer
If you’ve previously uninstalled Internet Explorer from your Windows computer and now wish to reinstall it, you can do so by following these steps:
- Open a web browser on your computer, such as Microsoft Edge or a third-party browser like Google Chrome or Mozilla Firefox.
- Visit the official Microsoft website and navigate to the download page for Internet Explorer.
- On the download page, select the appropriate version of Internet Explorer for your operating system and click on the download link.
- Once the download is complete, locate the installation file in your computer’s Downloads folder or the location where you saved it.
- Double-click on the installation file to start the installation process.
- Follow the on-screen instructions provided by the Internet Explorer installer. These instructions may vary depending on the version of Windows you’re using.
- After the installation is complete, you may be prompted to restart your computer. If so, save any unsaved work and click “Restart Now” to apply the changes.
Upon restarting your computer, the newly installed version of Internet Explorer will be available on your system. You can launch it from the Start menu or by searching for “Internet Explorer” in the search bar.
Remember that reinstalling Internet Explorer does not automatically set it as the default browser. If you want to make Internet Explorer your default browser, you can do so by going to the browser’s settings and configuring the necessary options.
Reinstalling Internet Explorer can be useful if you require specific features or compatibility with certain websites or applications that rely on the browser. However, keep in mind that many users have moved on to alternative browsers due to Internet Explorer’s performance and security issues.
Troubleshooting Issues with Internet Explorer Removal
While uninstalling or removing Internet Explorer from your Windows system should be a straightforward process, you may encounter some issues along the way. Here are a few common problems that users may face and potential solutions:
1. Internet Explorer cannot be found in Programs and Features: If you cannot locate Internet Explorer in the Programs and Features list, it is possible that it has already been uninstalled or disabled. In this case, there may be no further action required.
2. Error messages during the uninstallation process: If you receive error messages or encounter problems during the uninstallation process, try running the process as an administrator. Right-click on the Control Panel or the Internet Explorer uninstallation option and select “Run as administrator” to see if that resolves the issue.
3. Uninstallation process does not complete or freezes: If the uninstallation process gets stuck or does not complete, you can try restarting your computer and running the uninstallation process again. If the issue persists, you may need to seek technical support or consult Microsoft’s official documentation for further troubleshooting steps.
4. System functionalities are affected after uninstalling Internet Explorer: Some applications or system functionalities may rely on Internet Explorer being present on your Windows system. If you notice any issues with certain programs or services after uninstalling Internet Explorer, consider reinstalling the browser or seeking alternative solutions recommended by the affected applications or services.
5. Internet Explorer reverts to a previous version after uninstallation: In some cases, Internet Explorer may automatically revert to a previous version after uninstallation. To prevent this, ensure that you have the latest version of Windows installed on your system and regularly update your operating system.
If you encounter any other difficulties or issues while removing Internet Explorer, it is recommended to consult Microsoft’s official support channels or community forums for assistance. The Windows support team can provide specific guidance based on your system configuration and any error messages you encounter.
Remember that removing Internet Explorer is an optional action, and it may affect certain system functionalities or applications. Therefore, it is essential to weigh the pros and cons before deciding to uninstall the browser, considering your specific needs and requirements.