
Why Remove Norton Internet Security?
Norton Internet Security is a popular antivirus program designed to protect your computer from various online threats such as viruses, malware, and phishing attacks. While it offers robust security features, there might be instances when you need to remove Norton Internet Security from your computer. Here are a few reasons why you might consider removing this software:
Switching to a Different Antivirus Solution: You may have decided to switch to a different antivirus program that better suits your needs. Whether it’s due to personal preference, performance issues, or pricing considerations, removing Norton Internet Security allows you to install and use a different antivirus solution.
Conflicts with Other Software: Some users have reported compatibility issues when installing Norton Internet Security alongside certain software applications. These conflicts can result in system slowdowns, crashes, or other performance issues. In such cases, removing Norton Internet Security can help resolve these conflicts and ensure smooth operation of your computer.
Software Upgrade or Downgrade: When upgrading or downgrading your operating system, it’s important to check if Norton Internet Security is compatible with the new version. In some cases, the software may not be supported, requiring you to remove it before proceeding with the upgrade or downgrade.
Unwanted Pop-ups and Notifications: While Norton Internet Security provides real-time protection, some users may find the constant pop-ups and notifications intrusive. If you prefer a less intrusive antivirus solution or simply want to minimize distractions, removing Norton Internet Security can help achieve a more streamlined experience.
System Performance Issues: Although Norton Internet Security is known for its comprehensive protection, some users have reported that it can impact system performance. If you notice that your computer is significantly slower or experiences frequent freezes, removing Norton Internet Security may alleviate these performance issues.
Expired or Unutilized Subscription: If you have an expired Norton Internet Security subscription or have decided not to renew it, removing the software ensures that it is no longer running and consuming system resources unnecessarily.
These are just a few reasons why you might consider removing Norton Internet Security from your computer. It’s important to make an informed decision based on your specific circumstances and needs. Whether you’re switching to a different antivirus program, resolving software conflicts, or optimizing system performance, the following methods will guide you through the process of removing Norton Internet Security.
Preparing to Remove Norton Internet Security
Before you begin the process of removing Norton Internet Security from your computer, it’s important to take a few preparatory steps to ensure a smooth and successful uninstallation. Here are some key considerations:
Back Up Your Data: While removing Norton Internet Security should not result in data loss, it’s always a good practice to back up any important files, documents, or personal data before making any changes to your system. This provides an extra layer of protection and peace of mind.
Save Product Key or Subscription Information: If you plan on reinstalling Norton Internet Security in the future or transferring your subscription to another device, make sure to save your product key or subscription information. This will allow you to easily activate the software when needed.
Close Other Programs: Before uninstalling Norton Internet Security, close all other running programs on your computer. This will minimize potential conflicts and ensure a smooth uninstallation process.
Disconnect from the Internet: To prevent any interruptions or potential security threats during the uninstallation process, it is recommended to disconnect your computer from the internet. This will ensure that Norton Internet Security is not actively monitoring or receiving updates while you remove it.
Review Norton Internet Security Documentation: Familiarize yourself with the official documentation provided by Norton for uninstalling their software. This will give you a better understanding of the specific steps involved and any additional recommendations or requirements.
Temporarily Disable Other Security Software: If you have any other antivirus or security software installed on your computer, it’s important to temporarily disable them to prevent any potential conflicts during the uninstallation process. Once Norton Internet Security has been successfully removed, you can re-enable your other security software.
Make Note of Any Error Messages: If you encounter any error messages or issues while attempting to uninstall Norton Internet Security, take note of them. These details can be useful if you need to seek further assistance from Norton’s support team or online forums.
By following these preparatory steps, you can ensure a hassle-free removal of Norton Internet Security from your computer. Once you are ready, you can proceed with one of the following methods to uninstall the software completely and effectively.
Method 1: Uninstalling Norton Internet Security through Control Panel
The easiest way to remove Norton Internet Security from your computer is through the Control Panel. Follow these step-by-step instructions:
- Open the Control Panel on your computer. You can usually access it by clicking on the Start button and selecting Control Panel from the menu.
- In the Control Panel, locate and click on the “Programs” or “Programs and Features” option. This will display a list of installed programs on your computer.
- Scroll through the list and find Norton Internet Security. Click on it to select it.
- Click on the “Uninstall” or “Remove” button at the top of the list. This will initiate the uninstallation process.
- Follow the on-screen prompts to complete the uninstallation. The process may take a few minutes to complete.
- Once the uninstallation is finished, restart your computer to fully remove Norton Internet Security.
It is important to note that the steps provided here may vary slightly depending on your version of Windows. If you encounter any difficulties or the uninstallation process does not proceed as expected, refer to the official Norton documentation or seek assistance from their customer support.
After restarting your computer, Norton Internet Security should be completely removed. However, it is always a good idea to perform a thorough check to ensure all remnants of the software have been successfully eliminated.
Overall, the Control Panel method is a straightforward and user-friendly way to remove Norton Internet Security from your computer. If you prefer a more automated and comprehensive removal process, you can explore the next method using the Norton Remove and Reinstall Tool.
Method 2: Using the Norton Remove and Reinstall Tool
If the Control Panel method did not successfully remove Norton Internet Security from your computer, you can try using the Norton Remove and Reinstall Tool. This tool is specifically designed to completely remove Norton software from your system. Follow these steps:
- First, download the Norton Remove and Reinstall Tool from the official Norton website. Save the file to a location on your computer where you can easily access it.
- Once the download is complete, locate the file and double-click on it to run the tool. If prompted, give the necessary permissions to make changes to your computer.
- When the tool opens, you will see the License Agreement. Read the agreement carefully, and if you agree to the terms, click on the “Agree & Install” button.
- Wait for the tool to uninstall Norton Internet Security completely from your computer. This may take some time, so be patient and avoid interrupting the process.
- Once the uninstallation is complete, the tool will automatically reinstall the latest version of Norton Internet Security, or the Norton product you had previously installed. This step is important to ensure that your computer remains protected.
- After the reinstallation is finished, restart your computer to complete the process.
The Norton Remove and Reinstall Tool provides a comprehensive removal and reinstallation process, which can help resolve any issues encountered during the standard uninstallation process. However, keep in mind that running this tool will remove all Norton products from your system, not just Norton Internet Security.
If you experience any difficulties or the tool fails to remove Norton Internet Security, it is recommended to contact Norton’s customer support for further assistance. They can provide you with specialized guidance to ensure a successful removal.
Using the Norton Remove and Reinstall Tool can be an effective solution when the Control Panel method is unable to uninstall Norton Internet Security completely. If you prefer a manual approach, you can explore the next method, which involves manually removing the software components.
Method 3: Manually Removing Norton Internet Security
If the previous methods did not completely remove Norton Internet Security from your computer, you can try manually removing the software components. Keep in mind that manual removal requires a bit more technical knowledge, so proceed with caution. Here’s how you can manually remove Norton Internet Security:
- Before you begin, make sure to close all running programs on your computer, including Norton Internet Security.
- Press the Windows Key + R on your keyboard to open the Run dialog box. Type in “regedit” and hit Enter. This will open the Registry Editor.
- In the Registry Editor, navigate to the following locations:
- HKEY_CURRENT_USER\Software\
- HKEY_LOCAL_MACHINE\SOFTWARE\
- HKEY_USERS\.DEFAULT\Software\
- Under each of these locations, look for any entries related to Norton Internet Security or Symantec, and delete them. Right-click on the entry and select “Delete”.
- Next, open the File Explorer on your computer and navigate to the following locations:
- C:\Program Files\
- C:\Program Files (x86)\ (if applicable)
- C:\ProgramData\
- C:\Users\YourUserName\AppData\Local\
- C:\Users\YourUserName\AppData\Roaming\
- In each of these locations, look for any folders or files related to Norton Internet Security or Symantec, and delete them.
- Once you have deleted all the relevant registry entries, folders, and files, restart your computer.
It’s important to note that making changes to the Windows Registry can have unintended consequences if not done correctly. If you are uncomfortable or unsure about manually editing the registry, it is recommended to use one of the earlier methods or seek expert assistance.
After restarting your computer, Norton Internet Security should be completely removed. To ensure that there are no remnants of the software left behind, you can perform a thorough scan using an antivirus program and a malware removal tool.
Manual removal is an advanced method that should be used with caution. If you are not confident in your technical abilities, it is recommended to seek assistance from Norton’s customer support or consult with a knowledgeable professional.
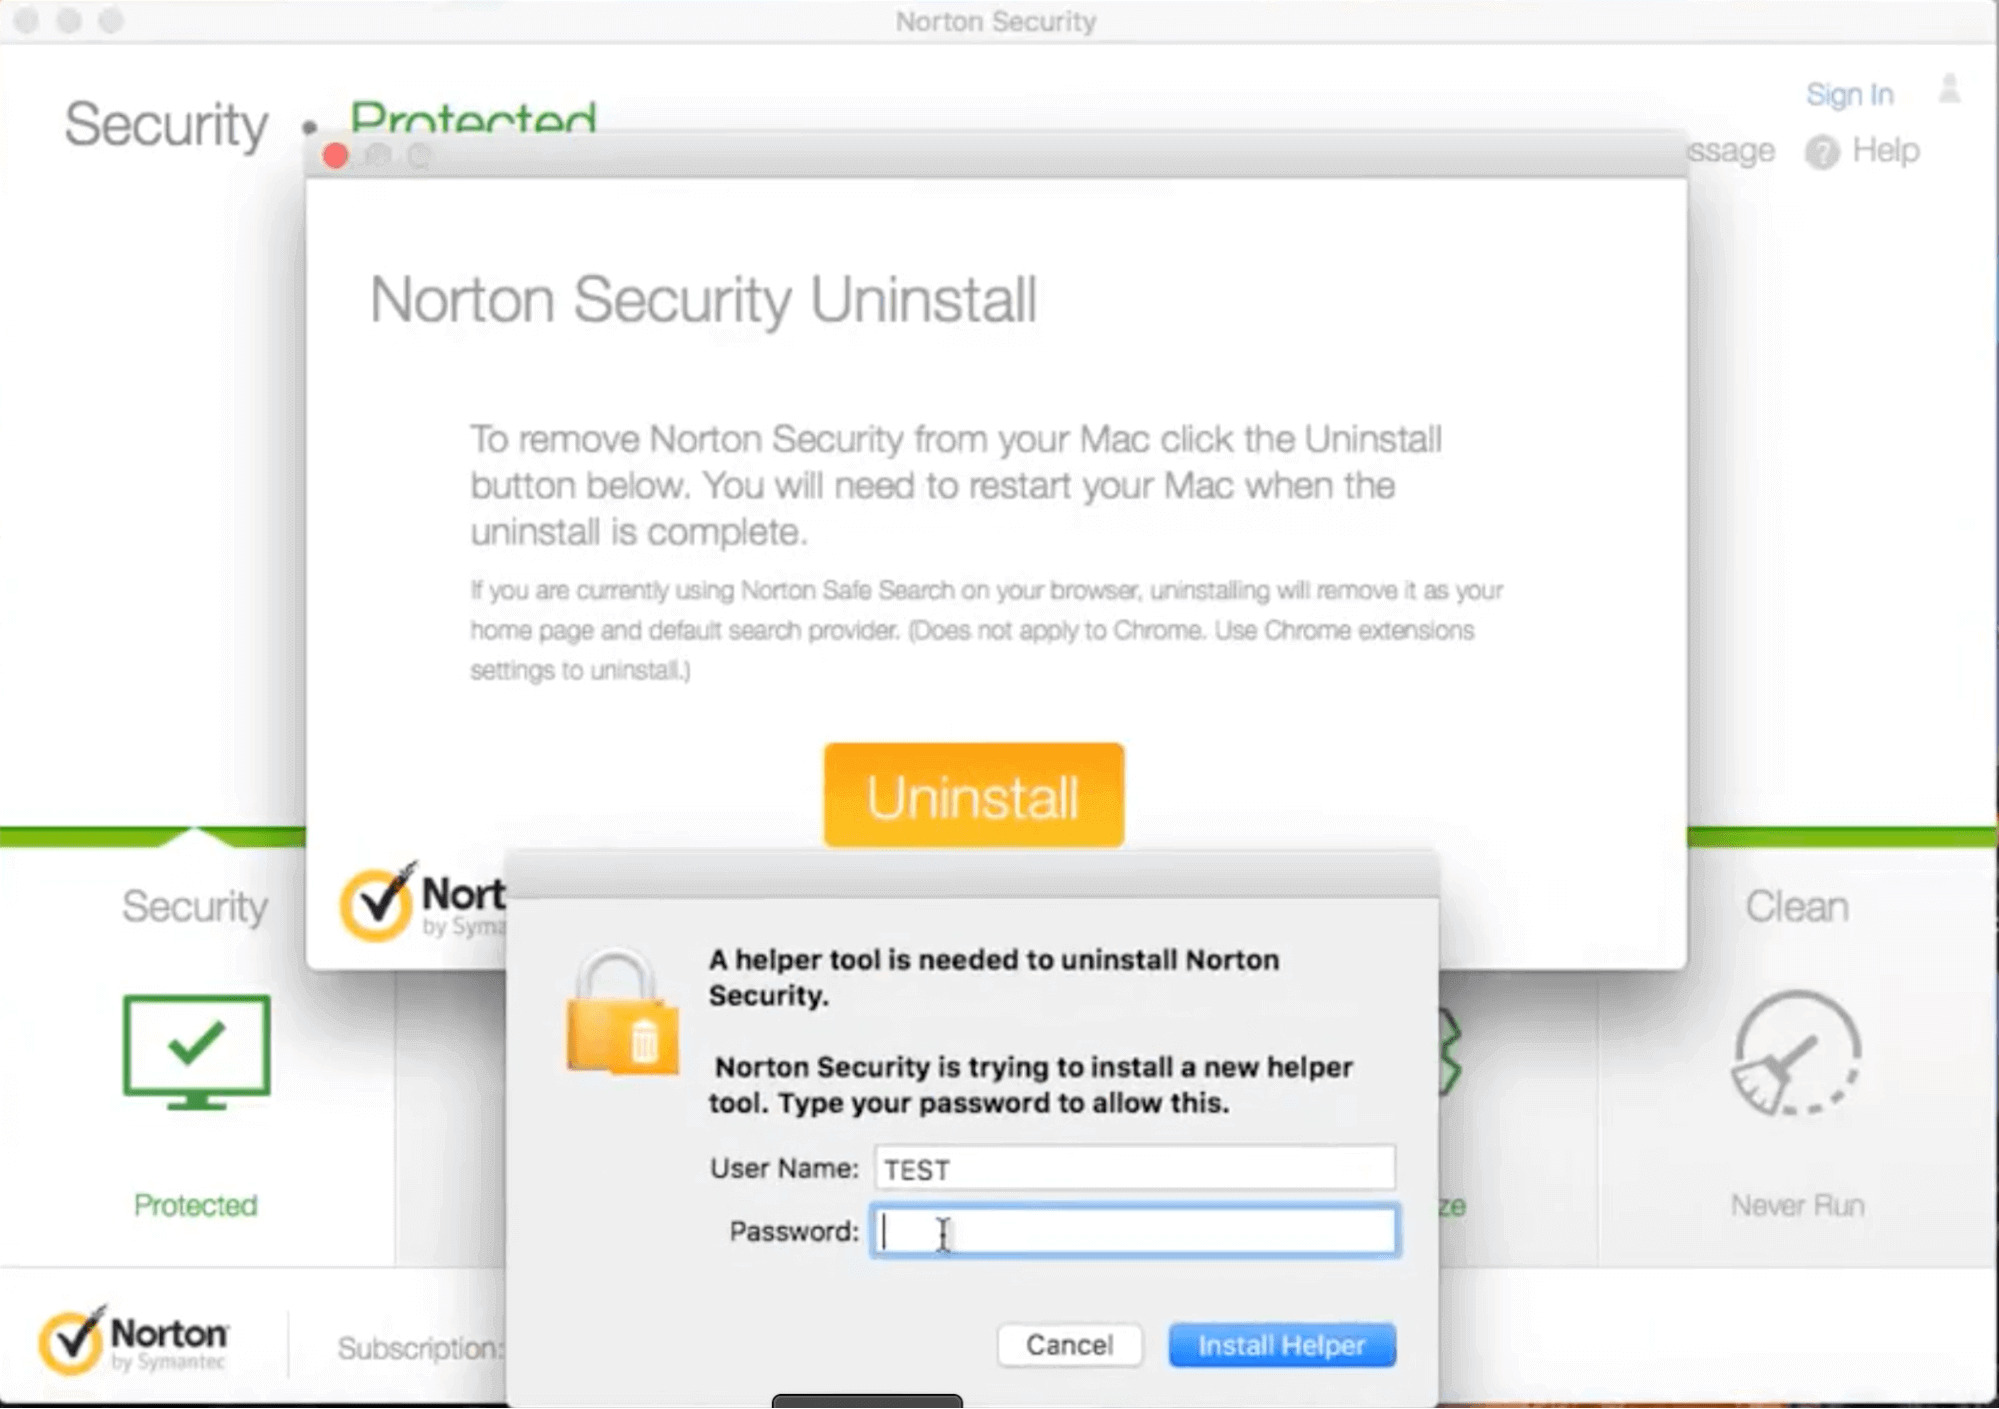
Method 4: Removing Norton Internet Security on Mac
If you’re using a Mac computer and want to remove Norton Internet Security, follow these steps:
- Quit Norton Internet Security by clicking on the Norton icon in the menu bar and selecting “Quit Norton.”
- Open the Finder application on your Mac.
- In the Finder menu, click on “Go” and select “Applications.”
- Locate the Norton Internet Security application in the Applications folder.
- Drag the Norton Internet Security application to the Trash icon on your desktop or right-click on it and select “Move to Trash.”
- Enter your Mac administrator password when prompted.
- In Finder, click on “Go” again, but this time select “Go to Folder.”
- Type in “/Library” and click “Go.”
- In the Library folder, locate and open the “Application Support” folder.
- Find the Norton Security folder and drag it to the Trash.
- Go back to the Library folder and open the “Preferences” folder.
- Find any Norton-related files or folders and drag them to the Trash.
- Empty the Trash by right-clicking on the Trash icon and selecting “Empty Trash.”
After completing these steps, Norton Internet Security should be completely removed from your Mac computer. It’s recommended to restart your Mac to ensure that all remnants of the software are eliminated.
If you encounter any difficulties during the removal process or if there are any Norton-related files or folders that you can’t delete, you can visit the official Norton Support website or contact their customer support for further assistance.
By following these steps, you can successfully remove Norton Internet Security from your Mac and free up valuable system resources. If you decide to install a different antivirus software, make sure to download and install it from a reliable source to ensure the security and protection of your Mac.
Additional Tips and Considerations
When removing Norton Internet Security from your computer, there are some additional tips and considerations to keep in mind:
- Restart Your Computer: After uninstalling Norton Internet Security, it’s important to restart your computer. This ensures that any residual files or processes associated with the software are completely cleared from your system.
- Temporary Disabling Firewall: Keep in mind that removing Norton Internet Security will also disable its firewall protection. If you haven’t installed another firewall solution, consider enabling the default Windows Firewall or installing a different firewall program for continued protection.
- Regularly Update Your Antivirus Software: Whether you switch to a different antivirus program or continue using Norton Internet Security, remember to regularly update your antivirus software. This ensures that your computer is protected against the latest threats.
- Scan for Malware After Removal: After removing Norton Internet Security, it’s a good practice to perform a full scan using a reputable malware removal tool. This helps identify any potentially harmful files or programs that might have been missed during the uninstallation process.
- Keep Your Operating System Updated: Keeping your operating system up to date with the latest security patches is crucial. Regularly check for updates and install them to ensure the overall security of your computer.
- Consider Professional Assistance: If you encounter any difficulties during the removal process, or if you’re unsure about making any changes to your system, it’s advisable to seek assistance from professional technicians or Norton’s customer support. They can provide expert guidance and ensure a successful removal.
- Read Documentation and Release Notes: Always refer to the official Norton documentation and release notes for specific uninstallation instructions, compatibility information, and any known issues related to your product and version.
By following these tips and considerations, you can safely and effectively remove Norton Internet Security from your computer. It’s always important to activate and maintain an updated antivirus program to protect your system from potential threats and ensure a secure computing experience.