
Step 1: Launch Norton Internet Security
When it comes to safeguarding your computer from online threats, Norton Internet Security is a trusted name in the industry. To ensure that you are fully protected, it is important to know how to properly launch and configure the software. In this step-by-step guide, we will walk you through the process of launching Norton Internet Security.
The first step is to locate the Norton Internet Security icon on your desktop or in your program files. Once you have found the icon, double-click on it to launch the program.
After launching the program, you will be greeted with the Norton Internet Security main window. This window will provide you with an overview of your computer’s security status, as well as easy access to various features and settings.
If you are launching Norton Internet Security for the first time, you may be prompted to activate your product. Simply follow the on-screen instructions to activate your software using the provided product key. This step is crucial to ensure that you have access to all the features and updates that Norton Internet Security has to offer.
Once you have activated your product, you will have full access to the features and settings of Norton Internet Security. It is recommended to explore these options and configure them according to your specific needs and preferences.
Before proceeding to the next step, it is important to make sure that your Norton Internet Security software is up to date. To do this, click on the “LiveUpdate” option in the main window. This will check for any available updates and install them if necessary. Keeping your software up to date is vital in order to stay protected against the latest security threats.
In this step, we have covered the process of launching Norton Internet Security and ensuring that your software is activated and up to date. In the next step, we will discuss how to access the settings menu and configure the various security options.
Step 2: Access the Settings menu
Once you have launched Norton Internet Security, the next step is to access the Settings menu. This is where you can configure and customize the various security options to suit your specific needs. Here is how you can access the Settings menu:
1. In the Norton Internet Security main window, look for the “Settings” option. It is usually located in the upper-right corner of the window. Click on it to open the Settings menu.
2. In the Settings menu, you will find a list of different categories on the left-hand side. These categories include items such as “General,” “Firewall,” “Identity Protection,” “Web Protection,” and more. Click on a category to expand it and view the available options.
3. Within each category, you can further customize the settings by clicking on the specific feature or option. For example, if you click on the “Firewall” category, you will see options like “Smart Firewall,” “Intrusion and Browser Protection,” and “Advanced Settings.” Click on any of these options to modify their settings.
4. As you navigate through the various categories and options, take your time to review and adjust the settings according to your preferences. You can enable or disable specific features, set up exclusions, customize notifications, and more.
5. Don’t forget to click on the “Apply” or “Save” button after making any changes to ensure that your new settings are implemented.
By accessing the Settings menu in Norton Internet Security, you have full control over the security configurations of your software. This allows you to customize your protection according to your specific needs and preferences. In the next step, we will discuss how to turn on the important feature of real-time protection.
Step 3: Turn on Real-Time Protection
In Norton Internet Security, real-time protection is a crucial feature that continuously monitors your computer for any potential threats and takes immediate action to block or remove them. Turning on real-time protection ensures that your system is actively protected at all times. Here’s how you can enable real-time protection:
1. In the Norton Internet Security main window, click on the “Settings” option located in the upper-right corner.
2. In the Settings menu, select “General” from the list of categories on the left-hand side.
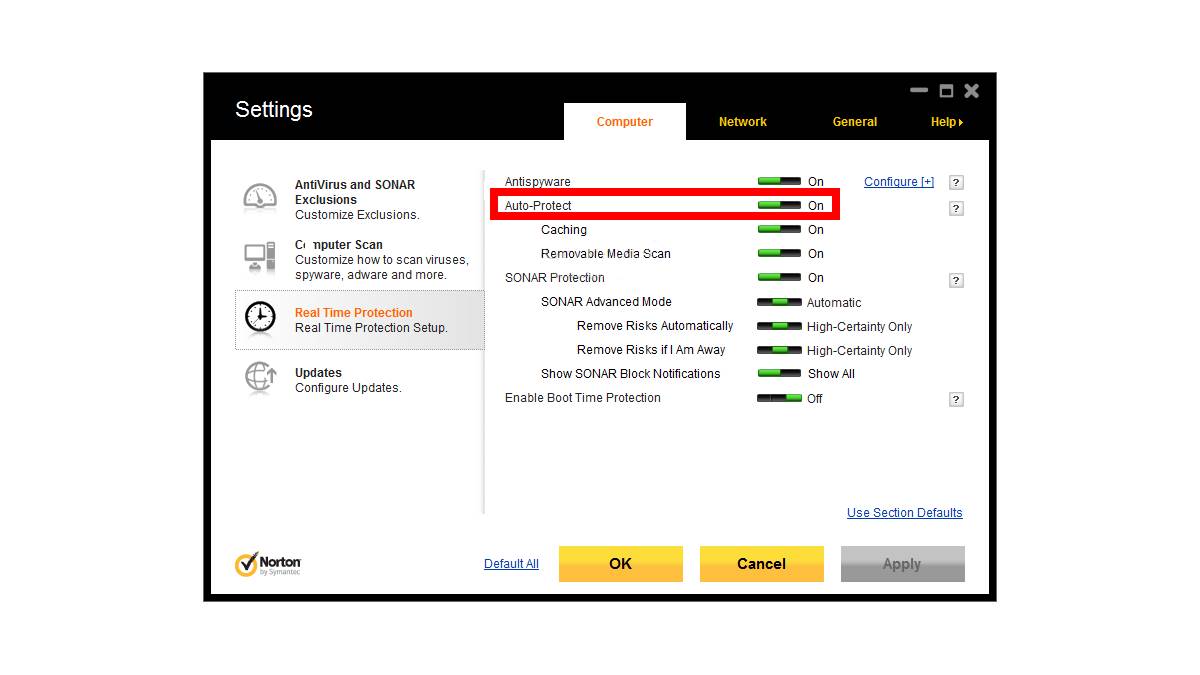
3. Look for the option labeled “Real-Time Protection” or similar wording. It is usually located in the main window, under the “General” category.
4. To turn on real-time protection, simply toggle the switch or checkbox next to the option. It should change from “Off” or “Disabled” to “On” or “Enabled.”
5. Once you have enabled real-time protection, Norton Internet Security will start actively monitoring your system for any suspicious activities or files. It will automatically block and remove any threats it detects in real-time, keeping your computer safe from malware, viruses, and other digital dangers.
It is important to note that real-time protection works alongside other security features in Norton Internet Security, such as the firewall and web protection. By enabling real-time protection, you create multiple layers of defense to safeguard your computer from various online threats. This proactive approach ensures that cyber threats are detected and addressed before they can cause harm.
Turning on real-time protection in Norton Internet Security is a vital step in securing your computer. In the next step, we will discuss how to activate firewall protection, which adds an additional layer of security by controlling network traffic.
Step 4: Activate Firewall Protection
In today’s digital landscape, protecting your computer from unauthorized access and network threats is of utmost importance. Norton Internet Security offers robust firewall protection that acts as a barrier between your computer and the outside world, monitoring and controlling incoming and outgoing network traffic. Activating firewall protection adds an extra layer of security to your system. Here’s how you can enable firewall protection in Norton Internet Security:
1. Launch Norton Internet Security by double-clicking the icon on your desktop or in your program files.
2. In the main window, click on “Settings” located in the upper-right corner.
3. From the list of categories on the left-hand side, select “Firewall.”
4. In the Firewall settings, you will find options like “Smart Firewall,” “Intrusion and Browser Protection,” and “Advanced Settings.”
5. Toggle the switch or checkbox next to “Smart Firewall” to activate it. The switch should change from “Off” or “Disabled” to “On” or “Enabled.”
6. If desired, you can also customize the firewall settings by clicking on “Advanced Settings” or other relevant options. This allows you to configure specific rules and permissions for different applications and network connections.
7. Remember to click on “Apply” or “Save” to save any changes you’ve made to the firewall settings.
Once you’ve activated firewall protection in Norton Internet Security, it will start monitoring network traffic and automatically block any unauthorized access or suspicious activities. This helps to prevent hackers, malware, and other cyber threats from gaining access to your computer and sensitive data.
Firewall protection is an essential component of your overall computer security. It acts as a shield that sits between your network and the outside world, ensuring that only authorized and safe connections are allowed. By activating firewall protection in Norton Internet Security, you add an extra layer of defense to your system and enhance your online safety.
In the next step, we will explore how to enable automatic updates to ensure that your Norton Internet Security software is always up to date with the latest security patches and definitions.
Step 5: Enable Automatic Updates
Keeping your Norton Internet Security software up to date is crucial in ensuring that you have the latest protection against emerging threats. Norton provides regular updates that include important security patches and definitions to keep your system secure. Enabling automatic updates ensures that you receive these updates without any manual intervention. Here’s how you can enable automatic updates:
1. Launch Norton Internet Security by double-clicking the icon on your desktop or in your program files.
2. In the main window, click on “Settings” located in the upper-right corner.
3. From the list of categories on the left-hand side, select “General.”
4. Look for the option labeled “Automatic Updates” or similar wording. It is typically located in the “General” category.
5. To enable automatic updates, toggle the switch or checkbox next to the option. It should change from “Off” or “Disabled” to “On” or “Enabled.”
6. Once you have enabled automatic updates, Norton Internet Security will now regularly check for updates and install them automatically in the background.
Enabling automatic updates is vital as it ensures that your Norton Internet Security software is always equipped with the latest security patches and definitions. These updates help to safeguard your system against new and emerging threats, providing you with the highest level of protection.
Automatic updates not only keep your security software up to date but also save you time and effort. You no longer need to manually check for updates or worry about missing crucial security patches. Norton Internet Security takes care of this for you, allowing you to have peace of mind knowing that your system is constantly protected.
In the next step, we will discuss how to adjust scan options to customize your scanning preferences in Norton Internet Security.
Step 6: Adjust Scan Options
Norton Internet Security offers a variety of scanning options to thoroughly check your system for potential threats. By adjusting the scan options, you can customize the scanning process to meet your specific needs and preferences. Here’s how you can adjust the scan options in Norton Internet Security:
1. Launch Norton Internet Security by double-clicking the icon on your desktop or in your program files.
2. In the main window, click on “Settings” located in the upper-right corner.
3. From the list of categories on the left-hand side, select “Scans.”
4. In the “Scans” settings, you will find various scan options, such as “Full System Scan,” “Quick Scan,” “Custom Scan,” and more.
5. To adjust the scan options, click on the specific scan type you want to customize. For example, click on “Full System Scan” to modify its settings.
6. Inside the scan settings, you can configure aspects like the scan frequency, scan depth, file types to include or exclude, and more. Customize these options according to your requirements.
7. After adjusting the scan options, make sure to click on “Apply” or “Save” to save your changes.
By adjusting the scan options, you can optimize the scanning process in Norton Internet Security. This allows you to perform comprehensive scans as per your desired frequency and depth, ensuring that your system is thoroughly checked for any potential threats.
Customizing the scan options also enables you to exclude specific file types or folders from the scan, saving time and resources. This is helpful if you have files or directories that you trust and do not require regular scanning.
Adjusting the scan options in Norton Internet Security provides you with flexibility and control over how your system is scanned for potential threats. It allows you to tailor the scanning process to match your specific requirements, ensuring the optimal balance between thorough protection and system performance.
In the next step, we will explore how to customize web protection settings to enhance your online safety with Norton Internet Security.
Step 7: Customize Web Protection Settings
In the digital age, web protection is crucial to prevent malicious websites, phishing attempts, and other online threats. Norton Internet Security provides powerful web protection features that keep you safe while browsing the internet. Customizing the web protection settings allows you to tailor the level of protection to your liking. Here’s how you can customize the web protection settings in Norton Internet Security:
1. Launch Norton Internet Security by double-clicking the icon on your desktop or in your program files.
2. In the main window, click on “Settings” located in the upper-right corner.
3. From the list of categories on the left-hand side, select “Web Protection.”
4. In the “Web Protection” settings, you will find various options to customize your web protection preferences.
5. Look for features such as “Safe Web,” “Phishing Protection,” “Download Intelligence,” and more.
6. To customize a specific web protection feature, click on the corresponding option and adjust its settings according to your preferences.
7. Within each web protection feature, you can typically find options to enable or disable certain functionalities, choose the level of protection, and customize specific website exclusions or inclusions.
8. After customizing the web protection settings, click on “Apply” or “Save” to save your changes.
By customizing the web protection settings in Norton Internet Security, you can enhance your online safety and protect yourself from various threats.
For example, enabling the “Safe Web” feature helps to identify and block dangerous websites, ensuring that you don’t accidentally visit malicious or compromised sites. The “Phishing Protection” feature guards against phishing scams by detecting and blocking fraudulent websites that attempt to steal your personal information.
Customizing the “Download Intelligence” feature allows Norton Internet Security to analyze and evaluate downloaded files for potential risks before allowing them to run on your system. This adds an extra layer of protection against malware or viruses that may be disguised as harmless applications.
By customizing the web protection settings in Norton Internet Security, you can tailor your online security to suit your browsing habits and preferences. This allows you to navigate the internet with peace of mind, knowing that you are protected against various online threats.
In the next step, we will discuss how to enable email and spam filtering in Norton Internet Security to safeguard your inbox from unwanted and malicious messages.
Step 8: Enable Email and Spam Filtering
In Norton Internet Security, enabling email and spam filtering is crucial to protect your inbox from unwanted and potentially malicious messages. The email and spam filtering feature scans incoming emails, identifies spam, and blocks dangerous attachments or links. By enabling this feature, you can ensure a safer email experience. Here’s how you can enable email and spam filtering in Norton Internet Security:
1. Launch Norton Internet Security by double-clicking the icon on your desktop or in your program files.
2. In the main window, click on “Settings” located in the upper-right corner.
3. From the list of categories on the left-hand side, select “Email.”
4. In the “Email” settings, you will find options related to email and spam filtering.
5. Look for features such as “Email Antivirus Scan,” “Spam Filtering,” “Attachment Protection,” and more.
6. To enable email and spam filtering, toggle the switch or checkbox next to the desired feature. It should change from “Off” or “Disabled” to “On” or “Enabled.”
7. After enabling the email and spam filtering features, make sure to click on “Apply” or “Save” to save your changes.
Enabling email and spam filtering in Norton Internet Security enhances the security of your inbox. The “Email Antivirus Scan” feature scans all incoming emails and attachments for potential threats, ensuring that any malicious files are detected and blocked.
The “Spam Filtering” feature helps to automatically identify and filter out unsolicited and potentially harmful messages, reducing the clutter and protecting you from phishing attempts or scams.
With “Attachment Protection” enabled, Norton Internet Security will specifically scan email attachments for any signs of malware or viruses, preventing them from reaching your system and causing harm.
By enabling email and spam filtering in Norton Internet Security, you can have peace of mind knowing that your inbox is safeguarded against unwanted and potentially dangerous messages.
In the next step, we will discuss how to turn on the identity protection features in Norton Internet Security to safeguard your personal information and prevent identity theft.
Step 9: Turn on Identity Protection Features
Protecting your personal information and preventing identity theft should be a top priority when using your computer. Norton Internet Security offers robust identity protection features that help safeguard your sensitive data from being compromised. By turning on these features, you can add an extra layer of security to your online activities. Here’s how you can enable the identity protection features in Norton Internet Security:
1. Launch Norton Internet Security by double-clicking the icon on your desktop or in your program files.
2. In the main window, click on “Settings” located in the upper-right corner.
3. From the list of categories on the left-hand side, select “Identity Protection.”
4. In the “Identity Protection” settings, you will find various options related to protecting your personal information.
5. Look for features such as “Identity Safe,” “Password Manager,” “Browser Protection,” and more.
6. To turn on the identity protection features, toggle the switch or checkbox next to the desired feature. It should change from “Off” or “Disabled” to “On” or “Enabled.”
7. After enabling the identity protection features, make sure to click on “Apply” or “Save” to save your changes.
Enabling the identity protection features in Norton Internet Security helps safeguard your personal information from being compromised. The “Identity Safe” feature securely stores and manages your login credentials, credit card information, and other sensitive data, protecting them from unauthorized access.
The “Password Manager” feature allows you to generate strong and unique passwords for your online accounts, reducing the risk of password-related breaches. It also syncs your passwords across devices for ease of use and accessibility.
Browser Protection features, such as anti-phishing and safe search, help protect you from malicious websites and prevent your personal information from being intercepted while browsing the internet.
By turning on the identity protection features in Norton Internet Security, you can have peace of mind knowing that your personal information is secure and your online activities are guarded against potential threats.
In the next step, we will discuss how to enable parental control settings in Norton Internet Security to keep your children safe while using the internet.
Step 10: Enable Parental Control Settings
As a responsible parent, ensuring the safety and security of your children while they use the internet is crucial. Norton Internet Security offers robust parental control settings that allow you to monitor and control your child’s online activities. By enabling these settings, you can create a safe and age-appropriate digital environment for your children. Here’s how you can enable parental control settings in Norton Internet Security:
1. Launch Norton Internet Security by double-clicking the icon on your desktop or in your program files.
2. In the main window, click on “Settings” located in the upper-right corner.
3. From the list of categories on the left-hand side, select “Parental Controls.”
4. In the “Parental Controls” settings, you will find various options to customize the online experience for your children.
5. Look for features such as “Web Supervision,” “Time Supervision,” “Search Supervision,” and more.
6. To enable parental control settings, toggle the switch or checkbox next to the desired feature. It should change from “Off” or “Disabled” to “On” or “Enabled.”
7. After enabling the parental control settings, make sure to click on “Apply” or “Save” to save your changes.
Enabling parental control settings in Norton Internet Security allows you to monitor and control your child’s online activities. The “Web Supervision” feature enables you to block access to websites that may contain inappropriate content or pose a potential threat.
The “Time Supervision” feature allows you to set specific time limits for your child’s internet usage, ensuring that they have a healthy balance between screen time and other activities.
With “Search Supervision,” you can restrict access to explicit or adult-oriented search results, creating a safer online search experience for your child.
By enabling parental control settings, you can have peace of mind knowing that your children are protected and are accessing age-appropriate content while using the internet.
In the next step, we will discuss how to check for any pending tasks or notifications in Norton Internet Security to ensure a smooth and secure operation.
Step 11: Check for Any Pending Tasks or Notifications
Regularly checking for pending tasks and notifications in Norton Internet Security is essential to ensure that your software is running smoothly and remains up to date. Norton provides important alerts and notifications regarding security updates, scans, and other system tasks. By staying on top of these notifications, you can address any pending tasks promptly and maintain the optimal security of your system. Here’s how you can check for any pending tasks or notifications in Norton Internet Security:
1. Launch Norton Internet Security by double-clicking the icon on your desktop or in your program files.
2. In the main window, look for any banners, pop-ups, or notification icons that indicate there are pending tasks or notifications.
3. Click on the respective banner, pop-up, or notification icon to access the details of the pending task or notification.
4. Review the information provided in the notification to understand the nature of the task and any necessary action required from your end.
5. Follow the prompts or instructions given in the notification to address the pending task or complete any required action.
6. Once you have completed the necessary task or action, make sure to acknowledge or close the notification to remove it from your pending tasks.
Checking for pending tasks and notifications allows you to stay updated and ensure that your Norton Internet Security software is functioning optimally.
Pending tasks can include scheduled scans, unfinished updates, or other important security-related activities that require your attention. By promptly addressing these tasks, you can maintain the integrity of your system’s protection and ensure that you are up to date with the latest security measures.
It’s worth noting that Norton Internet Security may provide notifications for other important events as well, such as new security threats, subscription renewals, or account-related updates. These notifications serve as alerts to keep you informed and take timely action.
By regularly checking for and addressing any pending tasks or notifications in Norton Internet Security, you can proactively maintain the security and performance of your system.
Now that you have checked for any pending tasks or notifications, you are ready to exit the settings menu and enjoy secure and protected browsing with Norton Internet Security.
Step 12: Exit the Settings Menu and Enjoy Protected Browsing
After configuring and customizing the various settings and features of Norton Internet Security, it’s time to exit the settings menu and enjoy safe and protected browsing. Follow these simple steps to exit the settings menu:
1. In the Norton Internet Security main window, click on the “X” button or close button located in the upper-right corner.
2. If prompted, confirm that you want to exit the settings menu and apply any changes or updates you made.
3. Once you have exited the settings menu, you are now ready to browse the internet with confidence, knowing that Norton Internet Security is actively protecting your system.
With Norton Internet Security running in the background, you can enjoy a range of security features, such as real-time protection, firewall protection, email and spam filtering, identity protection, and more.
Real-time protection constantly monitors your computer, detecting and blocking any threats in real-time. The firewall protection acts as a barrier between your system and potential network threats, preventing unauthorized access.
Email and spam filtering ensures that your inbox remains free from unwanted and potentially harmful messages, while identity protection features safeguard your personal information and prevent identity theft.
By following the steps outlined in this guide and configuring Norton Internet Security to meet your specific needs, you can browse the internet with peace of mind, knowing that your computer is protected against online threats.
Remember to periodically check for software updates and run regular scans to ensure that your system remains protected at all times. Norton Internet Security offers comprehensive security solutions to keep you safe in the ever-evolving digital landscape.
Now that you have successfully exited the settings menu, go ahead and explore the internet, knowing that your computer is equipped with the power of Norton Internet Security.