
Step 1: Connect your iPhone to your computer
Transferring music from your computer to your iPhone requires a physical connection between the two devices. To begin the process, follow these steps:
- Using the USB cable that came with your iPhone, connect one end to the iPhone and the other end to an available USB port on your computer. Make sure both devices are powered on and unlocked.
- Once connected, you may see a prompt on your iPhone’s screen asking for your permission to trust this computer. Tap “Trust” to proceed.
- On your computer, if iTunes doesn’t open automatically, launch the application. You can find iTunes on both macOS and Windows operating systems.
- In iTunes, you should see your iPhone icon on the upper left corner of the window. Click on it to access your iPhone’s settings and content management options.
- If you don’t see your iPhone icon, it’s possible that your computer doesn’t recognize the device. In this case, ensure that your USB cable is securely connected and try using a different USB port.
By connecting your iPhone to your computer, you establish a communication channel that allows you to transfer music files seamlessly. Once the connection is established, you can proceed to the next step of the process.
Step 2: Open iTunes on your computer
iTunes is the software designed by Apple that allows you to manage and sync your media files, including music, between your computer and iPhone. To continue with the music transfer process, follow these steps:
- If you haven’t already done so, install iTunes on your computer. You can download the latest version of iTunes from the Apple website or through the Microsoft Store if you’re using a Windows computer.
- Once iTunes is installed, launch the application by searching for it in your computer’s applications or by clicking on its icon in the taskbar or dock.
- If prompted, sign in to iTunes using your Apple ID. This step is necessary to authorize the transfer of music files to your iPhone.
- Once you have successfully opened iTunes, you will see its interface with various tabs and options. Familiarize yourself with this interface as it will be used throughout the music transfer process.
- Make sure your iPhone is still connected to your computer. You should see the iPhone icon displayed in the upper left corner of the iTunes window.
Opening iTunes on your computer is a crucial step to establish the connection between your iPhone and the application. By doing so, you will gain access to the necessary tools and settings required to transfer your desired music files.
Step 3: Choose the music you want to transfer
Before you can transfer music from your computer to your iPhone, you need to select the specific songs, albums, or playlists that you want to transfer. Follow these steps to choose the music you want to transfer:
- In the iTunes interface, navigate to the “Library” tab located at the top of the window. This is where all the music in your iTunes library is stored.
- Explore your iTunes library to find the music you want to transfer. You can organize your music by artists, albums, songs, genres, or playlists to make it easier to locate specific tracks.
- If you have already created playlists in iTunes, you can simply select the desired playlist(s) and proceed to the next step. To select multiple playlists, hold down the Ctrl key (Windows) or Command key (Mac) and click on each playlist.
- If you prefer to choose individual songs or albums, click on the desired artist or album to view its contents. Then, select the specific songs or albums you want to transfer by clicking on them. To select multiple items, hold down the Ctrl key (Windows) or Command key (Mac) and click on each item.
- As you select the music, you will notice a checkmark indicating your selection.
Take your time to curate the perfect collection of songs that you want to enjoy on your iPhone. Once you have made your selections, you are ready to add the chosen music to your iTunes library.
Step 4: Add the music to your iTunes library
Now that you have chosen the music you want to transfer to your iPhone, it’s time to add it to your iTunes library. Follow these steps to add the selected music:
- In the iTunes interface, make sure you are still in the “Library” tab.
- If you have selected playlists, albums, or individual songs, right-click on your selection and choose “Add to Library”. If you have selected multiple items, you can also press the right-click button on your mouse and select “Add to Library”.
- Alternatively, you can drag and drop your selected music directly into the iTunes window. Simply click and hold on the music files, drag them over to the iTunes window, and release the mouse button to drop them into your library.
- As you add the music to your library, iTunes will begin to import and organize the files. This process may take a few moments depending on the size and number of files you’re adding.
- Once the import is complete, you will see the newly added music displayed in your iTunes library under the respective category, such as playlists, albums, or songs.
Adding the music to your iTunes library is an essential step in preparing it for synchronization with your iPhone. By ensuring that the music is properly organized within your iTunes library, you can easily manage and transfer the selected songs to your device.
Step 5: Sync your iPhone with iTunes
Once you have added the desired music to your iTunes library, the next step is to sync your iPhone with iTunes to transfer the music files. Follow these steps to sync your iPhone:
- In the iTunes interface, click on the iPhone icon located in the upper left corner of the window. This will take you to the summary page of your iPhone’s settings within iTunes.
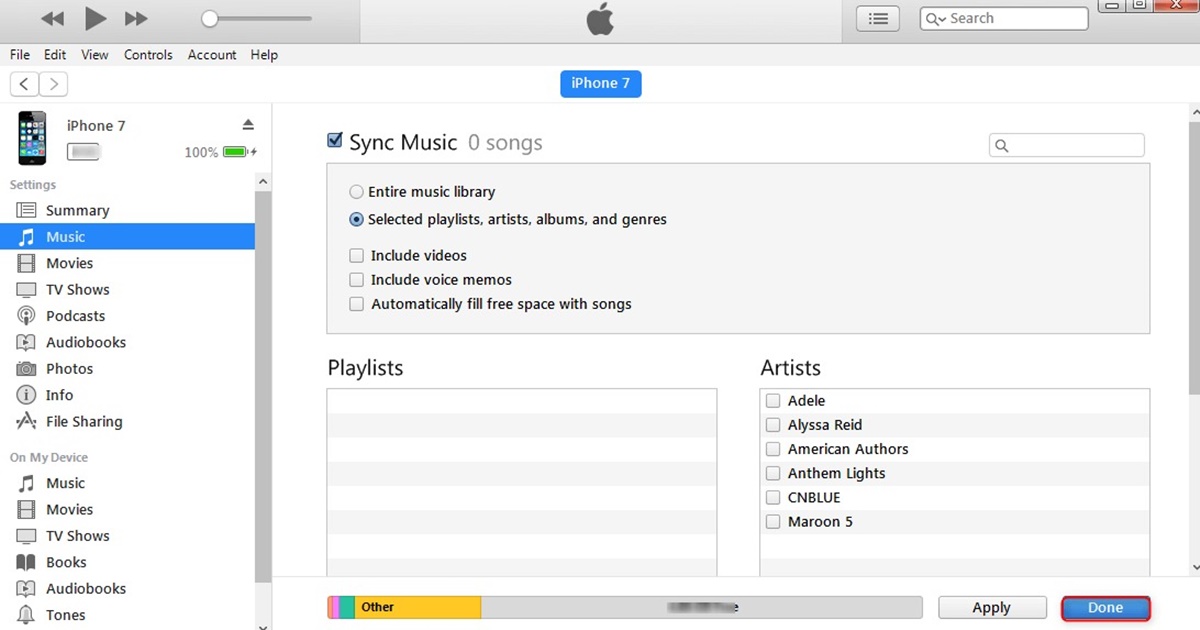
- On the left side of the summary page, you will find different categories such as Music, Movies, TV Shows, and more. Click on “Music” to access the music synchronization options.
- Check the box next to “Sync Music” to enable music synchronization with your iPhone.
- You can choose to sync your entire music library or select specific playlists, artists, albums, or genres. Select the appropriate option based on your preferences.
- Once you have made your selection, click on the “Apply” or “Sync” button located at the bottom right corner of the iTunes window. This will initiate the synchronization process.
- During the synchronization process, iTunes will transfer the selected music files from your library to your iPhone. The duration of the sync depends on the amount of music being transferred.
- Once the synchronization is complete, you will receive a notification in iTunes indicating that the process was successful.
By syncing your iPhone with iTunes, you ensure that the selected music is transferred from your computer to your iPhone. This step finalizes the music transfer process and makes the chosen songs available for playback on your iPhone.
Step 6: Check if the music transferred successfully
After syncing your iPhone with iTunes and transferring the selected music files, it’s important to ensure that the transfer was successful. Follow these steps to check if the music transferred successfully:
- Disconnect your iPhone from your computer by safely removing the USB cable.
- On your iPhone, go to the Music app and open it.
- Navigate to the library section of the Music app. This is where you will find all the music stored on your device.
- Browse through your music library and look for the songs, albums, or playlists that you transferred. You can use the search bar at the top of the screen to quickly find specific tracks.
- Tap on a song or playlist to play it and ensure that the audio is working properly.
- Check the artwork, titles, and metadata of the transferred music to ensure that they match your original selection in iTunes.
- If everything looks and sounds as expected, congratulations! The music transfer was successful, and you can enjoy your favorite tunes on your iPhone.
- If you encounter any issues, such as missing songs or distorted audio, double-check that you followed all the previous steps correctly. You can also try reconnecting your iPhone to your computer and syncing again.
By checking if the music transferred successfully, you can confirm that your chosen songs are now accessible on your iPhone. Now you can enjoy your favorite music wherever you go!
Alternative method: Use iCloud or Dropbox to transfer music
If you prefer not to use iTunes or connect your iPhone to a computer, there are alternative methods to transfer music to your device. One popular option is to utilize cloud storage services such as iCloud or Dropbox. Follow these steps to transfer music using these services:
Using iCloud:
- Make sure you have an active iCloud account and that you’re signed in on both your computer and iPhone with the same Apple ID.
- On your computer, open a web browser and go to the iCloud website (www.icloud.com).
- Sign in to iCloud with your Apple ID and password.
- Once logged in, open iCloud Drive and create a folder where you will store your music files.
- Upload the music files from your computer to the newly created folder in iCloud Drive. You can do this by dragging and dropping the files or using the upload button.
- On your iPhone, go to the App Store and download the iCloud Drive app if you haven’t already.
- Launch the iCloud Drive app on your iPhone and sign in with the same Apple ID.
- Navigate to the folder where you uploaded your music files and select the files you want to transfer.
- Tap the share button and choose “Save to Files” or directly select the music files to import them to your iPhone’s Music app.
Using Dropbox:
- Sign up for a Dropbox account if you don’t already have one.
- Download and install the Dropbox application on your computer and sign in with your Dropbox account.
- Create a new folder in your Dropbox account where you will store your music files.
- Copy or move the music files from your computer to the newly created folder in Dropbox.
- On your iPhone, go to the App Store and download the Dropbox app if you haven’t already.
- Launch the Dropbox app on your iPhone and sign in with your Dropbox account.
- Navigate to the folder where you uploaded your music files and select the files you want to transfer.
- Tap the little ellipsis (…) button and choose “Export”. From there, select “Save to Files” and choose the location as “On My iPhone” or directly select the music files to import them to your iPhone’s Music app.
Using cloud storage services like iCloud or Dropbox provides a convenient and wireless way to transfer music to your iPhone. Make sure you have enough storage space in your cloud account to accommodate the music files you want to transfer.
Troubleshooting tips
While transferring music from your computer to your iPhone is usually a straightforward process, you may encounter some issues along the way. Here are some troubleshooting tips to help you overcome common obstacles:
1. Ensure compatibility:
Make sure that the music files you are trying to transfer are in a compatible format supported by iTunes and your iPhone. Commonly supported formats include MP3, AAC, and ALAC.
2. Update iTunes and iOS:
Check for updates to both iTunes and your iPhone’s iOS. Keeping your software up to date can resolve compatibility issues and improve performance.
3. Restart your devices:
If you are experiencing connectivity issues or strange behavior, try restarting both your computer and iPhone. This can help refresh the devices’ connections and clear any temporary glitches.
4. Reset your iPhone settings:
If your iPhone is not being recognized by iTunes, you can try resetting your iPhone’s settings. Go to Settings > General > Reset > Reset All Settings. Note that this will not erase your data but will reset your preferences and network settings.
5. Check USB connections:
Ensure that the USB cable is securely connected to both your iPhone and computer. Try using a different USB port or a different USB cable if the connection is not stable.
6. Free up storage space:
If you are trying to add a large amount of music to your iPhone but don’t have enough available storage, you may encounter issues. Delete unnecessary files or apps from your iPhone to free up space for the music.
7. Disable restrictions:
Check if you have any restrictions or parental controls enabled on your iPhone that may prevent the transfer of music. Go to Settings > Screen Time > Content & Privacy Restrictions and disable any restrictions related to music.
If you continue to experience difficulties, you may want to seek additional support from Apple’s official support channels or consult other online resources for troubleshooting specific issues.
By following these troubleshooting tips, you can overcome common obstacles and ensure a smooth transfer of music from your computer to your iPhone.