
Why Would You Want to Transfer Data from Android to iPhone?
Switching from Android to iPhone is a decision many smartphone users make. Whether it’s for the sleek design, advanced features, or the seamless integration with other Apple devices, there are plenty of reasons to make the switch. However, one concern that arises when transitioning from Android to iPhone is how to transfer data between the two platforms. From contacts and photos to messages and apps, moving all your important data to your new iPhone can seem like a daunting task. Fortunately, there are several methods available to simplify the process and ensure a smooth data transfer.
One of the main reasons to transfer data from Android to iPhone is to maintain continuity. Your contacts, photos, messages, music, and other files hold immense value, and it’s vital to have them readily available on your new device. By transferring your data, you can seamlessly transition from your old Android phone to your new iPhone without missing a beat.
Another reason to transfer data is to take advantage of the unique features and capabilities offered by the iPhone. Whether it’s the superior camera, optimized software, or exclusive apps available only on iOS, transferring your data allows you to make the most of your new device and fully experience all it has to offer.
Furthermore, transferring your data ensures that you don’t lose any important information or memories in the process. Contacts, messages, and photos are all invaluable pieces of our digital lives, and being able to easily transfer them to your new iPhone ensures that you don’t lose any important connections or cherished moments.
Lastly, migrating your data from Android to iPhone provides you with a seamless transition in terms of functionality and compatibility. Since you are moving to a different operating system, it’s crucial to transfer your apps, calendar events, and notes to ensure that you can continue working and stay organized without any interruptions.
Transfer Contacts from Android to iPhone
One of the most important aspects of transferring data from Android to iPhone is ensuring that your contacts make the transition seamlessly. Thankfully, there are several methods available to transfer your contacts with ease.
One straightforward method is to use the built-in functionalities of both Android and iPhone. On your Android device, go to the Contacts app and navigate to the settings. Look for the option to import/export contacts and choose the appropriate export format, such as a vCard file. Save the vCard file to your device or transfer it to your iPhone using cloud storage or a USB cable.
Once you have the vCard file on your iPhone, open the Contacts app and select the option to import contacts. Choose the vCard file and let the iPhone handle the rest. This method ensures that all your contacts are transferred accurately, including names, phone numbers, email addresses, and any other relevant information.
Another method is to utilize cloud-based services such as Google Contacts and iCloud. On your Android device, make sure your contacts are backed up to your Google account. To do this, go to the settings, find the Accounts section, and select your Google account. Enable the syncing of contacts, and your contacts will be securely stored in your Google account.
On your iPhone, navigate to the settings and select the option to add your Google account. Make sure the option to sync contacts is enabled, and your Google contacts will be automatically imported to your iPhone’s Contacts app. This method also allows for continuous syncing, so any changes made to your contacts on either device will be reflected on both.
If you prefer a more streamlined approach, third-party apps are available to assist in transferring contacts. These apps, such as Copy My Data or My Contacts Backup, can be downloaded from the App Store and Google Play Store. The process usually involves installing the app on both your Android device and iPhone, following the instructions, and allowing the app to transfer your contacts wirelessly or through a local Wi-Fi network.
Regardless of the method you choose, transferring contacts from Android to iPhone ensures that you won’t lose any valuable connections. It’s important to double-check the transferred contacts on your iPhone to ensure accuracy and make any necessary adjustments. With your contacts safely transferred, you can easily reach out to friends, family, and colleagues without missing a beat.
Transfer Photos and Videos from Android to iPhone
When switching from an Android device to an iPhone, transferring your photos and videos is crucial to preserve your cherished memories. Thankfully, there are several methods available to ensure a seamless transfer of your precious media files.
One convenient method is to use cloud-based storage services like Google Photos or iCloud. On your Android device, download the Google Photos app and sign in with your Google account. Enable the option to automatically back up your photos and videos to the cloud. This will ensure that all your media is securely stored in your Google Photos account.
Now, on your iPhone, log in to the Google Photos app using the same Google account. All your photos and videos will automatically sync to your iPhone. Depending on your preferences, you can choose to keep the files in the Google Photos app or download them directly to your iPhone’s camera roll.
If you prefer a more direct method, you can use a USB cable to transfer your photos and videos. Connect your Android device to your computer using the USB cable, and access your device’s file system. Locate the folder where your photos and videos are stored, and simply copy them to your computer.
Next, connect your iPhone to the computer using a USB cable. Open iTunes (or Finder on later versions of macOS), select your iPhone, and go to the “Photos” tab. Enable the option to sync photos and choose the folder where you copied your media files. Select the photos and videos you want to transfer, and click the “Apply” button to start the sync process. This method allows you to directly transfer your media files from your computer to your iPhone.
Alternatively, you can also use third-party apps like Dropbox or SHAREit to transfer your photos and videos wirelessly. These apps allow you to select the files you want to transfer on your Android device and send them to your iPhone. On your iPhone, you can receive the files through the same app and save them to your camera roll.
Whichever method you choose, it’s important to ensure that all your photos and videos are successfully transferred before removing them from your Android device. Double-check your iPhone to make sure all your media files are intact and organized. With your memories transferred, you can easily access and enjoy your photos and videos on your new iPhone.
Transfer Messages from Android to iPhone
Transferring your messages from your Android device to your new iPhone is essential to ensure that you don’t lose any valuable conversations or important information. Although the process may seem tricky, there are several methods available to make the transfer as seamless as possible.
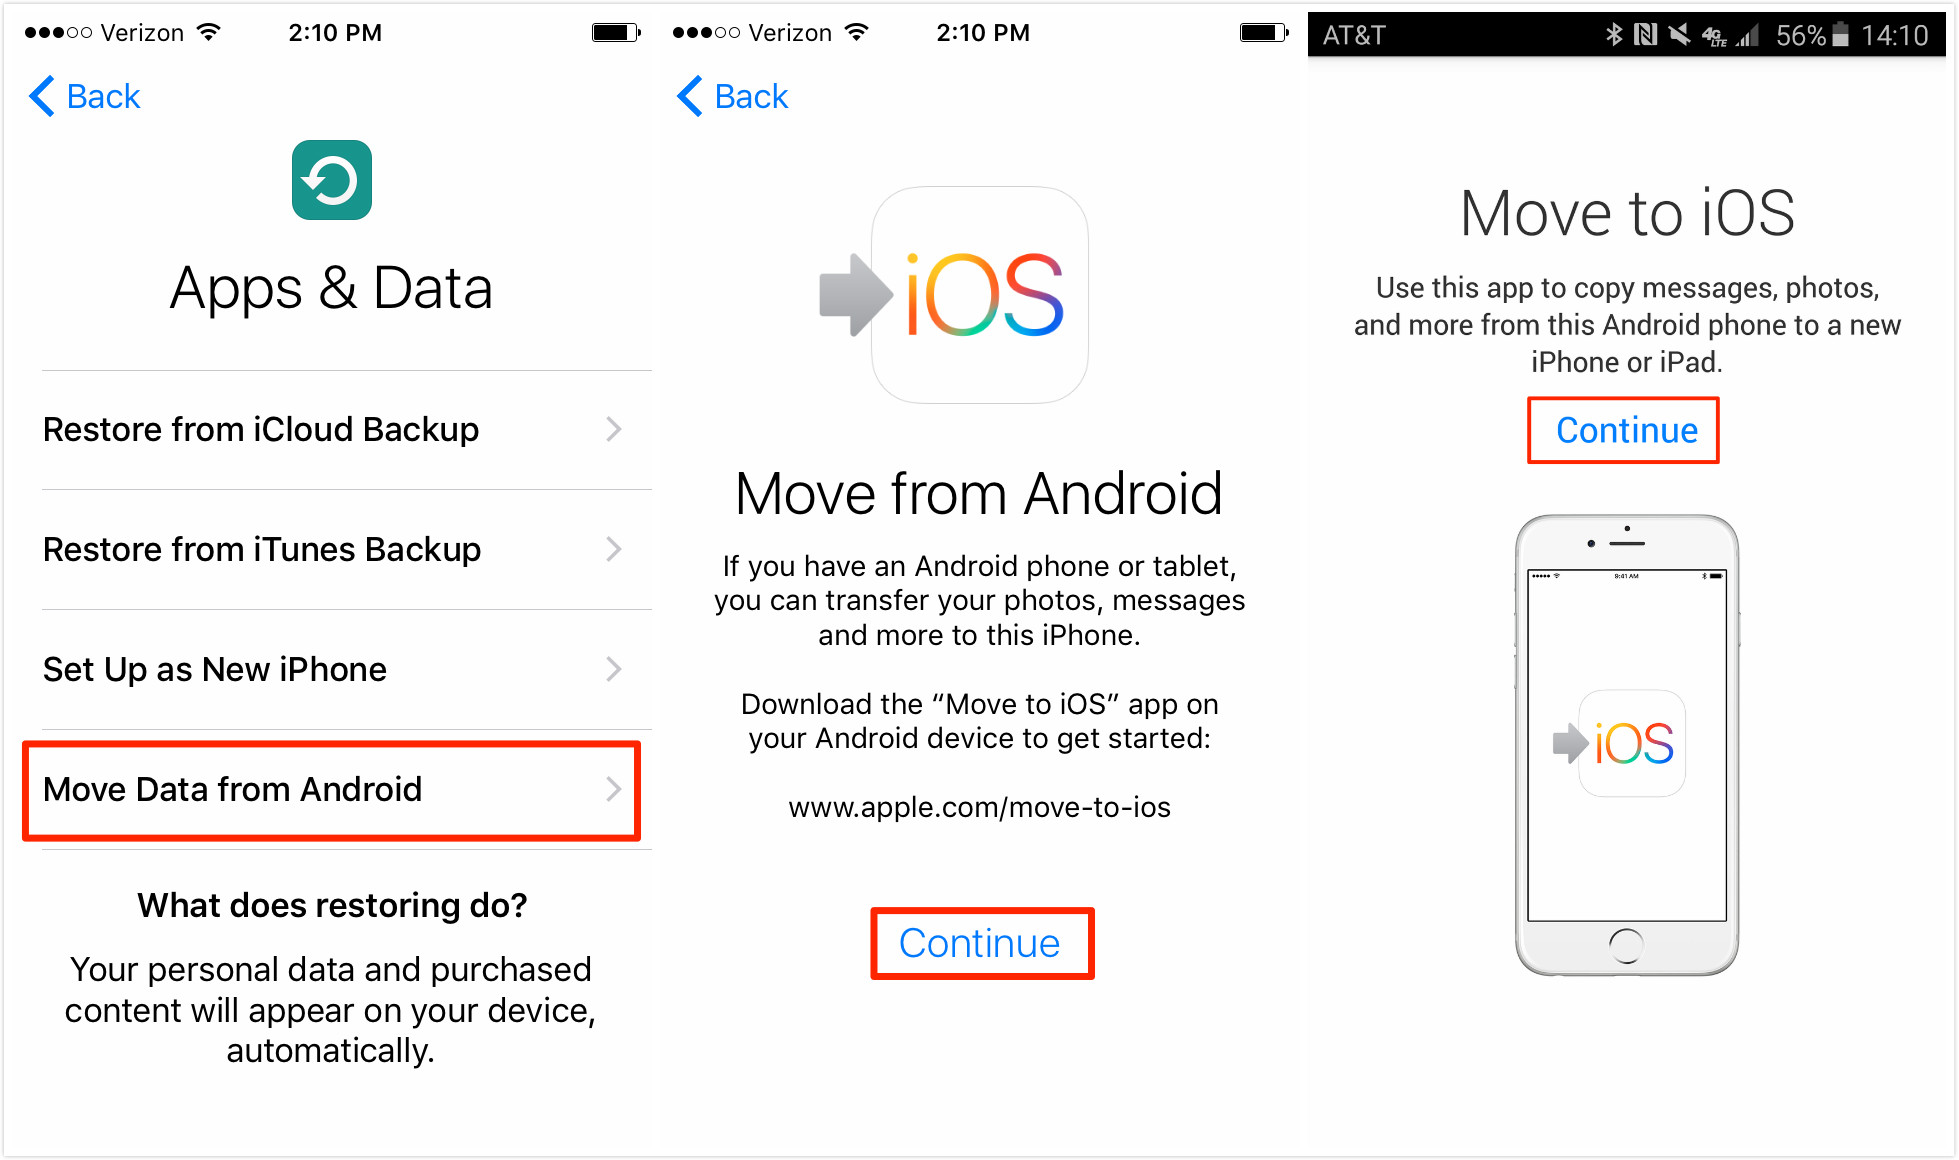
One method to transfer messages is by using the “Move to iOS” app, available on the Google Play Store. On your Android device, download and install the app. During the setup process on your new iPhone, select the option to transfer data from an Android device. Follow the prompts and when prompted, open the “Move to iOS” app on your Android device.
On your Android device, select the option to transfer messages and any other data you wish to migrate. The app will generate a security code. Enter the code on your new iPhone, and the transfer process will begin. This method ensures that your messages, along with other selected data, are seamlessly transferred to your new iPhone.
If you prefer a more manual approach, you can transfer messages by backing up your Android messages and then restoring them on your iPhone. On your Android device, look for the messaging app’s settings and enable the option to back up your messages. This process may vary depending on the messaging app you use.
Once the backup is complete, you’ll need to transfer the backup file to your iPhone. You can do this by using cloud storage services like Google Drive, Dropbox, or OneDrive. Upload the backup file to the cloud storage of your choice and download it onto your iPhone.
On your iPhone, you’ll need to install a third-party messaging app that supports the restoration of messages, such as iSMS2droid or SMS Backup & Restore. Follow the app’s instructions to import the backup file and restore your messages.
Alternatively, if you use a messaging app that is available on both Android and iOS, such as WhatsApp or Telegram, you can simply install the app on your new iPhone, sign in with the same account you used on your Android device, and your messages will automatically sync.
It’s important to note that while transferring messages, the formatting and attachments, such as photos or videos, may not transfer perfectly. It’s recommended to review your transferred messages on your new iPhone to ensure that all the important information is intact.
By following these methods, you can easily transfer your messages from your Android device to your new iPhone, allowing you to continue your conversations seamlessly and without any loss of data.
Transfer Music from Android to iPhone
When transitioning from an Android device to an iPhone, transferring your music collection is crucial to continue enjoying your favorite tunes on your new device. While transferring music may require a few additional steps compared to other types of data, there are several methods available to make the process seamless.
One method to transfer music is by using a cloud-based music streaming service. If you use a service like Spotify, Apple Music, or Google Play Music, your music library is already stored in the cloud. Simply download the app on your new iPhone, sign in with your existing account, and your music collection will automatically sync to your iPhone. This method allows you to access your music library on both Android and iPhone devices.
If you have music files stored directly on your Android device, you can transfer them to your iPhone by using a computer as an intermediary. Connect your Android device to your computer using a USB cable and navigate to the music folder on your device. Copy the music files to a folder on your computer.
Next, connect your iPhone to the computer using a USB cable. Open iTunes (or Finder on newer versions of macOS) and select your iPhone. Go to the “Music” tab, and choose the option to sync music. Select the folder on your computer where you copied the music files and let iTunes handle the transfer process. This method allows you to have your music files readily available on your iPhone through the native Music app.
If you prefer a wireless transfer method, you can use third-party apps like AirDroid or SHAREit. These apps allow you to transfer files between Android and iPhone devices using a local Wi-Fi network. Install the app on both devices, select the music files you want to transfer on your Android device, and send them to your iPhone.
Alternatively, you can also transfer music files by using cloud storage services like Google Drive, Dropbox, or OneDrive. Upload your music files to the cloud storage from your Android device and then download them onto your iPhone. You can use the cloud storage app on your iPhone to access and play the music files.
Regardless of the method you choose, it’s essential to double-check your transferred music files on your iPhone to ensure that they are correctly imported and playable. With your music transferred, you can continue to enjoy your favorite songs and playlists on your new iPhone.
Transfer Apps from Android to iPhone
One of the biggest concerns when transitioning from an Android device to an iPhone is transferring your apps. While it’s not possible to transfer apps directly between Android and iOS due to their different operating systems, there are several ways to ensure a seamless transition and download your favorite apps on your new iPhone.
The easiest way to transfer your apps is to search for them individually on the App Store on your iPhone. The App Store offers a vast collection of apps, including many that you may have previously used on your Android device. Simply open the App Store, search for the apps you want to transfer, and download them onto your new iPhone.
However, keep in mind that not all apps available on Android are available on iOS. Some developers create apps exclusively for one platform, so you may need to search for alternative apps that provide similar functionalities on your iPhone.
Before moving to your new iPhone, it’s recommended to make a list of the apps you frequently use on your Android device. This way, you can easily search for them on the App Store and ensure that you don’t miss any essential tools or services.
If you want to transfer app data, such as game progress or preferences, from your Android device to your iPhone, the options are limited. Some developers provide specific methods for transferring app data between Android and iOS versions of their apps. Check the app developer’s website or contact their support team for guidance on how to transfer your app data.
Alternatively, you can look for cross-platform apps that offer syncing capabilities. These apps often require you to create an account and sign in on both your Android and iPhone devices. By doing so, your app data will be synced across platforms, allowing you to continue where you left off.
Additionally, take advantage of the iCloud ecosystem if you use Apple’s services. Many popular apps, like Google Drive, WhatsApp, and Evernote, have iOS versions that support syncing with their cloud-based services. Sign in to the respective accounts on your iPhone, and your data will be available across devices.
While transferring apps from Android to iPhone may require some effort, it’s an opportunity to explore new applications and adapt to the iOS ecosystem. Take the time to browse the App Store, discover new apps, and make your new iPhone uniquely yours.
Transfer Calendar Events from Android to iPhone
Transferring your calendar events from your Android device to your new iPhone is essential for staying organized and ensuring a smooth transition. Luckily, there are several methods available to transfer your calendar events without missing any important appointments or tasks.
One of the simplest ways to transfer calendar events is by using a cloud-based calendar service. If you already use a service like Google Calendar or Outlook, all your calendar events are stored in the cloud. On your Android device, make sure that your calendar events are synced with your chosen cloud service.
Navigate to the settings of your calendar app, select the option to sync, and choose your cloud service account. Once synced, your calendar events will be securely stored and accessible from any device. On your new iPhone, simply download the appropriate calendar app and sign in with the same account. Your calendar events will automatically sync with your iPhone.
If your calendar events are stored locally on your Android device, transferring them requires a different approach. One method is to export your calendar events as an .ics file. On your Android device, open your calendar app and go to the settings. Look for the option to export calendar events and choose the .ics file format. Save the file to your device or transfer it to your iPhone through cloud storage or email.
On your iPhone, open the Calendar app and navigate to the settings. Look for the option to import calendar events and select the .ics file you exported from your Android device. Let the iPhone handle the import process, and your calendar events will be transferred to your new device.
Another option is to use a third-party app that specializes in transferring calendar events. Apps like SmoothSync or iCalendar Import/Export provide an easy and efficient way to transfer calendar events between Android and iPhone. Simply install the app on both devices, follow the instructions to establish a connection, and let the app handle the transfer process.
Regardless of the method you choose, it’s important to double-check your calendar events on your new iPhone to ensure that all appointments, reminders, and events have been successfully transferred. Take the time to review your schedule and make any necessary adjustments to ensure a seamless transition.
By transferring your calendar events, you can seamlessly continue managing your schedule on your new iPhone, ensuring that you stay organized and never miss an important event.
Transfer Notes from Android to iPhone
Transferring your notes from an Android device to an iPhone is vital to ensure that you can access your important information and ideas on your new device. Although the process may vary depending on the note-taking app you use, there are several methods available to help you seamlessly transfer your notes to your iPhone.
If you use a note-taking app that is available on both Android and iPhone, like Evernote or Microsoft OneNote, transferring your notes is relatively straightforward. Make sure you have the latest version of the app installed on both devices. Sign in to your account on your Android device and ensure that your notes are synced to your cloud account.
On your iPhone, download the same note-taking app and sign in with the same account. Your notes will automatically sync to your iPhone, ensuring that you have access to all your important information.
If your notes are not saved in a cloud-based app, there are additional options available. One method is to manually transfer your notes using a file transfer method. On your Android device, open your note-taking app and look for an export option. Export your notes in a compatible file format, such as .txt or .html.
Transfer the exported file to your iPhone using a cloud storage service like Google Drive or Dropbox. Install a compatible note-taking app on your iPhone and locate the import option. Select the exported file and import your notes into the app.
Another option is to use a note-taking app that specifically supports transferring notes from Android to iPhone. Apps like Simplenote or Bear offer easy migration features, allowing you to transfer your notes by simply signing in to your account on your iPhone.
If you have a large number of notes or use a note-taking app that doesn’t have a direct transfer feature, consider using the “Copy and Paste” method. Open each note on your Android device, select the contents of the note, and copy it. Then, open your note-taking app on your iPhone and create a new note. Paste the contents from your Android note into the new note on your iPhone. Repeat this process for each note you want to transfer.
Regardless of the method you choose, it’s important to double-check your transferred notes on your iPhone to ensure that all the information is intact. Take the time to review and organize your notes to ensure a smooth transition and easy access to your important information.
By transferring your notes to your iPhone, you can continue to access and manage your important information seamlessly, ensuring that you have all your notes at your fingertips whenever you need them.
Transfer WhatsApp Messages from Android to iPhone
Transferring your WhatsApp messages from an Android device to an iPhone can be a bit more challenging due to the different operating systems. However, with the right tools and methods, you can successfully transfer your WhatsApp messages and continue your conversations on your new iPhone.
One method to transfer WhatsApp messages is by using a third-party software designed specifically for this purpose. Apps such as Dr.Fone – WhatsApp Transfer or MobileTrans offer a straightforward solution. Install the software on your computer and connect both your Android device and iPhone to the computer using USB cables.
Next, follow the instructions provided by the software to initiate the transfer process. This typically involves selecting the WhatsApp messages you want to transfer and specifying the destination device, which is your iPhone in this case. The software will handle the transfer process, ensuring that your WhatsApp messages are successfully migrated to your iPhone.
Note that some of these third-party software solutions may be paid or have limitations in terms of the number of messages that can be transferred.
Another method is to use the built-in WhatsApp chat export feature. On your Android device, open WhatsApp, go to the chat you want to transfer, and tap on the three-dot menu. Select the “More” or “Export” option, depending on your WhatsApp version.
Choose to export the chat as an email attachment and provide your email address. This will create a .txt file containing the chat history as an email attachment. Open the email on your iPhone and download the attachment.
Once downloaded, open WhatsApp on your iPhone, install and set up your WhatsApp account. Tap “Restore Chat History” when prompted and select the .txt file you downloaded to import the chat history to your iPhone.
It’s important to note that this method can only transfer text messages and not media files, such as photos or videos, included in the chats.
WhatsApp also provides a feature to back up your chats to Google Drive on Android and to iCloud on iPhone. If you have an existing WhatsApp backup on Google Drive and signed in with the same Google account on your iPhone, you may be able to restore your chat history during the initial setup of WhatsApp on your iPhone.
Please note that this method may not work if you have previously used a different phone number or if you did not have a backup enabled on your Android device.
Transferring WhatsApp messages from an Android device to an iPhone may not be as straightforward as other data transfers. However, by following the appropriate methods and utilizing the available tools, you can successfully migrate your WhatsApp conversations to your new iPhone and continue chatting seamlessly with your contacts.
Transfer Files from Android to iPhone
Transferring files from an Android device to an iPhone can be a bit challenging due to the different file systems and operating systems. However, there are several methods available to help you transfer your files and ensure a seamless transition to your new iPhone.
One of the most straightforward ways to transfer files is by using cloud storage services. Services like Google Drive, Dropbox, or OneDrive are available on both Android and iPhone. Install the respective app on your Android device and upload the files you want to transfer to the cloud.
Next, install the same cloud storage app on your iPhone and sign in with the same account. You can now download the files from the cloud storage to your iPhone, ensuring that you have your important documents, photos, or videos readily available on your new device.
If you prefer a wired connection, you can transfer files using a computer as an intermediary. Connect your Android device to the computer using a USB cable and navigate to the file system of your device. Locate the files you want to transfer and copy them to your computer’s hard drive.
Next, disconnect your Android device and connect your iPhone to the computer using a USB cable. Open iTunes (or Finder on later versions of macOS), select your iPhone, and go to the “Files” tab. Choose the option to manually manage files and select the folder where you copied the files from your Android device. Drag and drop the files into the designated area in iTunes or Finder, and they will be transferred to your iPhone.
If you prefer a wireless file transfer method, you can use third-party apps like AirDroid or SHAREit. These apps allow you to transfer files between Android and iPhone devices using a local Wi-Fi network. Install the app on both devices, follow the instructions to establish a connection, and then you can easily transfer your files wirelessly.
Another option to transfer files wirelessly is by using Bluetooth. Turn on Bluetooth on both your Android device and iPhone, ensure that they are discoverable, and pair them. Once paired, you can send files from your Android device to your iPhone using the Bluetooth transfer feature.
It’s important to note that not all file types or file formats may be compatible with both Android and iPhone devices. Some files, such as specific video formats or specialized file types, may require additional apps or software on your iPhone to be opened or viewed.
By utilizing cloud storage services, wired connections, or wireless transfer methods, you can successfully transfer your files from your Android device to your new iPhone, ensuring that you have all your important documents and multimedia files accessible on your new device.