
Getting Started with OneDrive
OneDrive is a versatile cloud storage service provided by Microsoft that allows you to sync your files across devices and access them from anywhere. Whether you’re using a Windows PC, Mac, or mobile device, setting up and getting started with OneDrive is a breeze. In this section, we’ll walk you through the steps to get started with OneDrive on your desktop.
To begin, you’ll need to create a Microsoft account if you don’t already have one. Simply visit the Microsoft website and follow the prompts to sign up for an account. Once you have your Microsoft account, you can proceed with the installation of the OneDrive desktop app.
Installing the OneDrive app on your desktop is quick and straightforward. Visit the official OneDrive website and download the app for your specific operating system. Once the download is complete, run the installer and follow the on-screen instructions to complete the installation process.
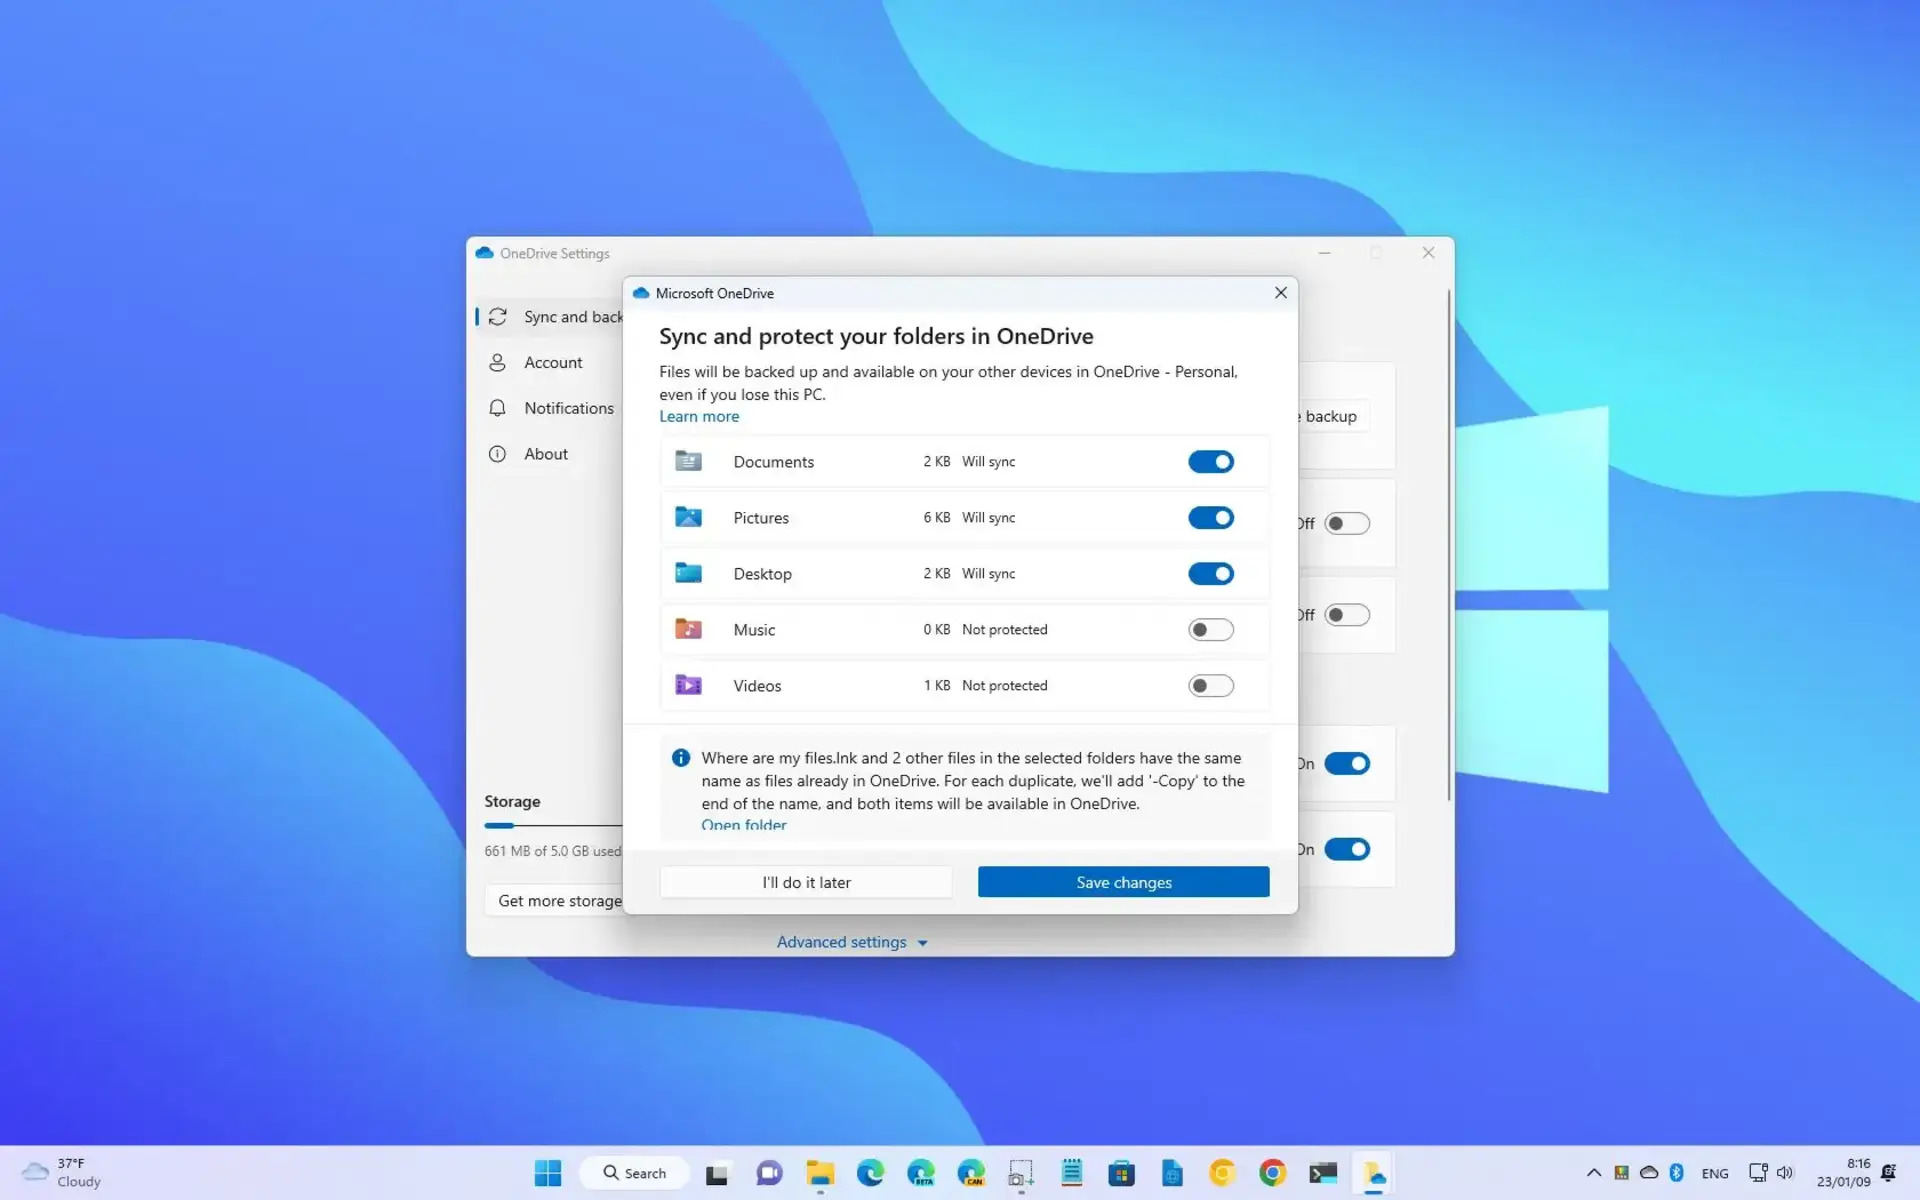
After the installation is finished, you can sign in to the OneDrive app using your Microsoft account credentials. Once you’re signed in, you’ll have the option to choose the folders you want to sync with OneDrive. By default, your Desktop, Documents, and Pictures folders are selected for syncing, but you have the flexibility to choose additional folders based on your preference.
Once you’ve selected the folders you want to sync, the OneDrive app will start automatically syncing your files in the background. This may take some time depending on the size and number of files you have in the selected folders. You can monitor the progress by checking the OneDrive app icon in the system tray or menu bar.
Once the initial sync is complete, any changes you make to the files in the synced folders will be automatically updated and synced to your OneDrive account. This ensures that you always have the most up-to-date version of your files available from any device with internet access.
Now that you’re all set up with OneDrive on your desktop, you can take full advantage of its features and capabilities. In the next sections, we’ll explore how to manage your synced files, access them from any device, collaborate with others, troubleshoot common sync issues, and customize OneDrive settings to suit your needs.
Installing OneDrive on Your Desktop
If you’re ready to start syncing your desktop files to the cloud with OneDrive, the first step is to install the OneDrive app on your desktop. By following a few simple steps, you’ll be up and running in no time.
To begin, visit the official OneDrive website (onedrive.com) and navigate to the “Downloads” section. Here, you’ll find the OneDrive app for various operating systems, including Windows and macOS. Click on the appropriate download link to start downloading the installation file.
Once the download is complete, locate the installation file and double-click on it to begin the installation process. On Windows, you may be prompted to allow the app to make changes to your device. Click “Yes” to continue.
Next, you’ll be presented with the OneDrive setup wizard. Follow the on-screen instructions to proceed with the installation. You may be asked to sign in to your Microsoft account or create a new one if you don’t already have an account.
After signing in, you’ll have the option to choose the location where you want to install the OneDrive app. By default, it will be installed in the recommended location, but you can choose a different directory if you prefer.
Once you’ve selected the installation location, click “Next” to continue. The setup wizard will then ask you if you want to start OneDrive automatically when you sign in to your computer. It’s recommended to keep this option enabled so that your files are always synced and up to date.
The installation will now begin, and you’ll see a progress bar indicating the status. Once the installation is complete, you’ll be presented with a confirmation message. Click “Finish” to close the setup wizard.
After installation, the OneDrive app will launch automatically, and you’ll see a cloud icon in your system tray or menu bar. This indicates that OneDrive is running and syncing your files to the cloud.
Now that you have successfully installed OneDrive on your desktop, you can start syncing your files and accessing them from any device. In the next section, we will guide you through the process of syncing your desktop files to OneDrive and managing them efficiently.
Syncing Your Desktop Files to OneDrive
Now that you have OneDrive installed on your desktop, it’s time to sync your important files and folders to the cloud. Syncing your desktop files with OneDrive ensures that you have access to them from any device and provides an extra layer of security for your data. Follow the steps below to start syncing your desktop files to OneDrive.
1. Launch the OneDrive app on your desktop: Look for the OneDrive icon in your system tray (Windows) or menu bar (Mac). Click on the icon to open the OneDrive app.
2. Sign in to your Microsoft account: If you’re not already signed in, enter your account credentials to log in to your Microsoft account.
3. Choose the folders you want to sync: By default, OneDrive syncs your Desktop, Documents, and Pictures folders. If you want to add or remove folders for syncing, click on the “Choose folders” button. Select the folders you want to sync and click “OK” to save your changes.
4. Monitor the sync progress: Once you’ve selected the folders to sync, OneDrive will start the synchronization process. The app will upload your files to the cloud, and a cloud icon will appear next to the files and folders indicating that they are being synced.
5. Access synced files from other devices or the web: After the initial sync, your desktop files will be available on other devices where you have OneDrive installed. You can also access your files from any web browser by logging in to your Microsoft account and navigating to the OneDrive website.
It’s important to note that the sync process may take some time, especially if you have a large number of files or a slow internet connection. Once the initial sync is complete, subsequent changes to your files will be automatically synced in the background, ensuring that you always have the latest versions available.
By syncing your desktop files to OneDrive, you can enjoy the flexibility of accessing and managing your files from anywhere, whether you’re using a desktop computer, laptop, or mobile device. In the next section, we will explore how to manage your synced files on OneDrive and utilize its collaborative features.
Managing Your Synced Files on OneDrive
Now that your desktop files are synced to OneDrive, it’s essential to understand how to effectively manage them. OneDrive offers a range of features and tools to organize, collaborate, and optimize your synced files. Let’s explore some key ways to manage your synced files on OneDrive.
1. Organize your files into folders: Create folders within your OneDrive account to keep your files organized. You can create a new folder by clicking on the “New” button and selecting “Folder.” Give it a descriptive name and drag and drop files into the folder to organize them effectively.
2. Rename, delete, or move files and folders: Right-click on a file or folder to access a context menu. From here, you can rename, delete, or move files and folders to another location within OneDrive. This allows you to keep your files organized and make changes as needed.
3. Share files and folders with others: OneDrive makes it easy to collaborate with others by sharing files and folders. Simply right-click on a file or folder, select “Share,” and enter the email addresses of the people you want to share with. You can also generate a link and set permissions to control who can view or edit the shared content.
4. Use version history: OneDrive keeps track of file versions, allowing you to restore previous versions if needed. Right-click on a file and select “Version history” to see a list of available versions. From here, you can preview and restore earlier versions of the file.
5. Set access permissions: If you’re collaborating on a file or folder with others, you can set access permissions to control what they can do with the shared content. Right-click on a file or folder, select “Share,” and click on the “More options” link to configure the access settings.
6. Enable selective sync: If you’re running out of disk space on your local machine, you can use selective sync to choose which folders to sync to your desktop. Open the OneDrive settings and go to the “Account” tab. Click on the “Choose folders” button and uncheck the folders you don’t want to sync to free up space.
By actively managing your synced files on OneDrive, you can keep your files organized, collaborate effectively with others, and take advantage of the various features and tools available. In the next section, we’ll explore how to access your desktop files from any device using OneDrive.
Accessing Your Desktop Files from Any Device
One of the key benefits of syncing your desktop files to OneDrive is the ability to access them from any device with an internet connection. Whether you’re using a computer, tablet, or smartphone, you can easily access your desktop files on the go. Let’s explore how to access your desktop files from any device using OneDrive.
1. Access from a web browser: OneDrive provides a web interface that allows you to access your files from any web browser. Simply go to the OneDrive website (onedrive.com), sign in with your Microsoft account credentials, and you’ll be able to browse and manage your synced files.
2. Use the OneDrive mobile app: OneDrive has dedicated mobile apps for both iOS and Android devices. Download and install the OneDrive app from the respective app store, sign in to your Microsoft account, and you’ll have access to all your synced files on your mobile device.
3. Install OneDrive on other devices: To access your desktop files on other computers or laptops, you can install OneDrive and sign in with your Microsoft account. Once signed in, your synced files will be available on those devices as well.
4. Offline access: With OneDrive, you can also access your files offline. Simply mark files or folders for offline availability within the OneDrive app on your mobile device or desktop. This allows you to access and edit your files even when you don’t have an internet connection.
5. File synchronization: Any changes you make to your files on one device will automatically sync across all your devices. For example, if you make edits to a document on your computer, the changes will be reflected in the file on your mobile device as well. This ensures that you always have the latest version of your files available.
By accessing your desktop files from any device using OneDrive, you can work seamlessly across multiple devices and have your files available at your fingertips wherever you go. In the next section, we’ll delve into how to collaborate on files and folders with others using OneDrive.
Collaborating on OneDrive with Others
OneDrive offers powerful collaboration features that allow you to work together with others on documents, presentations, and other files in real-time. Whether you’re collaborating on a project with colleagues or sharing files with friends and family, OneDrive makes collaboration seamless and efficient. Let’s explore how to collaborate on OneDrive with others.
1. Share files and folders: OneDrive makes it easy to share files and folders with others. Simply right-click on a file or folder, select “Share,” and enter the email addresses of the people you want to collaborate with. You can also generate a link and set permissions to control who can view or edit the shared content.
2. Real-time co-authoring: OneDrive allows multiple people to work on a document simultaneously. When collaborating on a file, changes made by one person will be instantly reflected for others. This real-time co-authoring feature ensures everyone stays on the same page and can see edits as they happen.
3. Commenting and feedback: With OneDrive, you can easily leave comments and provide feedback on shared files. Highlight specific sections, add comments or suggestions, and engage in discussions right within the document. This fosters efficient collaboration and enables seamless communication among team members.
4. Version control: OneDrive keeps track of file versions, allowing you to revert to earlier versions if needed. This feature is especially useful when collaborating on files, as it ensures you can easily revert changes or access previous versions of the document if required.
5. Integration with Microsoft 365: If you have a Microsoft 365 subscription, you can take advantage of additional collaboration features. This includes features like track changes, advanced commenting, and more in-depth collaboration tools within applications like Word, Excel, and PowerPoint.
6. Secure sharing: OneDrive provides options to control who can access your shared files and folders. You can set permissions to restrict access to specific individuals or to anyone with the link. This allows you to maintain the privacy and security of your shared content.
By leveraging OneDrive’s collaboration features, you can work together with others more effectively, streamline communication, and accelerate project completion. In the next section, we’ll discuss how to troubleshoot common sync issues that you may encounter while using OneDrive.
Troubleshooting Common OneDrive Sync Issues
While OneDrive is designed to provide seamless file synchronization, sometimes you may encounter sync issues that can disrupt your workflow. Understanding and troubleshooting these common sync issues can help you regain control and ensure that your files are up to date. Let’s explore some common OneDrive sync issues and how to troubleshoot them:
1. Check your internet connection: Ensure that you have a stable internet connection as a weak or unstable connection can interrupt the sync process. Try connecting to a different network or restarting your router to resolve connectivity issues.
2. Restart the OneDrive app: Sometimes, simply restarting the OneDrive app can resolve sync issues. Right-click on the OneDrive icon in your system tray (Windows) or menu bar (Mac) and select “Quit” or “Exit.” Then, relaunch the app to initiate a fresh sync process.
3. Pause and resume syncing: If you notice that a specific file or folder is not syncing, you can try pausing the sync and then resuming it. Right-click on the OneDrive icon and select “Pause syncing” or “Resume syncing” to refresh the syncing process.
4. Check storage capacity: Ensure that you have sufficient storage space on your OneDrive account. If your account is nearing its storage limit, it can cause sync issues. Remove any unnecessary files or consider upgrading your storage plan to resolve this issue.
5. Confirm file and folder names: OneDrive may encounter issues syncing files or folders with special characters or long file names. Check for any irregular characters or overly long names, and rename them if necessary to enable proper syncing.
6. Disable third-party antivirus or firewall: In some cases, third-party antivirus or firewall software can interfere with the OneDrive syncing process. Temporarily disable them and check if the sync issues persist. If the problem is resolved, adjust your antivirus or firewall settings to allow OneDrive to function properly.
7. Reinstall the OneDrive app: If all else fails, you can try uninstalling and reinstalling the OneDrive app. This can help fix any corrupted files or settings that may be causing sync issues. After reinstalling, sign in to your Microsoft account, select the folders to sync, and allow the app to complete the initial synchronization.
If you continue to experience sync issues despite troubleshooting, it may be beneficial to reach out to Microsoft support for further assistance. By addressing and resolving common OneDrive sync issues, you can ensure a smooth and efficient file syncing experience.
Customizing OneDrive Settings for Desktop Sync
OneDrive provides various customization options that allow you to tailor the desktop sync experience to your preferences. By adjusting these settings, you can optimize how your files sync, conserve disk space, and control the behavior of the OneDrive app on your desktop. Let’s explore how to customize OneDrive settings for desktop sync:
1. Access OneDrive settings: Right-click on the OneDrive icon in your system tray (Windows) or menu bar (Mac) and select “Settings” or “Preferences” to open the OneDrive settings window.
2. Choose folders to sync: In the “Account” tab, click on the “Choose folders” button to modify which folders are synced to your desktop. Unchecking a folder will remove it from your local machine, freeing up disk space while still keeping it accessible online.
3. Set up selective sync: If you’re running low on disk space, enabling selective sync can help. In the “Account” tab, check the “Make all files available” box, then choose the specific folders or file types you want to sync to your desktop. This ensures that only selected files will occupy space on your local machine.
4. Adjust bandwidth throttling: OneDrive allows you to allocate a portion of your internet bandwidth for syncing. In the “Network” tab, you can adjust the upload and download rate limits to prioritize syncing and manage network usage based on your needs.
5. Enable file on-demand: File on-demand is a useful feature that allows you to see all your OneDrive files on your desktop without having to download them all. In the “Files On-Demand” tab, check the box to enable this feature. You can then choose which files and folders to download locally as you access them.
6. Enable camera upload: If you take photos or videos with your mobile device, you can enable the camera upload feature to automatically sync your media to OneDrive. In the “Camera Upload” tab, check the box to enable camera upload and customize the settings to your preferences.
7. Adjust notification preferences: OneDrive provides notification options to keep you informed about sync status and important updates. In the “Settings” tab, check or uncheck the relevant boxes to customize the notifications you receive from the OneDrive app.
Remember to save your changes after customizing the OneDrive settings. By tailoring the settings to your needs, you can optimize the desktop sync experience, conserve storage space, and ensure that OneDrive behaves according to your preferences.
With the ability to access your files from any device, collaborate with others, and customize the sync settings, OneDrive offers a comprehensive cloud storage solution. Utilize these customization options to make the most of your OneDrive experience and streamline your file management process.