
Enabling Restrictions on your iPhone
If you want to have more control over the features and content accessible on your iPhone, then enabling restrictions is the way to go. By setting up restrictions, you can apply certain limitations and customize the device according to your preferences. Here’s how you can enable restrictions on your iPhone:
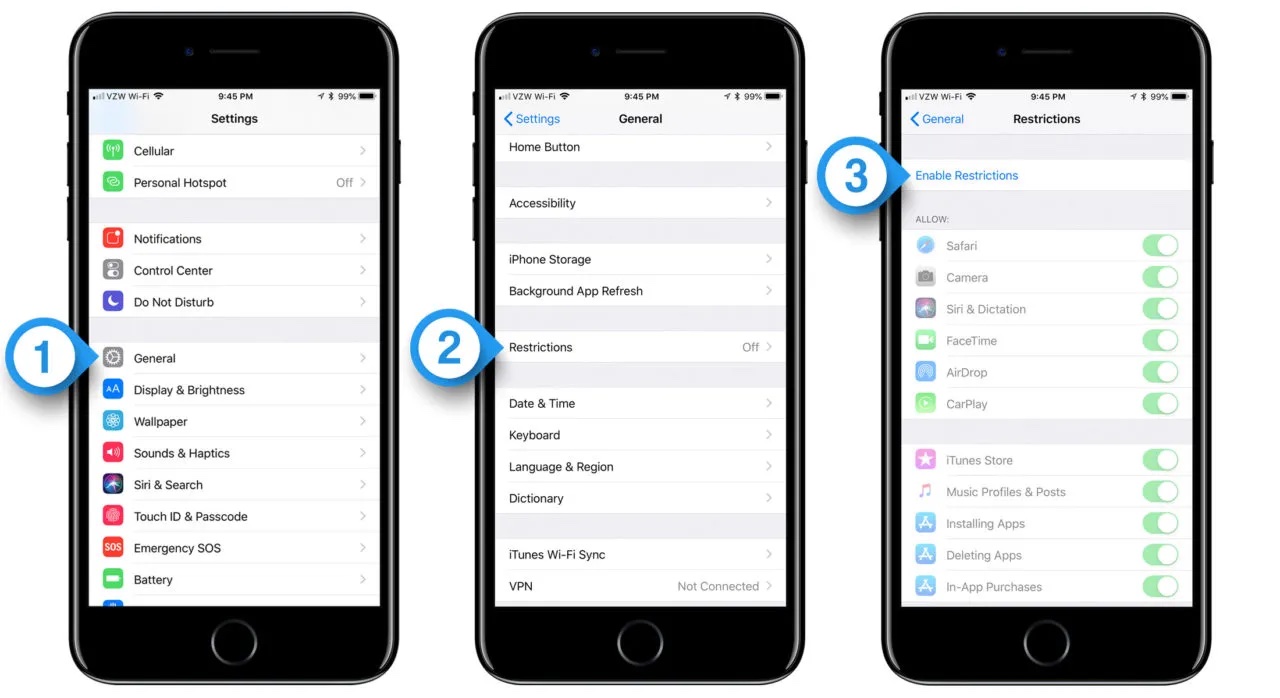
1. Open the “Settings” app on your iPhone and tap on “Screen Time.”
2. If you haven’t set up Screen Time before, you will need to tap on “Turn On Screen Time.” Otherwise, skip to step 4.
3. Set up a Screen Time passcode by following the on-screen instructions. This passcode will be required to access and modify the restrictions settings.
4. Once you have set up Screen Time, tap on “Content & Privacy Restrictions.”
5. Tap on “Content & Privacy Restrictions” again and enter your passcode.
6. Toggle the switch to enable Content & Privacy Restrictions.
7. Now you can customize the restrictions settings to suit your needs. There are several categories available, such as apps, web content, privacy settings, Siri, and more.
8. Tap on each category to explore the different options and restrictions you can apply. For example, you can restrict certain built-in apps or prevent the installation of new apps altogether.
9. Adjust the settings according to your preferences by toggling switches on or off.
10. Once you have finished customizing the restrictions, you can exit the Settings app. The restrictions you have set will now be in effect.
By enabling restrictions on your iPhone, you can have peace of mind knowing that certain features, apps, or content will be restricted according to your desired settings. This can be particularly useful if you want to limit access for children or create a more focused and productive environment for yourself.
Setting a Restrictions Passcode
When enabling restrictions on your iPhone, it’s essential to set up a restrictions passcode. This passcode acts as an extra layer of security and prevents unauthorized changes to the restrictions settings. Here’s how you can set a restrictions passcode:
1. Open the “Settings” app on your iPhone and tap on “Screen Time.”
2. If you haven’t set up Screen Time before, you will need to tap on “Turn On Screen Time.” Otherwise, skip to step 4.
3. Set up a Screen Time passcode by following the on-screen instructions. This passcode will not only be used for restrictions but also for accessing Screen Time and managing other features like app usage statistics.
4. Once you have set up Screen Time, tap on “Use Screen Time Passcode.”
5. Create a unique restrictions passcode. It is important to choose a passcode that is different from your device unlock code to ensure added security. Avoid using common numbers like birthdays or sequential patterns.
6. Re-enter the restrictions passcode to confirm and save it.
7. Your restrictions passcode is now set. It will be required whenever you want to access or modify the restrictions settings.
It’s crucial to remember your restrictions passcode and keep it secure. If you forget the passcode, you will need to reset your iPhone to factory settings, which will erase all data on your device. Therefore, it’s recommended to store the passcode in a safe place or use a password manager to keep track of it.
By setting a restrictions passcode, you can ensure that only you or authorized individuals can make changes to the restrictions settings on your iPhone. This helps maintain control over the device’s usage and safeguards against unwanted modifications.
Restricting Certain Apps
If there are specific apps that you want to restrict access to on your iPhone, you can easily do so by customizing the restrictions settings. Here’s how you can restrict certain apps:
1. Open the “Settings” app on your iPhone and tap on “Screen Time.”
2. Tap on “Content & Privacy Restrictions.”
3. Enter your restrictions passcode to proceed.
4. Tap on “Allowed Apps.”
5. You will see a list of all the apps installed on your iPhone. By default, all apps are allowed. To restrict a particular app, simply toggle the switch next to its name to the “Off” position.
6. Repeat this process for any other apps you wish to restrict.
Once you have restricted certain apps, they will no longer be visible or accessible on the home screen or in app folders. However, keep in mind that restricted apps may still appear elsewhere, such as in search results, Siri suggestions, or notifications. To completely hide them, consider moving them to a separate app folder and restricting access to that folder as well.
Restricting certain apps can be particularly useful if you want to limit distractions, control usage for specific individuals (especially children), or maintain a focused environment. For example, you might want to restrict social media apps during work hours or restrict gaming apps during school nights.
If you need to change the restrictions for any app in the future, simply follow the same steps and toggle the switch for that app to either allow or restrict it as needed.
By customizing app restrictions on your iPhone, you can have better control over the apps that are accessible, allowing for a more tailored and focused user experience.
Preventing In-App Purchases
In-app purchases can sometimes lead to unexpected costs, especially if you have children using your iPhone. To prevent any accidental or unauthorized purchases, you can enable restrictions to disable in-app purchases. Here’s how:
1. Open the “Settings” app on your iPhone and tap on “Screen Time.”
2. Tap on “Content & Privacy Restrictions.”
3. Enter your restrictions passcode to proceed.
4. Tap on “iTunes & App Store Purchases.”
5. Tap on “In-app Purchases.”
6. To disable in-app purchases completely, toggle the switch next to “In-app Purchases” to the “Off” position. This will prevent any purchases from being made within apps.
If you still want the option to make in-app purchases but want to require a password for authorization, leave the switch in the “On” position and select “Always Require” under the “Require Password” section. This way, you will be prompted to enter your Apple ID password for every in-app purchase.
By disabling or requiring a password for in-app purchases, you can have better control over your spending and prevent any unwanted charges. This is particularly useful if you share your iPhone with others, especially children who may accidentally make purchases without realizing the consequences.
It’s important to note that disabling in-app purchases may affect certain features or functionality within apps. Some apps rely on in-app purchases for additional content or features. If you encounter any issues or limitations, you can always adjust the restrictions settings to allow in-app purchases on a case-by-case basis.
Take advantage of these restrictions to ensure a safer and more controlled environment when it comes to making in-app purchases on your iPhone.
Controlling Access to Explicit Content
If you want to ensure that explicit content is not accessible on your iPhone, you can enable restrictions to control the types of content that can be viewed. Here’s how you can control access to explicit content:
1. Open the “Settings” app on your iPhone and tap on “Screen Time.”
2. Tap on “Content & Privacy Restrictions.”
3. Enter your restrictions passcode to proceed.
4. Tap on “Content Restrictions.”
5. Under the “Web Content” section, you can choose to allow unrestricted access to websites, limit adult content, or allow access to specific websites only. Select the option that suits your preferences.
6. In addition to web content, you can also control access to explicit content in other areas. For example, you can restrict the type of movies, TV shows, or music that can be played on your iPhone.
7. Tap on each content category, such as “Movies,” “TV Shows,” “Music,” or “Books,” to customize the restrictions for each category.
8. You can choose to limit content to specific ratings, such as “PG-13” for movies or “Explicit” for music. Additionally, you can select the “Don’t Allow” option to restrict access to that specific type of content entirely.
By customizing content restrictions on your iPhone, you can ensure that explicit or inappropriate content is not accessible. This is particularly crucial if you have children using your iPhone or if you want to create a family-friendly environment.
Keep in mind that the effectiveness of content restrictions may rely on accurate ratings and classifications set by content providers. While restrictions can help filter out explicit content, they are not foolproof. It’s always a good idea to periodically review the effectiveness of your settings and make adjustments as necessary.
Take advantage of these content restrictions to ensure a safer browsing and entertainment experience on your iPhone, tailored to your preferences and values.
Restricting Web Browsing
If you want to have more control over web browsing on your iPhone, you can enable restrictions to restrict access to certain websites or categories of websites. Here’s how you can restrict web browsing:
1. Open the “Settings” app on your iPhone and tap on “Screen Time.”
2. Tap on “Content & Privacy Restrictions.”
3. Enter your restrictions passcode to proceed.
4. Tap on “Content Restrictions.”
5. Under the “Web Content” section, tap on “Limit Adult Websites.”
6. This will automatically enable the “Restricted Websites” option. You can tap on “Add Website” to add specific websites to the block list or tap on “Allow Website” to allow access to specific websites only.
7. If you want to block access to all websites except those on your allowed list, toggle the “Only Allow Websites” switch to the “On” position. You can then add the websites you want to allow.
8. In addition to individual website restrictions, you can also restrict access to certain categories of websites by tapping on “Content Restrictions” and then “Web Content.”
9. Tap on “Limit Adult Websites” to restrict access to adult content, or tap on “Allowed Websites Only” to limit access to a specific list of websites.
By enabling web browsing restrictions on your iPhone, you can create a safer browsing environment, especially if you have children using your device. It can help prevent access to inappropriate or potentially harmful websites.
It’s important to note that web browsing restrictions are not foolproof and may not block access to all explicit or inappropriate content. It’s always a good idea to periodically review and update your restrictions settings to ensure they align with your preferences.
Take advantage of these web browsing restrictions to have greater control over the websites that can be accessed on your iPhone, promoting a safer and more secure web browsing experience for you and your family.
Disabling Location Services
If you value your privacy or want to conserve battery life on your iPhone, you can choose to disable location services. Disabling this feature prevents apps from accessing your device’s GPS and gathering your location data. Here’s how you can disable location services:
1. Open the “Settings” app on your iPhone.
2. Scroll down and tap on “Privacy.”
3. In the Privacy settings, tap on “Location Services.”
4. You will see a list of apps that have requested access to your location. By default, most apps will be set to “While Using” or “Always”.
5. To disable location services for all apps, simply toggle the switch at the top to the “Off” position. This will turn off location services completely for all apps.
6. If you prefer to disable location services for specific apps while allowing it for others, you can individually adjust the settings for each app on the list. Tap on the app, and choose the “Never” option to disable location access for that particular app.
7. Once you have made the necessary adjustments, exit the Settings app. The changes will take effect immediately.
Disabling location services can provide several benefits. It helps protect your privacy by preventing apps from tracking your whereabouts, and it can also contribute to better battery life since your device won’t be constantly using GPS.
Keep in mind, however, that disabling location services may limit the functionality of certain apps that rely on location data for features like mapping, navigation, and location-based recommendations. If you find that certain apps are not functioning as intended, you can selectively enable location access for those specific apps.
Take advantage of these location services settings to have greater control over your privacy and device performance on your iPhone.
Managing Privacy Settings
Your privacy is important, and managing privacy settings on your iPhone allows you to have more control over your personal information. By customizing these settings, you can safeguard your data and determine which apps have access to certain features. Here’s how you can manage privacy settings:
1. Open the “Settings” app on your iPhone and scroll down to “Privacy.”
2. Tap on “Privacy” to access various privacy settings available on your device.
3. Here, you will find a list of different categories like Location Services, Contacts, Calendars, Photos, and more.
4. Tap on each category to view the apps that have requested access to that particular feature or data.
5. Customize the settings for each category according to your preferences. For example, you can choose to grant or deny access to location services on an app-by-app basis. Similarly, you can control which apps have access to your contacts, photos, and other sensitive information.
6. Additionally, you can manage app permissions for features like the microphone, camera, health, and more by scrolling further down in the Privacy settings.
7. Review the app permissions and toggle the switches to grant or deny access as desired.
By managing privacy settings, you can protect your personal data and ensure that only the apps you trust have access to your sensitive information. It helps to maintain your privacy and reduces the risk of unauthorized data collection.
It’s important to regularly review your privacy settings, especially after installing new apps or when you have concerns about data privacy. By staying vigilant and proactive, you can maintain control over your personal information on your iPhone.
Take advantage of these privacy settings to enhance your privacy and security while using your iPhone.
Controlling Access to Siri
Siri, Apple’s virtual assistant, can be a helpful tool for performing various tasks on your iPhone. However, if you prefer to have more control over when and how Siri is accessed, you can customize the settings to suit your preferences. Here’s how you can control access to Siri:
1. Open the “Settings” app on your iPhone and tap on “Siri & Search.”
2. In the Siri & Search settings, you will find various options to customize Siri’s behavior.
3. To completely disable Siri, toggle the switch next to “Listen for ‘Hey Siri'” to the “Off” position.
4. If you still want to use Siri, but want to prevent it from being activated by voice, you can leave the “Listen for ‘Hey Siri'” switch on and disable the “Press Side Button for Siri” option. This way, you will only be able to access Siri through manual activation.
5. Additionally, you can control whether Siri is accessible from the lock screen. If you want to enhance security and privacy, toggle the switch next to “Allow Siri When Locked” to the “Off” position. This means that Siri won’t respond or provide answers when your iPhone is locked.
6. In the same settings menu, you can also choose whether Siri shows suggestions on the lock screen, in search, and while using specific apps. Customize these options based on your preferences.
Controlling access to Siri allows you to have more control over when and how Siri interacts with you and your device. It can be particularly useful if you want to limit accidental activations or maintain a more discreet user experience.
Remember that these settings apply to Siri as a whole. If you want to customize Siri’s behavior for specific apps, you can do so by exploring the Siri & Search settings for individual apps.
By customizing the access and behavior of Siri on your iPhone, you can tailor the virtual assistant to your preferences and enhance your overall user experience.
Restricting Access to Certain Features and Settings
If you want to have more control over the features and settings on your iPhone, you can enable restrictions to restrict access to specific functions. By customizing these settings, you can personalize your device and prevent unwanted modifications. Here’s how you can restrict access to certain features and settings:
1. Open the “Settings” app on your iPhone and tap on “Screen Time.”
2. Tap on “Content & Privacy Restrictions.”
3. Enter your restrictions passcode to proceed.
4. Tap on “Allow Changes.”
5. In this section, you will see various options for restricting access to different features and settings on your iPhone.
6. For example, you can disable the ability to make changes to accounts, location settings, or cellular data settings. Simply toggle the switches to the “Off” position for the features you want to restrict.
7. Additionally, you can personalize the restrictions further by tapping on “Apps” under the “Allowed Apps” section. From here, you can choose to restrict access to certain built-in apps, such as the camera, Siri & Dictation, or FaceTime.
8. Likewise, you can restrict changes to privacy settings, preventing apps from accessing certain data like contacts, calendars, or photos.
By restricting access to certain features and settings, you can safeguard your device and prevent unintended changes. This is particularly useful if you want to create a controlled environment or limit access for specific users, such as children.
Keep in mind that enabling restrictions may limit functionality in some cases. It’s important to strike a balance between customization and usability based on your specific needs.
Regularly reviewing and adjusting the restrictions settings ensures that your iPhone remains tailored to your preferences and maintains a secure and controlled environment.
Take advantage of these restrictions to have better control over the features and settings on your iPhone, creating a customized user experience that aligns with your needs and preferences.
Restricting Access to Music, Movies, and Books
If you want to have more control over the types of music, movies, and books that can be accessed on your iPhone, you can enable restrictions to restrict access to specific content. This can be particularly useful if you want to create a family-friendly environment or limit access to certain types of media. Here’s how you can restrict access to music, movies, and books:
1. Open the “Settings” app on your iPhone and tap on “Screen Time.”
2. Tap on “Content & Privacy Restrictions.”
3. Enter your restrictions passcode to proceed.
4. Tap on “Content Restrictions.”
5. Under the “Music, Podcasts & News” section, you can choose to limit explicit content for music, podcasts, and news. Toggle the switches to the “Off” position to restrict access to explicit content in these categories.
6. Similarly, under the “Movies” section, you can choose to restrict movies to specific ratings. By default, unrestricted access may be granted, but you can limit it to age-appropriate ratings such as “PG-13” or “G” by selecting the desired option.
7. In the “Books” section, you can choose to limit access to explicit and sexual content. Toggle the switches to the “Off” position to restrict books with explicit material.
By customizing these restrictions, you can create a more controlled environment for accessing music, movies, and books on your iPhone. This can be highly beneficial if you have children using your device or if you want to limit exposure to explicit or inappropriate content.
It’s important to note that while restrictions can help filter out certain types of content, they may not be completely foolproof. It’s always recommended to review and monitor the content that is being accessed on your device, especially if you have concerns about age-appropriate or explicit material.
Take advantage of these content restrictions to ensure a more tailored and family-friendly media experience on your iPhone.
Managing App Downloads and Deletions
Controlling the app downloads and deletions on your iPhone allows you to keep your device organized and ensure that only the apps you want are installed. By managing these processes, you can prevent unwanted or unnecessary apps from cluttering your device. Here’s how you can manage app downloads and deletions:
Managing App Downloads:
1. Open the “Settings” app on your iPhone and tap on your Apple ID at the top.
2. Tap on “Media & Purchases.”
3. Under the “Automatic Downloads” section, tap on “App Downloads.”
4. Choose whether you want to allow automatic downloads of apps across your devices by toggling the switch next to “Apps” to the “On” or “Off” position.
If you enable automatic app downloads, any app that you download on one device connected to your iCloud account will automatically download on all other devices as well. This makes it easier to keep your apps up to date across multiple devices.
5. If you want to manually manage app downloads, leave the “App Downloads” switch in the “Off” position. This means that any apps you download on one device will not automatically download on other devices.
Managing App Deletions:
When it comes to managing app deletions, you have a couple of options:
– On your iPhone’s home screen, long-press on any app icon until all the app icons start wiggling. Tap on the “X” icon that appears on the app you want to delete. Confirm the deletion when prompted.
– To prevent the accidental deletion of apps, you can enable “Offload Unused Apps” in your iPhone’s “Settings.” This option allows your iPhone to automatically remove apps that you haven’t used recently when your device is low on storage. The app’s data will be saved, allowing you to easily reinstall it in the future.
By managing app downloads and deletions, you can maintain a more organized and streamlined app collection on your iPhone. It allows you to control the apps that are installed and prevent unnecessary clutter.
Remember to regularly review your app collection and remove any unused or unwanted apps to free up storage space and optimize your device’s performance.
Take advantage of these app management features to keep your iPhone’s app ecosystem under control and ensure a more efficient user experience.
Restricting Access to Multiplayer Games and Social Media
If you want to limit access to multiplayer games and social media on your iPhone, you can enable restrictions to create a more controlled digital environment. This can be particularly useful if you want to manage screen time or restrict certain activities for yourself or others. Here’s how you can restrict access to multiplayer games and social media:
1. Open the “Settings” app on your iPhone and tap on “Screen Time.”
2. Tap on “Content & Privacy Restrictions.”
3. Enter your restrictions passcode to proceed.
4. Tap on “Allowed Apps.”
5. Scroll down to the “Social Networking” section. To restrict access to social media apps, toggle the switch next to “Social Networking” to the “Off” position. This will prevent any social media apps from being accessed.
6. Similarly, scroll down to the “Games” section. To restrict access to multiplayer games, toggle the switch next to “Multiplayer Games” to the “Off” position. This will prevent multiplayer gaming features within apps from being accessed.
By restricting access to multiplayer games and social media, you can help manage screen time and promote a more balanced digital experience. This can be particularly beneficial for parents who want to create a controlled environment for their children or for individuals looking to reduce distractions and focus on other activities.
It’s important to note that restrictions may not impact all aspects of multiplayer gaming or social media. Some apps may include features that allow communication or social interaction outside of the restrictions settings. It’s recommended to regularly review and monitor the apps being used to ensure they align with your restrictions and preferences.
Take advantage of these restrictions to promote healthier digital habits and create a more balanced and focused environment on your iPhone.