
Benefits of Using a Custom Email Address
When it comes to email communication, using a custom email address can provide several advantages over generic email services. Here are some of the key benefits of using a custom email address:
- Professionalism: One of the primary benefits of using a custom email address is that it adds a touch of professionalism to your online presence. Instead of using a generic email address like abc@gmail.com, having an email address with your domain name (e.g., yourname@yourdomain.com) gives a more professional impression to clients, colleagues, and potential business partners.
- Branding: A custom email address allows you to reinforce your brand identity. By using your domain name in your email address, you can align your email communication with your website and other marketing materials. This consistency helps to build brand recognition and trust among recipients.
- Credibility: Having a custom email address instills trust and credibility in your recipients. It shows that you have taken the time to invest in your online presence and establishes you as a legitimate business or professional.
- Security: Custom email addresses offer enhanced security compared to generic email services. With custom email accounts, you can implement stronger password policies and enable two-factor authentication, adding an extra layer of protection to your email communications.
- Organization: A custom email address allows for better organization of your emails. You can create specific email addresses for different purposes, such as sales@yourdomain.com or support@yourdomain.com, making it easier to manage and categorize incoming messages.
Overall, using a custom email address offers numerous benefits in terms of professionalism, branding, credibility, security, and organization. It is an essential element of creating a strong online presence and can greatly improve your communication with clients, customers, and business partners.
Setting Up a Custom Email Address
If you want to set up a custom email address, follow these steps:
- Choose a Domain Provider: Start by selecting a domain provider where you can register your domain name. Popular domain providers include GoDaddy, Namecheap, and Google Domains.
- Register a Domain: Once you have chosen a domain provider, search for a domain name that aligns with your brand or business. Once you find an available domain name, complete the registration process and secure your domain.
- Select an Email Hosting Provider: Next, you need to choose an email hosting provider that will handle your custom email address. Some popular options include G Suite (now known as Google Workspace), Microsoft 365, and Zoho Mail.
- Set Up Email Hosting: Once you have selected an email hosting provider, you will need to follow their instructions to set up email hosting for your domain. This typically involves verifying your domain ownership and configuring the necessary DNS records.
- Create Email Accounts: After your email hosting is set up, you can create custom email accounts. Typically, you can create multiple email accounts with your custom domain name, such as info@yourdomain.com or sales@yourdomain.com. Follow the email hosting provider’s instructions to create these accounts.
When setting up your custom email address, it is important to consider the storage space, security features, and email management tools provided by the email hosting provider. Additionally, ensure that the provider offers reliable customer support in case you need assistance in the future.
By following these steps and setting up a custom email address, you can establish a professional and branded email presence that enhances your online communication. It’s a simple process that can have a significant impact on how your brand or business is perceived by others.
Configure Custom Email Address in Gmail
If you prefer to use Gmail as your email client for your custom email address, you can easily configure it by following these steps:
- Access Gmail Settings: Log in to your Gmail account and click on the gear icon in the top right corner. From the dropdown menu, select “Settings”.
- Go to Accounts and Import: In the Gmail Settings menu, navigate to the “Accounts and Import” tab. Here, you will find various options to manage your email accounts.
- Add Custom Email Address: Under the “Send mail as” section, click on the “Add another email address” option. A popup will appear where you can enter your name and custom email address.
- Enter Email Configuration Details: After entering your name and custom email address, click on the “Next Step” button. In the next screen, you will need to provide the SMTP server (which you can obtain from your email hosting provider) and your email account username and password.
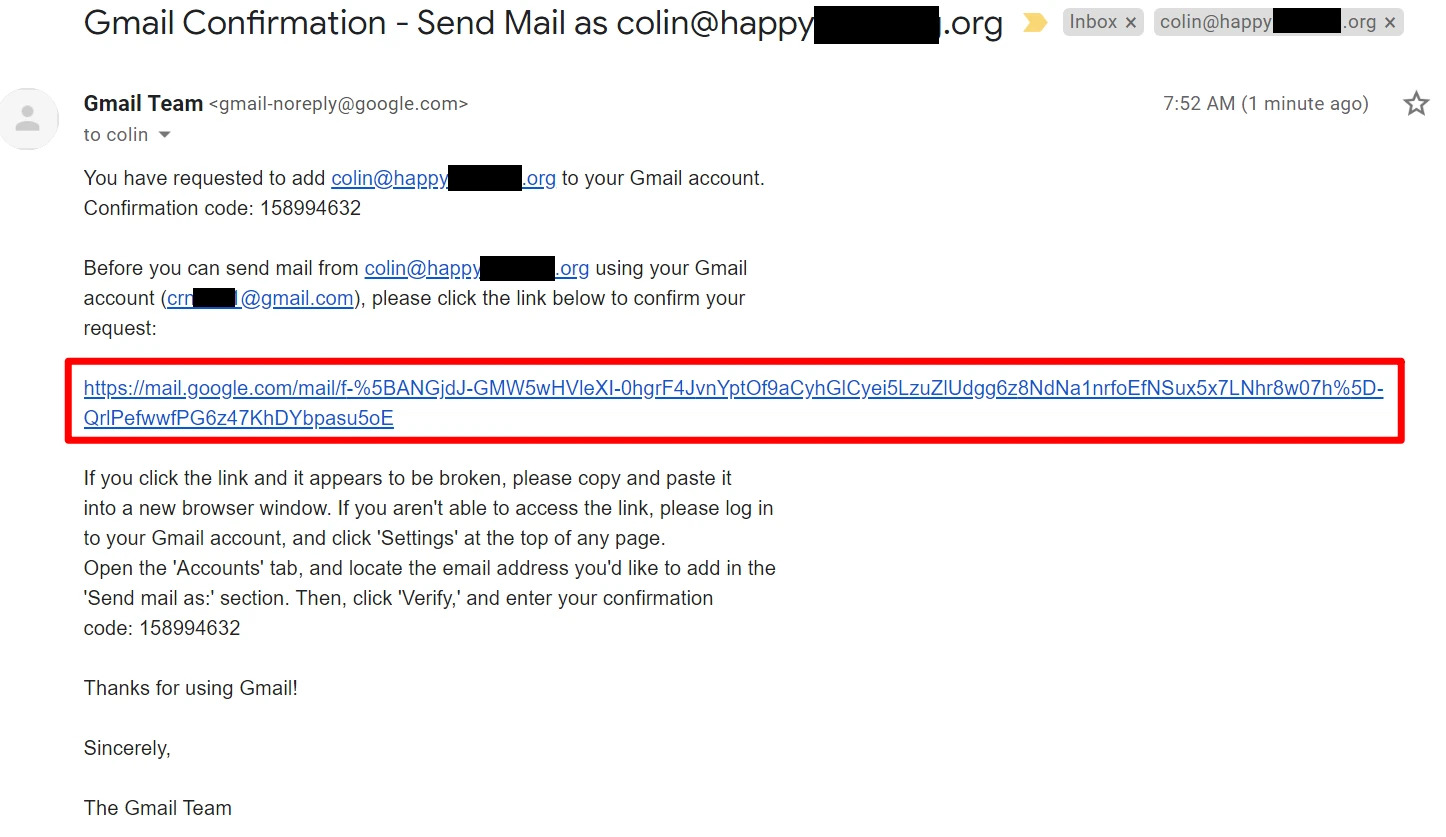
- Verify Custom Email Address: Gmail will attempt to verify the email configuration by sending a verification email to your custom email address. Access your custom email account and follow the instructions in the verification email to confirm that you own the email address.
- Set Custom Email Address as Default: Once the verification process is complete, you can choose to set your custom email address as the default address for sending emails. This allows you to send emails from your custom email address directly within Gmail.
By configuring your custom email address in Gmail, you can manage all your email accounts in one place, benefiting from Gmail’s user-friendly interface and robust features. It becomes easier to send, receive, and organize emails across multiple accounts while maintaining a professional image with your custom email address.
Remember to update your email signature in Gmail to reflect your custom email address, adding a personal touch to your outgoing emails.
Adding Custom Email Address as an Alias in Gmail
If you want to use your custom email address as an alias in Gmail, allowing you to receive and reply to emails from your custom address within your Gmail account, follow these steps:
- Access Gmail Settings: Log in to your Gmail account and click on the gear icon in the top right corner. From the dropdown menu, select “Settings”.
- Go to Accounts and Import: In the Gmail Settings menu, navigate to the “Accounts and Import” tab. This section contains options to manage your email accounts and aliases.
- Add Another Email Address: Under the “Send mail as” section, you will see the email address you configured earlier. Click on the “Add another email address” option to add your custom email address as an alias.
- Enter Alias Details: In the popup that appears, enter your name and the custom email address you want to add as an alias. Leave the “Treat as an alias” checkbox selected, and click on the “Next Step” button.
- Verify Alias Ownership: Gmail will send a verification email to your custom email address. Access your custom email account and follow the instructions in the verification email to verify ownership of the alias. Once verified, the alias will be added to your Gmail account.
- Select Default Sending Account: In the “Send mail as” section of Gmail settings, you can choose your default sending account. This allows you to select whether you want to send emails from your primary Gmail address or your custom email address alias by default.
Once you have added your custom email address as an alias in Gmail, you can easily switch between your primary Gmail address and the alias when composing emails. Recipients will see emails sent from your custom email address as if they were originating from that address directly.
It’s worth noting that when you receive emails addressed to your custom email address alias, they will appear in your Gmail inbox alongside your primary Gmail emails, allowing you to manage all your email correspondence in one place.
Sending Mail From Custom Email Address in Gmail
Once you have added your custom email address as an alias in Gmail, you can easily send emails from your custom address within the Gmail interface. Follow these steps to send mail from your custom email address:
- Compose a New Email: Click on the “Compose” button in Gmail to start creating a new email.
- Select Custom Email Address: In the “From” field of the compose window, click on the dropdown arrow to see a list of available email addresses. Select your custom email address alias from the list.
- Write and Send Email: Proceed with writing your email, adding recipients, subject line, and the content of your message. When you are ready, click on the “Send” button at the bottom of the compose window to send the email from your custom email address.
When you send an email from your custom email address, recipients will see the email coming from your custom address, providing a consistent and professional appearance. It’s important to note that replies to the email will be sent to the address you used to log in to Gmail, not your custom email address.
Additionally, you can switch between your primary Gmail address and the custom email address alias for each email you compose, giving you the flexibility to choose the appropriate sender identity for different situations.
By being able to send mail from your custom email address directly within Gmail, you can streamline your email management, maintain a professional image, and provide a cohesive branding experience to your recipients.
Managing Multiple Custom Email Addresses
If you have multiple custom email addresses associated with different domains or purposes, you can effectively manage them within Gmail. Here are some tips for managing multiple custom email addresses:
- Organize Emails with Labels: Use Gmail’s label feature to create labels for each of your custom email addresses. This allows you to categorize and filter incoming emails, keeping your inbox organized and easily accessible.
- Set Up Filters: Create filters in Gmail to automatically sort incoming emails based on the recipient’s email address. For example, you can set up a filter to automatically label and archive emails sent to your sales@yourdomain.com address, making it easier to manage specific email accounts.
- Customize Signature for Each Email Address: Tailor your email signature to match each custom email address. Gmail allows you to set up different signatures for different aliases, enabling you to maintain consistent branding across multiple email accounts.
- Manage Sent Emails: By default, Gmail saves sent emails in the “Sent” folder of your primary Gmail address. However, you can configure Gmail to save sent emails from each custom email address in separate folders or labels. This makes it easier to locate past emails sent from specific aliases.
- Delegate Access: If you have team members or assistants helping you manage your multiple custom email addresses, Gmail allows you to delegate access to specific email accounts. This allows others to access, send, and manage emails on your behalf without needing to share your password.
By employing these strategies, you can effectively manage multiple custom email addresses within Gmail. It helps you stay organized, streamline your email workflow, and ensure that each email address receives the appropriate attention it deserves.
Remember to regularly check and maintain each custom email address to avoid missing important messages. By keeping a proactive approach to managing multiple email accounts, you can optimize your communication and deliver a professional experience to your recipients.
Troubleshooting Common Issues
While setting up and managing a custom email address in Gmail can be relatively straightforward, you may encounter some common issues along the way. Here are some troubleshooting tips for addressing these issues:
- Email Delivery Problems: If you are experiencing issues with emails not being delivered from your custom email address, double-check your email hosting provider’s settings. Ensure that the MX records are correctly configured and that there are no DNS issues affecting email delivery.
- Authentication Errors: Authentication errors can occur when sending emails from your custom email address. Make sure that the outgoing SMTP server settings are accurate, including the server name, port number, and authentication method. Double-check the username and password you are using for the custom email account to ensure they are correct.
- Verification Failures: If you encounter difficulties when verifying your custom email address in Gmail, check that you have correctly followed the verification instructions provided by your email hosting provider. Ensure that you have access to the inbox of the custom email address to receive the verification email and complete the verification process.
- Alias Not Appearing: If you added a custom email address alias in Gmail, but it is not appearing as a selectable option when composing emails, go back to the Gmail settings. Make sure that you have added the alias correctly under the “Send mail as” section. If necessary, delete the alias and re-add it following the instructions provided earlier.
- Emails Sent to Wrong Account: If emails meant for one custom email address are ending up in a different account or not being received at all, check the email forwarding settings in your email hosting provider’s control panel. Ensure that email forwarding is properly set up for each custom email address to the corresponding Gmail account.
If you continue to experience issues with your custom email address in Gmail, it’s recommended to reach out to your email hosting provider’s support team for assistance. They can help identify and resolve any configuration or technical issues that may be causing problems.
By troubleshooting and addressing these common issues, you can ensure a smooth experience when using your custom email address in Gmail, allowing you to effectively communicate and manage your emails with ease.