
Reasons to Send Email to Undisclosed Recipients
Sending emails to undisclosed recipients can be beneficial in various situations. Here are some common reasons why you might choose to send an email to undisclosed recipients:
- Bulk Communications: When you need to send the same message to multiple individuals without revealing their identities or email addresses, sending an email to undisclosed recipients is a convenient option. This is particularly useful when you want to maintain privacy or confidentiality.
- Protecting Privacy: By using the undisclosed recipients feature, you can ensure that each person receiving the email does not see the other recipients’ email addresses. This protects their privacy and prevents the spread of their contact information.
- Email Newsletters: If you run a newsletter or distribution list, sending the email to undisclosed recipients helps maintain professionalism. Your subscribers will appreciate receiving a personalized email without their email addresses being visible to others.
- Group Collaboration: When working on a project with a group of people, sending an email to undisclosed recipients allows you to communicate effectively without exposing the email addresses of every participant. This fosters a sense of privacy and confidentiality within the team.
- Surveys and Feedback: If you’re conducting surveys or seeking feedback from a group of individuals, sending an email to undisclosed recipients ensures that each recipient’s response remains confidential. This encourages honest and unbiased feedback.
These are just a few examples of the many situations where sending an email to undisclosed recipients can be beneficial. It offers a convenient way to communicate en masse while maintaining privacy and professionalism.
How to Use Group Mailing Lists in Gmail
Gmail offers a convenient feature called “Group Mailing Lists” that allows you to send emails to multiple recipients without having to add each address individually. Here’s how you can create and use group mailing lists in Gmail:
- Creating a New Group Mailing List: To create a new group mailing list, follow these steps:
- Open your Gmail account and click on the “Google Apps” button in the top-right corner.
- Click on “Contacts” to open your contacts list.
- On the left sidebar, click on “Labels” and then select “Create new label.”
- Name your new label, such as “Group Mailing List,” and click “Save.”
- Adding Contacts to the Group Mailing List: Once you have created a group mailing list, you can add contacts to it by following these steps:
- Open your contacts list in Gmail.
- Select the contacts you want to add to the group mailing list by checking the boxes next to their names.
- Click on the “Labels” button at the top of the page and select the group mailing list label you created earlier.
- The selected contacts will be added to the group mailing list.
- Composing an Email to Undisclosed Recipients: To send an email to undisclosed recipients using the group mailing list, follow these steps:
- Click on the “Compose” button in Gmail to start a new email.
- In the “To” field, enter the name of your group mailing list label. Gmail will automatically suggest the label as you type.
- The email will be sent to all the contacts in the group mailing list without revealing their email addresses to each other.
With group mailing lists in Gmail, you can easily manage and send emails to multiple recipients without the hassle of manually adding each address. It saves time and ensures privacy for your contacts.
Creating a New Group Mailing List
Creating a group mailing list in Gmail allows you to organize and manage a set of contacts whom you frequently email as a group. By creating a new group mailing list, you can easily send messages to multiple recipients without having to add each email address individually. Here’s how you can create a new group mailing list in Gmail:
- Step 1: Access Your Contacts
Log in to your Gmail account and click on the “Google Apps” button in the top-right corner. From the dropdown menu, select “Contacts” to access your contact list. - Step 2: Open Labels
On the left sidebar of the Contacts page, click on “Labels.” This will display a list of your existing labels and mailing lists. - Step 3: Create a New Label
At the top of the Labels section, click on the “Create new label” button. A popup window will appear, prompting you to enter a name for your new label. Choose a descriptive name for your group mailing list, such as “Friends,” “Colleagues,” or “Family.” - Step 4: Add Contacts to the Mailing List
Now, you can add contacts to the newly created mailing list. To do this, search for the contacts you want to include by using the search bar or browsing through your contacts. Once you find a contact, select the checkbox next to their name. Repeat this process for all the contacts you want to add to the mailing list. - Step 5: Assign the Label
With the desired contacts selected, click on the “Labels” button at the top of the page. A dropdown menu will appear, displaying your available labels. Find and click on the label you created earlier. This will assign the label to the selected contacts, effectively adding them to the newly created group mailing list.
Once you have completed these steps, you have successfully created a new group mailing list in Gmail. You can now easily send emails to this group by simply entering the label’s name in the recipient field when composing a new message. This feature streamlines your emailing process, saving you time and effort.
Adding Contacts to the Group Mailing List
After creating a group mailing list in Gmail, the next step is to add contacts to the list. By adding contacts to the group mailing list, you can easily send emails to multiple recipients without having to manually enter each email address. Here’s how you can add contacts to a group mailing list in Gmail:
- Step 1: Access Your Contacts
Log in to your Gmail account and click on the “Google Apps” button in the top-right corner. From the dropdown menu, select “Contacts” to access your contact list. - Step 2: Select Contacts
Once you’re on the Contacts page, navigate to the contact list or search for specific contacts using the search bar. To add a contact to the group mailing list, select the checkbox next to their name. Repeat this step for all the contacts you want to add. - Step 3: Assign the Label
With the desired contacts selected, click on the “Labels” button at the top of the page. A dropdown menu will appear, displaying your available labels. Find and click on the group mailing list label you created earlier. This will assign the label to the selected contacts, adding them to the group mailing list.
Once you have completed these steps, the contacts will be added to the group mailing list, and you can easily send emails to all of them by using the label’s name in the recipient field when composing a new message. This simplifies the process of sending emails to multiple recipients, saving you time and effort.
Composing an Email to Undisclosed Recipients
When you want to send an email to multiple recipients without revealing their identities or email addresses to each other, Gmail provides the option to send an email to undisclosed recipients. This ensures privacy and confidentiality. Here’s how you can compose an email to undisclosed recipients in Gmail:
- Step 1: Open a Compose Window
Log in to your Gmail account and click on the “Compose” button to start a new email. - Step 2: Enter Recipient Field
In the “To” field, enter the label name of your group mailing list that contains the undisclosed recipients. As you type, Gmail will automatically suggest the label based on what you’ve entered. - Step 3: Add a Personalized Greeting (Optional)
If you would like to personalize the email by including each recipient’s name, you can use Gmail’s mail merge feature. Simply use a curly brace followed by the contact field name, such as “{First Name}”. For example, if you want to address each recipient by their first name, type “{First Name}” in the body of the email. - Step 4: Compose Your Email
Write your email content as you would for any other email. You can format your text, add attachments, and include images, just like in a regular email.
By following these steps, you can easily compose an email to undisclosed recipients in Gmail. This allows you to communicate effectively while maintaining the privacy and confidentiality of each recipient. It’s a convenient feature that ensures professionalism and discretion in your email communications.
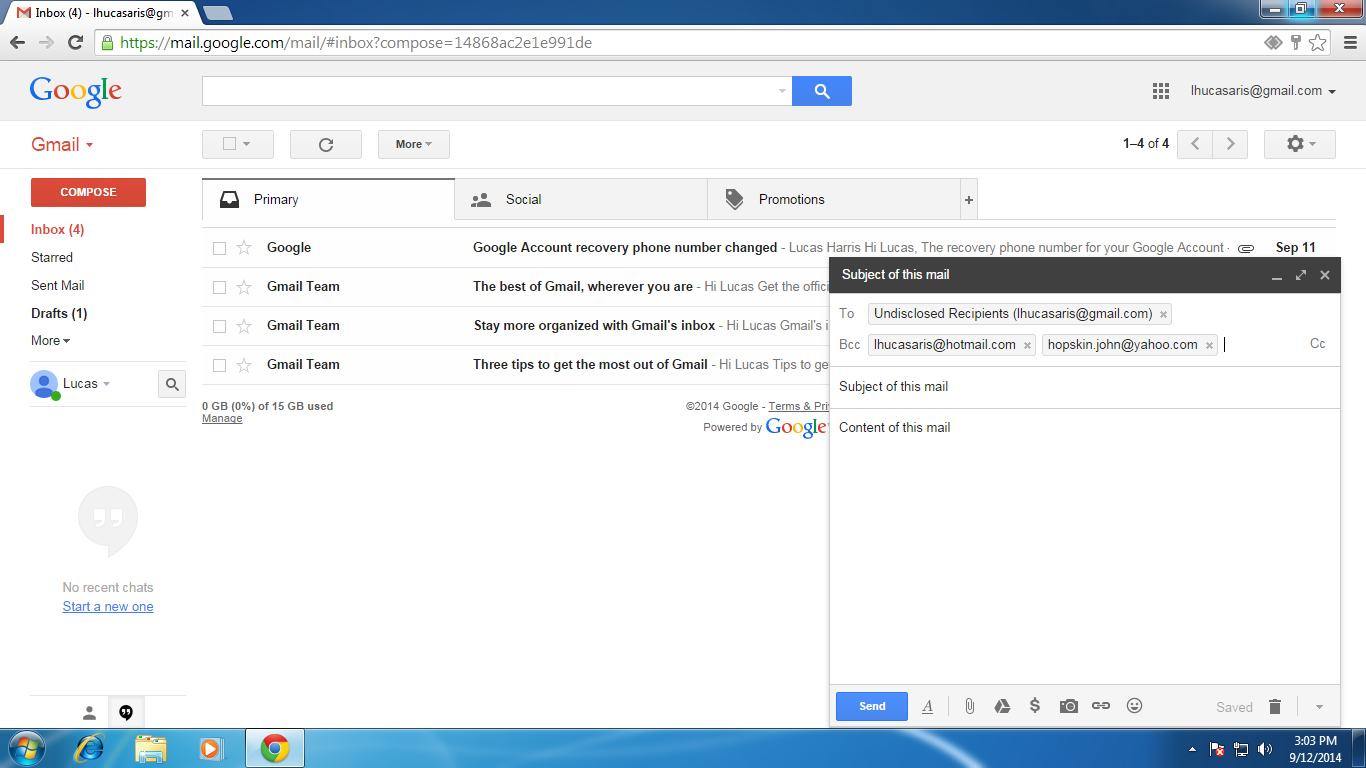
Using the Bcc Field in Gmail
The Bcc (Blind Carbon Copy) field in Gmail is a useful feature that allows you to send an email to multiple recipients without revealing their email addresses to each other. When you add recipients to the Bcc field, their email addresses are hidden from the other recipients. Here’s how you can use the Bcc field in Gmail:
- Step 1: Open a Compose Window
Log in to your Gmail account and click on the “Compose” button to start a new email. - Step 2: Enable the Bcc Field
By default, the Bcc field is hidden in Gmail. To enable it, click on the “Bcc” link located next to the “To” field. The Bcc field will appear, allowing you to add recipients without their email addresses being visible to each other. - Step 3: Add Recipients to the Bcc Field
In the Bcc field, enter the email addresses of the recipients you want to send the email to. Separate each email address with a comma to add multiple recipients. The recipients in the Bcc field will receive the email, but their email addresses will be hidden from each other. - Step 4: Complete the Email and Send
Compose your email content in the body of the email, just as you would for a regular email. You can also include attachments, format your text, and add images. Once you are ready, click the “Send” button to send the email to the recipients in the Bcc field.
By utilizing the Bcc field in Gmail, you can maintain the privacy and discretion of your email communications. This feature is particularly useful when sending emails to a large group of recipients or when you want to protect their personal information from being shared with others. It’s a valuable tool that allows you to send emails conveniently and securely.
How to Hide Email Addresses in Gmail
Gmail offers various options to hide email addresses and protect the privacy of recipients. By using these techniques, you can ensure that the email addresses of your contacts are not visible to other recipients. Here’s how you can hide email addresses in Gmail:
- Use the Bcc Field:
One of the simplest ways to hide email addresses is by using the Bcc (Blind Carbon Copy) field. When composing an email, enter the recipients’ email addresses in the Bcc field instead of the To or Cc fields. This way, each recipient will receive the email, but their email addresses will not be visible to others. - Send to a Mailing List:
Create a group mailing list in Gmail and add your contacts to it. When composing an email, enter the mailing list’s label name in the To, Cc, or Bcc field. The email will be sent to all recipients, but their email addresses will be concealed. - Use Gmail’s Mail Merge Feature:
Gmail’s mail merge feature allows you to personalize emails sent to multiple recipients without revealing their email addresses to each other. By using curly braces and the contact field names (e.g., {First Name}), you can include personal data in the email such as the recipient’s name or other custom fields. - Utilize Google Groups:
Consider using Google Groups as an alternative method to hide email addresses. With Google Groups, you can create a group, add members, and send emails to the group address. This way, each member of the group will receive the email without seeing the email addresses of other recipients.
By utilizing these methods, you can effectively hide email addresses in Gmail and maintain the privacy and confidentiality of your recipients. Whether you’re sending emails to a large group or just a few individuals, these techniques will help you protect sensitive information and ensure a professional and secure communication experience.
Tips for Sending Email to Undisclosed Recipients
When sending an email to undisclosed recipients, there are a few tips you can follow to ensure a smooth and professional experience. These tips will help you maintain privacy, ensure successful delivery, and optimize your communication. Here are some valuable tips for sending email to undisclosed recipients:
- Use Bcc:
Always use the Bcc (Blind Carbon Copy) field to add recipients when you want to keep their email addresses hidden. Avoid adding recipients in the To or Cc fields, as this can expose their email addresses to other recipients. - Test Before Sending:
Before sending the email, it’s important to test the email delivery to ensure everything is working as intended. Send a test email to yourself and a few trusted contacts to verify that the recipients remain undisclosed and that the email appears as expected. - Protect Confidential Information:
If your email contains sensitive or confidential information, consider using additional security measures such as password protection or encryption. This adds an extra layer of protection to prevent unauthorized access to the content of the email. - Personalize with Mail Merge:
If you want to address each recipient individually, make use of Gmail’s mail merge feature and include appropriate personalization tags, such as the recipient’s name or other relevant details. This adds a personalized touch to your email while still keeping recipients undisclosed to each other. - Double-Check Recipients:
Before sending the email, double-check the recipients’ email addresses to ensure accuracy. Mistakenly including an incorrect address could expose someone’s email address to unintended recipients and compromise their privacy. - Respect Privacy Preferences:
Respect the privacy preferences of your recipients. If someone explicitly requests that their email address not be shared with others, ensure that you honor their request and refrain from including their address in future emails. - Review Email Content:
Take a moment to review the email content for any personal or confidential information that may have been inadvertently included. Make sure that the information you are sharing is appropriate and relevant for all recipients.
By following these tips, you can ensure that your emails to undisclosed recipients are delivered smoothly, maintain privacy, and uphold a professional communication experience. Use these guidelines to optimize your email practices and enhance the confidentiality of your messages.