
What is a Gmail Alias?
A Gmail alias is an additional email address that you can use to send and receive emails from your existing Gmail account. It acts as a virtual mask, allowing you to maintain your privacy and separate your personal and professional communications without having to create multiple Gmail accounts.
When you create a Gmail alias, all emails sent to that alias will be delivered to your main Gmail inbox. This means that you can manage multiple email addresses from a single Gmail account, making it convenient and efficient for organizing your various email needs.
For example, if your main Gmail address is “example@gmail.com” and you create an alias like “work@example.com,” you can use the alias to send and receive work-related emails. This way, your colleagues and clients will see the alias instead of your personal email address.
Gmail aliases are particularly useful for professionals, freelancers, and entrepreneurs who need to maintain a professional image while separating personal and work-related communications. By using aliases, you can keep your personal email address private while still managing all your emails in one central place.
It’s important to note that a Gmail alias is not a separate email account. It is simply an alternative address that directs emails to your primary Gmail inbox. This means that you can sign in to your main Gmail account and access both your primary address and any aliases you have set up.
Now that you understand what a Gmail alias is and its benefits, we can move on to setting up an alias in Gmail and using it with iOS Mail.
Setting up a Gmail Alias
Setting up a Gmail alias is a straightforward process that can be done within your Gmail account settings. Here’s how you can create and set up a Gmail alias:
- Open your web browser and sign in to your Gmail account.
- Click on the gear icon located in the top right corner of the Gmail interface and select “Settings” from the drop-down menu.
- Navigate to the “Accounts and Import” tab.
- Scroll down to the “Send mail as” section and click on the “Add another email address” option.
- A small pop-up window will appear. Enter the desired name and email address you wish to use as an alias.
- Make sure the option “Treat as an alias” is checked. This ensures that all emails sent to the alias will be delivered to your main Gmail inbox.
- Click the “Next Step” button.
- Choose whether you want to send emails through Gmail servers or through your own SMTP server. Select the option that suits your preferences and follow the on-screen instructions to complete the setup process.
- Once you’ve finished setting up the alias, Gmail will send a verification email to the address you used. Follow the instructions in the email to verify the alias.
- After verifying the alias, you can start using it to send and receive emails.
It’s worth noting that Gmail has certain limitations on alias creation. You can only create a limited number of aliases within a specific timeframe. If you require more aliases, you may need to wait or consider using a different method, such as creating a separate email account.
Now that you’ve successfully set up a Gmail alias, let’s proceed to the next section to learn how to add and use the alias in iOS Mail.
Adding a Gmail Alias in iOS Mail
If you use iOS Mail on your iPhone or iPad, you can easily add your Gmail alias to the app to send and receive emails. Here’s how you can add a Gmail alias in iOS Mail:
- Open the Settings app on your iOS device.
- Scroll down and tap on “Mail.”
- Tap on “Accounts” and then select your Gmail account.
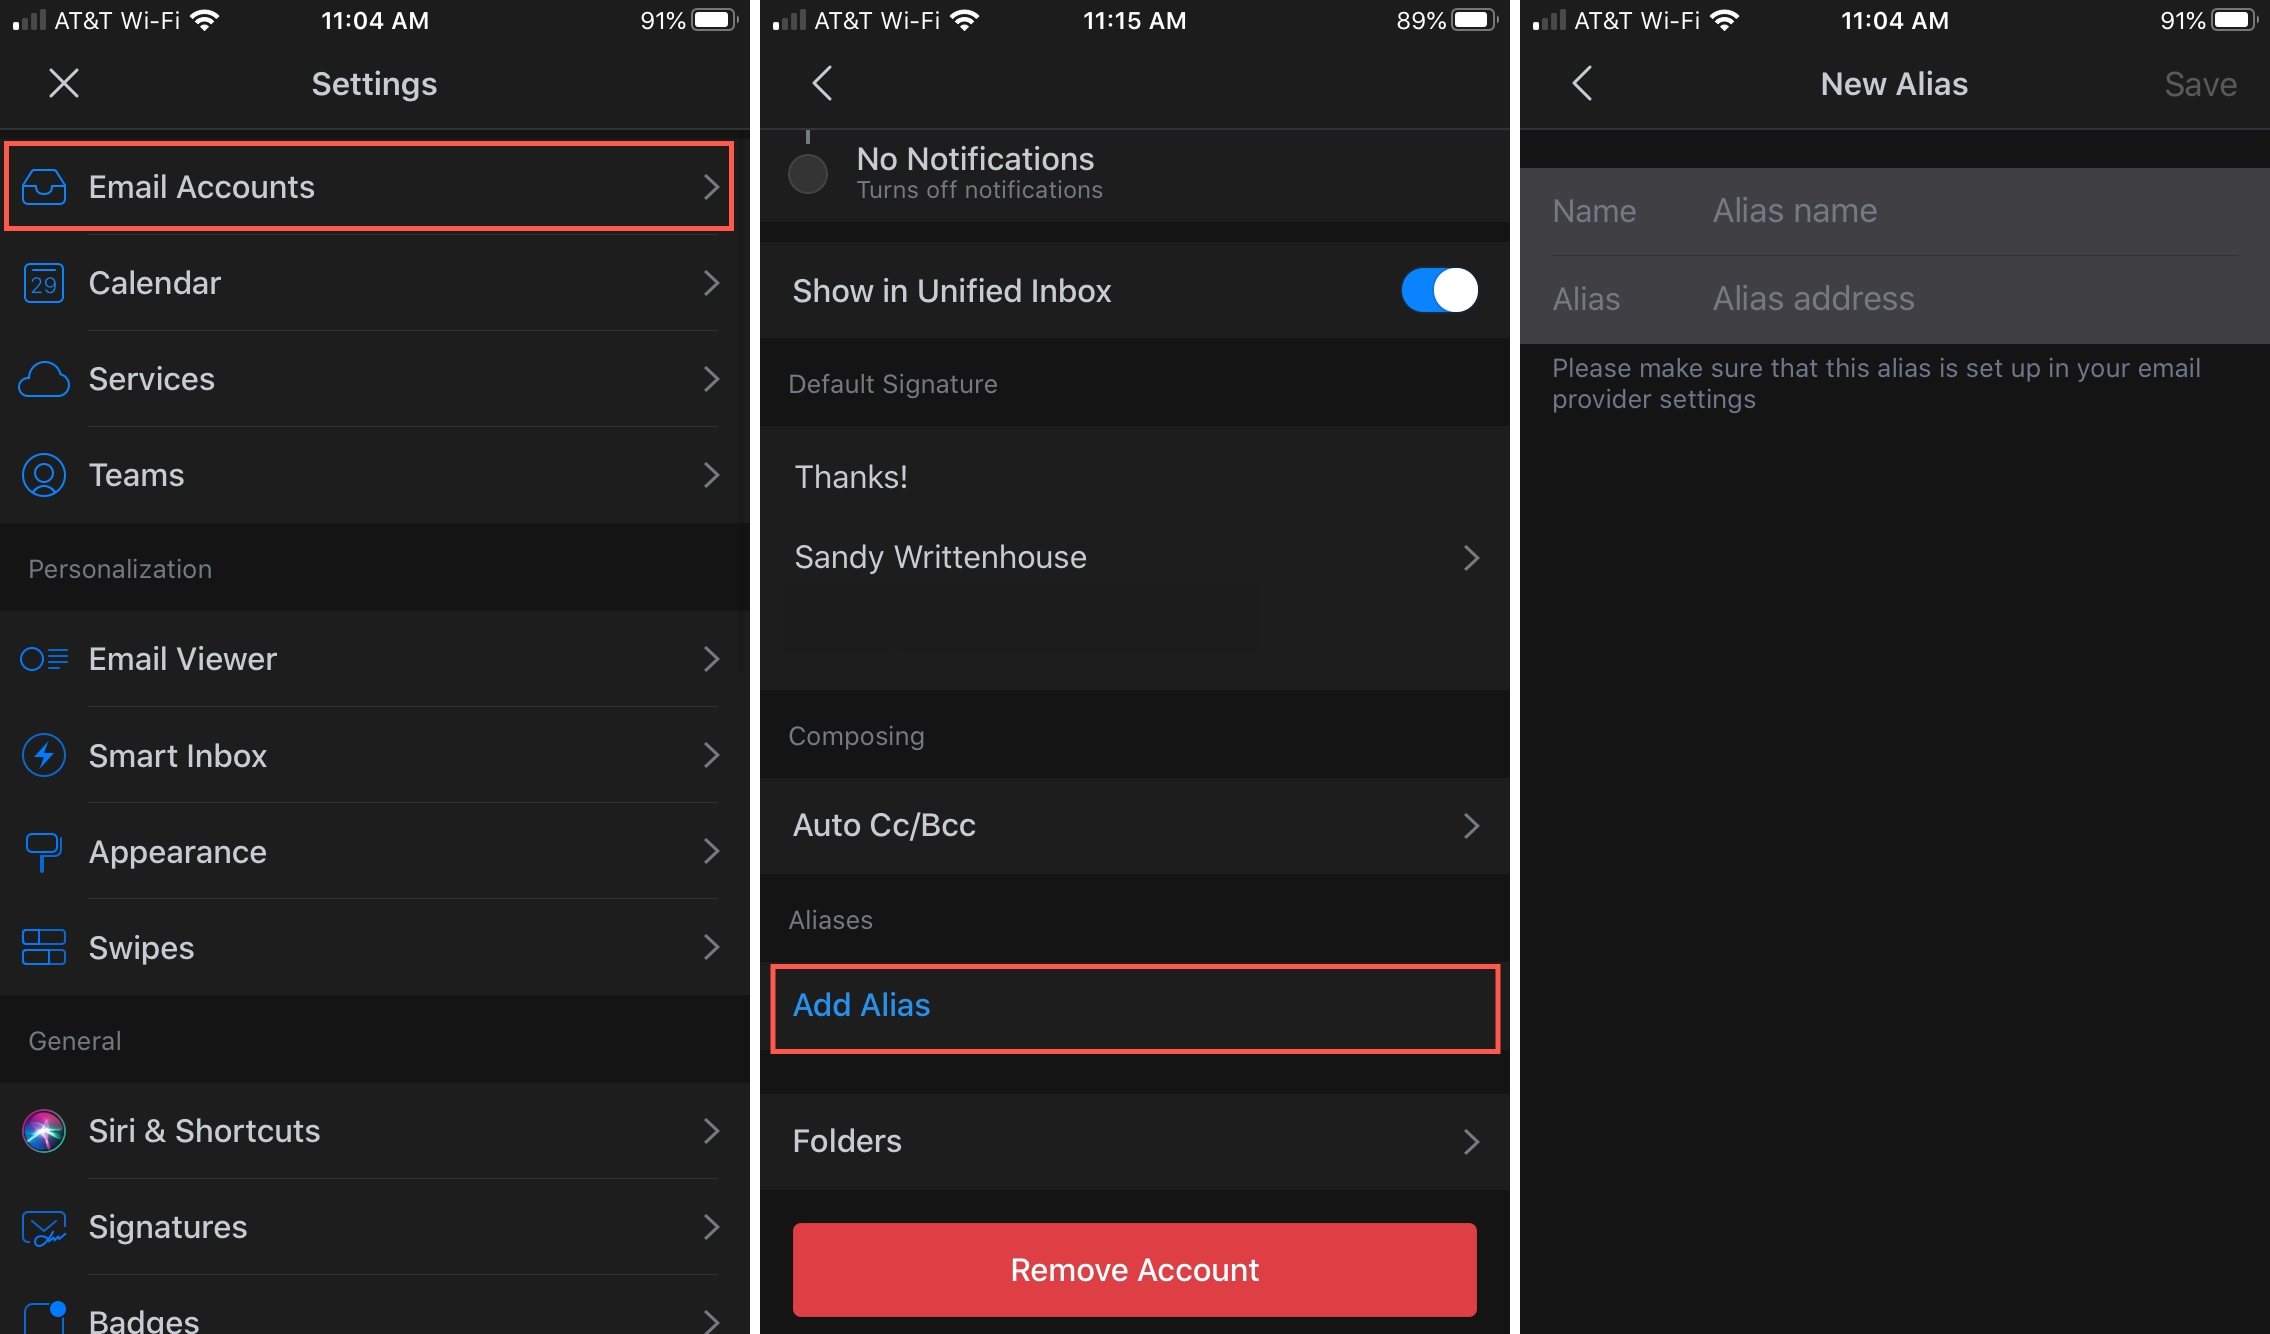
- Under the “ACCOUNT” section, tap on “Email” and then tap on “Add Another Email.”
- Enter your name and the email address of your Gmail alias.
- Tap “Next” and iOS Mail will attempt to configure the alias automatically.
- If the automatic setup is successful, you will see a confirmation message. Tap “Save” to add the alias to your Gmail account.
- If the automatic setup fails, you may need to provide the server settings manually. Contact your email provider or consult their documentation for the correct server settings.
- Once the alias is added, you can switch between your primary email and the alias when composing a new email by tapping on the “From” field.
By adding your Gmail alias to iOS Mail, you can conveniently manage and send emails from your alias directly from your mobile device. This allows for seamless communication, regardless of whether you’re using your computer or your iOS device.
Now that you know how to add a Gmail alias in iOS Mail, let’s move on to the next section to learn how to send emails using your Gmail alias.
Sending Emails using a Gmail Alias
Once you’ve set up a Gmail alias and added it to your iOS Mail account, you can start sending emails using your alias. Here’s how you can send emails using a Gmail alias:
- Open the iOS Mail app on your iPhone or iPad.
- Tap on the compose button to start a new email.
- In the “From” field, tap on your email address to switch to the alias.
- Choose your Gmail alias from the list of available email addresses.
- Compose your email as you normally would, entering the recipient’s email address, subject, and content.
- Once you’re finished composing your email, tap on the send button to send it using your Gmail alias.
When you send an email using your Gmail alias, the recipient will see the alias as the sender’s email address. This helps to maintain a professional image and keeps your personal email address private.
It’s important to note that replies to emails sent from your alias will be delivered to your main Gmail inbox. This allows you to manage all your email communications from one central location.
By leveraging your Gmail alias in iOS Mail, you can easily send emails from different addresses while maintaining a unified email management system.
Now that you know how to send emails using a Gmail alias, let’s move on to the next section to learn how to manage replies to your alias.
Managing Replies to a Gmail Alias
When you receive replies to emails sent from your Gmail alias, they will be delivered to your main Gmail inbox. Here are some tips for effectively managing replies to your Gmail alias:
- Check your main Gmail inbox regularly to ensure you don’t miss any replies or important communications.
- When replying to emails received on your Gmail alias, make sure to switch the “From” field to your alias before sending the response. This ensures that the recipient sees the alias as the sender.
- Organize your emails using labels or folders to keep track of conversations related to your Gmail alias. This can help you stay organized and easily find specific emails.
- If you want to differentiate emails received on your Gmail alias from your primary email, you can set up a rule or filter to automatically apply a specific label or move them to a separate folder.
- Consider creating a signature specifically for your Gmail alias. This can help establish a consistent and professional image when sending emails from the alias.
- If you use a mailbox app or another email client, make sure to configure it to sync with your main Gmail account. This will ensure that you receive replies to your Gmail alias on all devices.
- Regularly review and clean up your inbox to avoid clutter and keep it organized.
By managing your replies efficiently, you can stay on top of your communications and maintain a professional image when using your Gmail alias.
Now that you know how to manage replies to your Gmail alias, let’s move on to the next section to learn how to change or delete a Gmail alias.
Changing or Deleting a Gmail Alias
If you need to make changes to your Gmail alias or remove it altogether, Gmail provides simple options for modifying or deleting aliases. Here’s how you can change or delete a Gmail alias:
- Open your web browser and sign in to your Gmail account.
- Click on the gear icon located in the top right corner of the Gmail interface and select “Settings” from the drop-down menu.
- Navigate to the “Accounts and Import” tab.
- Find the “Send mail as” section, where you’ll see all your existing aliases listed.
- To change an alias, click on the edit icon (pencil) next to the alias you want to modify. Update the name or email address as needed, and save the changes.
- To delete an alias, click on the delete icon (trash bin) next to the desired alias. Confirm the action when prompted.
- After making the necessary changes or deleting the alias, your Gmail account will no longer include the modified or removed alias.
When changing a Gmail alias, it’s important to remember that the modified alias will be updated for any future emails you send. However, replies to previous emails sent from the original alias will still be received in your main Gmail inbox.
If you choose to delete a Gmail alias, any emails sent to that alias will no longer be delivered to your main Gmail inbox. It’s advisable to inform your contacts of the change to avoid any potential miscommunication.
Now that you know how to change or delete a Gmail alias, you have the flexibility to manage your aliases according to your evolving needs.
Next, let’s explore some common issues that you may encounter when using Gmail aliases and how to troubleshoot them.
Troubleshooting Common Issues
While using Gmail aliases can streamline your email management, you may occasionally encounter some common issues. Here are a few troubleshooting tips for addressing these problems:
1. Email delivery issues: If you’re experiencing problems receiving emails to your Gmail alias, first check that the alias is correctly set up and verified. Ensure that the sender is using the correct alias email address when trying to contact you.
2. Sending errors: If you encounter errors when trying to send emails using your Gmail alias, verify that the alias is properly added to your email client settings. Double-check the server settings and authentication details to ensure they are accurate.
3. Verification problems: In some cases, the verification email for a Gmail alias may not be delivered or may end up in the spam folder. If you encounter this issue, check your spam folder and mark the verification email as “Not Spam.” Alternatively, try the verification process again or contact Gmail support for assistance.
4. Limits on alias creation: Gmail has limitations on how many aliases you can create within a specific time frame. If you’re unable to create a new alias, try again later or consider alternative options, such as using a different email provider or creating a separate email account.
5. Syncing issues: If you’re using multiple devices or email clients, make sure that they are properly synced with your Gmail account. This ensures that you receive emails sent to your Gmail alias on all your devices.
6. Managing spam: Gmail’s spam filters may occasionally flag legitimate emails sent to your alias as spam. Make sure to regularly check your spam folder for any misclassified messages and mark them as “Not Spam” to prevent future occurrences.
If you encounter persistent issues or cannot resolve them on your own, it’s advisable to seek assistance from Gmail support or consult the support documentation provided by your email client.
With these troubleshooting tips in mind, you can overcome common issues and enjoy a seamless experience while using Gmail aliases.
Now that we have addressed some common troubleshooting scenarios, let’s wrap up with a quick recap of what we’ve covered.