
Methods to Resize an Image on Mac
Resizing an image on a Mac might seem like a complicated task, but fear not! There are several simple methods you can use to resize your images to suit your specific needs. Whether you want to reduce the file size for web optimization or adjust the dimensions for printing purposes, Mac provides various built-in and third-party tools that make the process easy and hassle-free.
Here are some effective methods you can use to resize an image on your Mac:
1. Using the Preview App
The Preview app comes pre-installed on all Mac computers and offers basic image editing functionalities, including the ability to resize images. Simply open the image using Preview, go to the “Tools” menu, select “Adjust Size,” and enter your desired dimensions or specify the percentage of the original size you want to maintain.
2. Using the Photos App
If you have the Photos app on your Mac, you can utilize its built-in editing tools to resize images. Open the image in the Photos app, click on the “Edit” button, and select the crop tool. Adjust the crop frame to your desired dimensions, and then click “Done” to save the changes.
3. Using the Quick Look Feature
A quick and convenient way to resize an image on Mac is by using the Quick Look feature. Simply select the image file in Finder, press the spacebar to open Quick Look, and click on the “Crop” button. Adjust the crop frame to the desired size and press “Enter” to apply the changes.
…
No matter which method you choose, resizing an image on your Mac is a straightforward process. Whether you prefer using built-in apps like Preview and Photos or opt for third-party software, you will be able to resize your images with ease. So go ahead, experiment with different methods, and find the one that works best for you to resize your images on your Mac.
Method 1: Using the Preview App
If you’re looking for a simple and built-in solution to resize images on your Mac, look no further than the Preview app. This app allows you to perform basic image editing tasks, including resizing, cropping, and adjusting image quality. Here’s how you can use the Preview app to resize an image:
- Open the image you want to resize in the Preview app. You can do this by either double-clicking on the image file or right-clicking on it and selecting “Open With” followed by “Preview.”
- Once the image is open, click on the “Tools” menu at the top of the screen and select “Adjust Size.”
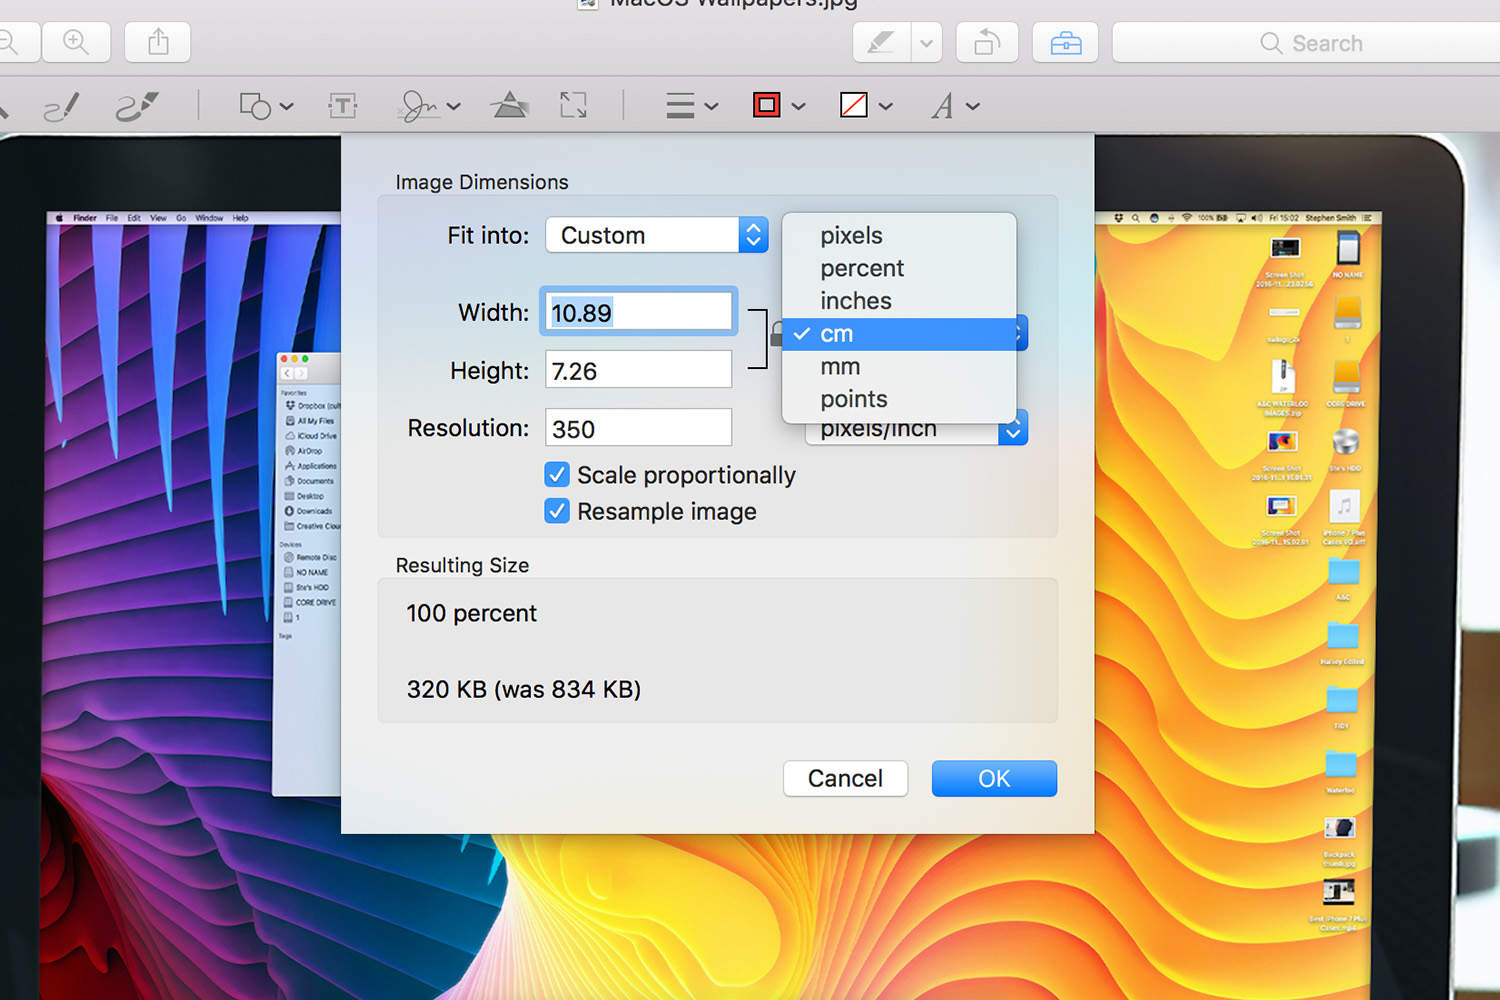
- A dialog box will appear, displaying the current dimensions of the image. To resize the image, you have two options: you can either enter specific pixel dimensions or resize it proportionally by specifying a percentage of the original size.
- If you want to enter specific pixel dimensions, make sure the “Scale proportionally” checkbox is unchecked. You can then enter the desired width and height values in pixels.
- If you prefer to resize the image proportionally, check the “Scale proportionally” checkbox. Enter a percentage value in the Width or Height field, and the other dimension will be automatically adjusted to maintain the original aspect ratio.
- Once you have set the desired dimensions, click on the “OK” button to resize the image.
- To save the resized image, go to the “File” menu and select “Save.” You can choose a new name and location for the resized image, or overwrite the original file if desired.
The Preview app also provides additional options for image adjustments, such as rotating, flipping, and adjusting image quality. These features can further enhance your resized image according to your specific requirements.
Using the Preview app to resize images on your Mac is a quick and straightforward process. It’s a convenient option for users who prefer built-in tools and don’t want to install additional software. Whether you need to resize images for web uploads, email attachments, or any other purpose, the Preview app has got you covered.
Method 2: Using the Photos App
If you have the Photos app installed on your Mac, you can take advantage of its built-in editing tools to easily resize your images. The Photos app offers a user-friendly interface and a range of features that make editing and organizing your photos a breeze. Here’s how you can use the Photos app to resize an image:
- Open the image you want to resize in the Photos app. You can do this by double-clicking on the image file or opening the image within the Photos app itself.
- Click on the “Edit” button located in the top-right corner of the toolbar. This will open the editing interface.
- In the editing interface, click on the crop tool icon, which looks like two overlapping right angles.
- Adjust the crop frame by clicking and dragging the edges or corners. Resize the frame to your desired dimensions.
- Once you have adjusted the crop frame, you can fine-tune the resizing by using the “Aspect” drop-down menu. This allows you to maintain the original aspect ratio or choose from various preset aspect ratios.
- After setting the desired dimensions and aspect ratio, click on the “Apply” button to resize the image.
- To save the resized image, click on the “Done” button in the top-right corner of the toolbar. The resized image will be saved as a new copy, leaving the original image untouched.
The Photos app also offers additional editing options, allowing you to enhance your resized image further. You can adjust lighting and color settings, apply filters, and make other aesthetic edits to achieve the desired look.
With its intuitive interface and robust editing capabilities, the Photos app is a great choice for resizing images on your Mac. Whether you want to resize images for social media, presentations, or personal use, the Photos app provides a simple and effective solution.
Method 3: Using the Quick Look Feature
The Quick Look feature on your Mac provides a convenient and efficient way to resize images without the need for any additional apps or software. With Quick Look, you can quickly preview and edit various file types, including images. Here’s how you can use the Quick Look feature to resize an image:
- Locate the image file you want to resize on your Mac.
- Select the image file by clicking on it once.
- Press the spacebar on your keyboard to open the Quick Look preview window. Alternatively, you can also right-click on the image file and select “Quick Look” from the context menu.
- In the Quick Look preview window, you will see options at the top of the window. Click on the “Crop” icon, which looks like a square with dotted lines.
- Adjust the crop frame by clicking and dragging the edges or corners. Resize the frame to your desired dimensions.
- Upon resizing the crop frame, you have the ability to further refine the resizing by using the aspect ratio options. You can choose from preset aspect ratios or select a custom ratio.
- Once you have set the desired dimensions and aspect ratio, press the Enter key on your keyboard to apply the changes and resize the image.
- To save the resized image, click on the “Save” button located at the top of the Quick Look preview window. Alternatively, you can also press the Command + S key combination to save the resized image.
The Quick Look feature not only allows you to resize images but also provides quick access to other file functionalities, such as rotating, renaming, and sharing. It eliminates the need for opening bulky applications and streamlines the image resizing process.
By utilizing the Quick Look feature, resizing images on your Mac becomes a hassle-free task. It’s a convenient option for users who prefer a simple and quick solution without the need for additional software.
Method 4: Using a Third-Party Image Editing Software
If you require more advanced customization options and features for resizing images on your Mac, utilizing a third-party image editing software might be the perfect solution. These software applications offer a wide range of tools and functionalities that go beyond the basic resizing capabilities of built-in apps. Here’s how you can use a third-party image editing software to resize an image:
- Choose a third-party image editing software that suits your needs and preferences. Some popular options include Adobe Photoshop, GIMP, and Pixelmator.
- Install and launch the chosen software on your Mac.
- Open the image you want to resize in the software by either selecting “File” > “Open” from the menu or dragging and dropping the image file into the software interface.
- If needed, navigate to the “Image” or “Resize” menu option to access the resizing tools.
- Specify your desired dimensions for the resized image. This can typically be done by entering values in pixels, inches, or as a percentage of the original size.
- Depending on the software, you may have additional options available to customize the resizing process further, such as selecting a specific interpolation method or adjusting the image quality.
- After configuring the resizing settings, click on the “Apply” or “OK” button to resize the image.
- Finally, save the resized image by selecting “File” > “Save” or “Export” from the menu. Choose a file format and location for the resized image, and give the file a new name if desired.
Third-party image editing software provides advanced tools for resizing images, making it an ideal choice for professionals or users who require precise control over the resizing process. These applications often come with additional features for editing, retouching, and enhancing images, allowing you to achieve the desired results with utmost accuracy and flexibility.
When using a third-party image editing software, make sure to explore the various options available to customize the resizing process according to your specific needs. Whether you’re resizing images for print, web, or other purposes, using a third-party software allows you to have full control and achieve professional-grade results.
Method 5: Using the Automator App
If you’re looking for a more automated approach to resize images on your Mac, the Automator app is a powerful tool that can simplify the process. Automator allows you to create custom workflows and automate repetitive tasks, including image resizing. Here’s how you can use the Automator app to resize images:
- Launch the Automator app on your Mac. You can find it in the Applications folder or by using Spotlight search.
- When the Automator window opens, select “New Document” and choose “Workflow.” This will open a blank workflow template.
- In the Library section of the Automator window, locate and search for the “Scale Images” action. Drag and drop this action into the workflow area.
- Specify the desired dimensions for the resized image by adjusting the “Width” and “Height” parameters in the “Scale Images” action. You can choose a specific size in pixels or maintain the aspect ratio by selecting the “By Proportionally Scaling” option.
- Optionally, you can add additional actions to the workflow to perform other tasks, such as renaming the resized images or saving them to a specific location.
- Click on the “File” menu and select “Save” to save the Automator workflow. Choose a name and location for the workflow and click “Save.”
- To resize images, simply drag and drop them onto the saved Automator workflow file. The workflow will execute and resize the images according to the specified dimensions.
The Automator app allows you to create reusable workflows, making it a convenient solution for resizing images in batches. You can save time and effort by automating the resizing process and applying it to multiple images at once.
Take advantage of the flexibility of the Automator app and explore the various actions and options it offers. You can customize your Automator workflows further to perform additional tasks or incorporate them into larger automated processes.
By using the Automator app, resizing images on your Mac becomes a streamlined and efficient task, especially when dealing with a large number of images or recurring resizing requirements.
Method 6: Using the Command Line (Terminal)
If you prefer using the command line interface and have some familiarity with it, resizing images on your Mac can be done using the Terminal app. The Terminal provides a powerful way to control your computer through text commands and offers various image manipulation options. Here’s how you can use the Terminal to resize images:
- Open the Terminal app on your Mac. You can find it in the Utilities folder within the Applications folder, or by using Spotlight search.
- Navigate to the location of the image you want to resize using the
cd(change directory) command. For example, if your image is located in the “Pictures” folder, typecd Pictures. - Once you’re in the correct directory, you can use command-line tools like
sipsorImageMagickto resize the image. Forsips, use the following command to resize the image proportionally: - Replace
<new width>with the desired width dimension and<image file>with the name of the image file you want to resize. This command will automatically adjust the height while maintaining the aspect ratio. - If you want to specify both the width and height dimensions, you can use the following command, which resizes the image to fit within the given dimensions:
- Once you have entered the appropriate command, press Enter to execute it. The image will be resized accordingly.
- To verify the resized image, you can open it in a preview or image viewing application.
sips -Z <new width> <image file>sips -z <new height> <new width> <image file>Using the command line interface for image resizing provides you with flexibility and control. It can be particularly useful when working with a large number of images or when you need to automate the process through scripting.
Remember to back up your original images before using command line tools to resize them, just in case any mistakes are made or the desired results are not achieved. Additionally, make sure you have proper knowledge of the commands and tools you are using to ensure accurate resizing.
By leveraging the power of the Terminal, you can efficiently resize images on your Mac while taking advantage of the command line’s flexibility and control over the resizing process.
Method 7: Using Online Image Resizing Websites
If you prefer a hassle-free and platform-independent method for resizing images on your Mac, utilizing online image resizing websites can be a convenient option. These websites allow you to resize your images with just a few clicks, without the need to install any software on your computer. Here’s how you can use online image resizing websites to resize your images:
- Open your preferred web browser on your Mac.
- Search for online image resizing websites using a search engine of your choice. Some popular options include “Resizeimage.net,” “PicResize.com,” and “BeFunky.com.”
- Visit one of these websites by clicking on the associated link in the search results.
- Once you’re on the website, look for an “Upload” or “Choose File” button to upload the image you want to resize.
- Select the image file from your computer’s storage.
- Depending on the website, you may have different resizing options available, such as specifying the desired width and height dimensions, selecting a percentage scale, or choosing from preset templates.
- After specifying the desired resizing options, click on the “Resize” or “Apply” button to process the image.
- Once the image has been resized, you may have the option to preview and download the resized image.
- Click on the “Download” button to save the resized image to your computer.
Online image resizing websites are user-friendly and provide a quick solution for resizing images, especially for users who prefer a simple and accessible method. These websites often offer additional features, such as cropping, rotating, and applying filters, allowing you to further enhance your resized images.
Keep in mind that when using online image resizing websites, it’s essential to review the privacy policy and terms of use of the website to ensure your images are handled securely. Additionally, remember to delete any uploaded files from the website’s server once you have downloaded the resized image.
Using online image resizing websites is an effective shortcut for resizing images on your Mac, especially if you don’t have the need for complex editing functionalities or want to avoid installing additional software.