Gather Your Favorite Pictures
To personalize your Mac’s desktop wallpaper with your own pictures, the first step is to gather your favorite photos. This is an opportunity to showcase your memories, unique style, and personal preferences. Here are some tips to help you gather the perfect selection of pictures:
- Explore Your Photo Library: Take a trip down memory lane by browsing through your photo library. Look for pictures that hold sentimental value or ones that you simply enjoy looking at. It could be photos from vacations, family gatherings, or even nature shots that you find visually appealing.
- Search Online: If you’re looking for specific themes or styles that you don’t have in your personal collection, explore online platforms like stock photo websites. They offer a wide range of high-quality images that can add a unique touch to your desktop wallpaper.
- Consider Different Genres: Experiment with different genres of photography. Mix landscapes, portraits, black and white, and macro shots to create a diverse collection of images. This variety will keep your desktop wallpaper interesting and visually captivating.
- Choose Images That Reflect Your Interests: Select pictures that align with your hobbies, interests, or passions. Whether it’s pictures of your favorite sports, hobbies like cooking or painting, or images related to your profession, these photos will help personalize your desktop and make it truly yours.
- Think About Color and Composition: Consider the color palettes and composition of the images when gathering your pictures. Harmonizing colors or contrasting vibrant hues can create a visually striking desktop wallpaper, while well-composed images can add a sense of balance and aesthetics to your screen.
- Ensure High-Quality Resolution: Pay attention to the resolution of the pictures you choose. Higher resolution images will look sharper and more vibrant on your screen, offering a better overall viewing experience.
- Don’t Forget About Seasonal Themes: If you’re feeling festive or want to add a seasonal touch to your desktop wallpaper, consider selecting images that reflect the current season or upcoming holidays. This will add a sense of freshness and celebrate the time of the year.
By gathering a curated collection of your favorite pictures, you’ll be ready to move on to the next steps of personalizing your Mac’s desktop wallpaper.
Select the Photos You Want to Use
Once you’ve gathered your favorite pictures, it’s time to narrow down your selection and choose the ones you want to use as your desktop wallpaper. Here are some steps to help you decide:
- Review and Evaluate: Take the time to review all the gathered photos. Look for images that stand out to you, evoke positive emotions, or visually resonate with your personal style. Consider the composition, colors, and overall impact of each photo.
- Focus on Variety: Aim for a diverse mix of pictures that showcase different subjects, styles, and perspectives. Including a variety of images can keep your desktop wallpaper fresh and visually engaging.
- Consider the Overall Mood: Think about the mood or atmosphere you want to create with your desktop wallpaper. Do you want it to be lively and vibrant, soothing and calm, or somewhere in between? Look for photos that align with the desired mood.
- Think About Screen Orientation: Take into account the screen orientation of your Mac. If you have a widescreen display, vertical photos may not work well. Consider choosing images that fit the aspect ratio of your screen for the best display.
- Rotate Images: If you want to add more variety, consider selecting a mix of horizontal and vertical pictures. You can rotate some of the vertical images to change their orientation and maximize the use of your desktop space.
- Keep It Simple: Avoid overcrowding your desktop with too many images. Choose a select few pictures that create an aesthetically pleasing and clutter-free composition. Remember, less is often more when it comes to desktop wallpapers.
- Consider Your Workflow: If you work with multiple applications and windows open simultaneously, choose images that won’t distract you or make it difficult to read text or icons on your desktop. Opt for photos that have a balanced composition and don’t have too much visual noise.
- Take Your Time: Don’t rush the selection process. Take your time to carefully choose the photos that truly resonate with you. It’s better to have a collection of images you love rather than settling for ones that don’t inspire you.
By following these steps, you’ll be able to select a cohesive and visually appealing set of photos that will transform your desktop into a personalized and inspiring space.
Edit Your Photos (optional)
Editing your photos is an optional step, but it can enhance the overall appearance and quality of your desktop wallpaper. Here are some editing tips to consider:
- Crop and Straighten: Use photo editing software or apps to crop and straighten your photos. This can help remove any unnecessary elements and ensure that your subjects are properly centered and aligned.
- Adjust Brightness and Contrast: Fine-tune the brightness and contrast of your photos to bring out the details and make them more visually appealing. This can help enhance the overall impact of your desktop wallpaper.
- Color Correction: If your photos have issues with color balance or saturation, use editing tools to correct them. Adjusting the colors can make your images more vibrant and true to life.
- Remove Blemishes: Depending on the subject of your photos, you might want to remove any blemishes or imperfections. Use the retouching or healing tools in your editing software to clean up your images.
- Add Filters or Effects: Experiment with filters or effects to add a personal touch to your photos. Play with black and white, sepia tones, vintage effects, or any other filters that align with your desired aesthetic.
- Add Text or Graphics: If you want to personalize your desktop wallpaper even further, consider adding text or graphics to your images. This could be a motivational quote, your name, or any other element that reflects your style and personality.
- Keep It Natural: While editing can be fun and creative, try not to go overboard. Aim for a natural and balanced look that still reflects the essence of the original photo.
- Save a Copy: When editing your photos, make sure to save a copy of the original file. This way, you can always go back to the unedited version or make further adjustments in the future.
Remember, editing your photos is a personal choice. Don’t feel pressured to make drastic changes if you prefer the natural look of your images. The goal is to create a desktop wallpaper that brings you joy and inspiration.
Resize and Format Your Photos
Before setting your photos as desktop wallpaper, it’s important to resize and format them to ensure they are compatible with your screen and the desktop wallpaper settings. Here are some steps to follow:
- Aspect Ratio: Determine the aspect ratio of your screen. Most modern screens have a standard aspect ratio of 16:9, while some older models may have a 4:3 ratio. It’s important to resize your photos to match the aspect ratio of your screen to avoid any distortion or cropping.
- Resize Your Photos: Use photo editing software or online resizing tools to adjust the dimensions of your photos. Set the width and height based on the resolution of your screen. For example, if your screen resolution is 1920×1080 pixels (16:9 aspect ratio), resize your photos to fit within those dimensions.
- File Format: Save your resized photos in a format that is supported by your operating system, such as JPEG or PNG. These formats are widely compatible and retain good image quality while keeping the file size manageable.
- Renaming Files: Consider renaming your photos with descriptive names that reflect their content. This can make it easier to identify and organize them when selecting the images for your desktop wallpaper.
- Create a Backup: Make a backup copy of your resized photos before setting them as wallpaper. This ensures that you have a copy of the original images in case you want to revert to them in the future.
- Organize in a Folder: Create a dedicated folder on your computer to store your resized and formatted photos. This way, you can easily access and manage your collection when selecting the images for your desktop wallpaper.
- Consider Compression: If you have a large number of images or if the file sizes are too big, consider compressing them without compromising too much on image quality. This can help optimize the storage space without significant loss in visual appeal.
- Check Image Quality: Before setting your photos as wallpaper, double-check the image quality. Make sure they are sharp, clear, and visually appealing. If needed, go back and adjust the resizing or formatting to ensure the best possible display.
By following these steps, you’ll be able to resize and format your photos to fit your screen perfectly, ensuring a seamless and visually pleasing desktop wallpaper experience.
Organize Your Photos in a Folder
As you gather and select the photos you want to use for your desktop wallpaper, it’s essential to organize them in a dedicated folder. This will help you easily locate and manage your collection. Here’s how to organize your photos in a folder:
- Create a New Folder: Start by creating a new folder on your computer where you will store all your desktop wallpaper photos. Choose a location that is easily accessible and convenient for you.
- Naming Convention: Develop a naming convention for your photo files to make them easy to identify. Consider using descriptive names that reflect the content or theme of each photo. For example, if you have a photo of a beautiful sunset, you can name it “sunset.jpg”.
- Subfolders: If you have a significant number of photos or want to further categorize them, you can create subfolders within your main desktop wallpaper folder. This can help you organize the photos by themes, seasons, or any other criteria that you find helpful.
- Date-based Organization: Another effective way to organize your photos is by creating folders based on the date they were taken. This can be particularly useful if you have a large collection and want to easily locate specific photos from a particular period.
- Drag-and-Drop: To organize your photos in the folder, simply drag and drop them from their current location into the appropriate folders. Take your time to arrange them in a way that makes sense to you and facilitates easy navigation.
- Keep a Back-up: It’s always a good practice to create a backup of your organized photo folder. This ensures that you have a copy of your desktop wallpaper photos in case of any accidental deletions or computer issues.
- Regular Maintenance: As you continue to gather more photos or make changes to your collection, periodically revisit your organized folder and ensure it remains up-to-date. This will help you stay organized and prevent any clutter or confusion.
- Consider Cloud Storage: If you want an additional layer of backup and accessibility, you can consider storing your organized photo folder in a cloud storage service. This allows you to sync your photos across multiple devices and access them from anywhere.
By organizing your photos in a dedicated folder, you can easily manage and locate your desktop wallpaper collection. This ensures a smooth and efficient process when selecting images for your personalized desktop wallpaper.
Open the Desktop & Screen Saver Preferences
In order to personalize your Mac’s desktop wallpaper with your own pictures, you’ll need to access the Desktop & Screen Saver preferences. Here’s how:
- Click on the Apple Menu: Start by clicking on the Apple menu () in the top-left corner of your screen.
- Select System Preferences: From the drop-down menu, select “System Preferences”. This will open the System Preferences window.
- Choose Desktop & Screen Saver: Within the System Preferences window, locate and click on the “Desktop & Screen Saver” icon. This will open the Desktop & Screen Saver preferences panel.
- Navigate to the Desktop Tab: Within the Desktop & Screen Saver preferences panel, you’ll see two tabs at the top: “Desktop” and “Screen Saver”. Click on the “Desktop” tab to access the settings for your desktop wallpaper.
- View Default Wallpaper Options: In the Desktop tab, you’ll be presented with a list of pre-installed desktop wallpapers that come with your Mac. You can browse through these options if you’re interested in using one of the default wallpapers provided.
- Choose a Folder with Your Photos: To use your own pictures as desktop wallpaper, click on the “+” (plus) sign located at the bottom left of the Desktop preferences panel. This will open a file browser where you can navigate to the folder where you have saved your personalized desktop wallpaper photos.
- Select Your Customized Folder: Once you’ve located and selected the folder containing your photos, click “Choose” to confirm your selection. The folder with your pictures will now appear in the left sidebar of the Desktop preferences panel.
- Adjust Desktop Wallpaper Options: To further customize how your pictures are displayed as wallpaper, you can adjust the settings in the Desktop preferences panel. This includes options such as picture position (fill screen, fit to screen, stretch, etc.), screen changes (manually or at a specified time interval), and picture rotation.
- Preview Your Desktop Wallpaper: As you make changes and customize your settings, you can preview how your desktop wallpaper will look by looking at your screen in the background. This allows you to fine-tune and adjust until you’re satisfied with the appearance.
- Save Your Changes: Once you’re happy with your settings and the preview of your desktop wallpaper, close the Desktop preferences panel. Your customized desktop wallpaper will now be set and displayed on your Mac’s desktop.
By following these steps, you can easily access and navigate the Desktop & Screen Saver preferences on your Mac to personalize your desktop wallpaper with your own pictures. Enjoy your personalized and visually captivating desktop experience!
Choose the Folder with Your Photos
Once you have opened the Desktop & Screen Saver preferences on your Mac, it’s time to choose the folder containing your personalized photos to be used as desktop wallpaper. Here’s how you can do it:
- Click on the “+” Sign: In the Desktop preferences panel, locate the “+” (plus) sign at the bottom left. Click on it to open the file browser.
- Navigate to Your Photo Folder: In the file browser, navigate to the folder where you have stored your personalized photos. You can do this by browsing through your computer’s directories and selecting the appropriate folder.
- Select the Photo Folder: Once you have found your photo folder, click on it to select it. You will see the folder appear in the left sidebar of the Desktop preferences panel.
- Explore Subfolders (optional): If you have organized your photos into subfolders within the main folder, you can click on the small triangle next to the folder name in the left sidebar to expand and view the subfolders. This allows you to select specific subfolders if desired.
- Adjust Folder Display Order (optional): In the left sidebar, you can rearrange the order of the folders by clicking and dragging them up or down. This can be helpful if you want certain folders to appear first or prioritize the display of specific photos.
- Preview Photos: As you select your photo folder, the Desktop preferences panel will display a grid of thumbnails of the photos within the selected folder. Take a moment to preview the photos and ensure that they are the ones you want to use as your desktop wallpaper.
- Remove Photos (optional): If you want to remove certain photos from the selected folder, you can do so by right-clicking on the photo thumbnail and selecting “Remove from Folder”. This removes the photo from the folder without deleting it from your computer.
- Save Your Changes: Once you have chosen the folder with your photos and are satisfied with the selection, close the Desktop preferences panel. Your chosen folder with the photos will now be set as the source for your desktop wallpaper.
By following these steps, you can easily choose the folder containing your personalized photos to be used as your Mac’s desktop wallpaper. Enjoy the visual beauty and personal touch of your own photos on your desktop!
Select How the Pictures are Displayed
After choosing the folder with your photos in the Desktop & Screen Saver preferences on your Mac, you have the option to customize how the pictures are displayed as your desktop wallpaper. Here’s how you can select the display options:
- Picture Position: In the Desktop preferences panel, you can choose how the pictures are positioned on your desktop. There are several options available, such as “Fill Screen”, “Fit to Screen”, “Stretch to Fill Screen”, and more. Select the option that best suits your preference.
- Tile or Center Picture: Depending on the size and aspect ratio of your pictures, you can further adjust their display. For smaller pictures or ones with different proportions, you can choose to tile them across the desktop or have them centered.
- Picture Transition: If you have multiple pictures in your selected folder, you can choose how they transition from one to another. Options include “Fade”, “Cube”, “Swirl”, and more. Preview the transitions to see which one you prefer.
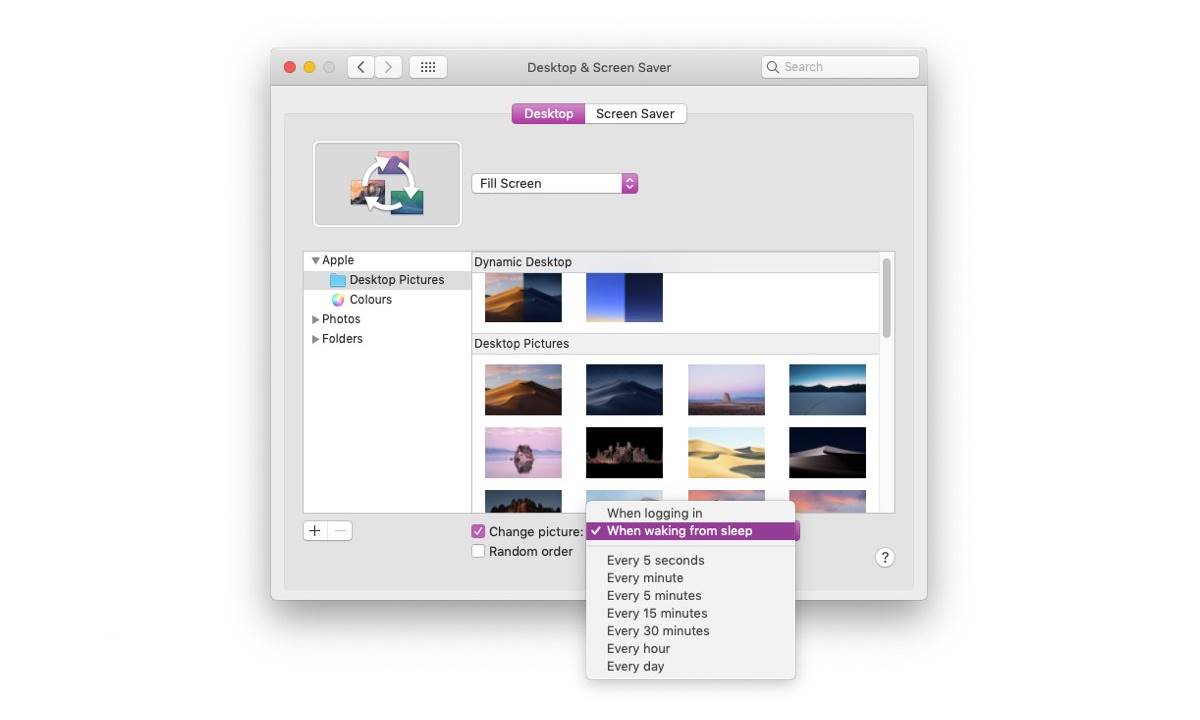
- Change Picture: You can decide when your desktop wallpaper pictures change. Choose between “Every 30 minutes”, “Every hour”, “Every day”, or select a custom time interval. This allows you to have a dynamic wallpaper that refreshes with new pictures throughout the day.
- Randomize Order (optional): If you want your pictures to appear in a random order each time they change, you can enable the “Random Order” option. This adds an element of surprise and keeps your desktop wallpaper fresh and dynamic.
- Enable Picture Rotation (optional): If you want your pictures to rotate within a folder instead of switching to a new picture with each transition, you can enable the “Change picture” drop-down menu and select “Rotate pictures randomly” or “Rotate through the selected pictures in order”. This allows you to enjoy all your selected photos without having to manually change them.
- Preview Your Wallpaper: As you make changes to the display options, take a moment to preview your desktop wallpaper. The Desktop preferences panel provides a live preview of how the pictures will appear on your desktop, allowing you to make adjustments until you’re satisfied with the result.
- Save Your Changes: Once you’re happy with the display options and the preview of your desktop wallpaper, close the Desktop preferences panel. Your chosen display settings will now be applied, and your personalized photos will grace your desktop.
By following these steps, you can customize how your selected pictures are displayed as your Mac’s desktop wallpaper. Enjoy the visual variety and aesthetics that come with a personalized wallpaper experience!
Customize the Photo Display Options
When personalizing your Mac’s desktop wallpaper with your own photos, you have the opportunity to further customize the display options to suit your preferences. Here’s how you can customize the photo display options:
- Picture Size: In the Desktop & Screen Saver preferences panel, you can adjust the size of the photos that appear on your desktop. Drag the “Size” slider to increase or decrease the size of the pictures until you achieve the desired effect.
- Screen Changes: You can choose how the pictures transition or change on your desktop by selecting the “Screen Change” drop-down menu. Options include “Slow”, “Medium”, and “Fast”. Preview the different speeds to find the one that suits your preference.
- Show Picture Info: Enable the “Show Picture Info” option if you want to display additional information about the photos on your desktop. This can include the photo’s file name, dimensions, and size. This is particularly useful if you like having informative details about the pictures readily available.
- Adjust Picture Color: If you want to adjust the color settings of the photos on your desktop, select the “Color” drop-down menu. You can choose between “Normal”, “Boost”, “Fade”, or “None”. Experiment with these options to find the color enhancement that best complements your photos.
- Magnification (Zoom In): Enable the “Magnification” option if you want the photos to zoom in slightly when you hover over them on the desktop. This can add a subtle interactive element and bring attention to the details of each picture.
- Alignment: Choose the desired alignment of the pictures on your desktop by selecting the “Alignment” drop-down menu. Options include “Left”, “Center”, and “Right”. This helps you maintain a cohesive visual appearance based on your preferences.
- Screensaver Time: If you have set a screensaver with your photos, you can customize the time delay before the screensaver kicks in. Adjust the “Start after” slider to define the period of inactivity before your screensaver activates.
- Hot Corners (optional): For quick and easy access to the screensaver or desktop, you can configure Hot Corners. These are corners of your screen that, when activated, can trigger actions like launching the screensaver or revealing the desktop.
- Preview Your Changes: As you make customizations to the photo display options, take a moment to preview the changes in the Desktop & Screen Saver preferences panel. This allows you to visualize and fine-tune the settings until you’re satisfied with the results.
- Save Your Customizations: Once you’re happy with the display options and the preview of your desktop wallpaper, close the Desktop & Screen Saver preferences. Your customizations will be applied, resulting in a personalized and visually stunning desktop experience.
By following these steps, you can customize the photo display options to create a unique and visually pleasing desktop wallpaper. Enjoy the customized display of your own photos and make your Mac’s desktop truly your own!
Set the Time Interval for Photos
When personalizing your Mac’s desktop wallpaper with your own photos, you have the ability to control how frequently the pictures change. You can set a specific time interval to ensure a dynamic and ever-changing desktop experience. Here’s how to set the time interval for photos:
- Select the “Change picture” Dropdown: In the Desktop & Screen Saver preferences panel, locate the “Change picture” dropdown menu. Click on it to reveal the available options for setting the time interval.
- Choose a Predefined Time Interval: The dropdown menu offers predefined time intervals such as “Every 30 minutes”, “Every hour”, or “Every day”. Select the interval that aligns with your preference for how often you want the pictures to change on your desktop.
- Customize the Time Interval: If the predefined options don’t suit your preference, you can choose the “Custom” option from the dropdown menu. This allows you to enter a specific time value in hours, minutes, and seconds.
- Enter the Custom Time Interval: Upon selecting the “Custom” option, enter your desired time interval in the provided text fields. This provides flexibility to set a unique and personalized time interval for the pictures to change.
- Preview Time Interval: As you set the time interval, the Desktop & Screen Saver preferences panel provides a live preview of how often the pictures will transition. This allows you to preview and verify if the interval matches your expectations.
- Observe Transitions: After setting the time interval, keep an eye on your desktop to observe the seamless transitions between the pictures on the designated schedule. This allows you to enjoy a dynamic and visually engaging desktop wallpaper experience.
- Make Adjustments (optional): If you find that the selected time interval is too fast or too slow, return to the “Change picture” dropdown menu and adjust the interval accordingly. This ensures that the picture changes align with your desired preference.
- Save Your Preferences: Once you’re satisfied with the time interval and the preview of the transitions, close the Desktop & Screen Saver preferences panel. Your selected time interval for the pictures to change will be in effect on your Mac’s desktop.
By following these steps, you can set a specific time interval for your personalized photos to change on your Mac’s desktop. Enjoy the dynamic and ever-changing display of your own pictures!
Choose Whether to Randomize the Photos
When personalizing your Mac’s desktop wallpaper with your own photos, you have the option to choose whether the photos are displayed in a random order. Randomizing the photos adds an element of surprise and variety to your desktop experience. Here’s how to choose whether to randomize the photos:
- Open the Desktop & Screen Saver Preferences: Begin by opening the Desktop & Screen Saver preferences on your Mac. You can access this by clicking on the Apple menu () in the top-left corner of your screen, selecting “System Preferences,” and then clicking on the “Desktop & Screen Saver” icon.
- Select the Photo Folder: Within the Desktop preferences panel, select the folder that contains your personalized photos. This is the folder you previously chose to be used as your desktop wallpaper.
- Enable Random Order: To randomize the order in which the photos are displayed, ensure that the checkbox labeled “Random Order” is checked. This option will shuffle the pictures each time they change, providing a unique and unpredictable sequence.
- Preview the Random Order: Take a moment to preview the desktop wallpaper display with the random order setting enabled. This allows you to see firsthand how the photos will appear in different, non-sequential sequences.
- Disable Random Order (optional): If you prefer to have the photos displayed in their original order, simply uncheck the “Random Order” checkbox. This will revert the display back to the sequential order in which they appear in the selected folder.
- Customize Other Display Options: While in the Desktop preferences panel, you may also choose to customize other display options such as picture position, screen changes, color settings, and more. Explore these options to further enhance your desktop wallpaper experience.
- Save Your Preferences: Once you’re satisfied with the display options, including whether or not to randomize the photos, close the Desktop preferences panel. Your chosen preferences will be in effect, and your desktop wallpaper will reflect your personalized settings.
By following these steps, you can choose whether to randomize the order in which your personalized photos are displayed on your Mac’s desktop. Enjoy the element of surprise and variety that comes with a randomized display!
Enable the Picture Rotation Feature
As you personalize your Mac’s desktop wallpaper with your own photos, you have the option to enable the picture rotation feature. Enabling this feature allows your selected photos to rotate and change automatically, providing a dynamic and ever-changing desktop experience. Here’s how to enable the picture rotation feature:
- Open the Desktop & Screen Saver Preferences: Begin by opening the Desktop & Screen Saver preferences on your Mac. You can access this by clicking on the Apple menu () in the top-left corner of your screen, selecting “System Preferences,” and then clicking on the “Desktop & Screen Saver” icon.
- Select the Photo Folder: Within the Desktop preferences panel, ensure that you have selected the folder containing your personalized photos. This is the folder you previously designated to be used as your desktop wallpaper.
- Enable the Picture Rotation: Look for the “Change picture” dropdown menu. Click on it to reveal the available options, and select either “Rotate pictures randomly” or “Rotate through the selected pictures in order”. This will enable the picture rotation feature based on your preference.
- Preview Picture Rotation: Take a moment to preview the picture rotation feature in the Desktop preferences panel. This allows you to see how the photos will automatically transition and rotate on your desktop.
- Adjust Picture Rotation Time: If desired, adjust the time interval for each photo’s rotation. In the “Change picture” dropdown menu, you may find options such as “15 minutes”, “30 minutes”, or “1 hour”. Select the interval that suits your preference for rotation frequency.
- Disable Picture Rotation (optional): If you wish to disable the picture rotation feature and display one static photo as your desktop wallpaper, select the “Turn Off” option from the “Change picture” dropdown menu.
- Save Your Preferences: Once you’re satisfied with the picture rotation settings, close the Desktop preferences panel. Your chosen preferences will be applied, and your personalized photos will rotate and change automatically on your Mac’s desktop.
By following these steps, you can enable the picture rotation feature to enjoy a dynamic and ever-changing desktop wallpaper experience. Watch as your selected photos automatically rotate and bring new visual interest to your desktop!
Add a Picture Slideshow to Your Screensaver
In addition to customizing your Mac’s desktop wallpaper with your own photos, you can also add a picture slideshow to your screensaver. This allows your selected photos to be displayed in a continuous and visually captivating manner, even when your computer is idle. Here’s how to add a picture slideshow to your screensaver:
- Open the Desktop & Screen Saver Preferences: Begin by opening the Desktop & Screen Saver preferences on your Mac. You can access this by clicking on the Apple menu () in the top-left corner of your screen, selecting “System Preferences,” and then clicking on the “Desktop & Screen Saver” icon.
- Switch to the Screen Saver Tab: Within the Desktop & Screen Saver preferences panel, click on the “Screen Saver” tab located at the top. This will take you to the options for customizing your screensaver.
- Select a Screensaver Style: In the left sidebar, you’ll see various screensaver styles to choose from. Select the “Pictures” screensaver style or any other similar option that allows for a picture slideshow.
- Choose the Source for Your Slideshow: Under the selected screensaver style, you’ll see a dropdown menu labeled “Source”. Click on the menu and choose the folder containing your personalized photos that you want to include in the slideshow.
- Customize Slideshow Settings (optional): Depending on the screensaver style you choose, there may be additional settings to customize the slideshow behavior. Explore the options provided, such as transition effects, slide duration, or music selection, if available, to further enhance your screensaver experience.
- Preview Your Screensaver: To see how the picture slideshow screensaver will appear, click on the “Preview” button in the bottom-right corner of the Desktop & Screen Saver preferences panel. This will activate the screensaver and allow you to visualize the slideshow.
- Save Your Preferences: Once you’re satisfied with the screensaver settings and the preview, close the Desktop & Screen Saver preferences panel. Your chosen settings for the picture slideshow screensaver will take effect the next time your computer goes idle.
- Adjust Screensaver Activation Time (optional): If desired, you can adjust the time it takes for the screensaver to activate when your computer is idle. In the “Screen Saver” tab, use the “Start after:” slider to set the desired period of inactivity before the screensaver begins.
- Enjoy Your Picture Slideshow Screensaver: From now on, when your computer is idle, the screensaver will activate, and a beautiful slideshow of your personalized photos will be displayed, bringing life and visual interest to your screen.
By following these steps, you can enhance your computer’s idle time with a picture slideshow screensaver featuring your own photos. Enjoy the visual journey and relive your favorite moments every time the screensaver activates!
Enjoy Your Personalized Desktop Wallpaper
Now that you have personalized your Mac’s desktop wallpaper with your own photos, it’s time to sit back, relax, and enjoy the fruits of your customization efforts. Here are some reasons why you’ll love your personalized desktop wallpaper:
- Showcasing Your Memories: Your personalized desktop wallpaper allows you to display your cherished memories, whether it’s photos from vacations, family gatherings, or special moments captured through your lens. Each time you glance at your desktop, you’ll be reminded of those special times.
- Expressing Your Style: Your desktop wallpaper reflects your unique style and personality. By choosing photos that resonate with you and organizing them in a way that appeals to your visual preferences, your desktop becomes a true reflection of who you are.
- Inspiring and Motivating: Your personalized desktop wallpaper can serve as a source of inspiration and motivation. Whether it features beautiful landscapes, motivational quotes, or images related to your passions, it can uplift your mood and provide a positive environment for your work or leisure activities.
- Bringing Life to Your Desktop: Instead of staring at a static and mundane background, your personalized desktop wallpaper brings life and vibrancy to your computer screen. The rotating photos or dynamic slideshows keep your desktop visually engaging and prevent monotony.
- Infusing Joy into Your Work: Personalizing your desktop wallpaper with meaningful photos can bring a touch of joy and happiness to your work or study routine. Looking at images that make you smile or evoke positive emotions can help create a more enjoyable and productive working environment.
- Refreshing and Updating: If you grow tired of your current desktop wallpaper, the process of gathering new photos, selecting them, and organizing them in a different way can be an enjoyable refreshment. This allows you to constantly update your desktop and discover new visual inspirations.
- Sharing Your Creativity: Your personalized desktop wallpaper is an expression of your creativity. You can proudly share your customized desktop with others, whether it’s colleagues, friends, or family, and inspire them to personalize their own desktops as well.
With your personalized desktop wallpaper, you have created a space that is unique to you. Enjoy the visual beauty, nostalgia, and personal touch that your own photos bring to your daily computer usage. Let your desktop be a reflection of your memories, interests, and style.