
How to Enable Dark Mode on Mac
Dark Mode is a popular feature on Mac that allows users to change the appearance of their system interface to a darker color scheme, which can be easier on the eyes especially during nighttime or in low-light environments. If you want to enable Dark Mode on your Mac, follow these simple steps:
-
Step 1: Open System Preferences
The first step is to open the System Preferences on your Mac. You can do this by clicking on the Apple menu in the top-left corner of your screen and selecting “System Preferences” from the dropdown menu.
-
Step 2: Click on General
In the System Preferences window, you will see various icons representing different categories. Look for and click on the “General” icon, which is represented by a gray gear-like symbol.
-
Step 3: Choose the Dark Mode Appearance
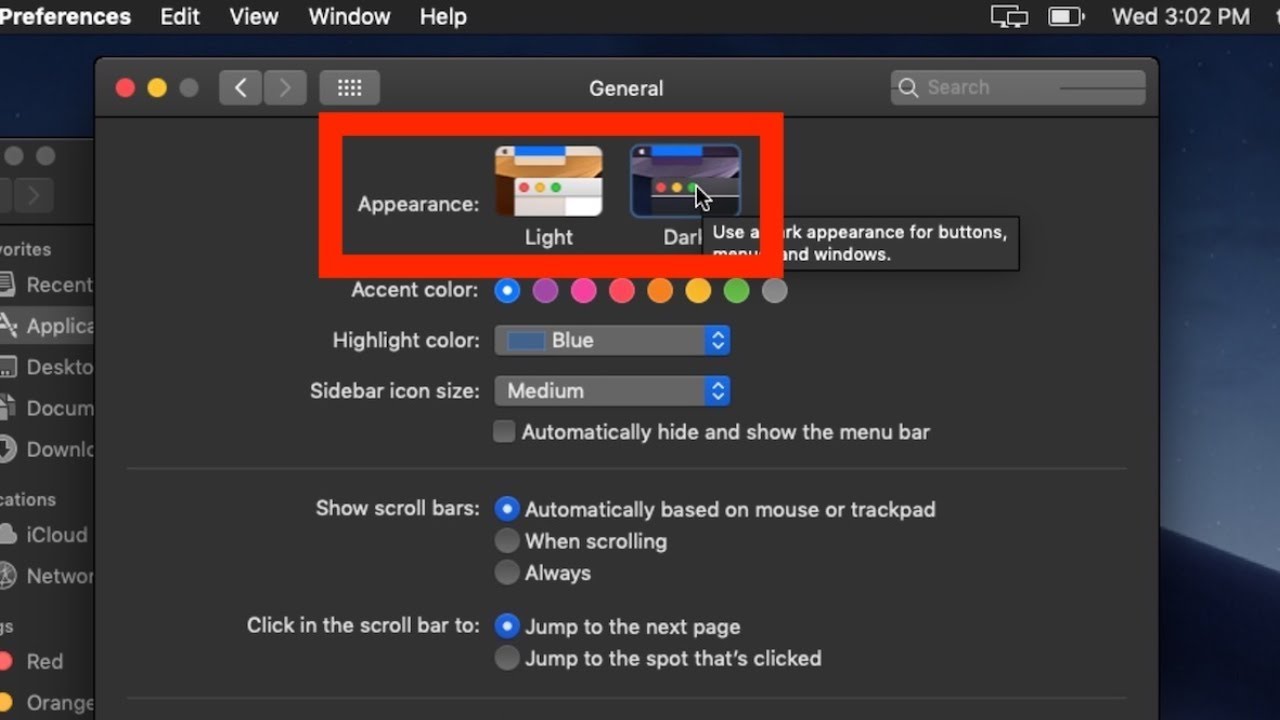
Once you’re in the General settings, you will see several options related to the overall appearance of your Mac. Look for the “Appearance” section, and click on the “Dark” option to enable Dark Mode.
That’s it! You have successfully enabled Dark Mode on your Mac. The system interface, including the menu bar, dock, and system apps, will now appear in a dark color scheme.
Using Dark Mode on your Mac not only provides a sleek and modern look, but it can also help reduce eye strain, especially in low-light environments. Now, let’s move on to the next section to learn how to disable Dark Mode if you prefer a lighter interface.
Step 1: Open System Preferences
When enabling Dark Mode on your Mac, the first step is to open the System Preferences. This is where you can access various settings and customization options for your Mac. Here’s how to do it:
1. Click on the Apple menu located in the top-left corner of your screen. It is represented by the Apple logo.
2. From the dropdown menu, select “System Preferences”.
3. A new window will open, displaying a grid of icons representing different categories of settings.
4. Look for and click on the “General” icon, which is represented by a gray gear-like symbol.
By clicking on the “General” icon, you will gain access to a range of customization options related to the appearance and behavior of your Mac.
The System Preferences is a centralized hub that allows you to manage and personalize various aspects of your Mac’s settings. In addition to enabling Dark Mode, you can customize other preferences such as display resolution, mouse and keyboard settings, energy-saving options, and more.
Opening the System Preferences is the first step towards enabling Dark Mode on your Mac. Once you have successfully opened the System Preferences, you can proceed to the next step to continue the process of enabling Dark Mode.
Step 2: Click on General
After opening the System Preferences on your Mac, the next step to enable Dark Mode is to click on the “General” icon. The General settings allow you to customize various aspects of your Mac’s appearance, behavior, and accessibility. Here’s how to proceed:
1. Once you’re in the System Preferences window, look for the icons representing different categories of settings.
2. Amongst these icons, locate and click on the “General” icon. It can be identified by a gray gear-like symbol.
By clicking on the “General” icon, you will be taken to the General settings panel, where you can make changes to the overall appearance and behavior of your Mac.
The General settings panel provides a range of customization options, including preferences for the appearance of buttons, scroll bars, sidebar icons, and more. It allows you to tailor your Mac experience to your liking, and Dark Mode is one of the prominent features that can be accessed from this section.
By selecting the General settings, you are one step closer to enabling Dark Mode on your Mac. In the next step, we will explore how to choose the Dark Mode appearance and complete the process of enabling Dark Mode.
Step 3: Choose the Dark Mode Appearance
Once you have clicked on the “General” icon in the System Preferences, you will be presented with a range of customization options for your Mac. Now, it’s time to choose the Dark Mode appearance and complete the process of enabling Dark Mode. Follow these simple steps:
- Within the General settings panel, locate the “Appearance” section.
- Click on the option that says “Dark”. This will enable Dark Mode on your Mac.
By selecting the “Dark” option, you are instructing your Mac to switch to a darker color scheme for the system interface, including the menu bar, dock, and system apps. This change in appearance can be beneficial not only for aesthetic reasons but also for reducing eye strain, especially in low-light environments.
Dark Mode provides a visually pleasing and modern look, and it can create a more immersive experience when using your Mac. Whether you’re working late into the night or simply prefer a darker interface, this option enhances readability and reduces the glare emitted by bright screens.
If at any point you decide to revert to the standard “Light” appearance, you can follow the same steps and select the “Light” option in the Appearance section within the General settings.
With the Dark Mode appearance now selected, you have successfully enabled Dark Mode on your Mac. Enjoy the new look and feel as you navigate through your Mac’s interface with a sleek and sophisticated style.
How to Disable Dark Mode on Mac
If you have enabled Dark Mode on your Mac but now wish to switch back to the lighter interface, you can easily disable Dark Mode by following these steps:
-
Step 1: Open System Preferences
First, click on the Apple menu in the top-left corner of your screen and select “System Preferences” from the dropdown menu.
-
Step 2: Click on General
In the System Preferences window, locate and click on the “General” icon, represented by a gray gear-like symbol.
-
Step 3: Select the Light Mode Appearance
Within the General settings panel, find the “Appearance” section and click on the option that says “Light”. This will switch your Mac back to the standard light mode.
By selecting the “Light” option in the Appearance section, your Mac’s interface will revert to the default lighter color scheme. The menu bar, dock, and system apps will no longer be displayed in the dark mode style.
Disabling Dark Mode allows for a brighter and more traditional interface that many users prefer. It can be especially useful in well-lit environments or for individuals who find the dark colors less comfortable to work with.
Remember, you can always switch back to Dark Mode by following the same steps and selecting the “Dark” option in the Appearance section within the General settings.
Now that you know how to enable and disable Dark Mode on your Mac, you can easily switch between the two modes based on your preferences and the lighting conditions in your environment.
Step 1: Open System Preferences
To disable Dark Mode on your Mac, the first step is to open the System Preferences. This is where you can access various settings and customization options for your Mac. Here’s how to do it:
1. Click on the Apple menu located in the top-left corner of your screen. It is represented by the Apple logo.
2. From the dropdown menu, select “System Preferences”.
3. A new window will open, displaying a grid of icons representing different categories of settings.
4. Look for and click on the “General” icon, which is represented by a gray gear-like symbol.
By clicking on the “General” icon, you will gain access to a range of customization options related to the appearance and behavior of your Mac.
The System Preferences is a centralized hub that allows you to manage and personalize various aspects of your Mac’s settings. In addition to enabling or disabling Dark Mode, you can customize other preferences such as display resolution, mouse and keyboard settings, energy-saving options, and more.
Opening the System Preferences is the first step towards disabling Dark Mode on your Mac. Once you have successfully opened the System Preferences, you can proceed to the next step to continue the process.
Step 2: Click on General
After opening the System Preferences on your Mac, the next step to disable Dark Mode is to click on the “General” icon. The General settings allow you to customize various aspects of your Mac’s appearance, behavior, and accessibility. Here’s how to proceed:
1. Once you’re in the System Preferences window, look for the icons representing different categories of settings.
2. Amongst these icons, locate and click on the “General” icon. It can be identified by a gray gear-like symbol.
By clicking on the “General” icon, you will be taken to the General settings panel, where you can make changes to the overall appearance and behavior of your Mac.
The General settings panel provides a range of customization options, including preferences for the appearance of buttons, scroll bars, sidebar icons, and more. It allows you to tailor your Mac experience to your liking, and disabling Dark Mode is one of the available options within this section.
By selecting the General settings, you are one step closer to disabling Dark Mode on your Mac. In the next step, we will explore how to switch back to the light mode appearance and complete the process.
Step 3: Select the Light Mode Appearance
Once you have clicked on the “General” icon in the System Preferences, you will be presented with a range of customization options for your Mac. Now, it’s time to switch back to the light mode appearance to disable Dark Mode. Follow these simple steps:
- Within the General settings panel, locate the “Appearance” section.
- Click on the option that says “Light”. This will switch your Mac back to the standard light mode.
By selecting the “Light” option in the Appearance section, your Mac’s interface will revert to the default lighter color scheme. The menu bar, dock, and system apps will no longer be displayed in the dark mode style.
Disabling Dark Mode allows for a brighter and more traditional interface that many users prefer. It can be especially useful in well-lit environments or for individuals who find the dark colors less comfortable to work with.
The General settings panel not only provides the option to enable or disable Dark Mode, but it also offers other customization preferences to tailor your Mac experience to your liking.
Remember, if at any point you decide to switch back to Dark Mode, you can follow the same steps and select the “Dark” option in the Appearance section within the General settings.
Now that you know how to disable Dark Mode on your Mac, you can switch between light and dark modes based on your preference or the lighting conditions of your environment.
Additional Tips and Tricks for Dark Mode on Mac
Now that you know how to enable and disable Dark Mode on your Mac, let’s explore some additional tips and tricks to enhance your Dark Mode experience:
-
Tip 1: Schedule Dark Mode to Automatically Turn On or Off
If you find yourself frequently toggling between light and dark modes, you can set up a schedule to automatically switch between the two. Open the System Preferences, click on the “Displays” icon, and navigate to the “Schedule” tab. From there, you can specify the times for Dark Mode to activate and deactivate, making it a hands-free experience.
-
Tip 2: Use Dynamic Desktops for a Stunning Dark Mode Experience
Take advantage of Mac’s Dynamic Desktop feature, which changes the desktop wallpaper based on the time of day. When in Dark Mode, dynamic wallpapers can create a visually immersive experience. To enable Dynamic Desktops, go to the “Desktop & Screen Saver” section in System Preferences and select a dynamic wallpaper.
-
Tip 3: Customize Accent Colors for Dark Mode
Personalize your Dark Mode further by customizing the accent colors. Open the System Preferences, go to the “General” section, and click on the “Accent color” dropdown menu. Choose a color that complements the dark interface and gives your Mac a unique touch.
By using these tips and tricks, you can maximize your Dark Mode experience and tailor it to your preferences. Whether it’s automating the switch between modes, enjoying dynamic wallpapers, or personalizing accent colors, these additional features add an extra level of customization and aesthetics to Dark Mode.
Experiment with these tips and explore other customization options within the System Preferences to make Dark Mode on your Mac truly your own.
Tip 1: Schedule Dark Mode to Automatically Turn On or Off
One of the convenient features of Dark Mode on Mac is the ability to schedule it to automatically turn on or off at specified times. This means you can have Dark Mode activate during the evening or nighttime when it’s darker, and switch back to the light mode during daytime or well-lit hours. Here’s how to set up this scheduling feature:
-
Step 1: Open System Preferences
Click on the Apple menu in the top-left corner of your screen and select “System Preferences” from the dropdown menu.
-
Step 2: Click on Displays
In the System Preferences window, locate and click on the “Displays” icon. This will open the settings related to your Mac’s display.
-
Step 3: Go to the Schedule Tab
Within the Displays settings, find and click on the “Schedule” tab. This is where you can configure the timing for Dark Mode.
-
Step 4: Set Up the Schedule
In the Schedule tab, you will see two options: “Sunset to Sunrise” and “Custom”.
– Sunset to Sunrise: This option will automatically enable Dark Mode from sunset to sunrise, based on your Mac’s local time.
– Custom: If you prefer, you can select the “Custom” option to set your own specific times for Dark Mode to activate and deactivate.
-
Step 5: Apply the Schedule
After setting up your preferred schedule, close the System Preferences window. Your Mac will now automatically switch between Dark Mode and light mode according to the specified times.
By scheduling Dark Mode, you can enjoy a seamless transition between light and dark interfaces without manually toggling the mode on and off. This can be particularly useful if you desire a more automated and personalized experience or if you often work in low-light environments.
Take advantage of this scheduling feature to optimize your Mac’s appearance based on the time of day, enhancing both aesthetics and usability.
Tip 2: Use Dynamic Desktops for a Stunning Dark Mode Experience
One way to enhance your Dark Mode experience on Mac is by utilizing Dynamic Desktops. Dynamic Desktops are wallpapers that change based on the time of day, providing a visually immersive experience. By using Dynamic Desktops in conjunction with Dark Mode, you can elevate the aesthetics of your Mac even further. Here’s how to enable Dynamic Desktops:
-
Step 1: Open System Preferences
Click on the Apple menu in the top-left corner of your screen and select “System Preferences” from the dropdown menu.
-
Step 2: Click on Desktop & Screen Saver
In the System Preferences window, find and click on the “Desktop & Screen Saver” icon. This will open the settings related to your Mac’s desktop appearance.
-
Step 3: Select a Dynamic Desktop
In the Desktop & Screen Saver settings, you will see various options for wallpapers.
– Look for the “Dynamic Desktops” section and click on it.
– Browse through the available Dynamic Desktops and select one that suits your preferences. These wallpapers change throughout the day to match the time and give a stunning Dark Mode experience.
-
Step 4: Apply the Dynamic Desktop
After selecting a Dynamic Desktop, close the System Preferences window. Your Mac’s desktop wallpaper will now automatically change based on the time of day, complementing your Dark Mode experience.
Dynamic Desktops not only add visual interest to your Mac’s interface but also create a more immersive experience when using Dark Mode. As the wallpaper transitions throughout the day, it enhances the overall atmosphere, especially when combined with a darker color scheme.
Explore the available Dynamic Desktop options to find the one that resonates with your personal style and preferences. Whether it’s a serene landscape or a captivating cityscape, Dynamic Desktops can take your Dark Mode experience on Mac to the next level.
Tip 3: Customize Accent Colors for Dark Mode
To further enhance your Dark Mode experience on Mac and add a personal touch, you can customize the accent colors. Accent colors serve as highlights throughout the interface, bringing attention to buttons, links, and other elements. By customizing these colors, you can create a unique and cohesive look. Here’s how you can do it:
-
Step 1: Open System Preferences
Click on the Apple menu in the top-left corner of your screen and select “System Preferences” from the dropdown menu.
-
Step 2: Click on General
In the System Preferences window, find and click on the “General” icon. This will open the settings related to the appearance and behavior of your Mac.
-
Step 3: Customize Accent Color
Within the General settings, you will see the “Accent color” option. Click on the dropdown menu to explore the available accent colors.
– Select an accent color that complements the dark mode interface and aligns with your visual preferences.
– As you select different accent colors, the changes will be immediately reflected in the interface, allowing you to preview and find the perfect customization.
-
Step 4: Apply the Accent Color
Once you are satisfied with your accent color choice, close the System Preferences window. The newly selected accent color will now be applied throughout the interface, enhancing the overall visual coherence and personalization of your Dark Mode experience.
Customizing accent colors in Dark Mode provides an opportunity to infuse your personality into the interface. Whether you prefer a bold and vibrant accent or a subtle and muted one, the choice is yours. Experiment with different colors until you find the one that suits your preferences and makes using Dark Mode on your Mac an even more enjoyable experience.
Remember, you can always revisit the General settings in System Preferences to change the accent color and adjust it to your liking whenever you desire a new look.