
Importance of Removing Blank Rows in Excel
Excel is a powerful tool that helps us organize data, analyze information, and make informed business decisions. However, when working with large datasets, it’s not uncommon to come across sheets with blank rows. These empty rows can cause various problems, from skewed calculations to inaccurate data analysis. That’s why it’s essential to remove these blank rows to ensure the accuracy and integrity of our Excel files.
One significant impact of blank rows is the distortion of data analysis. When conducting statistical analysis or creating charts and graphs, empty rows can skew the results and give a misleading representation of the information. Removing these blank rows allows us to obtain accurate insights and make well-informed decisions based on reliable data.
Furthermore, blank rows can interfere with sorting and filtering records in Excel. When we apply filters to a dataset, any blank rows within the range can disrupt the filtering process and lead to incomplete or incorrect results. Removing blank rows ensures that we can filter our data accurately and extract the information we need efficiently.
Another reason to remove blank rows is to optimize the performance of Excel files. Large spreadsheets with numerous blank rows can slow down calculations, especially when using functions or formulas that reference entire columns. By removing these unnecessary rows, we can significantly improve the performance of our Excel files, making them faster and more efficient to work with.
In addition to data integrity and performance, removing blank rows also enhances the overall organization and visual appeal of Excel sheets. Blank rows can make a worksheet look cluttered and unprofessional. By tidying up our data and removing these extraneous rows, we create a clean and polished presentation that is easier to navigate and understand.
Manual Method to Remove Blank Rows in Excel
One straightforward method to remove blank rows in Excel is by manually deleting them. Although it might be time-consuming for large datasets, it is a viable option for smaller sheets. Here’s how you can do it:
- Open your Excel worksheet and navigate to the sheet containing the data you want to process.
- Select the entire range of cells that you want to check for blank rows. You can do this by clicking on the first cell, holding down the Shift key, and then clicking on the last cell of the range.
- Once the range is selected, press the Ctrl + G keyboard shortcut to open the Go To dialog box.
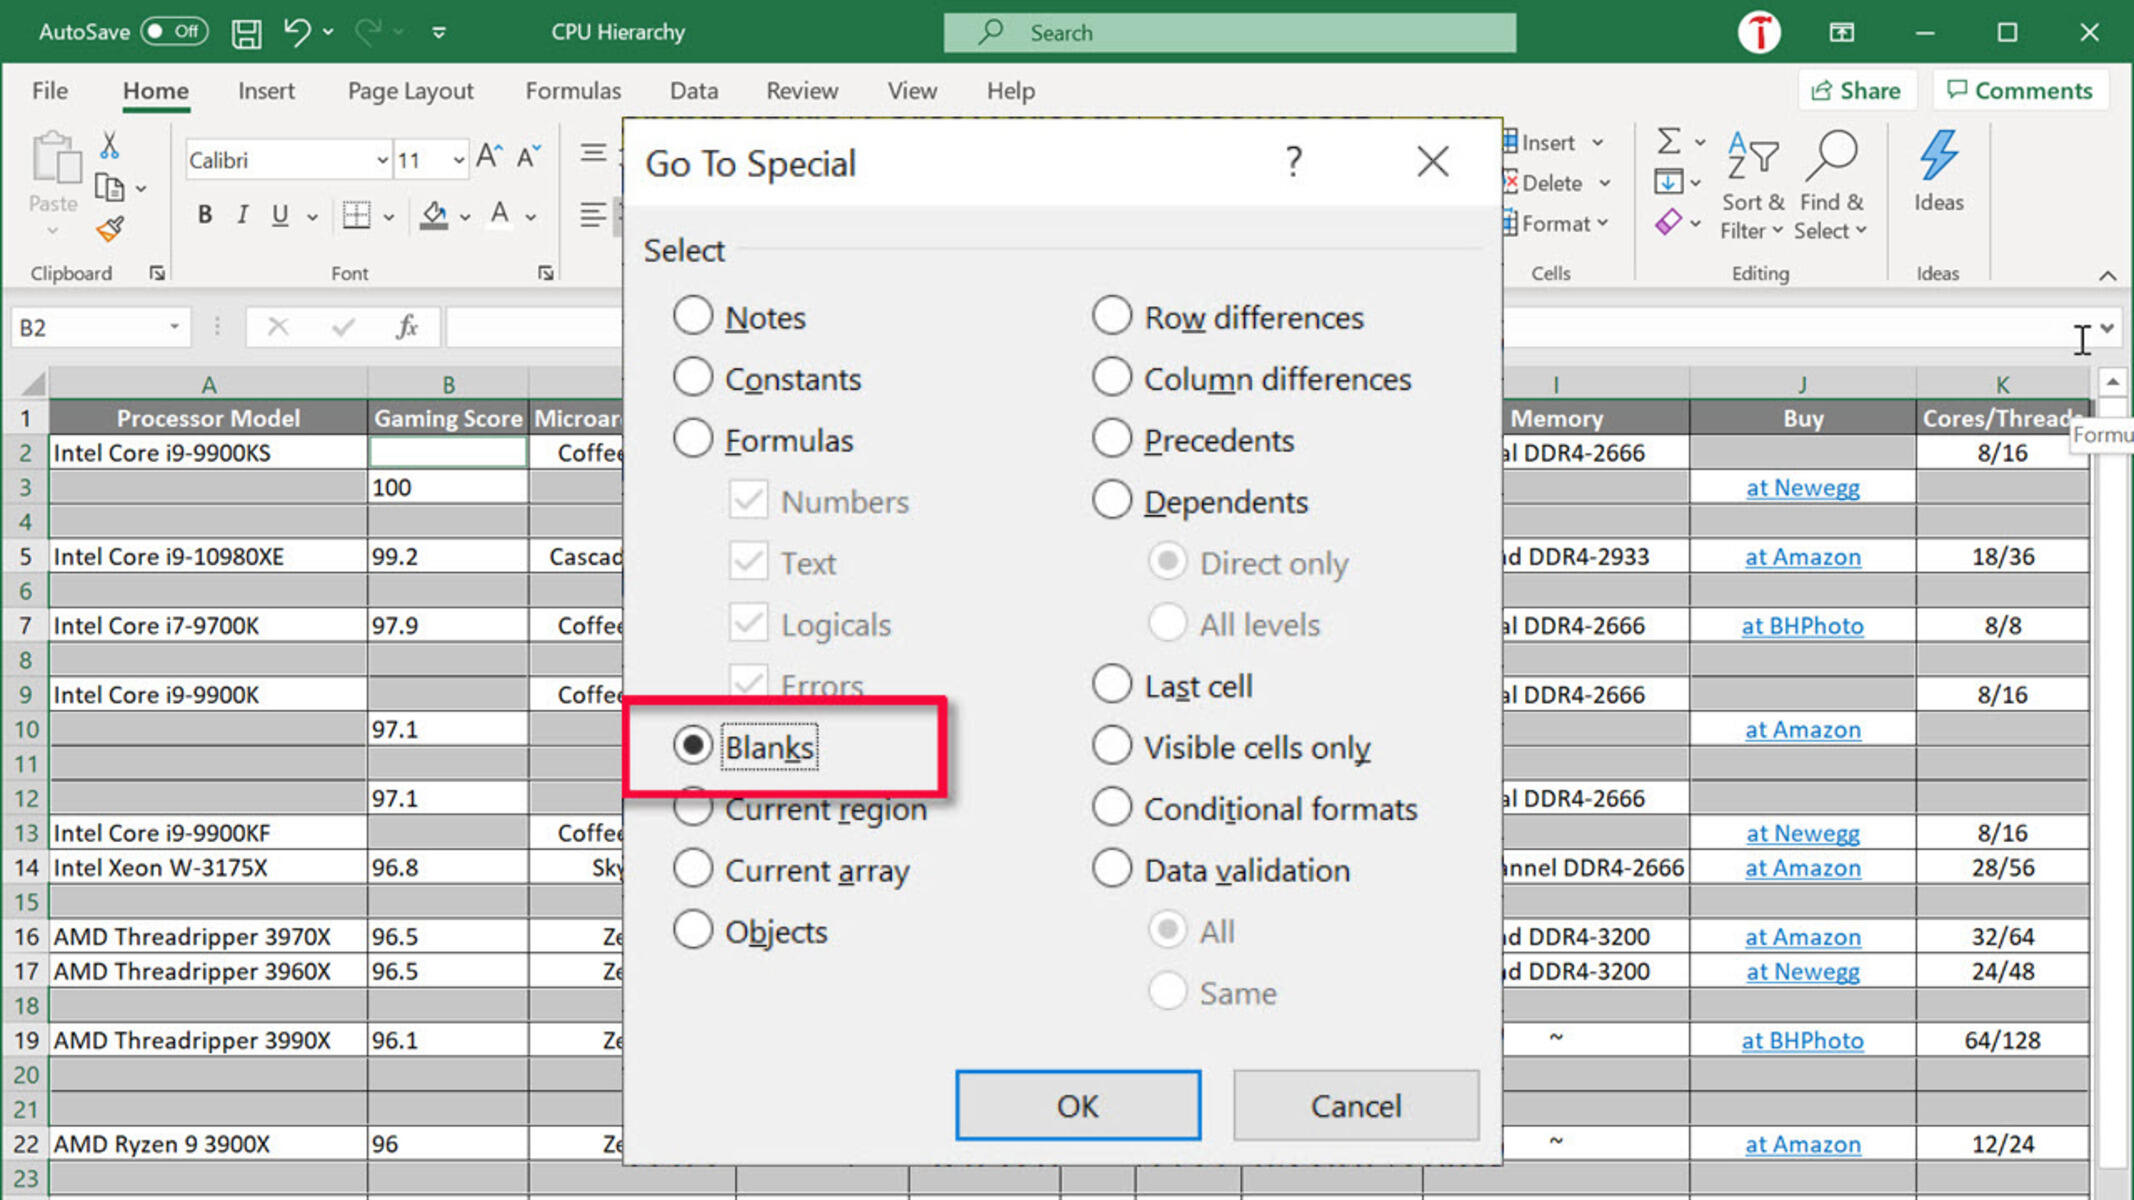
- In the Go To dialog box, click on the Special button to open the Go To Special dialog box.
- In the Go To Special dialog box, select the Blanks option and click OK. This will select all the blank cells in the selected range, including the entire rows containing the blanks.
- Now, right-click on any of the selected rows and choose the Delete option. Alternatively, you can also go to the Home tab, click on the Delete dropdown button, and select Delete Sheet Rows.
This manual method allows you to remove the blank rows in your Excel worksheet. However, it’s important to exercise caution and double-check your selection before deleting the rows, as any mistake could lead to data loss. It’s also worth noting that this method might not be efficient for large datasets, so alternative approaches should be considered in those cases.
Using Filters to Remove Blank Rows in Excel
Excel provides a powerful filtering feature that allows us to easily remove blank rows from our dataset. By utilizing filters, we can streamline the process and quickly identify and remove the unnecessary rows. Here’s how you can do it:
- Open your Excel worksheet and navigate to the sheet containing the data you want to process.
- Select the entire range of cells that you want to filter. You can do this by clicking on the first cell, holding down the Shift key, and then clicking on the last cell of the range.
- Go to the Data tab in the Excel ribbon and click on the Filter button. This will add drop-down arrows to each column header in your selected range.
- Click on the drop-down arrow in the column header that you want to filter. In the drop-down menu, uncheck the Blanks option. This will filter out all the blank cells in that column.
- If you have multiple columns with blank cells, repeat step 4 for each column to remove the blank rows.
- Once you have filtered out all the blank cells, select the visible range by clicking and dragging over the filtered cells or by using the shortcut Ctrl + Shift + * (asterisk).
- Right-click on any of the selected rows and choose the Delete option. Alternatively, you can also go to the Home tab, click on the Delete dropdown button, and select Delete Sheet Rows.
Using filters to remove blank rows allows you to easily identify and get rid of the unnecessary data in your Excel worksheet. The advantage of this method is that it provides a visual representation of the data, making it easier to identify and manipulate specific rows based on your filtering criteria. It is a quick and efficient way to clean up your dataset and ensure the accuracy of your calculations and analysis.
Using the Go To Special Function to Remove Blank Rows in Excel
In Excel, the Go To Special function is a powerful tool that can be used to select and manipulate specific types of cells within a range. By utilizing the Go To Special function, you can easily select all the blank cells in your worksheet and delete the corresponding rows. Here’s how you can use this function to remove blank rows:
- Open your Excel worksheet and navigate to the sheet containing the data you want to process.
- Select the entire range of cells that you want to work with. You can do this by clicking on the first cell, holding down the Shift key, and then clicking on the last cell of the range.
- Press the Ctrl + G keyboard shortcut to open the Go To dialog box.
- In the Go To dialog box, click on the Special button to open the Go To Special dialog box.
- In the Go To Special dialog box, select the Blanks option and click OK. This will select all the blank cells in your selected range, including the entire rows containing the blanks.
- Right-click on any of the selected rows and choose the Delete option. Alternatively, you can also go to the Home tab, click on the Delete dropdown button, and select Delete Sheet Rows.
By using the Go To Special function, you can quickly and accurately identify and remove the blank rows in your Excel worksheet. This method is efficient, especially when dealing with large datasets, as it allows you to select all the blank cells at once without manually scrolling through the entire sheet. It provides a convenient way to clean up your data and ensure the integrity and accuracy of your calculations and analysis.
Using the Find and Replace Function to Remove Blank Rows in Excel
The Find and Replace function in Excel is a powerful tool that allows you to search for specific text or characters within your worksheet and replace them with other values. By utilizing this function, you can identify and remove the blank rows in your Excel sheet efficiently. Here’s how you can use the Find and Replace function to achieve this:
- Open your Excel worksheet and navigate to the sheet containing the data you want to process.
- Press the Ctrl + F keyboard shortcut to open the Find and Replace dialog box.
- In the Find and Replace dialog box, click on the Options button to expand the options.
- In the expanded options, enter a single space in the Find what field.
- Leave the Replace with field blank.
- Click on the Find All button to see a list of all instances of the single space in your worksheet.
- Hold down the Ctrl key and select all the rows in the list that contain the single space.
- Right-click on any of the selected rows and choose the Delete option. Alternatively, you can also go to the Home tab, click on the Delete dropdown button, and select Delete Sheet Rows.
Using the Find and Replace function with a single space allows you to detect and remove the blank rows in your Excel worksheet effectively. This method is efficient and doesn’t require any complex formulas or coding. It provides a quick solution for cleaning up your data and ensures that your calculations and analysis are based on accurate and reliable information.
Using Formulas to Identify and Remove Blank Rows in Excel
Excel’s powerful formula functions can help you identify and remove blank rows in your worksheet. By using specific formulas, you can check for empty cells and then delete the corresponding rows. Here’s how you can use formulas to achieve this:
- Open your Excel worksheet and navigate to the sheet containing the data you want to process.
- Create a new column next to your data or choose an empty column where you want to apply the formula.
- In the first cell of the new column, enter a formula to check if the corresponding row is empty. For example, you can use the formula: =IF(COUNTA(A1:X1)=0,1,0) where A1:X1 is the range of cells in the row you want to check.
- Drag the formula down to fill the entire column or use the fill handle to copy it to the desired range.
- Filter the column to show only the rows with a value of 1. This will display the rows that have at least one blank cell in the corresponding row.
- Select the visible rows by clicking and dragging over the filtered cells or using the shortcut Ctrl + Shift + * (asterisk).
- Right-click on any of the selected rows and choose the Delete option. Alternatively, you can also go to the Home tab, click on the Delete dropdown button, and select Delete Sheet Rows.
By using formulas, you can create a systematic approach to identify and remove blank rows in your Excel worksheet. This method is useful for large datasets with many columns, as it allows you to customize the formula to check for specific conditions. It provides a dynamic way to clean up your data and ensure the accuracy of your calculations and analysis.
Using VBA Code to Remove Blank Rows in Excel
If you’re comfortable with programming, using VBA (Visual Basic for Applications) code can provide a powerful and efficient way to remove blank rows in Excel. With VBA, you can automate the process and handle large datasets with ease. Here’s an example of how you can use VBA code to remove blank rows:
- Open your Excel worksheet and press Alt + F11 to open the Visual Basic Editor.
- In the Visual Basic Editor, go to Insert and click on Module to insert a new module.
- In the module window, paste the following VBA code snippet:
vba
Sub RemoveBlankRows()
Dim rng As Range
Dim row As Range
Set rng = Sheets(“Sheet1”).UsedRange ‘ Replace “Sheet1” with the name of your sheet
For Each row In rng.Rows
If WorksheetFunction.CountA(row) = 0 Then
row.Delete
End If
Next row
End Sub
- Modify the code to specify the name of your sheet. Replace “Sheet1” in the code with the name of your sheet.
- Press F5 or click on the Run button to execute the code.
The VBA code above iterates through each row in the specified range and checks if it is blank using the CountA function. If a row is found to be completely blank, it is deleted using the Delete method.
Using VBA code provides a flexible and powerful solution to remove blank rows in Excel. It can handle large datasets efficiently, saving you time and effort. However, it is important to back up your data before running any VBA code to prevent any unintended data loss or corruption. Additionally, it’s recommended to test the code on a copy of your file first to ensure everything works as expected.
Best Practices for Removing Blank Rows in Excel
When working with Excel and removing blank rows from your dataset, there are some best practices to keep in mind to ensure a smooth and effective process. By following these practices, you can maintain data integrity and avoid potential issues. Here are some best practices for removing blank rows in Excel:
- Take a backup of your file: Before making any changes to your Excel file, it’s always a good idea to take a backup. This ensures that you have a copy of your original data in case anything goes wrong during the removal process.
- Verify your selection: Double-check the range or selection before deleting any rows. Make sure you have selected the correct range, as deleting rows incorrectly can result in the loss of important data.
- Use filters to review the data: Prior to deleting rows, consider using filters to review the data and ensure that the rows you’re going to delete are truly empty. This helps you confirm that you haven’t missed any important information.
- Test your method on a copy of the data: If you’re using a method that involves filtering, formulas, or VBA code, it’s recommended to test it on a copy of your data first. This allows you to make sure the method works as intended and avoids any unintended consequences.
- Know your data: Understand the structure, formatting, and potential inconsistencies of your data. This knowledge can help you choose the most appropriate method to remove the blank rows and ensure the accuracy of your results.
- Document your process: Maintain clear documentation of the steps you followed to remove blank rows. This documentation can be helpful for future reference or when sharing the procedure with others.
- Update your calculations and analysis: After removing blank rows, ensure that any calculations, formulas, or analysis you have performed are updated accordingly. Check that your formulas reference the correct data range to reflect the changes made to the worksheet.
- Regularly review and clean your data: It’s a good practice to routinely review and clean your data, including removing any blank rows. This helps to maintain data accuracy and improve the overall quality of your Excel files.
By following these best practices, you can ensure that your Excel files remain organized, accurate, and free from unnecessary empty rows. Implementing these guidelines will contribute to a smoother data management process and enhance the efficiency of your work with Excel.