
Why Post Multiple Photos on Instagram?
Instagram is a visual platform that allows users to share their photos and videos with their followers. While the traditional way of sharing a single photo at a time has its own charm, there are several reasons why posting multiple photos on Instagram can be advantageous.
Firstly, posting multiple photos in one go allows you to tell a more comprehensive story or showcase a series of related images. This can be especially useful for photographers, artists, or businesses looking to showcase their products or services. By posting multiple photos, you can engage your audience and give them a richer experience that goes beyond a single image.
Additionally, posting multiple photos on Instagram can help you save time and avoid cluttering your followers’ feeds. Instead of bombarding your followers with several individual posts, you can condense multiple photos into a single carousel post. This allows you to share multiple moments, events, or perspectives without overwhelming your followers’ timelines.
Another reason to consider posting multiple photos is the opportunity to create visual collages or grid layouts. Collage apps and grid layouts enable you to combine several images into a cohesive and visually appealing composition. This can be an effective way to express creativity, show different angles, or highlight a particular theme or mood.
Lastly, posting multiple photos can improve your chances of reaching a wider audience and garnering more engagement. Instagram’s algorithm takes into account various factors, including the number of likes, comments, and shares, when determining the visibility of your post. By sharing multiple photos, you increase the opportunity for your followers to interact with your content, increasing the likelihood of greater engagement and reach.
Option 1: Posting Multiple Photos as a Carousel
Posting multiple photos as a carousel is a popular option on Instagram that allows you to share multiple images in a single post. Carousels provide a seamless way to showcase a series of photos without cluttering your followers’ feeds. Here’s how you can post multiple photos as a carousel:
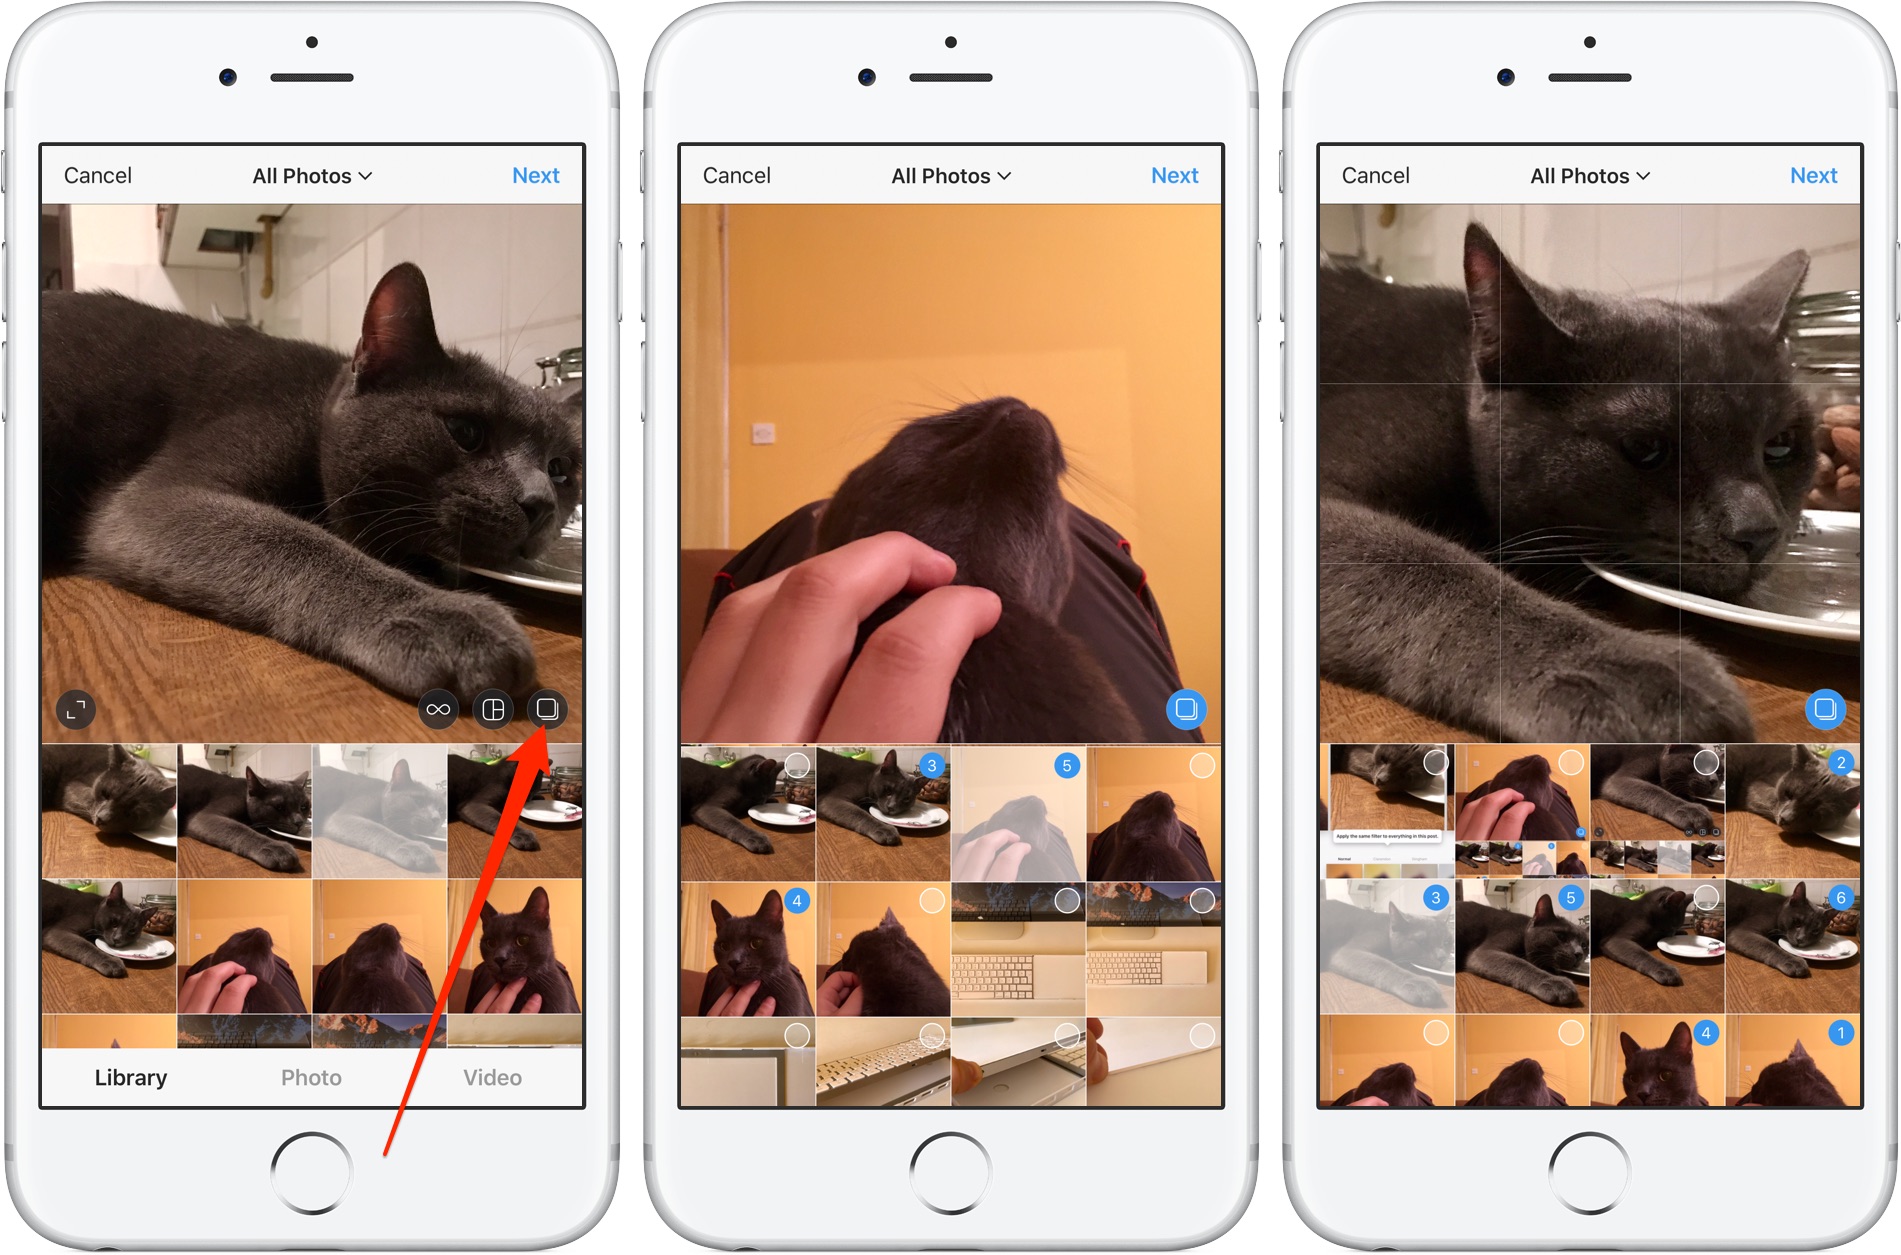
- Select the photos: Choose the photos you want to include in your carousel. You can select up to 10 photos from your camera roll or library. It’s best to choose photos that are related or tell a story when viewed together.
- Create the carousel post: Open the Instagram app and tap on the ‘+’ button to create a new post. Tap on the multiple photo icon at the bottom-right corner of the screen.
- Arrange the photos: Arrange the selected photos in the desired order by dragging and repositioning them. This will determine the sequence in which the photos will appear in the carousel.
- Add captions and tags: After arranging the photos, you can add captions, tags, and location to each individual photo or provide a single caption that applies to the entire carousel.
- Apply filters and effects: If desired, you can apply filters, adjust brightness, contrast, and other editing options to each photo individually. This allows you to enhance the visual appeal and maintain consistency across all the photos in the carousel.
- Share the carousel post: Once you’re satisfied with the arrangement, captions, and effects, tap on the ‘Share’ button to publish the carousel post. It will appear in your followers’ feeds as a single post, and they can swipe left to view all the photos in the carousel.
Posting multiple photos as a carousel provides a cohesive and organized way to share a series of images. It offers a better viewing experience for your followers, allowing them to explore multiple photos without the need to scroll through several individual posts. Carousels also increase the likelihood of your content being seen, as they encourage users to engage and spend more time on your post. So, next time you have a collection of photos you want to share, consider posting them as a carousel to make a more impactful impression on your Instagram community.
Option 2: Using Collage Apps to Post Multiple Photos
Another option to post multiple photos on Instagram is by using collage apps. Collage apps provide you with the flexibility to create visually appealing layouts by combining multiple photos into a single image. Here’s how you can use collage apps to post multiple photos:
- Select the collage app: There are many collage apps available for both iOS and Android devices. Do some research and choose a collage app that suits your needs and preferences. Some popular options include Canva, Pic Collage, and Layout by Instagram.
- Choose the layout: Once you’ve selected a collage app, browse through the available layout options. Collage apps offer various grid patterns, frames, and templates to help you create the desired composition for your photos.
- Import and arrange the photos: Import the photos you want to include in the collage from your camera roll or gallery. Arrange them within the chosen layout, positioning each photo according to your desired visual arrangement.
- Add effects and filters: Enhance the overall look of your collage by applying effects, filters, and adjustments to each photo. This will help maintain consistency and create a cohesive aesthetic.
- Customize the collage: Some collage apps allow you to customize the collage further by adding text, stickers, backgrounds, or other design elements. Explore the available options and add any additional elements that enhance the overall visual appeal of the collage.
- Save and export the collage: Once you’re satisfied with the collage, save it to your device’s photo library or gallery. Afterward, you can open the Instagram app, create a new post, and select the collage image from your saved photos to share it with your followers.
Using collage apps to post multiple photos provides you with a creative and unique way to showcase your images. Collages allow you to combine different photos into a single composition, enabling you to convey a specific theme, tell a story, or highlight various aspects of an event or experience. With the wide range of layout options, effects, and customization features offered by collage apps, you can unleash your creativity and make your Instagram posts stand out from the crowd. So, next time you want to share multiple photos, consider using a collage app to create an eye-catching and visually stunning composition that captures the attention of your followers.
Step 1: Selecting the Collage App
When it comes to posting multiple photos on Instagram using collage apps, the first step is selecting the right app for your needs. With a plethora of options available, it’s important to choose an app that offers the features and functionalities you desire. Here are some points to consider when selecting a collage app:
1. User-friendly interface: Look for an app that has an intuitive and user-friendly interface. A simple and easy-to-navigate app will make the collage creation process smoother and more enjoyable.
2. Layout options: Check if the app offers a variety of layout options, such as grid patterns, frames, or templates. This will allow you to choose the layout that best suits your vision for the collage.
3. Customization features: Consider the customization features available in the app. Look for options to adjust the size, spacing, and position of photos within the collage. Additionally, features like text overlays, stickers, and backgrounds can provide additional creative possibilities.
4. Editing tools: Explore the editing tools provided by the app. These tools may include filters, effects, cropping, and adjustment options that allow you to enhance the appearance of your photos within the collage.
5. Sharing options: Check if the app offers seamless integration with Instagram. Look for options to directly share the collage to your Instagram feed or stories. This will save you time and effort when it’s time to publish your collage.
6. User reviews and ratings: Read user reviews and ratings of various collage apps to get an idea of their performance, reliability, and overall user satisfaction. This can give you valuable insights and help you make an informed decision.
Take some time to research and experiment with different collage apps. Consider trying out a few free options before investing in paid apps. Keep in mind that everyone’s preferences and requirements are different, so choose an app that aligns with your specific needs and creative vision. By selecting the right collage app, you’ll set the foundation for creating stunning and visually captivating collages to share on your Instagram feed.
Step 2: Choosing the Layout
Once you have selected a collage app for posting multiple photos on Instagram, the next step is to choose the layout that best suits your desired composition. The layout plays a crucial role in determining the arrangement of your photos within the collage. Here are some considerations to keep in mind when choosing the layout:
1. Grid patterns: Collage apps often offer a variety of grid patterns, ranging from simple grids with equal-sized cells to more complex asymmetrical designs. Consider what type of grid pattern will best showcase your photos and highlight their unique qualities.
2. Frame options: Some collage apps provide frame options that can add an extra touch of elegance or visual interest to your collage. Frames can help create a border around each photo or divide the collage into distinct sections.
3. Template variety: Explore the template options available within the collage app. Templates can provide a pre-designed layout that requires minimal adjustment, making it ideal for those who want a quick and convenient solution for their collage.
4. Aspect ratio: Consider the aspect ratio of the layout and how it complements your photos. If your photos have different orientations (landscape or portrait), choose a layout that accommodates both orientations or emphasizes one over the other for a specific creative effect.
5. Number of photos: Determine the number of photos you want to include in your collage. Some layout options allow for a limited number of photos, while others are more flexible and can accommodate a larger number of images.
When choosing the layout, consider the story or theme you want to convey with your collage. Experiment with different layouts to find the one that best showcases your photos and creates a visually appealing composition. Some collage apps even provide randomization tools that can generate layout suggestions for you to explore.
Remember, the layout you choose is the foundation of your collage, so take your time and explore various options. Don’t be afraid to experiment and try different layouts to find the one that best suits your vision. By carefully selecting the layout, you’ll set the stage for creating a visually captivating collage that will grab attention and engage your Instagram followers.
Step 3: Importing and Arranging the Photos
After selecting the layout for your collage, the next step is to import and arrange the photos within the chosen layout. This step is crucial in creating a visually appealing and well-structured composition. Here’s how you can import and arrange the photos:
1. Import the photos: Open the chosen collage app and select the option to import photos. You can typically choose photos from your device’s camera roll, gallery, or cloud storage. Select the photos you want to include in your collage and import them into the app.
2. Arrange the photos: Once you have imported the photos, you can start arranging them within the layout. Most collage apps allow you to drag and drop the photos into their respective positions within the grid or template. Experiment with different arrangements until you find the one that best showcases the photos and creates a visually pleasing composition.
3. Consider visual balance: As you arrange the photos, pay attention to achieving a sense of visual balance within the collage. Distribute the photos evenly across the layout, mix different orientations (landscape and portrait), and be mindful of any prominent subjects or focal points within the photos. A well-balanced arrangement will create harmony and enhance the overall aesthetic appeal of the collage.
4. Resize and crop: Some collage apps offer the option to resize and crop the photos within the layout. This allows you to fit the photos perfectly into the designated cells or frames. Take advantage of these tools to ensure that each photo is correctly sized and positioned within the collage.
5. Layering and overlapping: For more advanced collage apps, you may have the option to layer or overlap the photos. This can add depth and visual interest to your collage. Experiment with layering certain photos or overlapping them slightly to create a dynamic and visually engaging composition.
Take your time during this step and consider the aesthetics and visual impact of each arrangement. Don’t be afraid to make adjustments until you achieve the desired look. Remember, the arrangement of the photos plays a significant role in conveying the intended message or story behind your collage. By importing and arranging the photos thoughtfully, you will create a visually cohesive and captivating collage that will leave a lasting impression on your Instagram followers.
Step 4: Adding Effects and Filters
Once you have imported and arranged the photos within the collage, the next step is to enhance their visual appeal by adding effects and filters. Effects and filters can add depth, mood, and consistency to your collage, creating a cohesive and aesthetically pleasing composition. Here’s how you can add effects and filters:
1. Explore editing options: Open the collage app and navigate to the editing or effects section. Here, you will find a range of editing tools that allow you to adjust various aspects of the photos, such as brightness, contrast, saturation, and sharpness. Familiarize yourself with these editing options and experiment with different settings to enhance the overall look of your photos.
2. Apply filters: Filters are preset adjustments that can instantly transform the appearance of your photos. Collage apps often offer a selection of filters with different styles, tones, and moods. Try applying different filters to the photos within the collage and compare the results to choose the one that best complements the overall aesthetic you want to achieve.
3. Maintain consistency: As you apply effects and filters, strive for consistency throughout the collage. Ensure that the degree of editing and choice of filters remain consistent across all the photos. This will help create a cohesive visual experience and prevent any jarring discrepancies between the edited photos within the collage.
4. Consider theme and mood: Think about the theme or mood you want to convey through your collage. Adjust the effects and filters to align with this desired theme or mood. For example, if you want to create a vintage look, you may opt for sepia or retro-inspired filters. If you want a vibrant and energetic collage, you might choose filters that enhance saturation and contrast.
5. Save and compare: After applying effects and filters to the photos within the collage, save your progress and take a moment to step back and evaluate the overall result. Compare the edited version of the collage with the original arrangement to ensure that the enhancements have enhanced the visual impact without overpowering the essence of the photos.
Remember, the purpose of adding effects and filters is to enhance the visual appeal and coherence of your collage without overshadowing the inherent qualities of the photos. By artfully applying effects and filters, you can elevate the overall aesthetic and create a visually captivating collage that leaves a lasting impression on your Instagram followers.
Step 5: Customizing the Collage
Once you have arranged the photos and applied effects, it’s time to customize the collage to add your personal touch and make it stand out. Customization allows you to further enhance the visual appeal of the collage and make it unique to your style and taste. Here are some ways you can customize your collage:
1. Text overlays: Consider adding text overlays to provide context, captions, or additional information about the photos within the collage. Choose fonts, sizes, and colors that complement the overall aesthetic of the collage without overpowering the visual impact of the photos.
2. Stickers and icons: Many collage apps offer a wide range of stickers and icons that can be added to the collage. These graphics can add a touch of fun, creativity, or emphasize certain themes or elements within the collage. Explore the available options and select stickers that enhance the overall composition.
3. Backgrounds and borders: Some collage apps provide the ability to customize the background color or pattern of the collage. Consider choosing a background that harmonizes with the colors and themes present in your photos. Additionally, you can experiment with adding borders or frames to give the collage a polished and finished look.
4. Graphic elements: If you want to further enhance the visual impact of your collage, consider incorporating graphic elements such as shapes, lines, or illustrations. These elements can help add structure, guide the eye, or create a unique artistic touch to the composition.
5. Fine-tune the arrangement: Take a step back and carefully examine the arrangement of the photos within the collage. Make any necessary adjustments to ensure a balanced and visually pleasing composition. Consider the proximity, spacing, and orientation of each photo to create a harmonious layout.
Be mindful not to overdo the customization and risk overshadowing the main focus, which is the collection of photos within the collage. Strive for a balance between customization and maintaining the visual impact of the photos themselves. Remember that customization should enhance the overall aesthetic and storytelling, rather than detract from it.
By customizing your collage, you can infuse it with your unique style and creativity. This personalization will help make your collage stand out and leave a lasting impression on your Instagram followers.
Step 6: Saving and Exporting the Collage
After you have customized your collage to perfection, the final step is to save and export it so that you can share it on Instagram. Here’s how you can save and export your collage:
1. Review your collage: Before saving and exporting the collage, take a moment to review it one last time. Double-check the arrangement, effects, filters, and any customizations you have applied to ensure that everything looks just the way you want it.
2. Save the collage: In your collage app, look for the option to save or export the collage. Depending on the app, you may be able to save the collage directly to your device’s photo library or gallery. This will allow you to have a copy of the collage ready for posting on Instagram.
3. Choose the appropriate resolution: Some collage apps give you the option to choose the resolution or image quality of the saved collage. Depending on your preferences and the intended use of the collage, you can select the resolution that best suits your needs. Higher resolutions are generally recommended for better image quality when posting on social media platforms.
4. Share on Instagram: Once the collage is saved to your device, open the Instagram app. Create a new post and select the saved collage from your device’s photo library or gallery. Add a caption, hashtags, and any additional details you want to include, and then share the collage with your followers on Instagram.
5. Additional sharing options: In addition to Instagram, you can also consider sharing the collage on other social media platforms or with friends and family. Most collage apps offer options to share the saved collage directly to other social media platforms like Facebook, Twitter, or Pinterest. You can also send it via email or messaging apps to specific recipients.
By saving and exporting the collage, you ensure that your hard work and creativity will be shared and enjoyed by others. Remember to save a copy of the collage for your own records and future reference.
Enjoy the process of creating and sharing collages on Instagram, and don’t be afraid to experiment with different styles and techniques. With each collage, you have the opportunity to showcase your creativity and captivate your audience with unique and visually stunning compositions.
Option 3: Creating a Grid Layout
Creating a grid layout is another great option for posting multiple photos on Instagram. Grid layouts allow you to arrange a series of photos in a grid-like pattern, creating a cohesive and visually appealing collage. Here’s how you can create a grid layout:
Step 1: Choosing the Right Photos
Start by selecting the photos you want to include in the grid. Consider the theme, story, or aesthetic you want to convey through your photos. Choose images that complement each other and create a cohesive visual narrative when viewed together.
Step 2: Resizing and Cropping the Photos
To create a consistent grid layout, ensure that all the photos have the same aspect ratio. Use a photo editing app or the built-in editing features in your device’s photo gallery to resize and crop the photos accordingly. This will help maintain a uniform look when you arrange them in the grid layout.
Step 3: Editing and Enhancing the Photos
Before arranging the photos in the grid, consider editing and enhancing them to ensure they look their best. Adjust the brightness, contrast, saturation, and other settings as needed. You can also apply filters or add effects to create a consistent visual style throughout the grid.
Step 4: Creating a Grid Template
There are several ways you can create a grid template. You can use dedicated collage apps that offer grid layout options, or you can manually create a grid template using photo editing software. In a grid template, you’ll set up the number of rows and columns you want for your grid and customize the spacing between the photos.
Step 5: Uploading the Grid Photos
Once you have the grid template ready, it’s time to upload the photos and arrange them in the grid. Start by placing each photo in its designated spot within the template, making sure they align properly. Adjust the spacing and positioning as necessary to achieve a visually balanced and pleasing composition.
Grid layouts can be an effective way to showcase a collection of photos as a cohesive story or create a visually striking collage. They allow you to highlight different aspects of an event, showcase various perspectives, or create a visually stunning mosaic of images. Experiment with different grid layouts and styles to find the one that best suits your photos and desired aesthetic.
Once you have created the grid layout, you can share it on Instagram by uploading each photo in the grid as a separate post. Be sure to mention in the captions that the posts are part of a grid layout and provide instructions for viewers on how to navigate and enjoy the complete grid. This creates a sense of anticipation and engagement as your followers explore your visually stunning grid composition.
Step 1: Choosing the Right Photos
When creating a grid layout for your Instagram post, the first step is selecting the right photos to include. The photos you choose will play a pivotal role in telling a story, conveying a specific theme, or capturing a particular mood within your grid. Here’s how you can choose the right photos:
1. Determine your purpose: Consider the purpose or message you want your grid layout to convey. Are you aiming to showcase a travel adventure, highlight a series of fashion looks, or share snapshots from a special event? Having a clear purpose in mind will guide your photo selection process.
2. Create a story or theme: Look for photos that can be linked together to create a narrative or a cohesive theme. Choose images that have a visual connection or capture different aspects of the same subject. This will give your grid layout a sense of unity and create a visually pleasing composition.
3. Consider visual variety: While creating a story or theme, also keep in mind the importance of visual variety. Aim for a mix of photos with different perspectives, angles, and compositions. This will add visual interest and make your grid layout more engaging for viewers.
4. Quality over quantity: It’s essential to prioritize quality over quantity when selecting photos for your grid layout. Choose images that are sharp, well-composed, and visually appealing. Avoid including photos that appear blurry, poorly lit, or irrelevant to the overall story or theme.
5. Ensure consistency: While variety is important, it’s also crucial to maintain consistency to achieve a visually harmonious grid layout. Consider factors like color palette, tone, and overall aesthetic when selecting your photos. This will ensure that they complement each other and create a cohesive visual experience when arranged in the grid.
6. Edit if necessary: Depending on your artistic vision, you might need to edit the selected photos to align them more closely with your desired style. Make adjustments to elements like brightness, contrast, and saturation to enhance the overall visual appeal and coherence of the grid layout.
By carefully selecting the right photos for your grid layout, you can create a visually captivating composition that grabs the attention of your Instagram followers. Each photo should contribute to the overall narrative, theme, or aesthetic you want to convey, ensuring that the grid layout tells a cohesive and compelling visual story.
Step 2: Resizing and Cropping the Photos
Once you have chosen the right photos for your grid layout, the next step is to resize and crop them to ensure a uniform and visually pleasing composition. Resizing and cropping the photos will help create consistency in size and aspect ratio, allowing them to fit seamlessly within the grid. Here’s how you can resize and crop the photos:
1. Determine the desired size: Decide on the size you want for the photos in your grid layout. Consider the number of rows and columns in your grid, as well as the overall dimensions of the final composition. It’s essential to maintain consistency in size across all the photos to achieve a visually balanced grid.
2. Use photo editing tools: Utilize photo editing tools available on your device or dedicated photo editing apps to resize the photos. These tools allow you to set specific dimensions and aspect ratios for the images. Follow the predetermined size you decided upon and resize each photo accordingly.
3. Crop for consistency: After resizing, crop the photos to ensure that they have a consistent aspect ratio. Pay attention to the composition of each photo and crop any unnecessary elements that may detract from the overall grid layout. Focus on the subject or main point of interest in the photo and eliminate any distractions.
4. Maintain visual coherence: As you resize and crop the photos, keep the visual coherence of the grid layout in mind. Ensure that the subjects or elements within the photos are not cut off abruptly or placed at awkward angles when arranged in the grid. Pay attention to the overall composition and make adjustments as needed to achieve a balanced and aesthetically pleasing result.
5. Save or export the resized and cropped photos: Once you are satisfied with the resizing and cropping of the photos, save each individual photo separately in the appropriate dimensions. This will ensure that you have the correctly sized photos ready for arranging in the grid layout and uploading to Instagram.
By resizing and cropping the photos for your grid layout, you create a visually consistent and pleasing composition. This enhances the overall aesthetic and ensures that the photos seamlessly fit within the designated cells of the grid. Take the time to carefully resize and crop each photo, paying attention to maintaining the integrity of the subject matter. The result will be a visually stunning grid layout that captivates your Instagram followers.
Step 3: Editing and Enhancing the Photos
Once you have resized and cropped the photos for your grid layout, the next step is to edit and enhance them to ensure they look their best. Editing the photos will help bring out their full potential and create a cohesive visual experience within the grid. Here’s how you can edit and enhance the photos:
1. Adjust brightness, contrast, and saturation: Use photo editing tools or apps to make adjustments to the brightness, contrast, and saturation levels of each photo. This will help enhance the overall appearance and ensure that the colors pop, creating a visually appealing grid layout.
2. Fine-tune exposure and shadows: Pay attention to exposure and shadows within the photos. Adjust these elements to ensure that important details are visible, and the overall tonal range is well-balanced. This will help create depth and dimension within the grid layout.
3. Enhance colors or apply a cohesive color scheme: If you want to create a specific mood or cohesive look within your grid, consider enhancing certain colors or applying a consistent color scheme. Adjust color temperature, apply selective color adjustments, or use filters to create a unified and visually pleasing grid layout.
4. Apply sharpening and noise reduction: Depending on the quality and resolution of your photos, apply sharpening to enhance details and bring out the clarity. Additionally, use noise reduction to minimize any unwanted noise or graininess in the images, particularly if you took the photos in low-light conditions.
5. Consider a consistent style or filter: To create a cohesive and visually pleasing grid layout, consider applying a consistent editing style or filter to all the photos. This will help create a harmonious visual experience and tie the photos together in a unified way.
6. Maintain the integrity of each photo: While editing and enhancing the photos, it’s important to maintain the integrity and authenticity of each individual photo. Avoid over-editing or applying excessive filters that can distort the original qualities or intentions of the images. Strive for a balance between enhancing the visual appeal and preserving the natural essence of each photo.
By editing and enhancing the photos, you can elevate the overall quality and visual impact of your grid layout. The adjustments and enhancements made during this step will help create a cohesive and visually stunning composition that captures the attention and admiration of your Instagram followers.
Step 4: Creating a Grid Template
After editing and enhancing the photos for your grid layout, the next step is to create a grid template. The grid template will serve as a blueprint to guide the placement of each photo within the grid. Here’s how you can create a grid template:
1. Determine the number of rows and columns: Decide on the number of rows and columns you want for your grid layout. This will depend on the number of photos you have and the desired visual composition. Consider factors like image size, aspect ratio, and the overall dimensions of the grid to ensure a balanced and visually pleasing layout.
2. Choose a layout style: Grid layouts can be created in various styles, such as equal-sized cells, varying-sized cells, or asymmetrical compositions. Decide on the style that best suits your photos and the story you want to tell through your grid layout.
3. Set the spacing and margins: Determine the spacing between each cell and the margins around the grid. This will impact the visual balance and overall aesthetic of the grid layout. Experiment with different spacing options to find the one that creates the desired visual impact and cohesiveness.
4. Use grid templates within collage apps: Many dedicated collage apps provide pre-designed grid templates that you can choose from. These templates are designed to help you create a visually appealing and balanced grid layout easily. Explore the templates available in your chosen collage app and select the one that aligns with your vision for the grid.
5. Manually create a grid template: If you prefer a more customized approach, you can manually create a grid template using photo editing software or design tools. Use guides, rulers, or grid patterns to ensure precise placement of the cells within your desired dimensions. This method allows for more flexibility in creating a unique and personalized grid template.
6. Consider overlapping or layered cells: As a creative choice, you can also experiment with overlapping or layered cells within the grid template. This can add depth and visual interest to the grid layout. Try different arrangements and combinations to create a visually captivating composition.
By creating a grid template, you establish a clear structure and organization for your photos within the grid layout. The template will guide you in placing each photo accurately and help you achieve a visually balanced composition. Whether you choose a pre-designed template or create your own, the grid template sets the foundation for an eye-catching and visually captivating grid layout on Instagram.
Step 5: Uploading the Grid Photos
After creating the grid template and arranging the photos accordingly, the next step is to upload the grid photos to Instagram. Here’s how you can successfully upload the grid photos:
1. Prepare the individual grid photos: Make sure that each photo in the grid is saved as a separate and correctly sized image file. This ensures that when uploaded to Instagram, they fit perfectly within the designated cells of the grid.
2. Starting with the first photo: Open the Instagram app and begin creating a new post. Choose the first photo in the grid to upload and enter any captions, hashtags, or tags you wish to include.
3. Indicate the sequence: In the caption or comments of the first photo, clearly mention that it is part of a grid layout. Indicate the sequence of the grid (e.g., “1/9”, “1/12,” etc.) to guide viewers on how to navigate and enjoy the complete grid.
4. Repeat the process for subsequent photos: Upload each subsequent photo in the sequence, following the same process as the first. Be consistent with your captions, hashtags, and tags to maintain coherence throughout the grid.
5. Ensure proper alignment: As you upload each photo, double-check that it aligns correctly within its respective cell in the grid. Pay attention to any borders, margins, or spacing to maintain the visual integrity of the grid layout.
6. Preview the grid: Once all the photos are uploaded, navigate to your Instagram profile and view the grid layout as a whole. Confirm that the photos align seamlessly and create the desired visual impact you envisioned for the grid.
7. Engage with your audience: Encourage your followers to explore the grid layout by mentioning in the captions or comments how the grid is connected. Invite them to swipe or scroll through the photos to appreciate the complete composition and the story or theme it conveys.
Keep in mind that uploading grid photos individually creates a sense of anticipation and engagement among your audience. They will be intrigued to see how each photo connects with the others within the grid layout. By providing clear instructions and engaging with your followers, you can enhance the viewing experience and maximize the impact of your grid on Instagram.
Option 4: Using Third-Party Apps to Post Multiple Photos
In addition to the built-in features on Instagram, you can also explore third-party apps to post multiple photos in a creative and unique way. These apps offer a wide range of features and customization options that can elevate your Instagram posts. Here’s how you can use third-party apps to post multiple photos:
Step 1: Researching and Choosing the Right App
Start by researching and exploring various third-party apps available for posting multiple photos on Instagram. Consider factors such as user reviews, ratings, features, user interface, and compatibility with your device. Look for apps that align with your specific requirements and offer the functionalities you desire.
Step 2: Installing and Setting Up the App
Once you have chosen the app, download and install it on your device. Follow the setup instructions provided by the app to grant necessary permissions and configure any account settings if required. Familiarize yourself with the app’s interface and navigation.
Step 3: Importing and Arranging the Photos
Use the app’s import feature to select and import the photos you want to post on Instagram. Arrange the imported photos in the desired order or sequence that tells a story or creates a visually appealing composition. The app may provide options for rearranging, resizing, rotating, or cropping the photos to further customize their appearance.
Step 4: Customizing and Editing the Grid
Explore the customization options provided by the app to enhance the grid layout. This may include applying filters, adjusting brightness and contrast, adding text overlays, or incorporating graphic elements. Experiment with different customization features to bring your creative vision to life and make the grid visually captivating.
Step 5: Saving and Exporting the Photos
Once you are satisfied with the arrangement and customization of the grid, save the final composition within the app. Ensure that you choose the appropriate resolution or quality settings for optimal results. Export the saved grid as an image file that is ready to be posted on Instagram.
Step 6: Posting on Instagram
Open the Instagram app and create a new post. Select the exported grid image from your device’s photo library or gallery. Write a caption that reflects the theme, story, or message behind the grid. Add relevant hashtags and location tags, if applicable. Then, share the grid image on your Instagram feed for your followers to enjoy.
Using third-party apps gives you access to a wide range of creative tools and options for posting multiple photos on Instagram. These apps offer flexibility, allowing you to customize your posts and create visually stunning compositions that capture the attention of your followers.
Step 1: Researching and Choosing the Right App
When utilizing third-party apps to post multiple photos on Instagram, the first step is to research and choose the right app that suits your specific needs. With a multitude of options available, it’s important to consider various factors and select an app that aligns with your requirements. Here’s how you can go about researching and choosing the right app:
1. Define your needs: Begin by clearly defining your needs and objectives. Consider the specific features and functionalities you require from the app. Do you need advanced editing options, collage templates, or unique layout designs? Having a clear understanding of your needs will help narrow down your choices.
2. Explore user reviews and ratings: Look for user reviews and ratings of the apps you are considering. This will provide insights into the overall user experience, app performance, and reliability. Pay attention to both positive and negative reviews to gather a comprehensive view.
3. Consider compatibility: Ensure that the app you choose is compatible with your device’s operating system (iOS or Android). Check the system requirements for each app to avoid any compatibility issues or download an incompatible app.
4. Evaluate app features: Explore the features offered by each app and assess how well they align with your requirements. Look for functionalities such as the ability to arrange photos in various layouts, adjust sizes and proportions, apply filters and effects, and add text or graphic elements. A comprehensive suite of features will provide more options for customization and enhance your creative capabilities.
5. User interface and ease of use: Consider the user interface of the app and how intuitive and user-friendly it is. The app should have clear navigation, easy-to-use tools, and a well-designed interface that allows for effortless editing and customization.
6. Additional considerations: Take into account any other factors that are important to you. This may include app pricing (free or paid), availability of customer support, frequency of updates and enhancements, and integration with other social media platforms.
By thoroughly researching and evaluating different third-party apps, you can make an informed decision when choosing the one that best fits your needs. Remember that everyone’s preferences and requirements can differ, so take the time to assess the features, reviews, and compatibility of each app. Doing so will ensure that you select the right app to facilitate the seamless and creative posting of multiple photos on Instagram.
Step 2: Installing and Setting Up the App
Once you have chosen the right third-party app for posting multiple photos on Instagram, the next step is to install and set up the app on your device. Here’s how you can install and set up the app for a smooth and hassle-free experience:
1. Download the app: Head to the app store or the official website of the app and download it onto your device. Ensure that you are downloading the official version from a trusted source.
2. Grant necessary permissions: Launch the app after installation and follow any prompts that appear. Grant the app the necessary permissions it requests, such as access to your device’s photo library or camera, to fully utilize its features.
3. Account creation: If the app requires an account, create one by providing the necessary information, such as your email address or connecting with a social media account. Ensure that you choose a secure password and review any terms and privacy policies before proceeding.
4. Familiarize yourself with the interface: Take some time to explore and become familiar with the app’s interface. Navigate through the menus, discover the various features, and get acquainted with the layout and design. This will help you navigate the app more efficiently in the future.
5. Customize settings: Depending on the app, you may have the option to customize various settings to personalize your experience. This may include adjusting preferences for notifications, auto-saving, or choosing default image quality. Customizing the settings will allow you to tailor the app to your specific preferences and needs.
6. Learn app functionality: Spend some time understanding the functionality of the app. Experiment with the different editing tools, collage layouts, or additional features offered. Many apps provide tutorials or help sections to guide you through the app’s functionality and make the most of its capabilities.
By following these steps, you can install and set up the third-party app smoothly, ensuring that you are ready to utilize its features effectively. Take the time to explore the app’s interface and customize settings according to your preferences. Familiarizing yourself with the app’s functionality will allow for a seamless experience when it comes to creating and posting multiple photos on Instagram.
Step 3: Importing and Arranging the Photos
After installing and setting up the third-party app for posting multiple photos on Instagram, the next step is to import and arrange the photos within the app. This step involves selecting the desired photos and arranging them in the desired order or composition. Here’s how you can import and arrange the photos:
1. Select the photos: Open the app and choose the photos you want to include in your post. You can select multiple photos from your device’s photo library or other connected platforms. Consider the story or theme you want to convey and select photos that align with your vision.
2. Import the photos: Once you have selected the photos, import them into the app. This typically involves tapping on a button or an import option within the app’s interface. Follow the prompts to select and import the desired photos.
3. Arrange the photos: After importing the photos, you can arrange them in the desired order or composition. The app may provide various layout options or grids to choose from, allowing you to arrange the photos in a visually appealing manner. Some apps also allow you to drag and drop the photos to customize their placement.
4. Experiment with different layouts: Explore different layout options offered by the app. Experiment with grid patterns, collage templates, or unique composition styles to find the one that best showcases your photos and suits your creative vision. Don’t be afraid to try different arrangements until you find the one that visually speaks to you.
5. Customize the arrangement: Some apps offer customization features that allow you to further personalize the arrangement. This may include adjusting the size, orientation, or adding borders and special effects to the photos within the layout. Take advantage of these options to create a unique and visually captivating arrangement.
6. Preview the arrangement: Once you have arranged the photos to your satisfaction, take a moment to preview the layout within the app. This will help you ensure that the composition is visually appealing and conveys the intended message or theme effectively.
By carefully importing and arranging the photos within the app, you can create a visually compelling composition that captivates your audience on Instagram. Take your time to experiment with different layouts and customization options to find the arrangement that best showcases your photos and tells your story in a visually captivating manner.
Step 4: Customizing and Editing the Grid
Once you have imported and arranged the photos within the third-party app, the next step is to customize and edit the grid. This step involves adding personalized touches, enhancing the visual appeal, and making the grid composition unique to your style and preferences. Here’s how you can customize and edit the grid:
1. Apply filters and effects: Many third-party apps offer a wide range of filters and effects to enhance the overall look of the grid. Experiment with different filters to adjust the color tones, saturation, or contrasts within the grid. Choose filters that complement the mood or theme you want to convey, creating a cohesive visual style throughout the grid.
2. Adjust brightness and contrast: Fine-tune the brightness and contrast levels of the grid to ensure that it presents your photos in the best light. This step will help eliminate any inconsistencies and ensure a visually balanced composition. Pay attention to each photo’s exposure and how it contributes to the overall grid’s aesthetic.
3. Add text or captions: Consider adding text or captions to the grid to provide context or further convey your message. Many third-party apps offer options for adding text overlays with various fonts, sizes, and decorative elements. Place the text strategically within the grid to enhance the storytelling or highlight specific aspects of the photos.
4. Incorporate graphic elements: Explore the app’s features to include graphic elements, such as stickers, doodles, or icons. This customization option allows you to add unique touches, create focal points, or inject additional visual interest into the grid. Experiment with different graphic elements and placements to find what works best for your desired aesthetic.
5. Adjust spacing and alignment: Pay attention to the spacing between each photo within the grid. You can adjust the spacing to create a sense of balance and harmony. Ensure that the photos are aligned properly, with uniform margins and even spacing, to create a visually pleasing and organized composition.
6. Preview and fine-tune the edits: Take a step back and preview the customized grid within the app. Assess how the applied edits and customization options have impacted the overall look and feel of the grid. Fine-tune the edits as needed to achieve the desired visual style and ensure that the grid accurately represents your creative vision.
By customizing and editing the grid, you can create a unique and visually captivating composition that reflects your personal style and vision. Take advantage of the app’s features to enhance the grid’s overall aesthetic and create a cohesive and engaging visual experience for your Instagram followers.
Step 5: Saving and Exporting the Photos
After customizing and editing the grid within the third-party app, the next step is to save and export the photos. Saving and exporting the photos ensures that they are ready to be shared on Instagram or other platforms. Here’s how you can save and export the photos:
1. Review the final composition: Before saving and exporting the photos, take a moment to review the final composition of the grid within the app. Make sure that all the edits, customizations, and arrangements are to your satisfaction. Pay attention to details such as alignment, spacing, and overall visual appeal.
2. Verify image quality and resolution: You may have the option to adjust the image quality or resolution within the app. Consider the intended use of the photos and ensure that they are saved in a suitable resolution for optimal viewing on Instagram or other platforms. Higher resolutions are generally recommended for better image quality.
3. Save the photos within the app: Look for the option to save the photos within the app. This may involve selecting a “Save” or “Export” option or tapping on a specific icon. Choose a location within your device or cloud storage to save the photos as individual files or as a collective grid image.
4. Export the photos from the app: After saving the photos within the app, you may need to export them to your device’s photo library or gallery. This step ensures that the photos are easily accessible and can be uploaded to various platforms, including Instagram.
5. Organize and rename if desired: If necessary, organize the exported photos in a folder or directory on your device to keep them easily accessible and organized. You may also consider renaming the photos with descriptive titles or numbers to indicate their sequence within the grid.
6. Share the photos on Instagram: Open the Instagram app and create a new post. Select the saved or exported photos from your device’s photo library or gallery. Write captions, add hashtags or location tags, and customize any additional settings within the Instagram app before sharing the photos on your feed.
By saving and exporting the photos from the third-party app, you ensure that the customized grid is ready for sharing on platforms like Instagram. Pay attention to the image quality and resolution to maintain the integrity of the grid’s visual appeal. With the photos saved and exported, you can confidently share your creatively customized grid with your Instagram followers.