
Using the Insert Picture Option
One of the easiest ways to place a picture inside a PowerPoint shape is by utilizing the insert picture option. This feature allows you to seamlessly incorporate images into your presentation to enhance visual appeal and convey your message effectively. Follow these simple steps to get started:
- Open your PowerPoint presentation and navigate to the slide where you want to place the picture inside a shape.
- Select the shape you want to work with by clicking on it. If you don’t have a shape on your slide yet, you can quickly add one by going to the “Insert” tab and choosing a shape from the options available in the “Shapes” gallery.
- Once you have selected the shape, go to the “Format” tab at the top of the PowerPoint window. Look for the “Insert Picture” or “Picture” button, which is typically located in the “Shape Styles” or “Shape Fill” group.
- Click on the “Insert Picture” button to open the file explorer window. Browse through your computer’s files and select the desired image you want to place inside the shape.
- After selecting the image, click the “Insert” button in the file explorer window to add the picture to the shape.
- The picture will automatically fit inside the shape, but you can resize and position it according to your preference. Simply click and drag any of the corner handles of the picture to adjust its size, and use the cursor to reposition it within the shape.
By using the insert picture option, you can quickly and effortlessly place images inside PowerPoint shapes, allowing you to create visually stunning presentations that leave a lasting impression on your audience.
Formatting the Shape
In addition to placing a picture inside a PowerPoint shape, you can further enhance its appearance by applying various formatting options. This will help you align the shape with your overall presentation design and make it more visually appealing. Follow these steps to format the shape:
- Select the shape that contains the picture by clicking on it. You can easily identify the selected shape by the selection handles that appear.
- Go to the “Format” tab at the top of the PowerPoint window. Here, you will find a range of formatting options to customize the shape’s appearance.
- In the “Shape Styles” or “Shape Fill” group, you can experiment with different fill colors or apply gradients, textures, or patterns to the shape. Choose an option that complements or contrasts with the picture inside the shape.
- Modify the shape’s outline by selecting an outline color, adjusting the weight, and applying dashed or dotted lines if desired. This will help the shape stand out or blend in with the rest of the slide elements.
- Utilize the “Shape Effects” menu to add shadows, reflections, bevels, or other effects to the shape. This can give the shape a more three-dimensional appearance and make it visually striking.
- Play around with the “Shape Transform” options to resize, skew, or rotate the shape. This feature allows you to creatively modify the shape’s proportions to fit your design goals.
By taking advantage of the formatting options available in PowerPoint, you can transform a simple shape into a visually captivating element that complements your presentation content.
Adjusting the Picture Inside the Shape
Once you have placed a picture inside a PowerPoint shape, you may need to make some adjustments to ensure that it fits perfectly and achieves the desired effect. Here are some tips on how to adjust the picture inside the shape:
- Select the shape containing the picture by clicking on it. You will notice that the selection handles appear, indicating that the shape is selected.
- To resize the picture proportionally, click and drag any of the corner handles of the picture. By holding the Shift key while resizing, you can maintain the aspect ratio of the image. This helps prevent any distortion or stretching of the picture.
- If you want to manually resize or reposition the picture inside the shape, you can do so by clicking and dragging within the shape. This allows you to frame the desired portion of the picture within the boundaries of the shape.
- For more precise adjustments, right-click on the shape and choose “Format Shape” from the context menu. In the Format Shape pane, go to the “Fill & Line” section and adjust the transparency or crop the picture using the Crop options. This allows you to control the visibility of the picture or remove any unwanted parts.
- If you need to rotate the picture inside the shape, click and drag the rotation handle that appears above the shape. This enables you to achieve the desired angle or orientation of the picture.
- To flip the picture vertically or horizontally, right-click on the shape, choose “Format Picture” from the context menu, then go to the “Size & Properties” section in the Format Picture pane. Here, you can select the desired flip option under the “Rotate” heading.
By adjusting the picture inside the shape, you can ensure that it is properly sized, positioned, and aligned, allowing you to create a visually appealing and cohesive presentation.
Using the Crop Tool
The crop tool in PowerPoint is a powerful feature that allows you to remove unwanted parts of a picture and focus on the specific area you want to showcase. This tool is especially handy when placing a picture inside a shape and needing to fine-tune the composition. Here’s how you can use the crop tool:
- Select the shape containing the picture by clicking on it. Ensure that the selection handles appear around the shape to indicate that it’s selected.
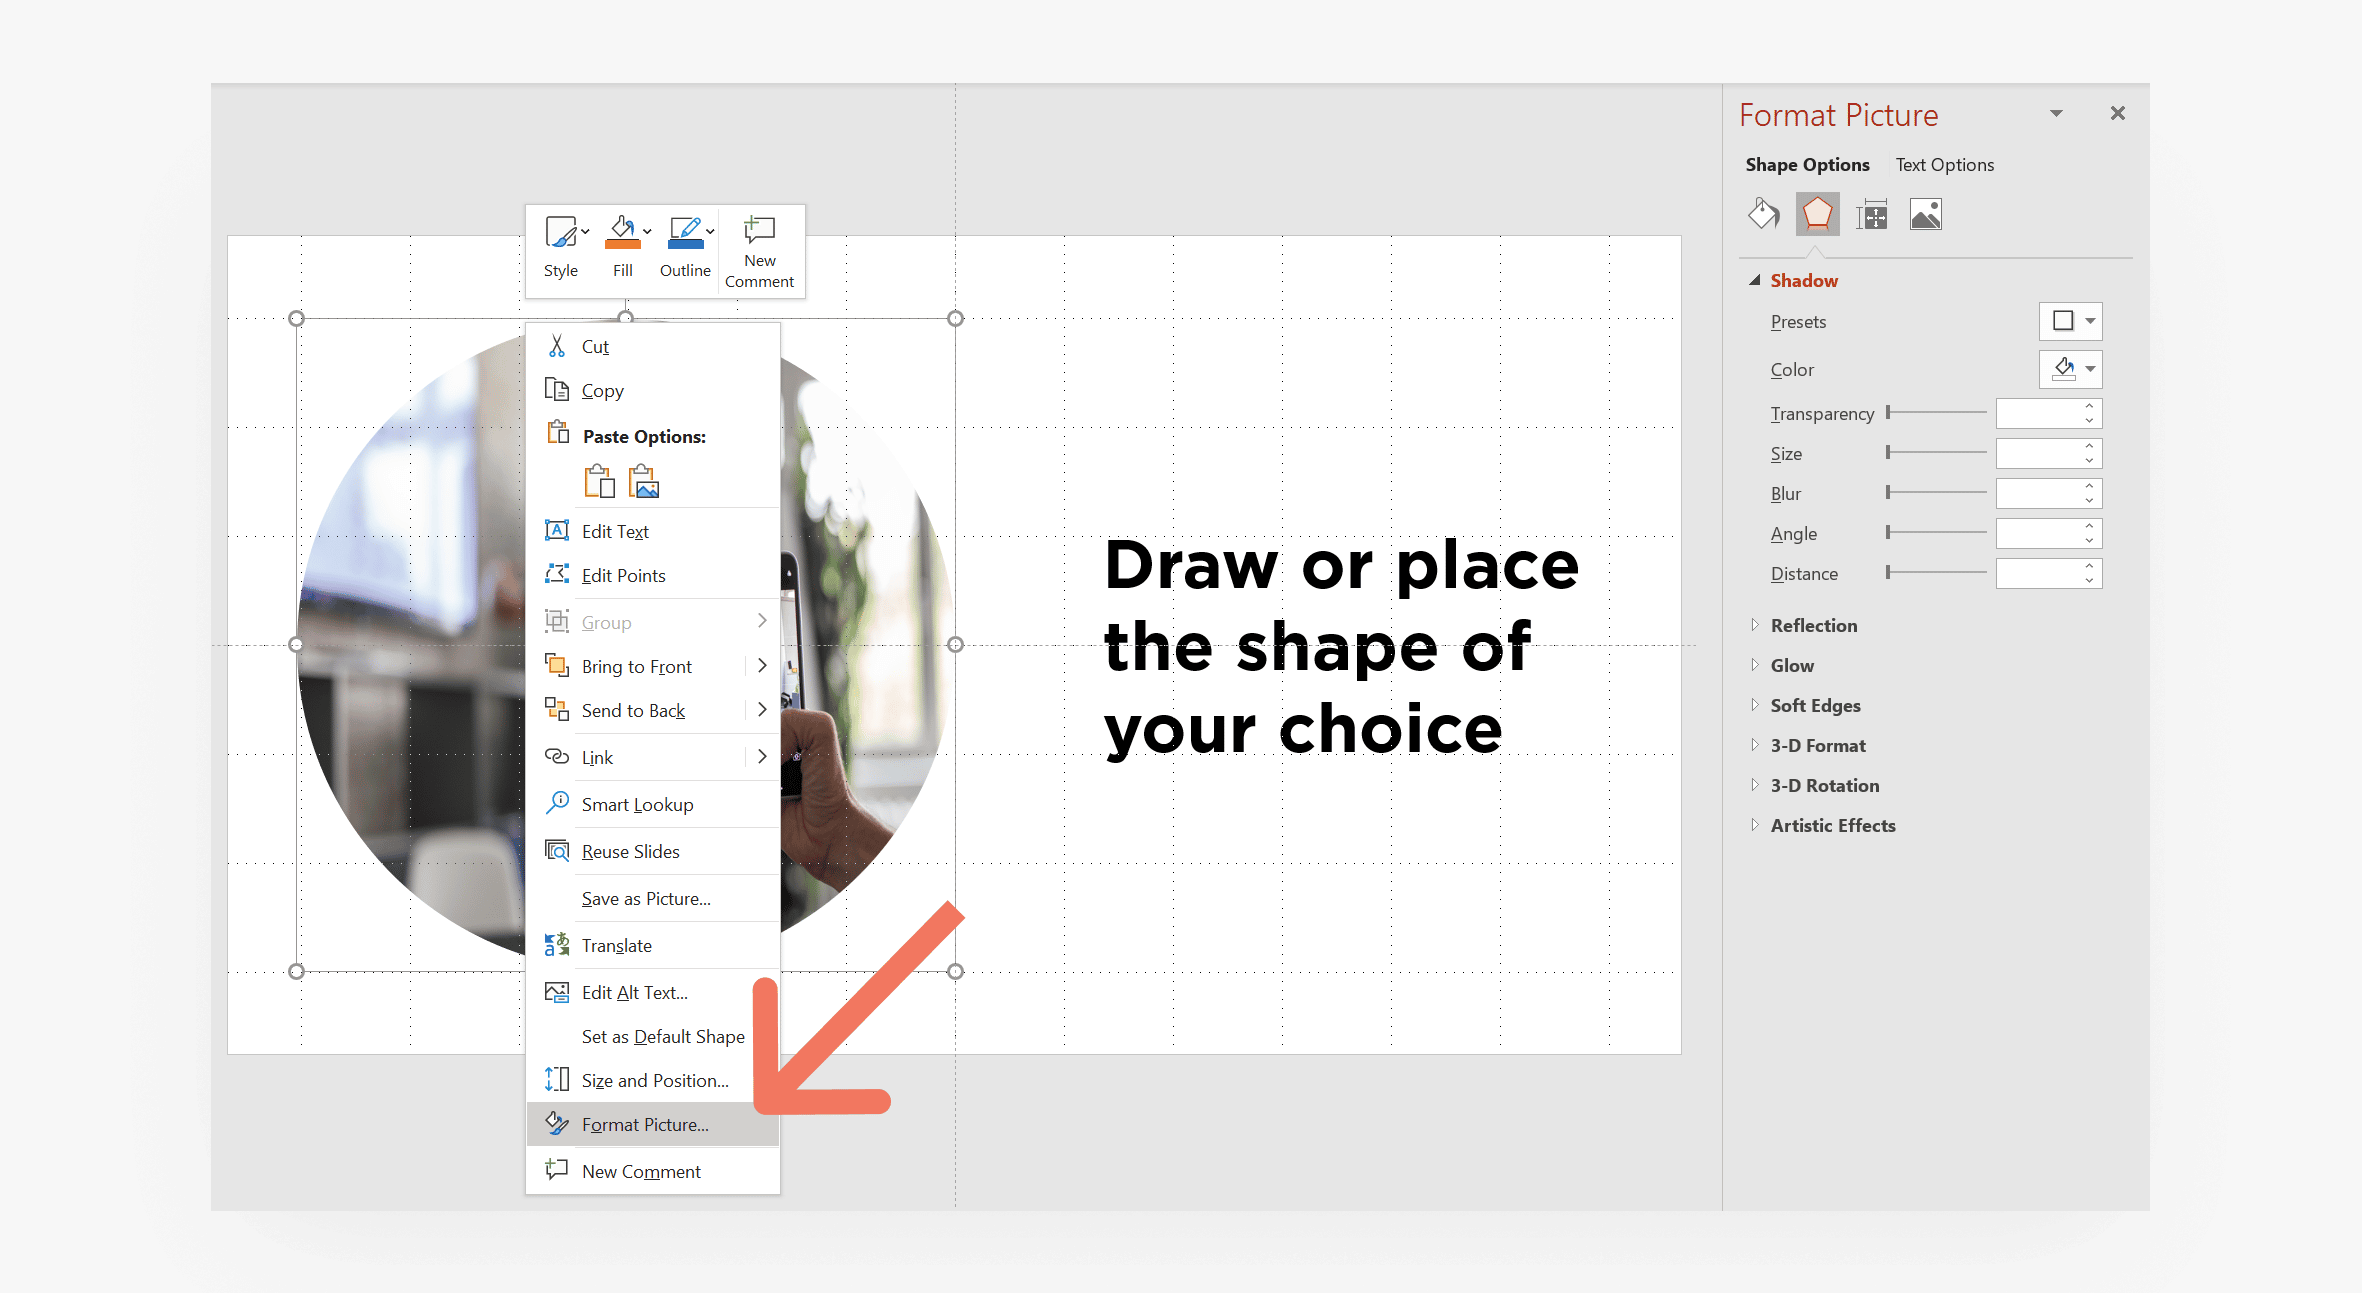
- Right-click on the shape and choose “Format Picture” from the context menu. This will open the Format Picture pane.
- In the Format Picture pane, navigate to the “Size & Properties” section and locate the “Crop” options. Click on the “Crop” checkbox to enable the crop tool.
- You will notice that the picture inside the shape now has crop handles at the corners and edges. Click and drag these handles to crop the picture as desired.
- If you need to adjust the crop area more precisely, right-click on the shape and choose “Crop” from the context menu. This will display a crop overlay on the picture. You can then click and drag the overlay to further refine the crop area.
- To remove the crop and restore the picture to its original state, uncheck the “Crop” checkbox in the Format Picture pane or right-click on the shape and choose “Crop” → “Reset” from the context menu.
The crop tool helps you enhance the visual impact of your PowerPoint presentation by allowing you to focus on the most important parts of an image. By utilizing this tool, you can effectively highlight and emphasize specific details within a picture placed inside a shape.
Adding Effects to the Picture and Shape
PowerPoint offers a range of effects that you can apply to both the picture inside the shape and the shape itself. These effects help enhance the visual appeal of your presentation and make your picture and shape stand out. Here’s how you can add effects:
- Select the shape containing the picture by clicking on it. Ensure that the selection handles appear to indicate that the shape is selected.
- Go to the “Format” tab at the top of the PowerPoint window and locate the “Shape Styles” or “Shape Effects” group.
- Click on the “Picture Effects” button to access a variety of effects that can be applied to the picture. This includes options like shadows, reflections, glows, and more. Choose the effect that best suits your design needs.
- To add effects to the shape itself, click on the “Shape Effects” or “Shape Fill” button. Here, you can choose from effects like bevels, 3D rotations, gradients, and more. Experiment with different options to find the effect that enhances the shape’s visual impact.
- After applying an effect, you can customize its settings further. Right-click on the shape, select “Format Shape” from the context menu, and go to the “Effects” tab in the Format Shape pane. Adjust the parameters like shadow intensity, reflection angle, or glow color to fine-tune the visual effect.
- To remove an effect, simply select the shape, go to the “Format” tab, and click on the “Clear Effects” button. This will revert the shape back to its original state.
By adding effects to both the picture inside the shape and the shape itself, you can add depth, visual interest, and professionalism to your PowerPoint presentation. Experiment with different effects to create a visually stunning and engaging slide.
Locking the Picture Inside the Shape
When you have carefully positioned and adjusted the picture inside a shape in PowerPoint, you may want to ensure that it remains in place and doesn’t accidentally get moved or resized. Locking the picture inside the shape can help protect your design and maintain the intended layout. Here’s how you can lock the picture inside the shape:
- Select the shape that contains the picture by clicking on it. Make sure the selection handles appear, indicating that the shape is selected.
- Right-click on the shape and choose “Format Picture” from the context menu.
- In the Format Picture pane, navigate to the “Size & Properties” section.
- Locate the “Lock aspect ratio” and “Lock position” checkboxes, and ensure that both of them are checked.
- The “Lock aspect ratio” option prevents the picture from being resized disproportionately when the shape is resized. The “Lock position” option prevents the picture from being accidentally moved within the shape.
- If you want to further protect the picture, you can also check the “Lock picture aspect ratio” and “Lock picture position” checkboxes. These options ensure that the picture maintains its original aspect ratio and position within the shape, even if the shape is resized or moved.
By locking the picture inside the shape, you can maintain the desired composition and prevent any accidental changes that may affect your presentation’s visual appeal. This ensures that your design remains consistent and professional throughout your slides.
Grouping the Picture and Shape Together
In PowerPoint, you have the option to group the picture and shape together as a single object. This can be useful when you want to move or resize both elements at the same time, or apply effects and formatting to them collectively. Here’s how you can group the picture and shape together:
- Select the shape containing the picture by clicking on it. Ensure that the selection handles appear, indicating that the shape is selected.
- Hold down the Shift key on your keyboard and click on the picture inside the shape. This allows you to select both the shape and the picture at the same time.
- With both elements selected, go to the “Format” tab at the top of the PowerPoint window.
- In the “Arrange” or “Group” section, click on the “Group” button. Alternatively, you can right-click on the selected objects and choose “Group” from the context menu.
- Once grouped, the picture and shape will become a single object. You can now move, resize, or format them together.
- To ungroup the picture and shape, select the grouped object and go to the “Format” tab. In the “Arrange” or “Group” section, click on the “Ungroup” button. This will revert the grouped object back to its individual components.
Grouping the picture and shape together allows for easier manipulation and management of elements within your PowerPoint slides. It streamlines the design process and enables you to work with the picture and shape as a cohesive unit.
Using the Eyedropper Tool to Match Colors
One of the key aspects of creating visually cohesive presentations is matching the colors of different elements, including pictures and shapes. In PowerPoint, the eyedropper tool comes in handy for precisely selecting colors from an image and applying them to other objects. Here’s how you can use the eyedropper tool to match colors:
- Select the shape or object that you want to match the color to.
- Go to the “Format” tab at the top of the PowerPoint window. Look for the “Shape Fill” or “Shape Outline” button, depending on whether you want to match the fill or outline color of the shape.
- Click on the drop-down arrow next to the “Shape Fill” or “Shape Outline” button to open the color palette.
- At the bottom of the color palette, you will see an icon that resembles an eyedropper. Click on this icon to activate the eyedropper tool.
- Move your cursor over the picture or image from which you want to match the color. As you hover over different areas, you will see the cursor change to an eyedropper icon.
- Click on the specific area of the image that has the color you want to match. PowerPoint will automatically sample that color and apply it to the shape or object you have selected.
- If needed, you can further refine the color by adjusting its brightness, saturation, or transparency using the color options in the palette.
By utilizing the eyedropper tool in PowerPoint, you can easily match colors from an image to ensure visual harmony and consistency throughout your presentation. This helps create a polished and professional look for your slides.
Saving the Picture and Shape as a Template
Once you have created a customized picture and shape combination in PowerPoint, you can save it as a template. Saving the picture and shape as a template allows you to reuse the specific design in future presentations, saving time and maintaining a consistent visual style. Here’s how to save the picture and shape as a template:
- Select the picture and shape that you want to save as a template. Ensure that the selection handles appear around both elements, indicating that they are selected.
- Right-click on the selected object and choose “Save as Picture” from the context menu. This will save the combined picture and shape as a single image file on your computer.
- To save the shape as a template, right-click on the shape and choose “Save as Picture” from the context menu. This will save the shape as a separate image file.
- Now, you can open a new PowerPoint presentation where you want to use the picture and shape template.
- Go to the “Insert” tab at the top of the PowerPoint window and click on the “Pictures” button. Select the combined picture file that you saved earlier.
- Position the picture on your slide and adjust its size and position as needed.
- Next, go to the “Insert” tab and click on the “Shapes” button. Choose the shape that matches your template and draw it on the slide.
- Format the shape to match the template by applying the same fill color, outline color, or effects that you used in the original design.
By saving the picture and shape as a template, you eliminate the need to recreate the design from scratch for each new presentation. This ensures consistency in your visual branding and streamlines the design process. Simply access the picture and shape template files, insert them into your slides, and customize them to fit the specific content of your presentation.
Troubleshooting Common Issues
While working with pictures and shapes in PowerPoint, you may encounter some common issues that can affect the appearance or functionality of your design. It’s important to be aware of these issues and know how to troubleshoot them. Here are some common problems and their solutions:
- Picture quality: If the picture inside a shape appears blurry or pixelated, ensure that you are using a high-resolution image. You can try replacing the picture with a higher-quality version or adjust the size of the picture to improve its clarity.
- Shape position: Sometimes, the shape may not align perfectly with the picture inside it. To fix this, select both the shape and picture, and try manually adjusting their positions until they line up properly.
- Picture or shape not visible: If the picture or shape is not visible on the slide, check if it is hidden behind other objects. Ensure that the picture or shape is brought to the front by right-clicking on it and selecting “Bring to Front” or adjusting the “Bring Forward” option in the “Arrange” tab.
- Incompatibility: When sharing your PowerPoint presentation with others, ensure that any custom fonts, image files, or shape styles used in the design are also shared or embedded in the presentation. This prevents issues with missing fonts or broken links.
- Shape resizing issue: If the shape does not resize proportionally when you resize it, make sure the “Lock aspect ratio” option is enabled in the “Format Picture” or “Format Shape” pane. Additionally, ensure that the picture inside the shape is also set to maintain its aspect ratio.
- Picture fading or transparency: If the picture inside the shape appears faded or transparent, adjust the fill settings of the shape. Make sure the transparency is set to 0% in the “Shape Fill” or “Format Shape” options.
- Shape distortion: If the shape appears distorted or stretched, ensure that the picture size matches the shape’s proportions. You can resize the picture while holding the Shift key to maintain its aspect ratio and prevent distortion.
By troubleshooting these common issues, you can ensure that your pictures and shapes work seamlessly in your PowerPoint presentations, allowing you to create visually appealing and professional slides.