
What is Text Wrapping in PowerPoint?
Text wrapping is a valuable feature in PowerPoint that allows you to control the positioning of text around images or shapes in your presentations. This feature grants you the flexibility to create visually appealing and professional-looking slides by arranging text in a way that complements your design.
When you insert an image or a shape into a PowerPoint slide, it is typically placed on top of the text by default. This can obstruct the readability and overall aesthetics of your presentation. By using text wrapping, you can adjust the layout so that the text flows around the object, giving your slide a more cohesive and visually pleasing appearance.
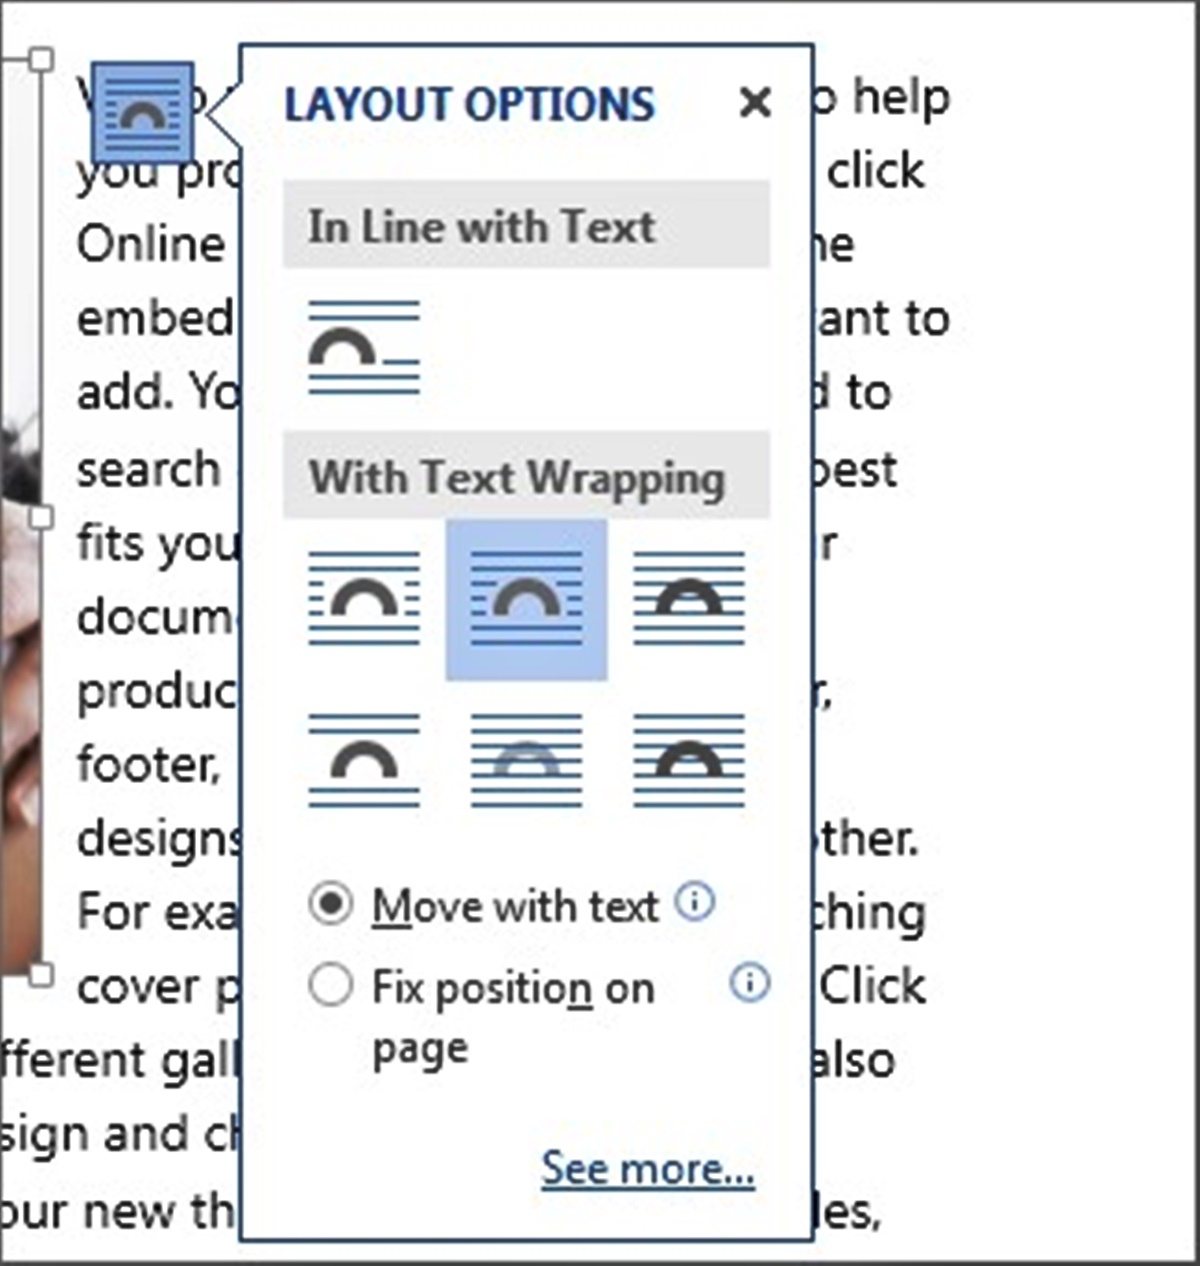
PowerPoint offers different text wrapping options to suit your specific needs and preferences. These options include:
- Square: The text wraps around the rectangular shape of the object.
- Tight: The text conforms closely to the contours of the object, allowing for a more precise wrap-around effect.
- Behind Text: The object is placed behind the text, allowing the text to appear in front.
- In Front of Text: The object is placed in front of the text, with the text appearing behind it.
Text wrapping is not limited to just a single image or shape. You can also wrap text around multiple objects, such as combining images and shapes together. This provides you with endless possibilities for creating dynamic and engaging slides that effectively communicate your message.
Whether you are preparing a professional presentation, a sales pitch, or a creative project, understanding how to utilize text wrapping in PowerPoint is an essential skill to ensure your slides look polished and visually compelling.
How to Adjust Text Wrapping Options
Adjusting text wrapping options in PowerPoint gives you the power to customize the appearance of your text around objects. Follow these steps to adjust the text wrapping options in your PowerPoint presentation:
- Select the image or shape around which you want to adjust the text wrapping.
- Go to the “Format” tab on the PowerPoint ribbon.
- In the “Arrange” group, click on the “Wrap Text” button.
- A drop-down menu with various text wrapping options will appear.
- Select the desired text wrapping option from the menu. You can choose from options like “Square,” “Tight,” “Behind Text,” or “In Front of Text.”
- Observe the changes in the text wrapping layout as you select different options.
- You can also fine-tune the text wrapping by selecting the “More Options” or “Wrap Text Options” button in the drop-down menu.
- A dialog box will appear, allowing you to adjust additional parameters, such as distance from the object, wrapping style, and more.
- Experiment with different settings until you achieve the desired text wrapping effect.
- Preview the changes by clicking outside of the object or pressing the “Escape” key.
By following these simple steps, you can easily adjust the text wrapping options in PowerPoint to create a visually pleasing presentation that effectively communicates your message.
Wrapping Text Around an Image
Wrapping text around an image is a popular technique used to enhance the visual appeal and readability of PowerPoint presentations. Follow these steps to wrap text around an image in PowerPoint:
- Insert an image into your PowerPoint slide by going to the “Insert” tab and selecting “Picture” or “Online Pictures.”
- Resize and position the image to your desired location on the slide.
- Select the image by clicking on it.
- Go to the “Format” tab on the PowerPoint ribbon.
- In the “Arrange” group, click on the “Wrap Text” button.
- Select the text wrapping option that best suits your design needs, such as “Square” or “Tight.”
- The text will now automatically start wrapping around the image, creating a visually appealing layout.
- To further refine the text wrapping, you can adjust the spacing and alignment options within the “Wrap Text” menu or by accessing the “Wrap Text Options” dialog box.
Remember to consider the placement of the image and the amount of text you want to wrap around it. Experiment with different text wrapping options and positioning until you achieve the desired effect.
Wrapping text around an image in PowerPoint can make your presentations more engaging and visually interesting. It helps to break up large blocks of text and allows for a more dynamic and aesthetically pleasing layout.
Wrapping Text Around a Shape
PowerPoint offers the ability to wrap text around shapes, allowing you to create eye-catching and unique slide designs. Follow these steps to wrap text around a shape in PowerPoint:
- Insert a shape into your PowerPoint slide by going to the “Insert” tab and selecting the desired shape from the “Shapes” menu.
- Resize and position the shape to your liking.
- Add text to the shape by double-clicking inside it and typing your desired text.
- With the shape selected, go to the “Format” tab on the PowerPoint ribbon.
- In the “Arrange” group, click on the “Wrap Text” button.
- Select a text wrapping option that suits your design, such as “Square” or “Tight.”
- The text will now wrap around the shape, conforming to its contours.
- To fine-tune the text wrapping, you can adjust the spacing and alignment options within the “Wrap Text” menu or by accessing the “Wrap Text Options” dialog box.
By wrapping text around a shape, you can create visually appealing slides that highlight important information or create a focal point. This technique is especially useful when presenting data or concepts that can be visualized through shapes.
Remember to experiment with different shapes and text wrapping options to achieve the desired effect for your presentation. Wrapping text around a shape can add a unique touch and enhance the overall visual impact of your slides.
Wrapping Text Around Multiple Objects
In PowerPoint, you have the ability to wrap text around multiple objects, allowing you to create complex and visually appealing slide layouts. Follow these steps to wrap text around multiple objects in PowerPoint:
- Insert the objects (images, shapes, etc.) that you want to wrap text around into your PowerPoint slide.
- Arrange the objects in the desired position on the slide.
- Select the first object you want the text to wrap around.
- Go to the “Format” tab on the PowerPoint ribbon.
- In the “Arrange” group, click on the “Wrap Text” button.
- Select a text wrapping option, such as “Square” or “Tight,” for the first object.
- Repeat steps 3-6 for each additional object, adjusting the text wrapping options accordingly.
- As you select different text wrapping options for each object, the text will wrap around them accordingly.
- To further refine the text wrapping, you can adjust the spacing and alignment within the “Wrap Text” menu or by accessing the “Wrap Text Options” dialog box.
By wrapping text around multiple objects, you can create visually compelling presentations that effectively showcase your content. This technique is particularly useful when you want to create a layout that combines text and visuals in an aesthetically pleasing way.
Remember to consider the placement and proportion of the objects on the slide. Experiment with different text wrapping options and object arrangements until you achieve a balanced and visually appealing design.
Wrapping text around multiple objects in PowerPoint allows you to create engaging and dynamic slide layouts that capture your audience’s attention and enhance the overall impact of your presentation.
Using the Wrap Text Feature for Better Presentations
The wrap text feature in PowerPoint is a powerful tool that can significantly improve the visual impact and readability of your presentations. By utilizing this feature effectively, you can create more engaging and professional-looking slides. Here are some ways to use the wrap text feature for better presentations:
1. Emphasize Key Points:
Wrapping text around images or shapes can help you highlight key points or important information in your slides. By strategically placing the text alongside relevant visuals, you can make the information more visually appealing and memorable for your audience.
2. Create Visual Hierarchy:
By wrapping text around different objects, you can establish a visual hierarchy in your slides. You can use larger or more prominent objects to hold the main text, while smaller objects can be used for supporting details. This helps organize the information and guides the viewer’s attention to the most important elements on the slide.
3. Enhance Readability:
Text wrapping can improve the readability of your slides by breaking up large blocks of text and creating a visually pleasing flow. It allows you to present information in a more digestible format, making it easier for your audience to comprehend and retain the information being presented.
4. Create Visual Interest:
The wrap text feature provides opportunities for creative and visually interesting slide designs. By experimenting with different text wrapping options and object placements, you can create unique and eye-catching layouts that captivate your audience’s attention. This visual interest can make your presentations more memorable and engaging.
5. Maintain Professionalism:
Using the wrap text feature appropriately can help you maintain a polished and professional appearance in your presentations. By ensuring that text and visuals are aligned properly and complement each other, you can convey a sense of professionalism and attention to detail, which can enhance your credibility as a presenter.
By utilizing the wrap text feature, you can take your presentations to the next level. Remember to experiment with different options, layout configurations, and object placements to find the best combination that suits your content and visual style. With practice, you will be able to create compelling and visually appealing presentations that leave a lasting impression on your audience.
Tips for Text Wrapping in PowerPoint
Text wrapping in PowerPoint can be a powerful tool in creating visually appealing presentations. Here are some tips to help you make the most out of text wrapping in PowerPoint:
1. Plan your content placement:
Before adding text and objects to your slide, plan the overall layout and placement. Consider where you want the text to wrap and how it will interact with the objects on the slide. This will help you create a more balanced and well-composed design.
2. Use appropriate text wrapping options:
Select the text wrapping option that best suits the context of your slide. For example, choose “Square” wrapping for images with a defined shape, or “Tight” wrapping for complex shapes and objects. Experiment with different options to find the one that works best for your specific design needs.
3. Adjust spacing and alignment:
Take advantage of the spacing and alignment options within the text wrapping feature. Adjusting the distance between the text and the object, or aligning the text with specific edges of the object, can further refine the visual appearance and readability of your slide.
4. Group objects for consistent wrapping:
If you have multiple objects that you want the text to wrap around, consider grouping them together. This ensures that the text wraps consistently around the entire group, making the design more cohesive and visually appealing.
5. Avoid overcrowding:
While text wrapping can help make your slides more visually engaging, it’s important to strike a balance between visuals and content. Avoid overcrowding the slide with too much text or too many objects. Keep the design clean and focused to ensure optimum readability.
6. Test and refine:
Preview your slide and test the text wrapping in presentation mode. Make necessary adjustments to spacing, alignment, or object placement to ensure that the text is wrapping as intended. Be meticulous in refining the details to achieve the desired visual effect.
By following these tips, you can effectively leverage the text wrapping feature in PowerPoint to create visually appealing and engaging presentations that capture and hold your audience’s attention.
Common Issues and Troubleshooting with Text Wrapping
While text wrapping in PowerPoint can enhance your presentations, you may encounter some common issues or challenges along the way. Here are some tips to troubleshoot and overcome these issues:
1. Text Is Not Wrapping as Expected:
If the text is not wrapping as intended, check that the text wrapping option you selected is appropriate for the object. Experiment with different wrapping options and adjust the spacing and alignment settings until you achieve the desired result.
2. Text Overlaps or Interferes with Objects:
If the text overlaps or interferes with other objects on the slide, try adjusting the placement and size of the objects or consider using different wrapping options. You can also try grouping objects together to ensure consistent and controlled wrapping.
3. Uneven or Inconsistent Text Wrapping:
Inconsistent text wrapping can occur when dealing with multiple objects or complex layouts. To address this, make sure all objects are properly aligned and grouped together, if applicable. Adjust the spacing and alignment settings to achieve uniform and balanced text wrapping throughout the slide.
4. Text Wrapping Causes Distorted or Stretched Text:
If the text appears stretched or distorted after applying text wrapping, it could be due to the settings or size of the object. Check that the aspect ratio of the objects is maintained, and avoid resizing them disproportionately. Adjust the text wrapping settings or reposition the object if necessary.
5. Overcrowded or Incoherent Design:
Be mindful of the overall design and balance of your slide when using text wrapping. Avoid overcrowding the slide with excessive text or too many objects. Ensure that the design is coherent and allows for easy readability and comprehension.
6. Compatibility Issues:
Keep in mind that the text wrapping feature may differ in various versions of PowerPoint or when sharing presentations across different devices or platforms. Make sure to test your presentation on different devices or PowerPoint versions to ensure compatibility and consistent text wrapping.
By addressing these common issues and troubleshooting challenges with text wrapping, you can ensure that your presentations look polished and visually appealing, effectively conveying your message to your audience.
Final Thoughts on Text Wrapping in PowerPoint
Text wrapping is a valuable tool in PowerPoint that allows you to enhance the visual appeal and readability of your presentations. By strategically wrapping text around images, shapes, and multiple objects, you can create visually compelling slides that captivate your audience’s attention and effectively convey your message. Here are some final thoughts on text wrapping in PowerPoint:
Firstly, it’s important to plan your slide design and consider the placement of text and objects before applying text wrapping. This will help you create a balanced and visually appealing layout that enhances the overall presentation.
Experiment with different text wrapping options, such as “Square,” “Tight,” “Behind Text,” or “In Front of Text,” to find the best fit for your content and design. Adjust the spacing, alignment, and other settings to fine-tune the text wrapping effect.
Remember to maintain a balance between visuals and content. Avoid overcrowding the slide with too much text or too many objects. Keep the design clean, focused, and easy to read.
Test your slides in presentation mode to ensure that the text is wrapping as intended and that the overall design aligns with your expectations. Make necessary adjustments to achieve the desired visual effect.
Finally, be aware of compatibility issues when sharing your presentations. Different versions of PowerPoint or devices may display text wrapping differently. Test your presentation on different platforms and devices to ensure consistent text wrapping across all environments.
Incorporating text wrapping in your PowerPoint presentations can significantly improve the visual impact and professionalism of your slides. By thoughtfully designing your slide layouts, using appropriate text wrapping options, and maintaining a clean and focused design, you can create engaging and visually appealing presentations that effectively communicate your message to your audience.