
Benefits of Using Both Landscape and Portrait Slides in a PowerPoint Presentation
A PowerPoint presentation is a powerful tool that allows you to effectively communicate information and captivate your audience. While most presentations are typically created using landscape slides, incorporating portrait slides can offer several benefits that enhance the overall visual appeal and engagement of your presentation.
One of the main advantages of using both landscape and portrait slides is the ability to showcase content in different orientations. Landscape slides offer a wide canvas that is ideal for displaying charts, graphs, and detailed images. On the other hand, portrait slides provide a taller and more vertical layout that is perfect for displaying text-heavy slides, such as bullet points, lists, and lengthy paragraphs.
This combination of landscape and portrait slides allows you to present information in a more dynamic and visually appealing manner. By alternating between the two orientations, you can create a varied and engaging presentation that keeps your audience interested and focused on the content.
Another benefit of using both landscape and portrait slides is improved readability. Landscape slides are best suited for displaying content that requires a larger font size, ensuring that viewers can easily read and comprehend the information. On the other hand, portrait slides are better suited for displaying smaller fonts, perfect for including detailed notes or additional information without cluttering the slide.
By utilizing both landscape and portrait slides, you can also enhance the overall flow and organization of your presentation. For example, you can use landscape slides to introduce key points or provide an overview, while using portrait slides to delve into more specific details or comparisons. This strategic use of slide orientations helps to break up the monotony and keeps the audience engaged throughout the presentation.
Furthermore, incorporating both landscape and portrait slides allows you to make the most of the available space on the screen. While landscape slides provide a wider area for showcasing visuals, portrait slides utilize the vertical space more effectively and allow for longer text passages. This versatility in slide orientations enables you to present your content in the most appropriate and impactful manner, depending on the specific information you want to convey.
Understanding the Difference Between Landscape and Portrait Slides
In a PowerPoint presentation, the terms “landscape” and “portrait” refer to the orientations of the slides. Landscape slides have a horizontal orientation, resembling the shape of a landscape painting, while portrait slides have a vertical orientation, similar to the shape of a portrait painting.
The main difference between landscape and portrait slides lies in the aspect ratio. Landscape slides typically have a wide aspect ratio, usually 16:9, which allows for a broader canvas to display content. This orientation is well-suited for showcasing visuals such as images, charts, and graphs, as they can be displayed in their full width, providing more clarity and detail.
On the other hand, portrait slides have a narrow aspect ratio, typically 9:16, which provides a taller and more vertical canvas. This orientation is ideal for presenting text-heavy slides, such as bullet points, lists, or paragraphs. The vertical layout allows for more text to be displayed on a single slide without making the font size too small, making it easier for the audience to read and comprehend the information.
Understanding the difference between landscape and portrait slides is crucial for designing a well-structured and visually appealing presentation. By determining the type of content you want to display, you can choose the appropriate slide orientation that best complements the information.
When deciding whether to use landscape or portrait slides, consider the nature of your content and the impact you want to create. If your presentation includes a significant amount of visual content, such as images or data visualizations, landscape slides would be the ideal choice. Conversely, if your presentation focuses more on textual information or requires a lot of written content, portrait slides would be more suitable.
Keep in mind that you are not limited to using only one slide orientation throughout your presentation. Combining landscape and portrait slides allows you to create a dynamic and engaging presentation that effectively communicates your message. By strategically alternating between the two orientations, you can maintain your audience’s interest and present information in a visually appealing manner.
In the next sections, we will explore how to create landscape and portrait slides in PowerPoint and discuss ways to seamlessly integrate them within the same presentation.
How to Create Landscape Slides in PowerPoint
Creating landscape slides in PowerPoint is a straightforward process that allows you to maximize the visual impact of your presentation. Follow these simple steps to create landscape slides:
- Open PowerPoint and create a new slide by clicking on the “New Slide” button in the toolbar or pressing the “Ctrl+M” shortcut.
- Select the “Layout” option from the ribbon at the top of the screen. Choose a layout that suits the content you want to present. Common options include title slides, content slides, and slides with placeholders for images or charts.
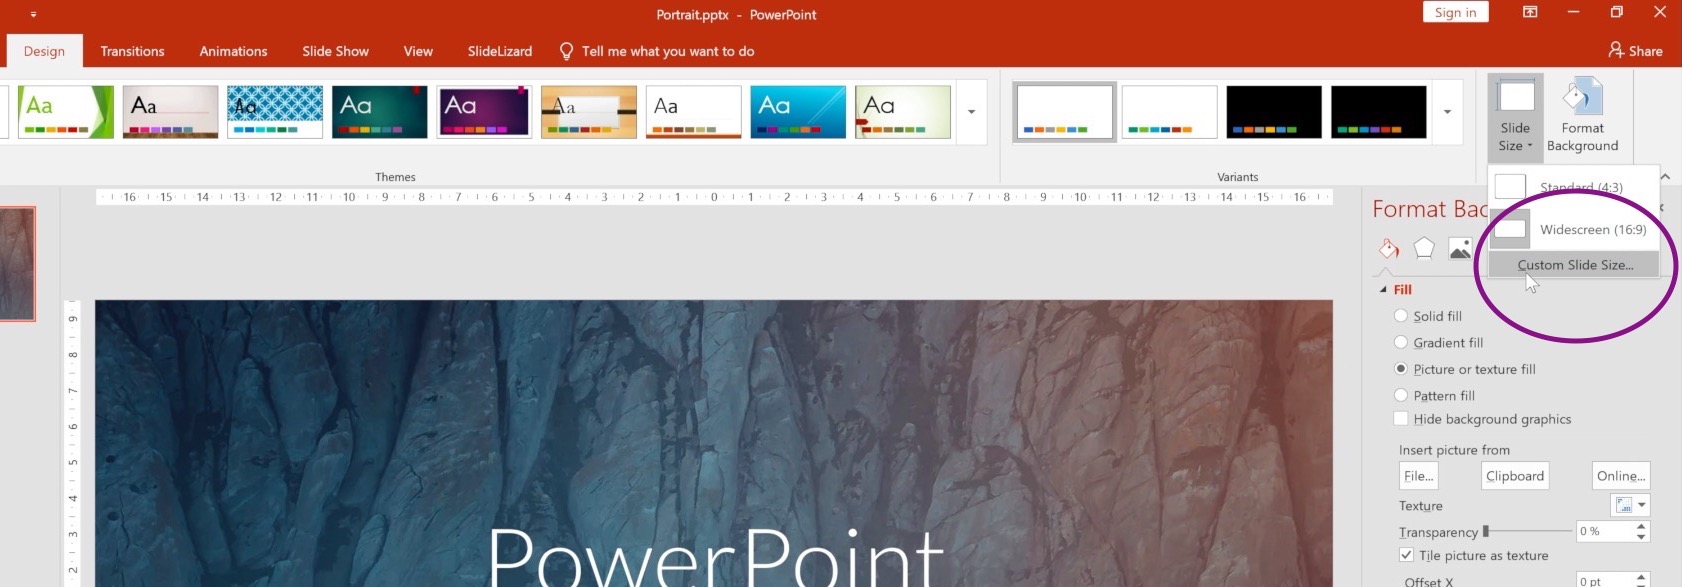
- To change the orientation to landscape, go to the “Design” tab and click on the “Slide Size” button in the “Customize” group. From the drop-down menu, select “Custom Slide Size.”
- In the “Slide Size” dialog box, select “Landscape” from the orientation options. You can also specify the desired width and height for the slide if needed. Click “OK” to apply the changes.
- Now you have a landscape slide ready for content creation. Add text, images, charts, or any other elements you want to include on the slide. Format and arrange them as desired to communicate your message effectively.
- To add additional landscape slides, click on the “New Slide” button or use the “Ctrl+M” shortcut, and repeat the process for each new slide you want to create. Remember to choose the desired layout for each slide to maintain consistency throughout your presentation.
By following these steps, you can easily create landscape slides in PowerPoint that effectively showcase your content and captivate your audience visually. Experiment with different layouts, fonts, colors, and graphics to create a visually appealing slide design that complements your message.
Next, we will explore how to create portrait slides in PowerPoint, which can be used to present text-heavy or detailed information in a more vertical format.
How to Create Portrait Slides in PowerPoint
Creating portrait slides in PowerPoint allows you to present text-heavy or detailed information in a more vertical format. Follow these simple steps to create portrait slides:
- Open PowerPoint and create a new slide by clicking on the “New Slide” button in the toolbar or pressing the “Ctrl+M” shortcut.
- Select the “Layout” option from the ribbon at the top of the screen. Choose a layout that suits the type of content you want to present. Options include title slides, content slides, and slides with placeholders for text or bullet points.
- To change the orientation to portrait, go to the “Design” tab and click on the “Slide Size” button in the “Customize” group. From the drop-down menu, select “Custom Slide Size.”
- In the “Slide Size” dialog box, select “Portrait” from the orientation options. You can also specify the desired width and height for the slide if needed. Click “OK” to apply the changes.
- Now you have a portrait slide ready for content creation. Add text, bullet points, lists, or any other elements you want to include on the slide. Format and arrange them as desired to convey your message effectively.
- To add additional portrait slides, click on the “New Slide” button or use the “Ctrl+M” shortcut, and repeat the process for each new slide you want to create. Remember to choose the desired layout for each slide to maintain a consistent look and feel throughout your presentation.
By following these steps, you can easily create portrait slides in PowerPoint that effectively display text-heavy or detailed information. Use different font styles, sizes, and formatting options to enhance the readability and visual appeal of your slides.
Remember that incorporating portrait slides in your presentation offers a different visual experience for your audience, allowing them to focus on the details and read content more easily. Mix and match landscape and portrait slides strategically to create a dynamic and engaging presentation flow that showcases your content effectively.
Next, we’ll explore how to combine landscape and portrait slides in the same PowerPoint presentation to create a visually appealing and cohesive overall design.
Combining Landscape and Portrait Slides in the Same PowerPoint
Incorporating both landscape and portrait slides in the same PowerPoint presentation allows you to create a visually appealing and dynamic layout. Here are some guidelines for effectively combining landscape and portrait slides:
- Consider your content: Determine which type of slide orientation is best suited for the specific content you want to present. Use landscape slides for images, charts, or graphs, while portrait slides are ideal for text-heavy slides or slides with detailed information.
- Plan your sequence: Plan the sequence of your landscape and portrait slides to ensure a smooth flow throughout your presentation. Use landscape slides for introductions, overviews, or visually impactful sections. Then transition to portrait slides for more detailed explanations or textual content.
- Maintain consistency: While landscape and portrait slides offer different orientations, it’s important to maintain consistency in design elements such as fonts, colors, and backgrounds. This keeps the overall presentation cohesive and professional.
- Use orientation cues: To help your audience transition between landscape and portrait slides, consider including orientation cues. These can be small icons or visual indicators in one corner of the slide that show whether the next slide will be in landscape or portrait orientation.
- Create visual harmony: Aim for a visually pleasing layout by alternating between landscape and portrait slides. Balance the use of visuals, text, and white space to prevent the presentation from feeling overwhelming or unbalanced.
- Ensure readability: Pay attention to font sizes and formatting to ensure that your content is readable on both landscape and portrait slides. Adjust the font size accordingly, especially when transitioning from landscape to portrait slides, to maintain clarity and readability.
- Practice transitions: When presenting, be aware of the transitions between landscape and portrait slides. Smoothly guide your audience through the change by briefly pausing or verbally indicating the shift. This helps maintain a seamless and cohesive flow.
By following these guidelines, you can effectively combine landscape and portrait slides in the same PowerPoint presentation, resulting in a visually appealing and engaging experience for your audience.
Next, we will explore tips for designing landscape and portrait slides that flow seamlessly and provide a visually cohesive presentation.
Tips for Designing Landscape and Portrait Slides that Flow Seamlessly
Designing landscape and portrait slides that flow seamlessly in a PowerPoint presentation requires attention to detail and a cohesive approach. Here are some tips to help you create a visually appealing and seamless transition between landscape and portrait slides:
- Consistent color scheme: Use a consistent color scheme throughout your presentation to maintain visual harmony. This includes background colors, text colors, and accent colors. Choose colors that complement each other well and enhance readability.
- Font considerations: Select fonts that are easily readable on both landscape and portrait slides. Avoid using fonts that are too small or intricate, as they can become difficult to read when presented in different orientations. Consider using a larger font size on portrait slides to ensure readability.
- Slide layout consistency: Stick to a consistent layout structure for both landscape and portrait slides. This helps maintain a sense of continuity and familiarity for your audience. Ensure that headings, subheadings, and content placement are consistent across all slides.
- Visual alignment: Pay attention to the alignment of visuals, such as images, charts, and graphs, on both landscape and portrait slides. Align them consistently to maintain a visually pleasing and professional look.
- Transitions and animations: Use transitions and animations to enhance the visual experience as you transition between landscape and portrait slides. Choose smooth and subtle transitions that do not distract from the content. Keep animations consistent throughout the presentation.
- Attention to whitespace: Utilize whitespace effectively in both landscape and portrait slides. Whitespace helps create visual balance and helps the audience focus on the content. Avoid overcrowding slides with too much information or visuals.
- Consider slide numbering: If you are using slide numbers, ensure they are positioned consistently across both landscape and portrait slides. This helps your audience follow along and navigate through the presentation smoothly.
- Slide orientation indicators: To help your audience anticipate the orientation of the next slide, consider adding small orientation indicators, such as icons or arrows, in one corner of the slides. These indicators can provide a visual cue and maintain a smooth flow between landscape and portrait slides.
- Preview and proofread: Before finalizing your presentation, preview all landscape and portrait slides to make sure they appear as intended. Double-check for any formatting inconsistencies or alignment issues. Proofread all content to ensure accuracy and readability.
By considering these tips, you can effectively design landscape and portrait slides that seamlessly flow together in your PowerPoint presentation. Ensuring visual consistency and readability across orientations will enhance the overall impact and engagement of your audience.
Next, we will explore ways to transition between landscape and portrait slides for a smooth and cohesive presentation experience.
Ways to Transition Between Landscape and Portrait Slides
Transitioning between landscape and portrait slides in a PowerPoint presentation requires careful planning and execution to maintain the flow of information. Here are some effective ways to transition seamlessly between landscape and portrait slides:
- Content continuity: Ensure that there is a logical flow of information between the landscape and portrait slides. Each slide should build upon the previous one, allowing your audience to easily follow the progression of your ideas.
- Visual cues: Use visual cues, such as icons or arrows, to indicate the transition between landscape and portrait slides. Place these cues either at the bottom or top corner of the slide to provide a subtle reminder to the audience about the change in orientation.
- Smooth animation: Incorporate smooth animation effects to transition between landscape and portrait slides. For instance, you can use a fade-in or dissolve effect to gradually reveal the next slide. This creates a seamless visual transition and maintains audience engagement.
- Consistent design elements: Maintain consistency in design elements between landscape and portrait slides. Use consistent fonts, colors, and graphics to create a cohesive look throughout the presentation. This helps the audience maintain focus and navigate through the slides smoothly.
- Repeating key visuals: If you wish to emphasize a specific visual element, consider repeating it on both the landscape and portrait slides. This repetition serves as a visual anchor that reinforces the content and aids in the transition between orientations.
- Clear transitions between sections: Use specific slides as transition points between sections where you switch the orientation. These transition slides can briefly summarize the previous section and introduce the next, giving the audience a clear indication of the change.
- Verbal cues: Along with visual cues, provide verbal cues to signal the transition between landscape and portrait slides. Use phrases like “Now, let’s move to the next section” or “As we shift gears…” to guide your audience through the change and mentally prepare them for the new orientation.
- Structured outline: Present a structured outline at the beginning or end of the presentation to help the audience understand how the landscape and portrait slides are organized. This outline serves as a roadmap and ensures a smooth transition between different sections.
- Practice and timing: Practice the timing and delivery of your presentation to ensure smooth transitions between landscape and portrait slides. Be mindful of any adjustments you may need to make while presenting to account for the different orientations.
By employing these strategies, you can transition seamlessly between landscape and portrait slides, maintaining a cohesive flow of information and enhancing the overall impact of your presentation.
In the next section, we will explore customizing slide sizes and orientations in PowerPoint, allowing you to create presentations that fit your specific needs and requirements.
Customizing Slide Sizes and Orientations in PowerPoint
PowerPoint allows you to customize the slide sizes and orientations to fit your specific needs and preferences. Whether you want to create traditional landscape presentations or incorporate portrait slides, here’s how you can customize slide sizes and orientations in PowerPoint:
- Open PowerPoint and create a new presentation or open an existing one that you want to modify.
- To customize the slide size, go to the “Design” tab and click on the “Slide Size” button in the “Customize” group. From the drop-down menu, select “Custom Slide Size.”
- In the “Slide Size” dialog box that appears, you have the option to choose from predefined slide sizes or set a custom size. If you want to use a predefined size, select the appropriate option from the list. Alternatively, you can enter specific width and height measurements to create a custom size.
- If you want to change the orientation of the slides, such as switching from landscape to portrait or vice versa, you can do so in the “Slide Size” dialog box. Select the desired orientation option, either landscape or portrait.
- Click “OK” to apply the changes to the slide size and orientation throughout your presentation.
- After customizing the slide size and orientation, you can start creating your content on the slides. Add text, images, graphics, and other elements to individualize your presentation.
- If you want to have a combination of landscape and portrait slides in the same presentation, follow the steps mentioned above to change the slide size and orientation when needed. Remember to consider the specific content and layout requirements for each slide to maintain a cohesive overall design.
- Preview your presentation to ensure that the customized slide sizes and orientations appear as intended. Make any necessary adjustments to maintain consistency and optimize the visual experience for your audience.
By customizing the slide sizes and orientations in PowerPoint, you gain the flexibility to create presentations that align with your unique requirements and design preferences. Whether you want to create traditional landscape presentations or incorporate portrait slides for specific types of content, PowerPoint allows you to customize your slides for enhanced visual impact.
In the next section, we will discuss how to ensure compatibility and consistency across devices and platforms when using customized slide sizes and orientations in PowerPoint.
How to Ensure Compatibility and Consistency Across Devices and Platforms
When customizing slide sizes and orientations in PowerPoint, it’s crucial to ensure compatibility and consistency across different devices and platforms. Here are some tips to help you achieve this:
- Test on different devices: Before delivering your presentation, test it on multiple devices, such as laptops, tablets, and smartphones. This ensures that the customized slide sizes and orientations are displayed correctly and are readable on different screen sizes.
- Consider aspect ratio: Pay attention to the aspect ratio of your slides, especially when customizing slide sizes. Common aspect ratios include 16:9 and 4:3. Choose an aspect ratio that is widely supported to ensure compatibility across different devices and platforms.
- Save in a compatible format: When saving your PowerPoint presentation, consider saving it in a format that is widely supported, such as PPTX or PDF. This ensures that the customized slide sizes and orientations are preserved when viewed on different devices and platforms.
- Embed fonts: If you have used special fonts in your presentation, it’s a good idea to embed them to maintain consistency. This ensures that the fonts are displayed correctly, even if the device or platform doesn’t have the same fonts installed.
- Check for alignment issues: When customizing slide sizes and orientations, review your presentation for any alignment issues that may arise. Make adjustments as needed to ensure that all elements, such as text boxes, images, and graphics, are properly aligned on different devices and platforms.
- Test interactivity and animations: If your presentation includes interactive elements or animations, test them on different devices and platforms to ensure they function as intended. Verify that interactivity and animations are compatible and work seamlessly across all devices.
- Consider file size: Be mindful of the file size of your presentation, especially when using customized slide sizes and orientations. Large file sizes may pose compatibility issues or slow down the performance on certain devices or platforms. Optimize the file size by compressing images and minimizing unnecessary media.
- Provide clear instructions: If you will be sharing your presentation with others, provide clear instructions on how to view it to ensure compatibility. Inform recipients about the supported devices, recommended software versions, and any specific settings required to maintain the intended layout and orientation.
By following these tips, you can ensure compatibility and consistency across devices and platforms when using customized slide sizes and orientations in PowerPoint. This allows you to confidently share and present your slides, knowing that they will be displayed correctly and efficiently on various devices and platforms.
In the next section, we will explore additional design considerations for landscape-portrait PowerPoint presentations, helping you create visually appealing and engaging slides.
Additional Design Considerations for Landscape-Portrait PowerPoint Presentations
When creating landscape-portrait PowerPoint presentations, there are additional design considerations to keep in mind to ensure a visually appealing and engaging experience for your audience. Here are some key points to consider:
- Clear visual hierarchy: Establish a clear visual hierarchy in your slides by using different font sizes, headings, subheadings, and bullet points. This helps guide the viewer’s attention and makes the content easier to understand.
- Balance between visuals and text: Maintain a balance between visuals and text on your slides. Use visuals, such as images, charts, and graphs, to communicate information effectively, but avoid overcrowding the slide or overwhelming the audience with too much visual content.
- Consistent branding: Ensure that your landscape and portrait slides reflect your brand’s visual identity. Use consistent color schemes, fonts, and logo placement to reinforce your brand and create a professional and cohesive presentation.
- Whitespace and breathing room: Leave ample whitespace around your content to create a sense of clarity and breathing room. This not only improves readability but also prevents the slides from feeling cluttered.
- Slide transitions: Choose slide transitions thoughtfully and consistently throughout your presentation. Select transitions that complement the content and add a visual flow between landscape and portrait slides, but ensure they enhance rather than distract from your message.
- Appropriate imagery: Select high-quality images that align with your presentation’s theme and convey your message effectively. Avoid using generic or irrelevant visuals that may confuse or distract your audience.
- Typography considerations: Use fonts that are legible across different devices and sizes. Ensure that the font style, size, and color combinations are easily readable, even on smaller screens or when projected in larger venues.
- Consistent slide layouts: Maintain consistent slide layouts throughout your presentation to create a cohesive look. This includes the placement of titles, content, images, and other elements. Consistent layouts help the audience navigate through the slides smoothly.
- Accessibility considerations: Ensure that your presentation is accessible to all individuals, including those with visual impairments. Use appropriate alt text for images, provide transcripts for audio or video elements, and follow accessibility guidelines to make your presentation inclusive.
- Proofreading and editing: Before finalizing your presentation, proofread and edit your slides to eliminate any typos, grammatical errors, or inconsistencies. A polished and error-free presentation enhances your professionalism and ensures the clarity of your message.
By considering these additional design considerations, you can create landscape-portrait PowerPoint presentations that are visually appealing, engaging, and effectively communicate your message to the audience.
Remember to align your design choices with the goals of your presentation and the preferences of your target audience. Adapt and customize these considerations to meet your specific needs and requirements.
Now, armed with these design considerations, you can confidently create landscape-portrait PowerPoint presentations that captivate and engage your audience.