
Why Print PowerPoint Slides With Notes?
PowerPoint presentations are a widely used tool for sharing information, whether it’s in a professional setting or an educational environment. While the slides themselves convey the main points and visuals, the additional notes section provides valuable context, explanations, and reminders for the presenter. These notes are often overlooked or forgotten once the presentation is complete, but they contain important insights and details that can enhance understanding and retention.
Printing PowerPoint slides with notes allows you to preserve this valuable information and refer back to it easily. Whether you want a physical copy for your own reference, to distribute to others, or to review and make revisions, having the slides and accompanying notes in a printed format offers several benefits.
Firstly, printing the slides with notes provides a comprehensive record of the presentation and serves as a reminder of the key points discussed. It allows you to revisit the content without having to open the digital file, making it convenient for quick references.
Secondly, having a printed copy with notes allows for easy collaboration and sharing. If you need to discuss the presentation with colleagues or collaborators, handing out physical copies allows everyone to follow along with the visuals and refer to the notes, promoting a more engaging and productive discussion.
Additionally, printing PowerPoint slides with notes can serve as a useful tool for future revisions and improvements. Reviewing a printed version allows you to see the presentation from a different perspective, helping you identify areas that may need further clarification or adjustments. You can annotate the printed copy with additional comments or ideas, making it a convenient reference for updating the presentation.
Furthermore, printed slides with notes can be helpful for those who prefer a physical copy for learning and studying purposes. Some individuals find it easier to absorb information when they can highlight, underline, or jot down additional notes directly on the printed slides. This tactile approach can enhance comprehension and retention of the material.
Overall, printing PowerPoint slides with notes provides a tangible and versatile resource that offers convenience, collaboration opportunities, and a different perspective for improving and retaining information. Don’t let valuable insights and details get lost in the digital realm. Take advantage of the option to print slides with notes to maximize the benefits of your PowerPoint presentations.
Step 1: Open the PowerPoint Presentation
Before you can print your PowerPoint slides with notes, you first need to open the PowerPoint presentation that contains the slides and accompanying notes. Follow these simple steps to begin:
1. Launch Microsoft PowerPoint on your computer. You can find it by searching for “PowerPoint” in the start menu or locating it in your list of installed applications.
2. Once PowerPoint is open, take a moment to locate the presentation file you want to print. You can do this by either opening a new presentation or navigating to the folder where your existing presentation is saved.
3. To open a new presentation, click on “File” in the top left corner of the screen. Then select “New” from the dropdown menu. Choose the desired presentation template or select “Blank Presentation” if you prefer to start from scratch.
4. If you already have an existing presentation that you want to print, click on “File” and select “Open” from the menu. Browse your computer’s folders and select the file you wish to open.
5. Once you have opened the presentation, you should see the slides displayed in the main PowerPoint window. Look for the thumbnail view or the slide sorter view, which provides an overview of all the slides in your presentation. You can easily switch between different views using the options available in the toolbar at the top of the screen.
6. It’s important to ensure that the notes section is visible as well. To do this, select the “View” tab in the PowerPoint ribbon at the top of the screen. Look for the “Notes Page” option and click on it. This will display the slides along with their corresponding notes in a split-screen view.
7. Take a moment to review the notes and make any necessary edits or additions. The notes section is located below each individual slide and provides ample space for you to enter any additional information that will assist you during your presentation or serve as a reference when printing.
Once you have successfully opened your PowerPoint presentation and reviewed the notes, you are ready to proceed to the next step of printing the slides with notes. Remember to save your presentation regularly to ensure that all your changes are preserved.
Step 2: Access the Print Settings
To print PowerPoint slides with notes, you need to access the print settings in Microsoft PowerPoint. Follow these simple steps to access the print settings:
1. With your PowerPoint presentation open, click on the “File” tab located in the top-left corner of the screen. This will open the Backstage view, which contains various options and settings for your presentation.
2. In the Backstage view, you will see a list of options on the left-hand side. Choose “Print” from the list. This will display the print settings and preview on the right-hand side of the screen.
3. Take a moment to review the print settings panel. Here, you will have access to several options that allow you to customize how your slides and notes are printed. These options include the number of copies, which slides to print, the slide orientation (landscape or portrait), and the color settings.
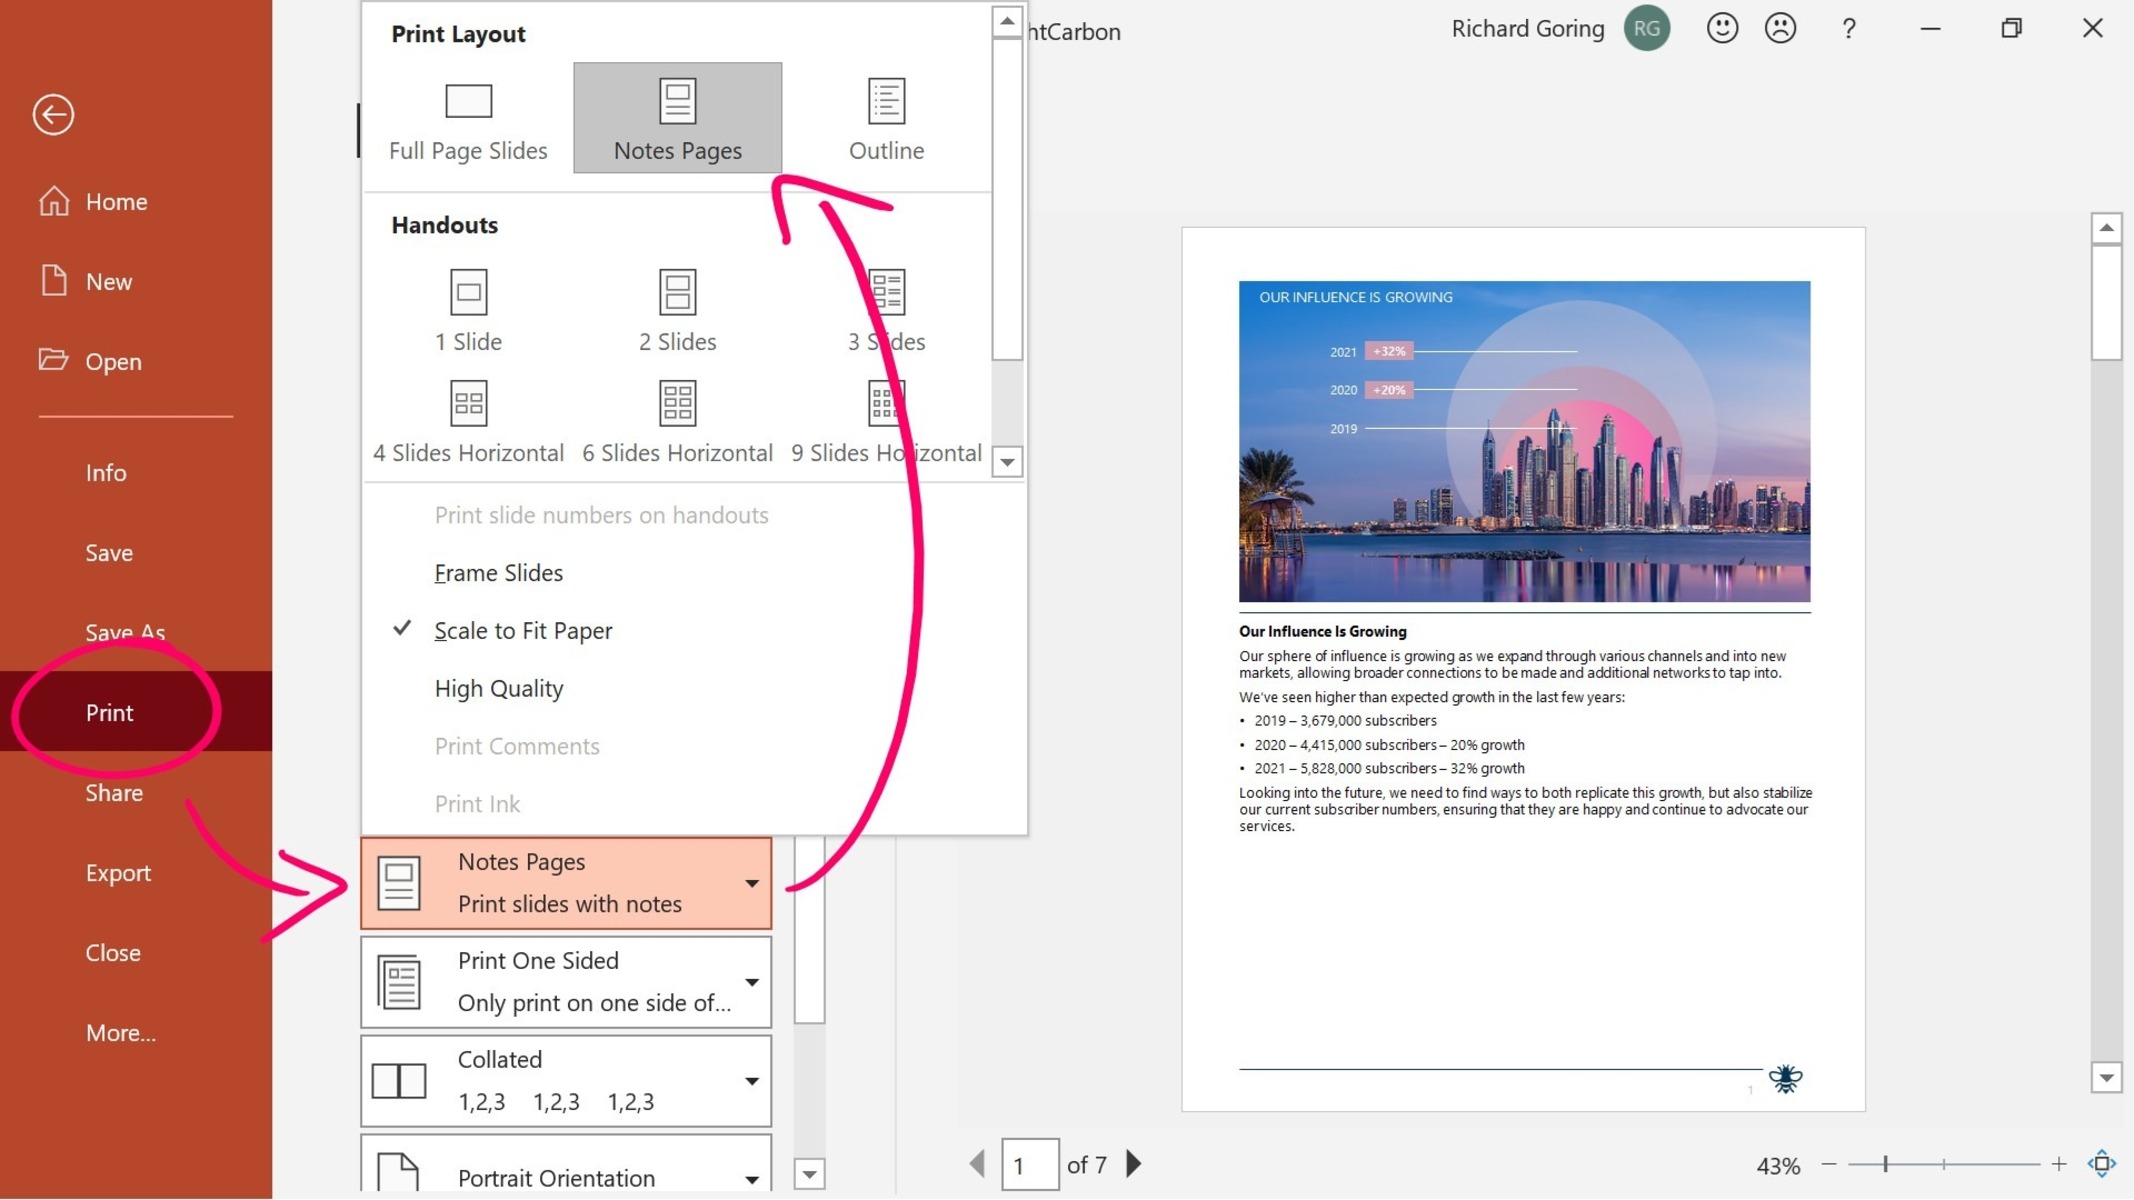
4. To specify that you want to print the slides with notes, make sure the “Full Page Slides” option is selected. By default, PowerPoint will print one slide per page, but you can change this to “Notes Pages” in the “Settings” section. This will ensure that both the slides and their accompanying notes are printed together.
5. If you only want to print specific slides, you can choose the desired range under the “Settings” section. For example, you can enter “1-5” to print slides 1 to 5 and their corresponding notes. Alternatively, you can select “All” to print all slides in the presentation.
6. Take a moment to check the print preview on the right-hand side of the screen. This allows you to see how the slides and notes will look when printed. You can use the navigation buttons above the preview to scroll through the pages and ensure that everything is as you expect it to be.
7. If you are satisfied with the print settings and preview, you are now ready to move on to the next step and actually print the slides with notes. If you need to make any adjustments, feel free to go back and modify the settings accordingly.
Accessing the print settings in PowerPoint gives you the flexibility to customize how your slides and notes are printed. Whether you want to print the entire presentation or only specific slides, these settings allow you to tailor the output to your needs. With the print settings accessed, you are one step closer to having a physical copy of your PowerPoint slides with their accompanying notes.
Step 3: Choose the Print Layout
Once you have accessed the print settings in Microsoft PowerPoint, the next step is to choose the print layout that best suits your needs. Follow these steps to select the appropriate print layout:
1. In the print settings panel, locate the “Settings” section. Here, you will find options that allow you to customize how your slides and notes are printed.
2. Look for the “Print Layout” option within the settings. By default, PowerPoint will print the slides using the “Full Page Slides” layout. This layout is suitable if you want each slide to occupy an entire page with its accompanying notes displayed below.
3. If you prefer a different print layout, click on the dropdown arrow next to the “Full Page Slides” option. This will reveal a list of available layouts that you can choose from.
4. One popular alternative is the “Notes Pages” layout, which prints each slide along with its notes on a single page. This layout is particularly useful if you want a concise version of your presentation that includes both visuals and textual explanations.
5. Another option is the “Handouts” layout, which allows you to print multiple slides on a single page. This layout is great for conserving paper and creating a compact version of your presentation that still includes the pertinent information.
6. Take a moment to consider your preferences and the purpose of your printed copy. Think about factors such as readability, space utilization, and the intended use of the printed slides with notes.
7. Once you have decided on the desired print layout, simply click on the respective option to select it.
8. Take a moment to review the print preview on the right-hand side of the screen. The preview will update based on the print layout you have chosen, allowing you to see how the slides and notes will appear on the printed pages.
9. If everything looks satisfactory, you are now ready to move on to the next step and proceed with printing the slides with notes. However, if you need to make any adjustments or changes to the print layout, feel free to go back and modify your selection.
Choosing the appropriate print layout is crucial to ensure that your printed PowerPoint slides with notes meet your specific requirements. Consider the purpose and readability of the printed materials, and select the layout that best suits your needs. With the print layout chosen, you are one step closer to having a physical copy of your presentation that includes both the slides and their accompanying notes.
Step 4: Set the Print Options
In order to print your PowerPoint slides with notes, you will need to set the print options to ensure the desired output. Follow these steps to configure the print options:
1. With the print settings panel still open, look for the “Print Options” section. This section contains various settings that allow you to customize the printing process.
2. One important option to consider is the “Print What” setting. By default, PowerPoint will print “Full Page Slides”, which includes both the slides and their accompanying notes. However, you can also choose to print only the slides or only the notes by selecting the corresponding option from the dropdown menu.
3. If you select “Slides”, only the slides themselves will be printed without the associated notes. This option is useful if you want to create a concise handout or if you prefer to have a separate set of notes to refer to while presenting.
4. On the other hand, if you select “Notes Pages”, PowerPoint will print each slide along with its notes on separate pages. This option is ideal for creating a comprehensive reference document that includes both visuals and explanations.
5. Another important option to consider is the “Color” setting. By default, PowerPoint will print your slides and notes in color if your printer supports it. However, if you prefer to conserve ink or if your printer only supports black and white printing, you can choose the “Grayscale” or “Pure Black and White” option from the dropdown menu.
6. You can also adjust the number of copies you want to print by specifying the desired quantity in the “Copies” field. If you need multiple copies of your printed slides with notes, this is where you can indicate how many you require.
7. Additionally, take a moment to review other available print options such as paper size, orientation, and print quality. These settings may vary depending on your printer and the specific requirements of your printing task.
8. Once you have configured the print options to your satisfaction, take a moment to review the print preview on the right-hand side of the screen. This will give you a glimpse of how your slides and notes will appear on the printed pages.
9. If everything looks good, you are now ready to move on to the next step and proceed with printing the slides with notes. However, if you need to make any adjustments or changes to the print options, feel free to go back and modify your selections accordingly.
Setting the print options in PowerPoint allows you to specify exactly what you want to print and how you want it to be presented. By customizing the “Print What” option, choosing the desired color setting, and adjusting other print parameters, you can ensure that the printed slides with notes meet your specific requirements. With the print options set, you are one step closer to having a physical copy of your PowerPoint presentation that includes both the slides and their accompanying notes.
Step 5: Preview and Adjust the Print Settings
Before finalizing the printing process for your PowerPoint slides with notes, it is important to preview and adjust the print settings to ensure the desired outcome. Follow these steps to effectively preview and adjust the print settings:
1. With the print settings panel still open, take a moment to review the print preview on the right-hand side of the screen. This preview provides a visual representation of how your slides and notes will appear on the printed pages.
2. Scroll through the pages of the print preview to ensure that everything looks as expected. Pay attention to the formatting, layout, and alignment of the slides and notes. If any content appears cut off or misaligned, you may need to make adjustments to the print settings.
3. While reviewing the print preview, consider the overall readability and aesthetics of the printed slides with notes. Ensure that the font sizes are appropriate, the colors are distinguishable, and the content is legible. If necessary, you can make changes to the font settings, color options, or slide layout within PowerPoint to optimize the print output.
4. If you notice any issues or inconsistencies in the print preview, you may need to adjust the print settings accordingly. Return to the print settings panel and make the necessary modifications to address the concerns you identified during the preview.
5. For example, if you find that the notes section is cut off or too small, you can try adjusting the print layout to “Notes Pages” or change the paper size to accommodate more readable notes. On the other hand, if the slides appear too small in the print preview, you can select a larger paper size or adjust the slide scaling options to ensure better visibility.
6. It is also recommended to proofread the content of your notes during the preview. Look for any typos, grammatical errors, or formatting issues that may have been missed during the initial creation of the presentation. In the preview, you can view the notes in a larger, more readable format, which makes it easier to identify any necessary revisions.
7. Once you have made the necessary adjustments to the print settings, previewed the slides with notes, and ensured that everything appears satisfactory, you are now ready to proceed with printing. If you need to make any additional changes, repeat the preview and adjustment process until you are completely satisfied with the print settings.
Previewing and adjusting the print settings before printing your PowerPoint slides with notes is essential to maintain the quality and accuracy of the printed output. By carefully reviewing the print preview, making necessary modifications, and proofreading the content, you can ensure that the final printed slides with notes meet your expectations and serve their intended purpose effectively.
Step 6: Print the Slides with Notes
After you have reviewed and adjusted the print settings for your PowerPoint slides with notes, it’s time to proceed with the printing process. Follow these steps to print your slides with notes:
1. Ensure that your printer is connected and turned on. Make sure you have enough paper loaded in the printer to accommodate the number of pages you will be printing.
2. With the print settings panel still open and the desired print options configured, click on the “Print” button located in the bottom-right corner of the print settings panel.
3. A print dialog box will appear, allowing you to select the specific printer you want to use. If you have multiple printers connected to your computer, choose the appropriate one from the available options.
4. Take a moment to review the other settings in the print dialog box, such as page range, number of copies, and orientation. Make any necessary changes to these settings to ensure they match your preferences.
5. Once you are satisfied with the print settings, click the “Print” button in the print dialog box to initiate the printing process. You may hear the sound of the printer initializing and the pages being printed.
6. Wait until the printing process is complete. The time required to print the slides with notes will depend on the number of pages, the printer’s speed, and other factors.
7. Once the printing is done, retrieve the printed pages from the output tray of your printer. Ensure that the pages are in the correct order and that all the slides and their accompanying notes are accounted for.
8. Take a moment to review the printed slides with notes to ensure that they meet your expectations. Double-check for any printing errors, such as smudged text or misaligned content. If you encounter any issues, you may need to reprint the affected pages.
9. After confirming that the printed slides with notes are accurate and of satisfactory quality, you can organize them as needed. You may want to staple or clip them together, insert them into a binder or folder, or use any other method that suits your personal preference and facilitates easy reference.
Printing your PowerPoint slides with notes is now complete! You now have a physical representation of your presentation that includes both the visual slides and the accompanying notes. This printed version can be a valuable tool for reference, collaboration, or distribution to others who may benefit from the additional context provided by the notes section.
Step 7: Review and Organize the Printed Slides with Notes
After printing your PowerPoint slides with notes, the final step is to review and organize the printed materials. This ensures that they are readily accessible and organized for future reference or distribution. Follow these steps to effectively review and organize your printed slides with notes:
1. Take a moment to review the printed slides with notes. Verify that all the information, including the slides and their accompanying notes, has been printed accurately and is legible. Check for any printing errors or missing pages.
2. Read through the notes section of each slide and familiarize yourself with the additional context and explanations provided. Use this opportunity to make any additional annotations or corrections directly on the printed pages, if desired.
3. Consider the purpose of your printed slides with notes. Determine whether you will be using them for personal reference, distributing them to colleagues or clients, or storing them for future use.
4. If you intend to distribute the printed slides with notes, consider organizing them in a presentable and professional manner. You could place them in a binder or folder, or use binding clips or staples to keep the pages together.
5. If you plan to use the printed slides with notes for personal or study purposes, think about how you prefer to organize them. For example, you could alphabetize them by topic, arrange them chronologically, or use dividers to separate sections.
6. It may be helpful to create an index or table of contents that provides a quick overview of the topics covered in the printed materials. This can save you time when searching for specific information in the future.
7. Consider adding any relevant metadata to the printed slides with notes, such as the date, presentation title, or presenter’s name. This will help provide additional context and ease navigation when reviewing the materials later on.
8. Store the organized printed slides with notes in a safe and easily accessible location. This could be a filing cabinet, a dedicated folder on your computer, or any other place that suits your organizational preferences.
9. Periodically review and update your printed slides with notes as needed. As your presentation evolves or new information becomes available, you may want to print updated versions or make additional annotations on the existing materials.
By reviewing and organizing your printed slides with notes, you ensure that they are easily navigable and readily available for future use. Whether for personal reference, collaboration, or distribution purposes, an organized set of printed slides with accompanying notes can be an invaluable resource for retaining and sharing information effectively.